According to the two leading analyst firms covering the high performance computing market, the use of the cloud for HPC workloads is looking a lot more attractive to users these days.
Intersect360 offered the most upbeat assessment in this regard, noting that cloud spending by HPC customers grew by a whopping 44 percent from 2016 to 2017, calling it a “breakout year” for this product category. According to the company’s market data, that put cloud-based spending at around $1.1 billion for 2017. And even though that represents only about three percent of total HPC revenue for the year, it’s a high-water mark for cloud computing in this space.
The big jump in cloud spending was driven by a number of different factors, according the Intersect360 folks, including “increasing facilities costs for hosting HPC, maturation of application licensing models, increased availability of high-performance cloud resources, and a spike in requirements for machine learning applications.”
A key goal in my career is growing the understanding and best practice of how communities, and open source communities in particular, can work well together. There is a lot of nuance to this work, and the best way to build a corpus of best practice is to bring people together to share ideas and experience.
In service of this, last year I reached out to The Linux Foundation about putting together an event focused on these “people” elements of Open Source such as community management, collaborative workflow, governance, managing conflict, and more. It was called the Open Community Conference, which took place at the Open Source Summit events in Los Angeles and Prague, and everything went swimmingly.
This train though, has to keep moving, and we realized that the scope of the event needed broadening. What about legal, compliance, standards, and other similar topics? They needed a home, and this event seemed like a logical place to house them. So, in a roaring display of rebranding, we renamed the event to the Open Collaboration Conference. It happens again at the Open Source Summit, this year in Vancouver from August 29-31 and then in Edinburgh from October 22-24, 2018.
The upcoming event in Vancouver is looking fantastic. Just like last year, we had a raft of submissions, so thanks everyone for making my job (rightly) difficult for choosing the final set of talks.
Featured Talks
Unsurprisingly, we have some really remarkable speakers, from a raft of different organizations, backgrounds, and disciplines. This includes:
Oh, and I will be speaking, too, delivering a new presentation called “Building Effective Community Leaders: A Guide.” It will cover key principles of leadership and how to bake them into your community, company, or other organization.
In addition to this, don’t forget the fantastic networking, evening events, and other goodness that will be jammed into an exciting few days. As usual, this all takes place at the Open Source Summit, and you view the whole schedule and learn more about how to join us at https://events.linuxfoundation.org/events/open-source-summit-north-america-2018/.
Finally, I will be there for the full event. If you want to have a meeting, drop me an email to jono@jonobacon.com.
Sign up to receive updates on Open Source Summit North America:
Whether you’re trying to rescue data from a dying storage drive, backing up archives to remote storage, or making a perfect copy of an active partition somewhere else, you’ll need to know how to safely and reliably copy drives and filesystems. Fortunately, dd is a simple and powerful image-copying tool that’s been around, well, pretty much forever. And in all that time, nothing’s come along that does the job better.
Using dd, on the other hand, can make perfect byte-for-byte images of, well, just about anything digital. But before you start flinging partitions from one end of the earth to the other, I should mention that there’s some truth to that old Unix admin joke: “dd stands for disk destroyer.” If you type even one wrong character in a dd command, you can instantly and permanently wipe out an entire drive of valuable data. And yes, spelling counts.
Remember: Before pressing that Enter key to invoke dd, pause and think very carefully!
The blockchain revolution is coming, but you might not see it. That’s the view of Brian Behlendorf, executive director of the Linux Foundation’s Hyperledger Project.
Speaking at the TC Sessions: Blockchain event in Zug, Switzerland, Behlendorf explained that much of the innovation that the introduction of blockchains are primed to happen behind this the scenes unbeknownst to most.
“For a lot of consumers, you’re not going to realize when the bank or a web form at a government website or when you go to LinkedIn and start seeing green check marks against people’s claims that they attended this university — which are all behind-the-scenes that will likely involve blockchain,” Behlendorf told interviewer John Biggs.
“This is a revolution in storage and networking and consumers.”
Open source has been a tech mainstay for decades in large part, as Tilde co-founder and JavaScript veteran Yehuda Katz has argued, because it “gives engineers the power to collaborate across …companies without involving [business development].”
“The benefits of this workaround are extraordinary and underappreciated,” Katz continued. But open source offers something just as extraordinary and even more underappreciated, something that edX community lead John Mark Walker recently pointed out on Twitter.
Namely, what open source does to collaboration among engineers inside the same company.
According to Walker, “one of the little known secrets is that [open source] allows eng[ineering] teams in the same company to collab[orate] without management getting in the way.”
Since I workalotwithclusteredVMs, I’ve ended up spending a lot of time trying to figure out how DNS lookups work. I applied ‘fixes’ to my problems from StackOverflow without really understanding why they work (or don’t work) for some time.
Eventually I got fed up with this and decided to figure out how it all hangs together. I couldn’t find a complete guide for this anywhere online, and talking to colleagues they didn’t know of any (or really what happens in detail)
So I’m writing the guide myself.
The first thing to grasp is that there is no single method of getting a DNS lookup done on Linux. It’s not a core system call with a clean interface.
There is, however, a standard C library call called which many programs use: getaddrinfo. But not all applications use this!
Let’s just take two simple standard programs: ping and host:
The number of Linux distributions available just keeps getting bigger. In fact, in the time it took me to write this sentence, another one may have appeared on the market. Many Linux flavors have trouble standing out in this crowd, and some are just a different combination of puzzle pieces joined to form something new: An Ubuntu base with a KDE desktop environment. A Debian base with an Xfce desktop. The combinations go on and on.
Robolinux, however, does something unique. It’s the only distro, to my knowledge, that makes working with Windows alongside Linux a little easier for the typical user. With just a few clicks, it lets you create a Windows virtual machine (by way of VirtualBox) that can run side by side with Linux. No more dual booting. With this process, you can have Windows XP, Windows 7, or Windows 10 up and running with ease.
And, you get all this on top of an operating system that’s pretty fantastic on its own. Robolinux not only makes short work of having Windows along for the ride, it simplifies using Linux itself. Installation is easy, and the installed collection of software means anyone can be productive right away.
Let’s install Robolinux and see what there is to see.
Installation
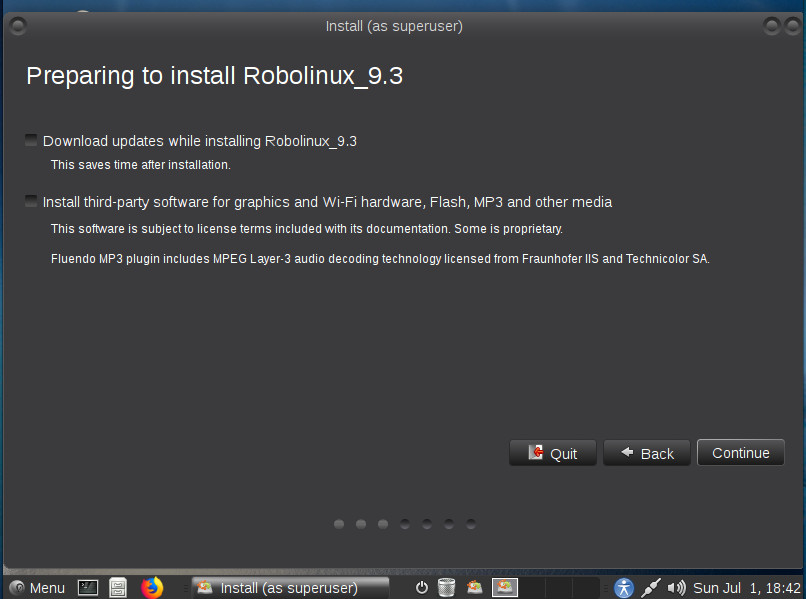
As I mentioned earlier, installing Robolinux is easy. Obviously, you must first download an ISO image of the operating system. You have the choice of installing a Cinnamon, Mate, LXDE, or xfce desktop (I opted to go the Mate route). I will warn you, the developers do make a pretty heavy-handed plea for donations. I don’t fault them for this. Developing an operating system takes a great deal of time. So if you have the means, do make a donation. Once you’ve downloaded the file, burn it to a CD/DVD or flash drive. Boot your system with the media and then, once the desktop loads, click the Install icon on the desktop. As soon as the installer opens (Figure 1), you should be immediately familiar with the layout of the tool.
Figure 1: The Robolinux installer is quite user-friendly.
Once you’ve walked through the installer, reboot, remove the installation media, and login when prompted. I will say that I installed Robolinux as a VirtualBox VM and it installed to perfection. This however, isn’t a method you should use, if you’re going to take advantage of the Stealth VM option. After logging in, the first thing I did was install the Guest Additions and everything was working smoothly.
Default applications
The collection of default applications is impressive, but not overwhelming. You’ll find all the standard tools to get your work done, including:
LibreOffice
Atril Document Viewer
Backups
GNOME Disks
Medit text editor
Seahorse
GIMP
Shotwell
Simple Scan
Firefox
Pidgen
Thunderbird
Transmission
Brasero
Cheese
Kazam
Rhythmbox
VLC
VirtualBox
And more
With that list of software, you shouldn’t want for much. However, should you find a app not installed, click on the desktop menu button and then click Package Manager, which will open Synaptic Package Manager, where you can install any of the Linux software you need.
If that’s not enough, it’s time to take a look at the Windows side of things.
Installing Windows
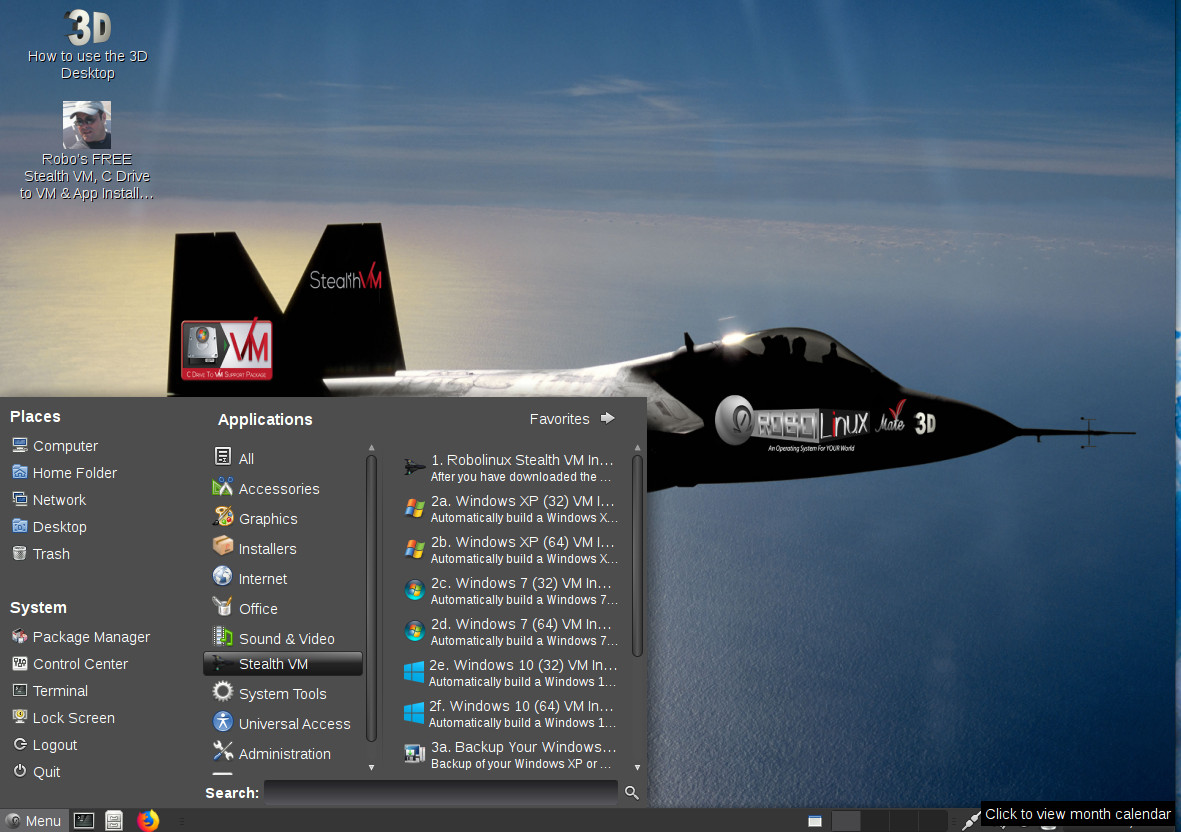
This is what sets Robolinux apart from other Linux distributions. If you click on the desktop menu button, you see a Stealth VM entry. Within that sub-menu, a listing of the different Windows VMs that can be installed appears (Figure 2).
Figure 2: The available Windows VMs that can be installed alongside of Robolinux.
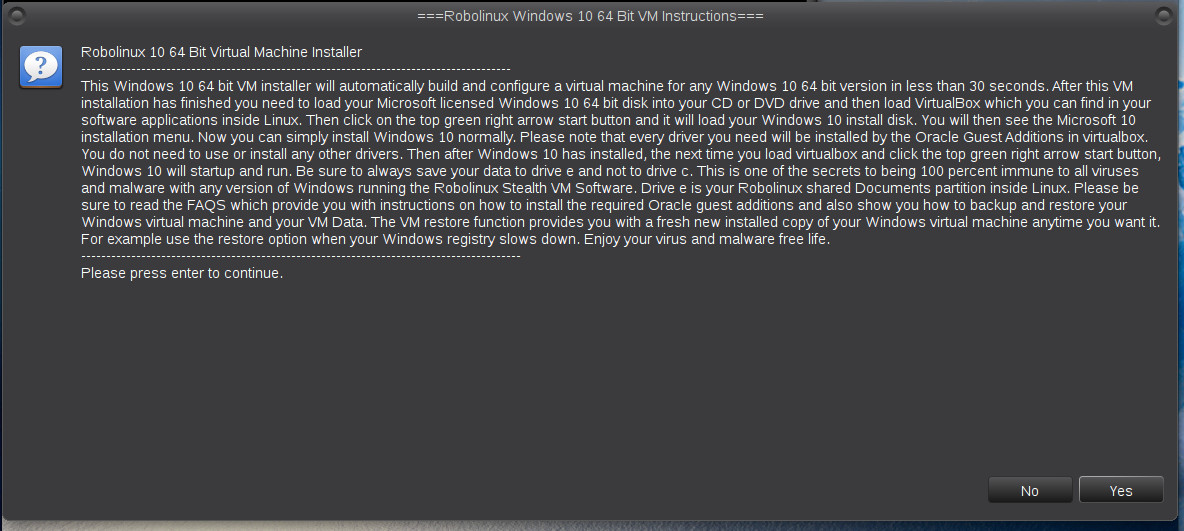
Before you can install one of the VMs, you must first download the Stealth VM file. To do that, double-click on the desktop icon that includes an image of the developer’s face (labeled Robo’s FREE Stealth VM). You must save that file to the ~/Downloads directory. Don’t save it anywhere else, don’t extract it, and don’t rename it. With that file in place, click the start menu and then click Stealth VM. From the listing, click the top entry, Robolinx Stealth VM Installer. When prompted, type your sudo password. You will then be prompted that the Stealth VM is ready to be used. Go back to the start menu and click Stealth VM and select the version of Windows you want to install. A new window will appear (Figure 3). Click Yes and the installation will continue.
Figure 3: Installing Windows in the Stealth VM.
Next you will be prompted to type your sudo password again (so your user can be added to the vboxusers group). Once you’ve taken care of that, you’ll be prompted to configure the RAM you want to dedicate to the VM. After that, a browser window will appear (once again asking for a donation). At this point everything is (almost) done. Close the browser and the terminal window.
You’re not finished.
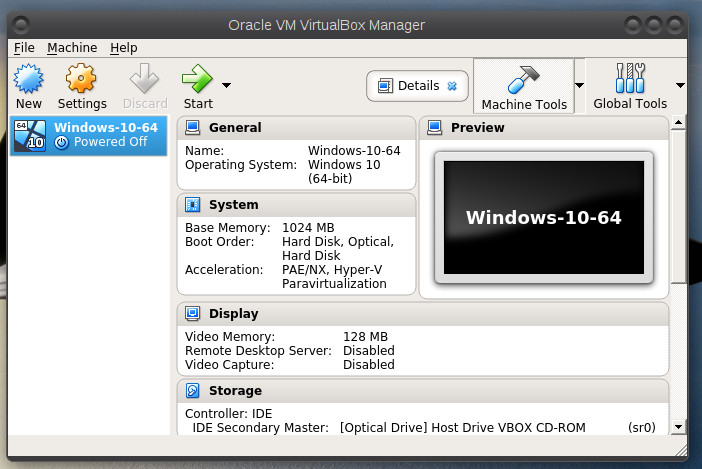
Next you must insert the Windows installer media that matches the type of Windows VM you installed. You then must start VirtualBox by click start menu > System Tools > Oracle VM VirtualBox. When VirtualBox opens, an entry will already be created for your Windows VM (Figure 4).
Figure 4: Your Windows VM is ready to go.
You can now click the Start button (in VirtualBox) to finish up the installation. When the Windows installation completes, you’re ready to work with Linux and Windows side-by-side.
Making VMs a bit more user-friendly
You may be thinking to yourself, “Creating a virtual machine for Windows is actually easier than that!”. Although you are correct with that sentiment, not everyone knows how to create a new VM with VirtualBox. In the time it took me to figure out how to work with the Robolinux Stealth VM, I could have had numerous VMs created in VirtualBox. Additionally, this approach doesn’t happen free of charge. You do still have to have a licensed copy of Windows (as well as the installation media). But anything developers can do to make using Linux easier is a plus. That’s how I see this—a Linux distribution doing something just slightly different that could remove a possible barrier to entry for the open source platform. From my perspective, that’s a win-win. And, you’re getting a pretty solid Linux distribution to boot.
If you already know the ins and outs of VirtualBox, Robolinux might not be your cuppa. But, if you don’t like technology getting in the way of getting your work done and you want to have a Linux distribution that includes all the necessary tools to help make you productive, Robolinux is definitely worth a look.
Learn more about Linux through the free “Introduction to Linux” course from The Linux Foundation and edX.
Reading the source is an important part of open source software. It means users have the ability to look at the code and see what it does.
But “read the source” doesn’t apply only to code. Understanding the standards the code implements can be just as important. These standards are codified in documents called “Requests for Comments” (RFCs) published by the Internet Engineering Task Force (IETF). Thousands of RFCs have been published over the years, so we collected a few that our contributors consider must-reads.
6 must-read RFCs
RFC 2119—Key words for use in RFCs to indicate requirement levels
This is a quick read, but it’s important to understanding other RFCs. RFC 2119 defines the requirement levels used in subsequent RFCs. What does “MAY” really mean? If the standard says “SHOULD,” do you really have to do it? By giving the requirements a well-defined taxonomy, RFC 2119 helps avoid ambiguity.
How important is leadership for evolving open source projects and communities? According to the most recent Open Source Guide for the Enterprise from The Linux Foundation and the TODO Group, building leadership in the community is key to establishing trust, enabling collaboration, and fostering the cultural understanding required to be effective in open source.
“Contributing code is just one aspect of creating a successful open source project,” says this Linux Foundation article introducing the latest guide. “The open source culture is fundamentally collaborative, and active involvement in shaping a project’s direction is equally important. The path toward leadership is not always straightforward, however, so the latest Open Source Guide for the EnterprisefromThe TODO Groupprovides practical advice for building leadership in open source projects and communities.”
The Call for Code initiative aims to harness the collective power of the global open source developer community against the growing threat of natural disasters. According to IBM, “the goal is to develop technology solutions that significantly improve disaster preparedness, provide relief from devastation caused by fires, floods, hurricanes, tsunamis and earthquakes, and benefit Call for Code’s charitable partners — the United Nations Human Rights Office and the American Red Cross.”
In a recent webcast — How 22M Developers Take on Disaster Preparedness — Mary Glackin, SVP of Science & Forecast at The Weather Company and IBM Business, spoke with representatives from participating organizations about the initiative and some of the specific goals it aims to achieve.
The Call for Code is “encouraging the global community of developers to stand up for the rights of others,” said Laurent Sauveur, Chief of External Relations, UN Human Rights.
We invite you to amplify the initiative and join the call. You can learn more about the Call for Code and watch the complete webcast here:http://ibm.biz/BdYxHZ.