Home Blog Page 345

Resilient RDMA IP Addresses

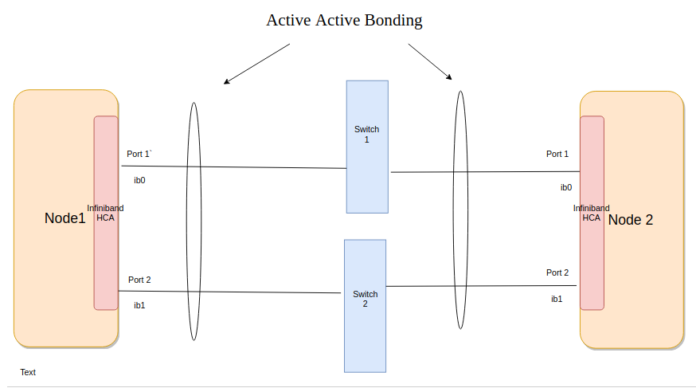
Oracle Linux kernel developer Sudhakar Dindukurti contributed this post on the work he’s doing to bring the Resilient RDMA IP feature from RDS into upstream. This code currently is maintained in Oracle’s open source UEK kernel and we are working on integrating this into the upstream Linux source code. 1.0 Introduction to Resilient RDMA IP The Resilient RDMAIP module assists ULPs (RDMA Upper Level Protocols) to do failover,…

Click to Read More at Oracle Linux Kernel Development

Users, Groups, and Other Linux Beasts

Having reached this stage, after seeing how to manipulate folders/directories, but before flinging ourselves headlong into fiddling with files, we have to brush up on the matter of permissions, users and groups. Luckily, there is already an excellent and comprehensive tutorial on this site that covers permissions, so you should go and read that right now. In a nutshell: you use permissions to establish who can do stuff to files and directories and what they can do with each file and directory — read from it, write to it, move it, erase it, etc.

To try everything this tutorial covers, you’ll need to create a new user on your system. Let’s be practical and make a user for anybody who needs to borrow your computer, that is, what we call a guest account.

WARNING: Creating and especially deleting users, along with home directories, can seriously damage your system if, for example, you remove your own user and files by mistake. You may want to practice on another machine which is not your main work machine or on a virtual machine. Regardless of whether you want to play it safe, or not, it is always a good idea to back up your stuff frequently, check the backups have worked correctly, and save yourself a lot of gnashing of teeth later on.

A New User

You can create a new user with the useradd command. Run useradd with superuser/root privileges, that is using sudo or su, depending on your system, you can do:

sudo useradd -m guest

… and input your password. Or do:

su  -c "useradd -m guest"

… and input the password of root/the superuser.

(For the sake of brevity, we’ll assume from now on that you get superuser/root privileges by using sudo).

By including the -m argument, useradd will create a home directory for the new user. You can see its contents by listing /home/guest.

Next you can set up a password for the new user with

sudo passwd guest

Or you could also use adduser, which is interactive and asks you a bunch of questions, including what shell you want to assign the user (yes, there are more than one), where you want their home directory to be, what groups you want them to belong to (more about that in a second) and so on. At the end of running adduser, you get to set the password. Note that adduser is not installed by default on many distributions, while useradd is.

Incidentally, you can get rid of a user with userdel:

sudo userdel -r guest

With the -r option, userdel not only removes the guest user, but also deletes their home directory and removes their entry in the mailing spool, if they had one.

Skeletons at Home

Talking of users’ home directories, depending on what distro you’re on, you may have noticed that when you use the -m option, useradd populates a user’s directory with subdirectories for music, documents, and whatnot as well as an assortment of hidden files. To see everything in you guest’s home directory run sudo ls -la /home/guest.

What goes into a new user’s directory is determined by a skeleton directory which is usually /etc/skel. Sometimes it may be a different directory, though. To check which directory is being used, run:

useradd -D
GROUP=100 
HOME=/home 
INACTIVE=-1 
EXPIRE= 
SHELL=/bin/bash 
SKEL=/etc/skel 
CREATE_MAIL_SPOOL=no

This gives you some extra interesting information, but what you’re interested in right now is the SKEL=/etc/skel line. In this case, and as is customary, it is pointing to /etc/skel/.

As everything is customizable in Linux, you can, of course, change what gets put into a newly created user directory. Try this: Create a new directory in /etc/skel/:

sudo mkdir /etc/skel/Documents

And create a file containing a welcome text and copy it over:

sudo cp welcome.txt /etc/skel/Documents

Now delete the guest account:

sudo userdel -r guest

And create it again:

sudo useradd -m guest

Hey presto! Your Documents/ directory and welcome.txt file magically appear in the guest’s home directory.

You can also modify other things when you create a user by editing /etc/default/useradd. Mine looks like this:

GROUP=users 
HOME=/home 
INACTIVE=-1 
EXPIRE= 
SHELL=/bin/bash 
SKEL=/etc/skel 
CREATE_MAIL_SPOOL=no

Most of these options are self-explanatory, but let’s take a closer look at the GROUP option.

Herd Mentality

Instead of assigning permissions and privileges to users one by one, Linux and other Unix-like operating systems rely on groups. A group is a what you imagine it to be: a bunch of users that are related in some way. On your system you may have a group of users that are allowed to use the printer. They would belong to the lp (for “line printer“) group. The members of the wheel group were traditionally the only ones who could become superuser/root by using su. The network group of users can bring up and power down the network. And so on and so forth.

Different distributions have different groups and groups with the same or similar names have different privileges also depending on the distribution you are using. So don’t be surprised if what you read in the prior paragraph doesn’t match what is going on in your system.

Either way, to see which groups are on your system you can use:

getent group

The getent command lists the contents of some of the system’s databases.

To find out which groups your current user belongs to, try:

groups

When you create a new user with useradd, unless you specify otherwise, the user will only belong to one group: their own. A guest user will belong to a guest group and the group gives the user the power to administer their own stuff and that is about it.

You can create new groups and then add users to them at will with the groupadd command:

sudo groupadd photos

will create the photos group, for example. Next time, we’ll use this to build a shared directory all members of the group can read from and write to, and we’ll learn even more about permissions and privileges. Stay tuned!

Learn more about Linux through the free “Introduction to Linux” course from The Linux Foundation and edX.

Xen Project Hypervisor: Virtualization and Power Management are Coalescing into an Energy-Aware Hypervisor

Power management in the Xen Project Hypervisor historically targets server applications to improve power consumption and heat management in data centers reducing electricity and cooling costs. In the embedded space, the Xen Project Hypervisor faces very different applications, architectures and power-related requirements, which focus on battery life, heat, and size.

Although the same fundamental principles of power management apply, the power management infrastructure in the Xen Project Hypervisor requires new interfaces, methods, and policies tailored to embedded architectures and applications. This post recaps Xen Project power management, how the requirements change in the embedded space, and how this change may unite the hypervisor and power manager functions.   

Evolution of Xen Project Power Management on x86

Time-sharing of computer resources by different virtual machines (VMs) was the precursor to scheduling and virtualization. Sharing of time using workload estimates was both a good and simple enough proxy for energy sharing. As in all main OSes, energy and power management in the Xen Project Hypervisor came as an afterthought.

Intel and AMD developed the first forms of power management for the Xen Project with the x86_64 architecture. Initially, the Xen Project used the `hlt’ instruction for CPU idling and didn’t have any support for deeper sleep states. Then, support for suspend-to-RAM, also known as ACPI S3, was introduced. It was entirely driven by Dom0 and meant to support manual machine suspensions by the user, for instance when the lid is closed on a laptop. It was not intended to reduce power utilization under normal circumstances. As a result, power saving was minimal and limited to the effects of `hlt’.

Finally, Intel introduced support for cpu-freq in the Xen Project in 2007. This was the first non-trivial form of power management for the Xen Project. Cpu-freq decreases the CPU frequency at runtime to reduce power consumption when the CPU is only lightly utilized. Again, cpu-freq was entirely driven by Dom0: the hypervisor allowed Dom0 to control the frequency of the underlying physical CPUs.

Not only was this a backward approach from the Xen architecture point of view, but this approach was severely limiting. Dom0 didn’t have a full view of the system to make the right decisions. In addition, it required one virtual CPU in Dom0 for each physical CPU and to pin each Dom0 virtual CPU to a different physical CPU. It was not a viable option in the long run.

To address this issue, cpu-freq was re-architected, moving the cpu-freq driver to the hypervisor. Thus, Xen Project became able to change CPU frequency and make power saving decisions by itself, solving these issues.

Intel and AMD introduced support for deep sleep states around the same time of the cpu-freq redesign. The Xen Project Hypervisor added the ability to idle physical CPUs beyond the simple `hlt’ instruction. Deeper sleep states, also known as ACPI C-states, have better power savings properties, but come with higher latency cost. The deeper the sleep state, the more power is saved, the longer it takes to resume normal operation. The decision to enter a sleep state is based on two variables: time and energy. However, scheduling and idling remain separate activities by large margins. As an example, the scheduler has very limited influence on the choice of the particular sleep state.

Xen Project Power Management on Arm

The first Xen release with Arm support was Xen 4.3 in 2013, but the Xen power management has not been actively addressed until very recently. One of the reasons may be the dominance of proprietary and in-house hypervisors for Arm in the embedded space and the overwhelming prevalence of x86 for servers. Due to the Xen Project’s maturity, its open source model and wide deployment, it is frequently used today in a variety of Arm-based applications. The power management support for the Xen Project hypervisor on Arm is becoming essential, in particular in the embedded world.

In our next blog post, we will cover architectural choices for Xen on Arm in the embedded world and use cases on how to make this work.

Xen Power Management for Embedded Applications

Embedded applications require the same OS isolation and security capabilities that  motivated the development of server virtualization, but come with a wider variety of multicore architectures, guest OSes, and virtual to physical hardware mappings. Moreover, most embedded designs are highly sensitive to deteriorations in performance, memory size, power efficiency and wakeup latency that often come with hypervisors. As the embedded devices are increasingly cooler, quieter, smaller and battery powered, efficient power management emerges as a vital hurdle for the successful adoption of hypervisors in the embedded community.

Standard non-virtualized embedded devices manage power at two levels: the platform and the OS level. At the platform level, the platform manager is typically executing on dedicated on-chip or on-board processors and microcontrollers. It is monitoring and controlling the energy consumption of the CPUs, the peripherals, the CPU clusters and all board level components by changing the frequencies, voltages, and functional states of the hardware. However, it has no intrinsic knowledge about the running applications, which is necessary for making the right decisions to save power.

This knowledge is provided by the OS, or, in some cases, directly by the application software itself. The Power State Coordination Interface (PSCI) and the Extensible Energy Management Interface (EEMI) are used to coordinate the power events between the platform manager, the OSes, and the processing clusters. Whereas PSCI coordinates the power events among the CPUs of a single processor cluster, EEMI is responsible for the peripherals and the power interaction between multiple clusters.

Contrary to the ACPI based power management for x86 architectures typical for desktops and servers, PSCI and EEMI allow for much more direct control and enable precise power management of virtual clusters. In embedded systems, every micro Joule counts, so the precision in terms of timing and scope of power management actions is essential.     

When a virtualization layer is inserted between the OSes and the platform manager, it effectively enables additional virtual clusters, which come with virtual CPUs, virtual peripherals, and even physical peripherals with device passthrough. The EEMI power coordination of the virtual clusters can execute in the platform manager, hypervisor or both.  If the platform manager is selected, the power management can be made very precise, but at the expense of firmware memory bloating, as it needs to manage not only the fixed physical clusters but also the dynamically created virtual clusters.

Additionally, the platform manager requires stronger processing capabilities to optimally manage power, especially if it takes the cluster and system loads into consideration. As platform managers typically reside in low power domains, both memory space, and processing power are in short supply.

The hypervisor usually executes on powerful CPU clusters, so has enough memory and processing power at its disposal. It is also well informed about the partitioning and load of the virtual clusters, making it the ideal place to manage power. However, for proper power management, the hypervisor also requires an accurate energy model of the underlying physical clusters. Similar to the energy-aware scheduler in Linux, the hypervisor must coalesce the sharing of time and energy to manage power properly. In this case, the OS-based power management is effectively transformed into the hypervisor-based power management.

The Hypervisor and Power Manager Coalesce

Most embedded designs consist of multiple physical clusters or subsystems that are frequently put into inactive low-power states to save energy, such as sleep, suspend, hibernate or power-off suspend. Typical examples are the application, real-time video, or accelerator clusters that own multiple CPUs and share the system memory, peripherals, board level components, and the energy source. If all the clusters enter low-power states, their respective hypervisors are inactive, and the always-on platform manager has to take over the sole responsibility for system power management. Once the clusters become active again, the power management is passed back to the respective hypervisors. In order to secure optimum power management, the hypervisors and the power manager have to act as one, ultimately coalescing into a distributed system software covering both performance and power management.

A good example of a design in action indicative of such evolution is the power management support for the Xilinx Zynq UltraScale+ MPSoC. The Xen hypervisor running in the Application Processing Unit (APU) and the power manager in the Power Management Unit (PMU) have already evolved into a tight bundle around EEMI based power management and shall further evolve with the upcoming EEMI clock support.

The next blog in this series will cover the suspend-to-RAM feature for the Xen Project Hypervisor targeting the Xilinx Zynq UltraScale+ MPSoC, which lays the foundation for full-scale power management on Arm architectures.

Authors:

Vojin Zivojnovic, CEO and Co-Founder at AGGIOS

Stefano Stabellini, Principal Engineer at Xilinx and Xen Project Maintainer

Docker Guide: Dockerizing Python Django Application

Docker is an open-source project that provides an open platform for developers and sysadmins to build, package, and run applications anywhere as a lightweight container. Docker automates the deployment of applications inside software containers.

Django is a web application framework written in python that follows the MVC (Model-View-Controller) architecture. It is available for free and released under an open source license. It is fast and designed to help developers get their application online as quickly as possible.

In this tutorial, I will show you step-by-step how to create a docker image for an existing Django application project in Ubuntu 16.04. We will learn about dockerizing a python Django application, and then deploy the application as a container to the docker environment using a docker-compose script.

In order to deploy our python Django application, we need additional docker images. We need an nginx docker image for the web server and PostgreSQL image for the database.

Read more at HowToForge

Last Chance to Speak at Hyperledger Global Forum | Deadline is This Friday

Hyperledger Global Forum is the premier event showcasing the real uses of distributed ledger technologies for businesses and how these innovative technologies run live in production networks today. Hyperledger Global Forum unites the industry’s most respected thought leaders, domain experts, and key maintainers behind popular frameworks and tools like Hyperledger Fabric, Sawtooth, Indy, Iroha, Composer, Explorer, and more.

The Hyperledger Global Forum agenda will include both technical and enterprise tracks on everything from Distributed Ledger Technologies to Smart Contracts 101; roadmaps for Hyperledger projects; cross-industry keynotes and panels on use-cases in development, and much more. Hyperledger Global Forum will also facilitate social networking for the community to bond.

Learn more about submitting a proposal, review suggested technical and business topics, and see sample submissions. The deadline to submit proposals is Friday, July 13, so apply today!

Submit Now >>

Not submitting a session, but plan to attend? Register now and save before ticket prices increase on September 30.

This article originally appeared at Hyperledger

How to Easily Purge Unwanted Repositories in Linux

After a year of so of working with Ubuntu Linux (or derivative such as Elementary OS), I almost always find myself with a number of repositories from software I may have installed and removed or never really needed in the first place. That means /etc/apt/sources.d can get pretty crowded and the apt update process becomes a bit sluggish. Or worse, repositories can become broken, bringing apt update to halt. Because of this, I try hard to keep those repositories to a minimum. One way to do this is to simply open a terminal window and comb through that directory (deleting any unnecessary .list file).

Sure, you can install the third-party ppa-purge tool, but with that you must know the official name of the repository. I don’t know about you, but after installing a PPA, the official name escapes me moments later. Fortunately, there’s an easier way—one that’s already built into the distribution. Those who would rather deal with the command line as little as possible will find this tool incredibly easy to use.

Let me show you how to remove repositories from your Linux distribution, with the help of a user-friendly GUI.

Read more at Tech Republic

Cloud Computing in HPC Surges

According to the two leading analyst firms covering the high performance computing market, the use of the cloud for HPC workloads is looking a lot more attractive to users these days.

Intersect360 offered the most upbeat assessment in this regard, noting that cloud spending by HPC customers grew by a whopping 44 percent from 2016 to 2017, calling it a “breakout year” for this product category. According to the company’s market data, that put cloud-based spending at around $1.1 billion for 2017. And even though that represents only about three percent of total HPC revenue for the year, it’s a high-water mark for cloud computing in this space.

The big jump in cloud spending was driven by a number of different factors, according the Intersect360 folks, including “increasing facilities costs for hosting HPC, maturation of application licensing models, increased availability of high-performance cloud resources, and a spike in requirements for machine learning applications.”

Read more at Top500

Open Collaboration in Practice at Open Source Summit

A key goal in my career is growing the understanding and best practice of how communities, and open source communities in particular, can work well together. There is a lot of nuance to this work, and the best way to build a corpus of best practice is to bring people together to share ideas and experience.

In service of this, last year I reached out to The Linux Foundation about putting together an event focused on these “people” elements of Open Source such as community management, collaborative workflow, governance, managing conflict, and more. It was called the Open Community Conference, which took place at the Open Source Summit events in Los Angeles and Prague, and everything went swimmingly.

This train though, has to keep moving, and we realized that the scope of the event needed broadening. What about legal, compliance, standards, and other similar topics? They needed a home, and this event seemed like a logical place to house them. So, in a roaring display of rebranding, we renamed the event to the Open Collaboration Conference. It happens again at the Open Source Summit, this year in Vancouver from August 29-31 and then in Edinburgh from October 22-24, 2018.

The upcoming event in Vancouver is looking fantastic. Just like last year, we had a raft of submissions, so thanks everyone for making my job (rightly) difficult for choosing the final set of talks.

Featured Talks

Unsurprisingly, we have some really remarkable speakers, from a raft of different organizations, backgrounds, and disciplines. This includes:

Oh, and I will be speaking, too, delivering a new presentation called “Building Effective Community Leaders: A Guide.” It will cover key principles of leadership and how to bake them into your community, company, or other organization.

In addition to this, don’t forget the fantastic networking, evening events, and other goodness that will be jammed into an exciting few days. As usual, this all takes place at the Open Source Summit, and you view the whole schedule and learn more about how to join us at https://events.linuxfoundation.org/events/open-source-summit-north-america-2018/.

Finally, I will be there for the full event. If you want to have a meeting, drop me an email to jono@jonobacon.com.

Sign up to receive updates on Open Source Summit North America:

How to Use dd in Linux Without Destroying your Disk

Whether you’re trying to rescue data from a dying storage drive, backing up archives to remote storage, or making a perfect copy of an active partition somewhere else, you’ll need to know how to safely and reliably copy drives and filesystems. Fortunately, dd is a simple and powerful image-copying tool that’s been around, well, pretty much forever. And in all that time, nothing’s come along that does the job better.

Using dd, on the other hand, can make perfect byte-for-byte images of, well, just about anything digital. But before you start flinging partitions from one end of the earth to the other, I should mention that there’s some truth to that old Unix admin joke: “dd stands for disk destroyer.” If you type even one wrong character in a dd command, you can instantly and permanently wipe out an entire drive of valuable data. And yes, spelling counts.

Remember: Before pressing that Enter key to invoke dd, pause and think very carefully!

Read more at OpenSource.com

Early Uses of Blockchain Will Barely Be Visible, Says Hyperledger’s Brian Behlendorf

The blockchain revolution is coming, but you might not see it. That’s the view of Brian Behlendorf, executive director of the Linux Foundation’s Hyperledger  Project.

Speaking at the TC Sessions: Blockchain event in Zug, Switzerland, Behlendorf explained that much of the innovation that the introduction of blockchains are primed to happen behind this the scenes unbeknownst to most.

“For a lot of consumers, you’re not going to realize when the bank or a web form at a government website or when you go to LinkedIn and start seeing green check marks against people’s claims that they attended this university — which are all behind-the-scenes that will likely involve blockchain,” Behlendorf told interviewer John Biggs.

“This is a revolution in storage and networking and consumers.”

Read more at TechCrunch