More companies are using their security logs to detect malicious incidents. Many of them are collecting too much log data—often billions of events. They brag about the size of their log storage drive arrays. Are they measured in terabytes or petabytes?
A mountain of data doesn’t give them as much useful information as they would like. Sometimes less is more. If you get so many alerts that you can’t adequately respond to them all, then something needs to change. A centralized log management system can help. This quick intro to logging and expert recommendations help new system admins understand what they should be doing to get the most out of security logs.
Security event logging basics
One of the best guides to security logging is the National Instituted of Standards & Technology (NIST) Special Publication 800-92, Guide to Computer Security Log Management. Although it’s a bit dated, written in 2006, it still covers the basics of security log management well.
It places security log generators into three categories: operating system, application, or security-specific software (e.g., firewalls or intrusion detection systems [IDS]). Most computers have dozens of logs. …
Unix-style systems usually have syslog enabled by default, and you can configure the detail level. Many other application and security log files are disabled by default, but you can enable each individually with a single command line.
Each network device and security application and device will generate its own logs. Altogether, a system administrator will have hundreds of log files to choose from. A typical end-user system can generate thousands to tens of thousands of events per day. A server can easily generate hundreds of thousands to millions of events a day.
If you’re anything like me, you probably got yourself a first- or second-generation Raspberry Pi board when they first came out, played with it for a while, but then shelved it and mostly forgot about it. After all, unless you’re a robotics enthusiast, you probably don’t have that much use for a computer with a pretty slow processor and 256 megabytes of RAM. This is not to say that there aren’t cool things you can do with one of these, but between work and other commitments, I just never seem to find the right time for some good old nerding out.
However, if you would like to put it to good use without sacrificing too much of your time or resources, you can turn your old Raspberry Pi into a perfectly functioning Tor relay node.
What is a Tor Relay node
You have probably heard about the Tor project before, but just in case you haven’t, here’s a very quick summary. The name “Tor” stands for “The Onion Router” and it is a technology created to combat online tracking and other privacy violations.
Everything you do on the Internet leaves a set of digital footprints in every piece of equipment that your IP packets traverse: all of the switches, routers, load balancers and destination websites log the IP address from which your session originated and the IP address of the internet resource you are accessing (and often its hostname, even when using HTTPS). If you’re browsing from home, then your IP can be directly mapped to your household. If you’re using a VPN service (as you should be), then your IP can be mapped to your VPN provider, and then they are the ones who can map it to your household. In any case, odds are that someone somewhere is assembling an online profile on you based on the sites you visit and how much time you spend on each of them. Such profiles are then sold, aggregated with matching profiles collected from other services, and then monetized by ad networks. At least, that’s the optimist’s view of how that data is used — I’m sure you can think of many examples of how your online usage profiles can be used against you in much more nefarious ways.
The Tor project attempts to provide a solution to this problem by making it impossible (or, at least, unreasonably difficult) to trace the endpoints of your IP session. Tor achieves this by bouncing your connection through a chain of anonymizing relays, consisting of an entry node, relay node, and exit node:
The entry nodeonly knows your IP address, and the IP address of the relay node, but not the final destination of the request;
The relay node only knows the IP address of the entry node and the IP address of the exit node, and neither the origin nor the final destination
The exit nodeonly knows the IP address of the relay node and the final destination of the request; it is also the only node that can decrypt the traffic before sending it over to its final destination
Relay nodes play a crucial role in this exchange because they create a cryptographic barrier between the source of the request and the destination. Even if exit nodes are controlled by adversaries intent on stealing your data, they will not be able to know the source of the request without controlling the entire Tor relay chain.
As long as there are plenty of relay nodes, your privacy when using the Tor network remains protected — which is why I heartily recommend that you set up and run a relay node if you have some home bandwidth to spare.
Things to keep in mind regarding Tor relays
A Tor relay node only receives encrypted traffic and sends encrypted traffic — it never accesses any other sites or resources online, so you do not need to worry that someone will browse any worrisome sites directly from your home IP address. Having said that, if you reside in a jurisdiction where offering anonymity-enhancing services is against the law, then, obviously, do not operate your own Tor relay. You may also want to check if operating a Tor relay is against the terms and conditions of your internet access provider.
What you will need
A Raspberry Pi (any model/generation) with some kind of enclosure
A keyboard and an HDMI-capable monitor (to use during the setup)
This guide will assume that you are setting this up on your home connection behind a generic cable or ADSL modem router that performs NAT translation (and it almost certainly does). Most of them have a USB port you can use to power up your Raspberry Pi, and if you’re only using the wifi functionality of the router, then it should have a free ethernet port for you to plug into. However, before we get to the point where we can set-and-forget your Raspberry Pi, we’ll need to set it up as a Tor relay node, for which you’ll need a keyboard and a monitor.
The bootstrap script
I’ve adapted a popular Tor relay node bootstrap script for use with Raspbian Stretch — you can find it in my GitHub repository here: https://github.com/mricon/tor-relay-bootstrap-rpi. Once you have booted up your Raspberry Pi and logged in with the default “pi” user, do the following:
Install the latest OS updates to make sure your Pi is fully patched
Configure your system for automated unattended updates, so you automatically receive security patches when they become available
Install Tor software
Tell your NAT router to forward the necessary ports to reach your relay (the ports we’ll use are 443 and 8080, since they are least likely to be filtered by your internet provider)
Once the script is done, you’ll need to configure the torrc file — but first, decide how much bandwidth you’ll want to donate to Tor traffic. First, type “Speed Test” into Google and click the “Run Speed Test” button. You can disregard the “Download speed” result, as your Tor relay can only operate as fast as your maximum upload bandwidth.
Therefore, take the “Mbps upload” number, divide by 8 and multiply by 1024 to find out the bandwidth speed in Kilobytes per second. E.g. if you got 21.5 Mbps for your upload speed, then that number is:
21.5 Mbps / 8 * 1024 = 2752 KBytes per second
You’ll want to limit your relay bandwidth to about half that amount, and allow bursting to about three-quarters of it. Once decided, open /etc/tor/torrc using your favourite editor and tweak the bandwidth settings.
Of course, if you’re feeling more generous, then feel free to put in higher numbers, though you don’t want to max out your outgoing bandwidth — it will noticeably impact your day-to-day usage if these numbers are set too high.
While you have that file open, you should set two more things. First, the Nickname — just for your own recordkeeping, and second the ContactInfo line, which should list a single email address. Since your relay will be running unattended, you should use an email address that you regularly check — you will receive an alert from the “Tor Weather” service if your relay goes offline for longer than 48 hours.
Nickname myrpirelayContactInfo you@example.com
Save the file and reboot the system to start the Tor relay.
Testing to make sure Tor traffic is flowing
If you would like to make sure that the relay is functioning, you can run the “arm” tool:
sudo -u debian-tor arm
It will take a while to start, especially on older-generation boards, but eventually it will show you a bar chart of incoming and outgoing traffic (or error messages that will help you troubleshoot your setup).
Once you are convinced that everything is functioning, you can unplug the keyboard and the monitor and relocate the Raspberry Pi into the basement where it will quietly sit and shuffle encrypted bits around. Congratulations, you’ve helped improve privacy and combat malicious tracking online!
Learn more about Linux through the free “Introduction to Linux” course from The Linux Foundation and edX.
As the Internet of Things has grown in scale, IoT developers are increasingly expected to support a range of hardware resources, operating systems, and software tools/applications. This is a challenge given many connected devices are size-constrained. Virtualization can help meet these broad needs, but existing options don’t offer the right mix of size, flexibility, and functionality for IoT development.
ACRN™ is different by design. Launched at Embedded Linux Conference 2018, ACRN is a flexible, lightweight reference hypervisor, built with real-time and safety-criticality in mind and optimized to streamline embedded development through an open source platform.
One of ACRN’s biggest advantages is its small size — roughly only 25K lines of code at launch.
This week we analyze more data from the Node.js Foundation‘s user survey. Almost three-quarters (73 percent) of survey respondents said they use a package manager. NPM was used by 60 percent and Yarn cited by 13 percent. Since Yarn sits on top of NPM, in reality these respondents are referring to an interface or tool they actually use day-to-day. Yarn’s use rose 44 percent compared to last year’s study.
Is Yarn a better alternative to NPM? That is up to you to decide.
We looked through the raw data provided by the Node.js Foundation and found two questions about JavaScript tooling that were not included as charts in its reports. The graphic below shows the charts we created about transpiler and modular bundler usage. The New Stack will use this data to support future reporting.
Kapitan (and presumably Ksonnet) is the more flexible and customizable (json and jsonnet)
Kustomize if the more straightforward, just released so we’ll need a bit more documentation on built-in functions (yaml only)
Helm combines a package approach and releases management that is powerful, with the caveats of Tiller for the release management part (additional source of truth)
During the implementation of https://www.weyv.com environments in Kubernetes, we went through various stages. From plain yaml files, to Helm charts releases and finally helm charts but with helm template output. Now with the announcement of Kustomize, I take the opportunity to re-evaluate our choice of tool vs our requirements with 3 contenders: Helm, Kapitan, Kustomize. I left out Ksonnet (https://github.com/ksonnet/ksonnet) it seems very close to Kapitan.
Digital twins are virtual replicas of physical devices that data scientists and IT pros can use to run simulations before actual devices are built and deployed. They are also changing how technologies such as IoT, AI and analytics are optimized.
Digital twin technology has moved beyond manufacturing and into the merging worlds of the Internet of Things, artificial intelligence and data analytics.
As more complex “things” become connected with the ability to produce data, having a digital equivalent gives data scientists and other IT professionals the ability to optimize deployments for peak efficiency and create other what-if scenarios.
Digital twins could be used in manufacturing, energy, transportation and construction. Large, complex items such as aircraft engines, trains, offshore platforms and turbines could be designed and tested digitally before being physically produced.
Join us in Vancouver in August for 250+ educational sessions covering the latest technologies and topics in open source, and hear from industry experts including keynotes from:
Ajay Agrawal, Artificial Intelligence & Machine Learning Expert, Author of Prediction Machines, and Founder, The Creative Destruction Lab
Jennifer Cloer, Founder of reTHINKit and Creator and Executive Producer, The Chasing Grace Project
Wim Coekaerts, Senior Vice President of Operating Systems and Virtualization Engineering, Oracle
Ben Golub, Executive Chairman and Interim CEO, and Shawn Wilkinson, Co-founder, Storj Labs
The landscape of applications is quickly changing. Many platforms are migrating to containerized applications… and with good cause. An application wrapped in a bundled container is easier to install, includes all the necessary dependencies, doesn’t directly affect the hosting platform libraries, automatically updates (in some cases), and (in most cases) is more secure than a standard application. Another benefit of these containerized applications is that they are universal (i.e., such an application would install on Ubuntu Linux or Fedora Linux, without having to convert a .deb package to an .rpm).
As of now, there are two main universal package systems: Snap and Flatpak. Both function in similar fashion, but one is found by default on Ubuntu-based systems (Snap) and one on Fedora-based systems (Flatpak). It should come as no surprise that both can be installed on either type of system. So if you want to run Snaps on Fedora, you can. If you want to run Flatpak on Ubuntu, you can.
I will walk you through the process of installing and using Flatpak on Ubuntu 18.04. If your platform of choice is Fedora (or a Fedora derivative), you can skip the installation process.
Installation
The first thing to do is install Flatpak. The process is simple. Open up a terminal window and follow these steps:
Add the necessary repository with the command sudo add-apt-repository ppa:alexlarsson/flatpak.
Update apt with the command sudo apt update.
Install Flatpak with the commandsudo apt install flatpak.
Install Flatpak support for GNOME Software with the command sudo apt install gnome-software-plugin-flatpak.
Reboot your system.
Usage
I’ll first show you how to install a Flatpak package from the command line, and then via the GUI. Let’s say you want to install the Spotify desktop client via Flatpak. To do this, you must first instruct Flatpak to retrieve the necessary app. The Spotify Flatpak (along with others) is hosted on Flathub. The first thing we’re going to do is add the Flathub remote repository with the following command:
Now you can install any Flatpak app found on Flathub. For example, to install Spotify, the command would be:
sudo flatpak install flathub com.spotify.Client
To find out the exact command for each install, you only have to visit the app’s page on Flathub and the installation command is listed beneath the description.
Running a Flatpak-installed app is a bit different than a standard app (at least from the command line). Head back to the terminal window and issue the command:
flatpak run com.spotify.Client
Of course, after you’ve re-started your machine (upon installing the GNOME Software Support), those apps should appear in your desktop menu, making it unnecessary to start them from the command line.
To uninstall a Flatpak from the command line, you would go back to the terminal and issue the command:
sudo flatpak uninstall NAME
where NAME is the name of the app to remove. In our Spotify case, that would be:
sudo flatpak uninstall com.spotify.Client
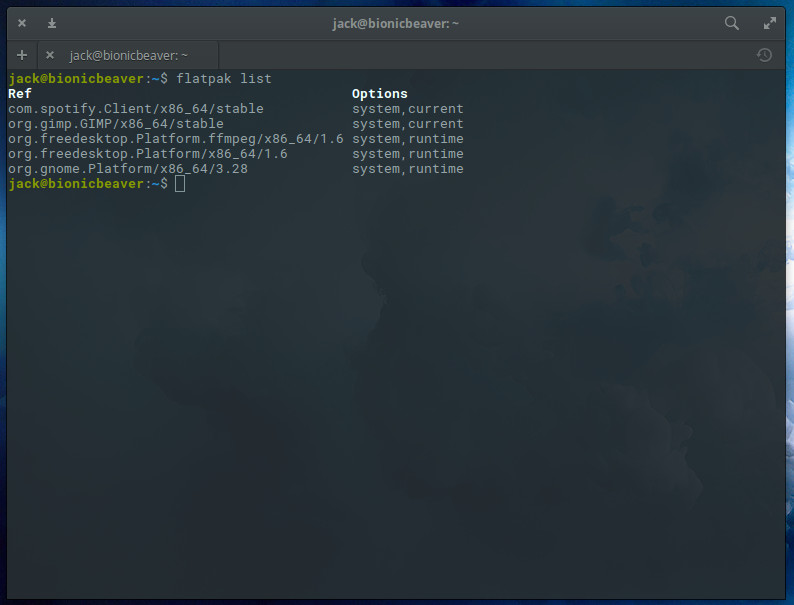
Now we want to update our Flatpak apps. To do this, first list all of your installed Flatpak apps by issuing the command:
flatpak list
Now that we have our list of apps (Figure 1), we can update with the command sudo flatpak update NAME(where NAME is the name of our app to update).
Figure 1: Our list of updated Flatpak apps.
So if we want to update GIMP, we’d issue the command:
sudo flatpak update org.gimp.GIMP
If there are any updates to be applied, they’’ll be taken care of. If there are no updates to be applied, nothing will be reported.
Installing from GNOME Software
Let’s make this even easier. Since we installed GNOME Software support for flatpak, we don’t actually have to bother with the command line. Don’t be mistaken, unlike Snap support, you won’t actually find Flatpak apps listed within GNOME Software (even though we’ve installed Software support). Instead, you’ll find support through the web browser.
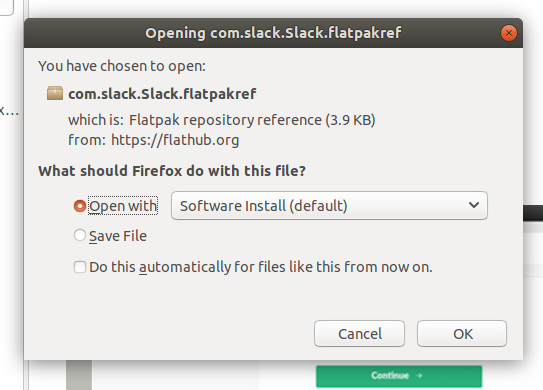
Figure 2: Installing a Flatpak app from the Firefox browser.
Let’s say you want to install Slack via Flatpak. Go to the Slack Flathub page and then click on the INSTALL button. Since we installed GNOME Software support, the standard browser dialog window will appear with an included option to open the file via Software Install (Figure 2).
This action will then open GNOME Software (or, in the case of Ubuntu, Ubuntu Software), where you can click the Install button (Figure 3) to complete the process.
Figure 3: The installation process ready to go.
Once the installation completes, you can then either click the Launch button, or close GNOME Software and launch the application from the desktop menu (in the case of GNOME, the Dash).
After you’ve installed a Flatpak app via GNOME Software, it can also be removed from the same system (so there’s still not need to go through the command line).
What about KDE?
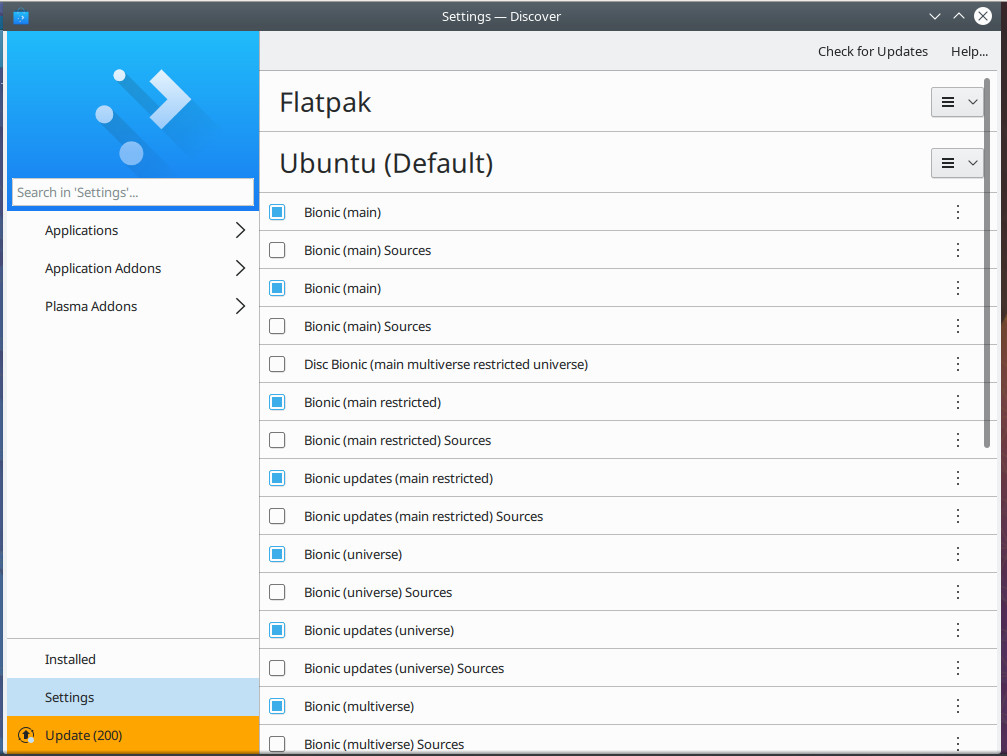
If you prefer using the KDE desktop environment, you’re in luck. If you issue the command sudo apt install plasma-discover-flatpak-backend, it’ll install Flatpak support for the KDE app store, Discover. Once you’ve added Flatpak support, you then need to add a repository. Open Discover and then click on Settings. In the settings window, you’ll now see a Flatpak listing (Figure 4).
Figure 4: Flatpak is now available in Discover.
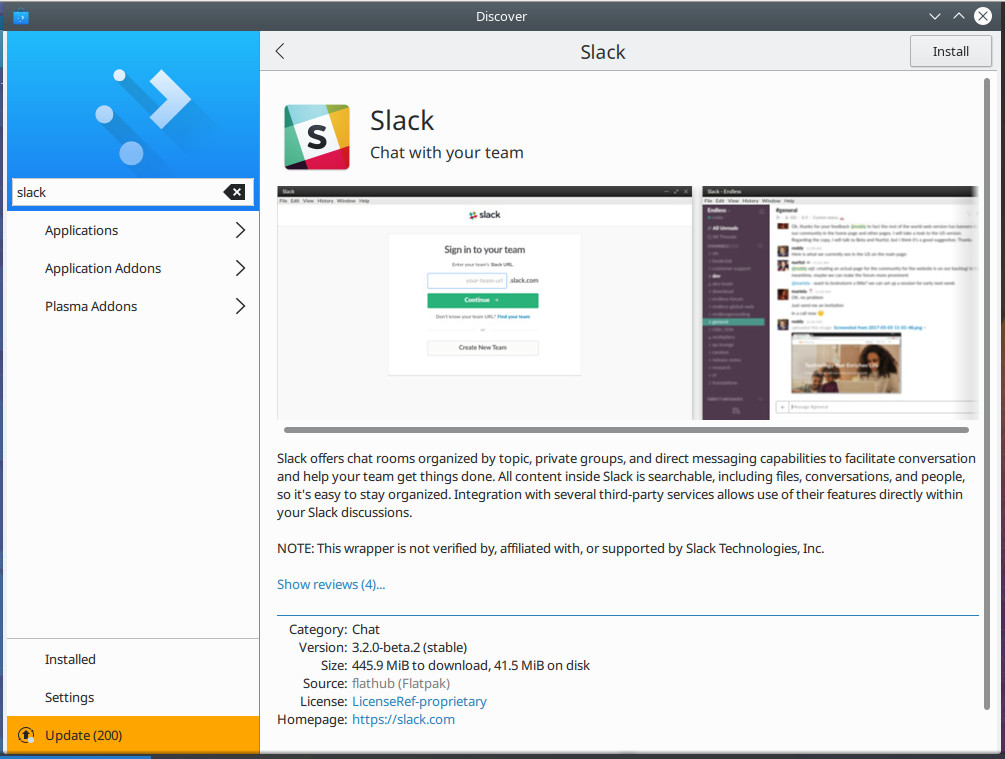
Click on the Flatpak drop-down and then click Add Flathub. Click on the Applications tab (in the left navigation) and you can then search for (and install) any applications found on Flathub (Figure 5).
Figure 5: Slack can now be installed, from Flathub, via Discover.
Easy Flatpak management
And that’s the gist of using Flatpak. These universal packages can be used on most Linux distributions and can even be managed via the GUI on some desktop environments. I highly recommend you give Flatpak a try. With the combination of standard installation, Flatpak, and Snaps, you’ll find software management on Linux has become incredibly easy.
Learn more about Linux through the free “Introduction to Linux” course from The Linux Foundation and edX.
PLENTY OF PEOPLE around the world got new gadgets Friday, but one in Eastern Tennessee stands out. Summit, a new supercomputer unveiled at Oak Ridge National Lab is, unofficially for now, the most powerful calculating machine on the planet. It was designed in part to scale up the artificial intelligence techniques that power some of the recent tricks in your smartphone.
America hasn’t possessed the world’s most powerful supercomputer since June 2013, when a Chinese machine first claimed the title. Summit is expected to end that run when the official ranking of supercomputers, from Top500, is updated later this month.
Summit, built by IBM, occupies floor space equivalent to two tennis courts, and slurps 4,000 gallons of water a minute around a circulatory system to cool its 37,000 processors. Oak Ridge says its new baby can deliver a peak performance of 200 quadrillion calculations per second (that’s 200 followed by 15 zeros) using a standard measure used to rate supercomputers, or 200 petaflops. That’s about a million times faster than a typical laptop, and nearly twice the peak performance of China’s top-ranking Sunway TaihuLight.
There are a number of ways to compare files and directories on Linux systems. The diff, colordiff, and wdiff commands are just a sampling of commands that you’re likely to run into. Another is comm. The command (think “common”) lets you compare files in side-by-side columns the contents of individual files.
Where diff gives you a display like this showing the lines that are different and the location of the differences, comm offers some different options with a focus on common content. Let’s look at the default output and then some other features.
Here’s some diff output — displaying the lines that are different in the two files and using < and > signs to indicate which file each line came from.