Home Blog Page 403

Namib Linux Makes Arch Linux a Dream for New Users

Let’s not mince words here. Arch Linux is a challenge to install. If it weren’t, we wouldn’t have so many distributions, such as Anarchy, which we covered previously, claiming to make Arch accessible for any user. Some of those distributions succeed and some fall flat. But few do as remarkable (albeit someone confusing) of a job as does Namib Linux. Not only does Namib Linux make installing and using Arch Linux as simple as can be, it also offers everything desktop Linux should have:

  • Pre-installed codecs to play multimedia files.

  • Automatic installation of hardware drivers.

  • Access to the latest versions of software.

  • Support for the easy installation and use of multiple kernels.

All of that, along with the usual Linux goodness that comes with standard desktop distribution (graphical desktop interface, pre-installed applications, etc.), helps make Namib Linux pretty impressive.

A little about Namib Linux

Namib Linux is a rolling release distribution created and maintained by Meerkat Software, which is based in New Zealand. One of the key aspects of Namib Linux is the idea that privacy, security, and control is of the utmost value. To that end, Namib Linux allows you to:

  • Update only when you want

  • Protect your data

  • Change nearly every aspect of the desktop

I’ve installed Namib Linux as a VirtualBox virtual machine and I can, without question, say the distribution lives up to its claims. Let’s get it installed and see what makes this user-friendly approach to Arch Linux special.

Installation

I’d love to spend a good amount of time discussing the installation of Namib Linux, but Meerkat Software has done such a great job of making the installation easy, there’s little use dwelling on the subject. Download the ISO image (there are four versions to choose from: Mate, GNOME, KDE, or Xfce), burn it to a disk, or USB drive (or just create a VirtualBox VM from the ISO) and boot up your machine (or virtual machine). I’ve tried both the Mate and GNOME versions of Namib Linux and can say they are both stellar options.

Namib Linux uses the Calamares Installer (Figure 1), which happens to be one the most user-friendly installers on the planet.
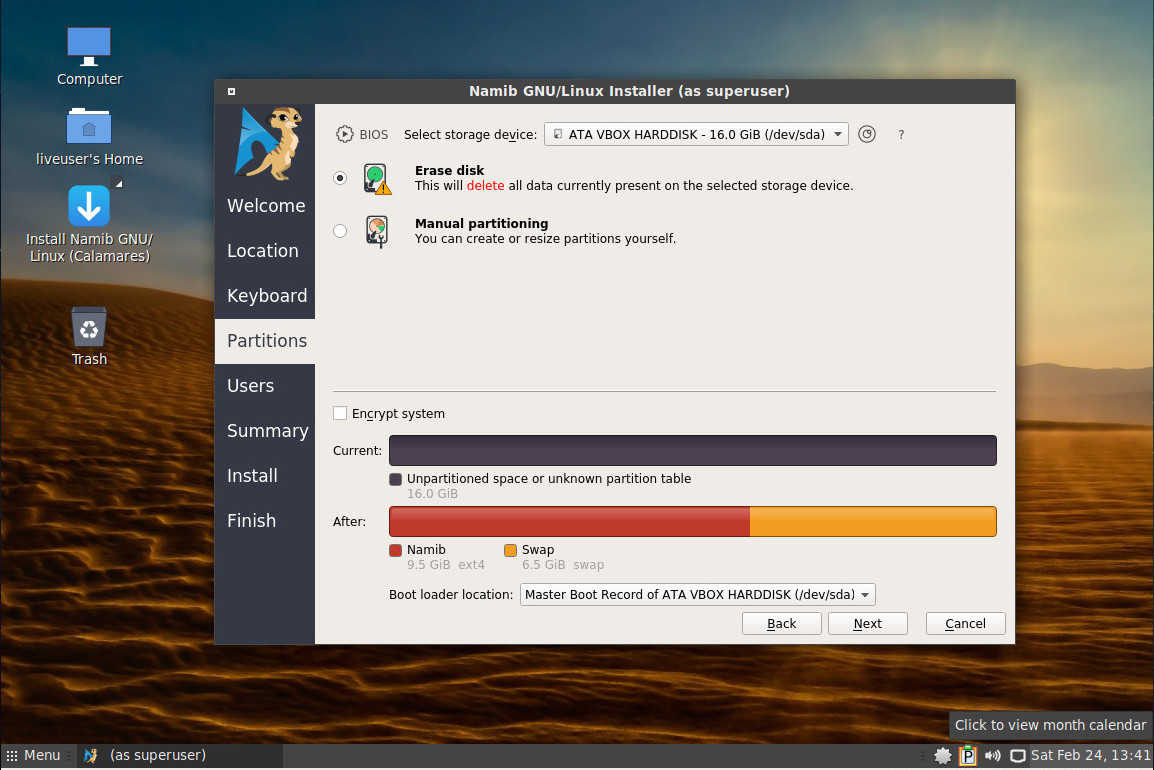
Figure 1: The Calamares Installer running from the live instance.

Once installed, you’ll find your Namib Linux desktop ready to serve. Reboot and log into your user account. The first thing you might check is to see if there are any updates. Open the software update tool for your desktop of choice (Figure 2) and run any necessary updates.
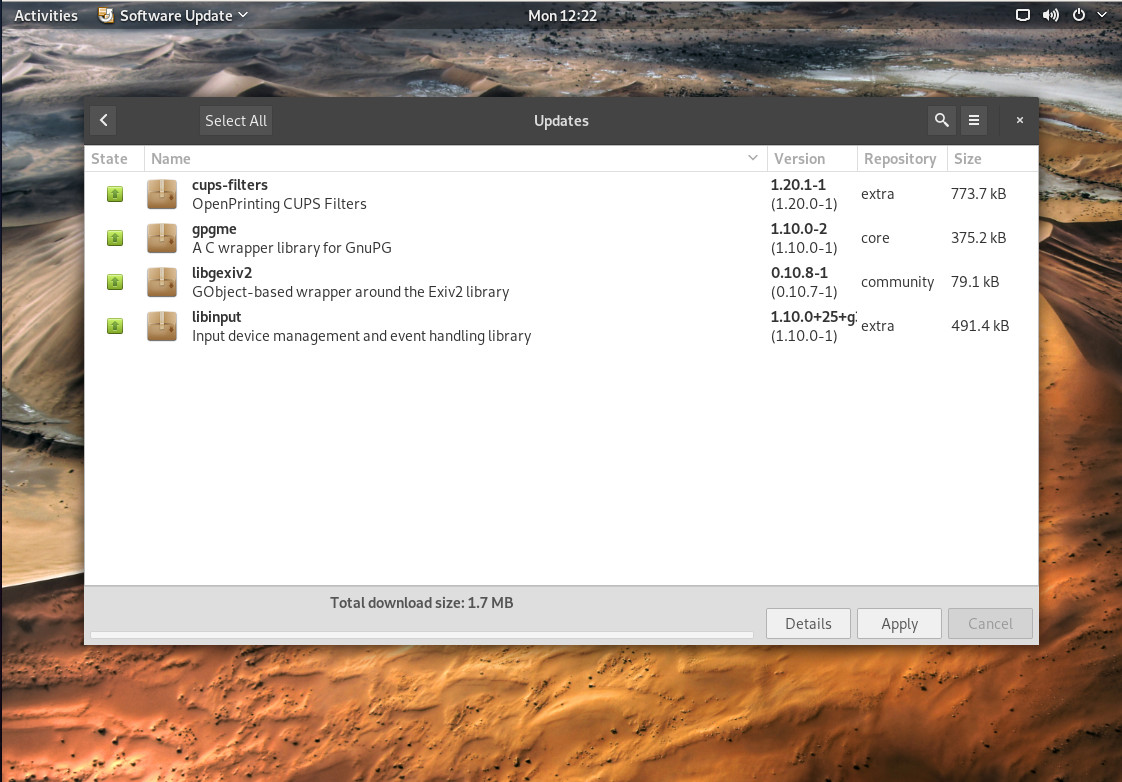
Figure 2: The GNOME version of Namib Linux, with a few updates available.

Because Namib Linux is a rolling release, you won’t have to install again, once a new release is out. Just keep it up to date and you’re good to go.

Software variations

I did notice that, between the Mate and GNOME editions of Namib, there are different main packages installed. For example, in the GNOME edition, LibreOffice is installed, whereas with the Mate edition, it is not. Oddly, the installed version of LibreOffice is out of date (at 5.4.5.1). Considering this is a rolling release, I am surprised that the Fresh version (6) of LibreOffice isn’t installed. If, however, you install LibreOffice from the default package manager, you will find the Fresh version (6.0.1.1 as of this writing) available. If you do this on the GNOME version, you’ll wind up with two different releases of LibreOffice.

Fortunately, each iteration of Namib Linux does include a graphical software installer (e.g., GNOME Software or Pamac). Thus, installing or removing software is as easy as opening the software installer, searching for the package to be installed (or removed), selecting it for installation (or removal), and providing your user password. This means you can open up the Add/Remove Software tool, and easily uninstall the LibreOffice 5 release. Oddly enough, GNOME Software wasn’t able to see the LibreOffice Still (5) version. Because of this, the only way to remove it (using a graphical tool) was by way of Pamac.

Conversely, I did notice that installing LibreOffice Fresh via GNOME Software resulted in the Add/Remove Software tool not being aware of this new installation. That’s right, both GNOME Software and Pamac will be available in the GNOME edition of Namib Linux, and they seem to have difficulting seeing what one another is doing. Even so, LibreOffice Fresh can be installed and launched from the GNOME Dash. NOTE: This issue didn’t appear in the Mate version of Namib Linux, as LibreOffice isn’t installed by default.

Regardless of your desktop of choice, Namib Linux does include a few extra bits and pieces (as compared to the likes of, say, Ubuntu Linux. You’ll find:

  • Avahi Server Browser

  • HP Device Manager

  • Parcellite (clipboard manager)

  • PulseAudio Volume Controller

  • V4L2 Test Bench

  • Polari IRC Chat

  • Builder

  • Nambi Notifications Settings

  • Namib Settings

It is that final entry that might be of interest to users. Within the Namib Settings tool, you can configure:

  • Locale Settings

  • Language Packages

  • User Accounts

  • Time and Date

  • Hardware

  • Keyboard

  • Kernel

That’s right, Namib Linux allows the user to easily install and remove kernels. If you open up the desktop menu and type namib, you’ll see the Namib Settings Manager. Open that and then double-click on the Kernel entry. In the resulting window (Figure 3), you will see a listing of available kernels.
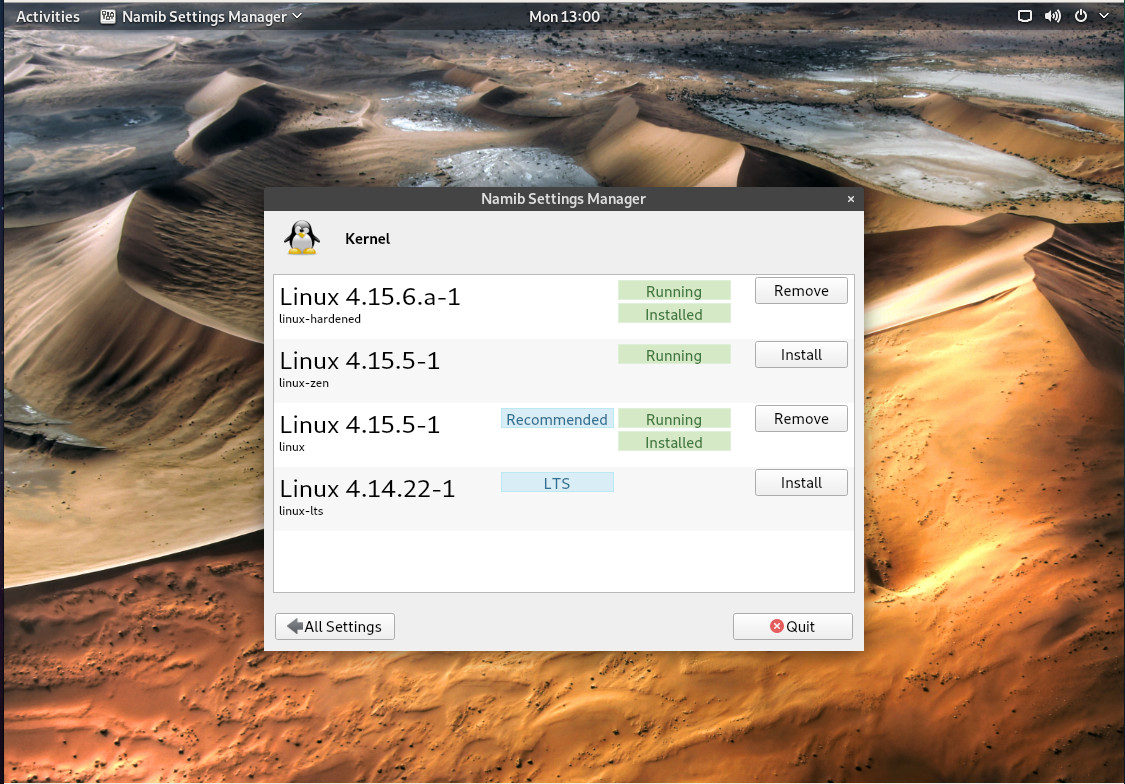
Figure 3: The Namib Kernel Settings Window.

As you can see in the figure, I’ve already installed kernel 4.15.6a-1, so it is now available, alongside 4.15.5-1. Kernel 4.14.22-1 is also available for installation. Should I opt for one of the other kernels, I only need to click the Install button associated with the kernel I want to run. After entering the user password, the kernel will be downloaded and installed. When prompted, click Close and reboot your machine for the changes to take effect.

I did find one issue with this tool. After installing the 4.15.6-1-hardened kernel (using the Namib tool), I rebooted as described, only to find the 4.15.5-1 kernel running. It wasn’t until I issued the command sudo grub-mkconfig -o /boot/grub/grub.cfg, that the newer kernel booted. This leads me to believe the Namib Kernel Settings window is incomplete or somewhat misleading. According to the documentation, this is a one-click kernel switcher. However, if (after installing a new kernel) it then requires the user to issue the grub-mkconfig command, it is not truly a one-click solution.

Even with that one caveat, it does make for easy kernel switching.

Definitely worth a try

Even with these caveats, Namib Linux makes Arch Linux incredibly accessible for new users. If you’ve been looking for an excuse to get familiar with Arch Linux, you should definitely give Namib Linux a go. Once you’re familiar with the environment, you may want to give Arch Linux a try.

Learn more about Linux through the free “Introduction to Linux” course from The Linux Foundation and edX.

Why Are There Few Women in Tech? Watch a Recruiting Session

Tech companies have employed a host of tactics to help lift the scant number of women and minorities who work within their ranks, like anti-bias training, affinity groups, and software that scans job postings for gendered language. Yet the numbers remain dire. Of men with science, technology engineering, or math (STEM) degrees, 40 percent work in technical careers; only 26 percent of women with STEM degrees do. That means that qualified women are turning away from the field before they even get started.

Some of the problems start in these preliminary recruiting sessions, which routinely discourage women from applying at all, according to a paper published in February by Alison Wynn, a postdoctoral fellow at Stanford University’s Clayman Institute for Gender Research, and Stanford sociology professor Shelley Correll. …

The researchers documented an unwelcoming environment for these women, including sexist jokes and imagery, geeky references, a competitive environment, and an absence of women engineers—all of which intimidated or alienated female recruits. “We hear from companies there’s a pipeline problem, that there just aren’t enough people applying for jobs. This is one area where they are able to influence that,” says Wynn. They just don’t.

Read more at WIRED

How to Make Your First Upstream Kubernetes Contribution

One of the best ways to join an open source community is to make a contribution, and this article is here to help your first contribution be a successful one.

Communicate

Join the Kubernetes Slack. Kubernetes is a growing community, which means we’re still figuring out how to document everything, and often the best way to get unstuck is to reach out for help from a more experienced contributor. In fact, on the second Wednesday of each month, we have a “Meet Our Contributors” video chat just for that. Find it in the Kubernetes Community Calendar, and the corresponding Slack channel #meet-our-contributors. You may also find help in the following  #kubernetes-users, #kubernetes-novice, or #sig-contribex.

Read more at OpenSource.com

​Memcached DDoS: The Biggest, Baddest Denial of Service Attacker Yet

We’ve been seeing a rise of ever bigger Distributed Denial of Service (DDoS) attacks for years now. But, now a new attack method, Memcrashed, can blast your site with over a terabyte of traffic. Good luck standing up to that volume of abuse!

Memcrashed works by exploiting the memcached program. Memcached is an open-source, high-performance, distributed, object-caching system. It’s commonly used by social networks such as Facebook and its creator LiveJournalas an in-memory key-value store for small chunks of arbitrary data. It’s the program that enables them to handle their massive data I/O. It’s also used by many to cache their web-server-session data to speed up their sites — and that’s where the trouble starts.

Read more at ZDNet

Shell Scripting and Security

Basic ways you can use shell scripts to monitor password strength and secret accounts.

Whether you have Linux running on your laptop or ancient PC file server or whether you’re managing a data center, your system is also vulnerable to malicious users. I can’t offer any sort of robust solution in this article, but let’s have a look at some basic things you can do with shell scripts to keep an eye on your system.

First and foremost, make sure you have complex non-guessable passwords for all your accounts and particularly your administrative or root account. It’s tough to check existing passwords, since they’re all stored in an encrypted manner without spending oodles of CPU cycles brute-forcing it, but how about a script where users can enter their password and it’ll confirm whether it’s hard to guess?

Read more at Linux Journal

New Linux Video Series from Jack Wallen and Swapnil Bhartiya

Two well-known tech journalists and frequent contributors to Linux.com have debuted a new video series discussing Linux topics. The “Let’s Get Serious” series from Jack Wallen and Swapnil Bhartiya will feature ideas, opinions, and engaging conversation based on their years of experience using Linux and covering the tech industry.

Swapnil and Jack started the video series in order to have a mature conversation about Linux, open source, and related topics. “With so many related topics, we felt it had become a challenge to have or find sensible, immediate, dialog with those involved, as each distinct community had become either too entrenched in their microcosm or disconnected from reality. Hence, ‘Let’s Get Serious,’” Jack said.

Join Jack and Swapnil as they dive into a lively discussion about Linux desktops, devices, distributions, and more.

Check out the first video below:


Linux LAN Routing for Beginners: Part 2

Last week we reviewed IPv4 addressing and using the network admin’s indispensible ipcalc tool: Now we’re going to make some nice LAN routers.

VirtualBox and KVM are wonderful for testing routing, and the examples in this article are all performed in KVM. If you prefer to use physical hardware, then you need three computers: one to act as the router, and the other two to represent two different networks. You also need two Ethernet switches and cabling.

The examples assume a wired Ethernet LAN, and we shall pretend there are some bridged wireless access points for a realistic scenario, although we’re not going to do anything with them. (I have not yet tried all-WiFi routing and have had mixed success with connecting a mobile broadband device to an Ethernet LAN, so look for those in a future installment.)

Network Segments

The simplest network segment is two computers in the same address space connected to the same switch. These two computers do not need a router to communicate with each other. A useful term is broadcast domain, which describes a group of hosts that are all in the same network. They may be all connected to a single Ethernet switch, or multiple switches. A broadcast domain may include two different networks connected by an Ethernet bridge, which makes the two networks behave as a single network. Wireless access points are typically bridged to a wired Ethernetwork.

A broadcast domain can talk to a different broadcast domain only when they are connected by a network router.

Simple Network

The following example commands are not persistent, and your changes will vanish with a restart.

A broadcast domain needs a router to talk to other broadcast domains. Let’s illustrate this with two computers and the ip command. Our two computers are 192.168.110.125 and 192.168.110.126, and they are plugged into the same Ethernet switch. In VirtualBox or KVM, you automatically create a virtual switch when you configure a new network, so when you assign a network to a virtual machine it’s like plugging it into a switch. Use ip addr show to see your addresses and network interface names. The two hosts can ping each other.

Now add an address in a different network to one of the hosts:

# ip addr add 192.168.120.125/24 dev ens3

You have to specify the network interface name, which in the example is ens3. It is not required to add the network prefix, in this case /24, but it never hurts to be explicit. Check your work with ip. The example output is trimmed for clarity:

$ ip addr show
ens3: 
    inet 192.168.110.125/24 brd 192.168.110.255 scope global dynamic ens3
       valid_lft 875sec preferred_lft 875sec
    inet 192.168.120.125/24 scope global ens3
       valid_lft forever preferred_lft forever

The host at 192.168.120.125 can ping itself (ping 192.168.120.125), and that is a good basic test to verify that your configuration is working correctly, but the second computer can’t ping that address.

Now we need to do bit of network juggling. Start by adding a third host to act as the router. This needs two virtual network interfaces and a second virtual network. In real life you want your router to have static IP addresses, but for now we’ll let the KVM DHCP server do the work of assigning addresses, so you only need these two virtual networks:

  • First network: 192.168.110.0/24
  • Second network: 192.168.120.0/24

Then your router must be configured to forward packets. Packet forwarding should be disabled by default, which you can check with sysctl:

$ sysctl net.ipv4.ip_forward
net.ipv4.ip_forward = 0

The zero means it is disabled. Enable it with this command:

# echo 1 > /proc/sys/net/ipv4/ip_forward

Then configure one of your other hosts to play the part of the second network by assigning the 192.168.120.0/24 virtual network to it in place of the 192.168.110.0/24 network, and then reboot the two “network” hosts, but not the router. (Or restart networking; I’m old and lazy and don’t care what weird commands are required to restart services when I can just reboot.) The addressing should look something like this:

  • Host 1: 192.168.110.125
  • Host 2: 192.168.120.135
  • Router: 192.168.110.126 and 192.168.120.136

Now go on a ping frenzy, and ping everyone from everyone. There are some quirks with virtual machines and the various Linux distributions that produce inconsistent results, so some pings will succeed and some will not. Not succeeding is good, because it means you get to practice creating a static route. First, view the existing routing tables. The first example is from Host 1, and the second is from the router:

$ ip route show
default via 192.168.110.1 dev ens3  proto static  metric 100 
192.168.110.0/24 dev ens3  proto kernel  scope link  src 192.168.110.164  metric 100
$ ip route show
default via 192.168.110.1 dev ens3 proto static metric 100
default via 192.168.120.1 dev ens3 proto static metric 101
169.254.0.0/16 dev ens3 scope link metric 1000
192.168.110.0/24 dev ens3 proto kernel scope link 
 src 192.168.110.126 metric 100
192.168.120.0/24 dev ens9 proto kernel scope link 
 src 192.168.120.136 metric 100

This shows us that the default routes are the ones assigned by KVM. The 169.* address is the automatic link local address, and we can ignore it. Then we see two more routes, the two that belong to our router. You can have multiple routes, and this example shows how to add a non-default route to Host 1:

# ip route add 192.168.120.0/24 via 192.168.110.126 dev ens3

This means Host 1 can access the 192.168.110.0/24 network via the router interface 192.168.110.126. See how it works? Host 1 and the router need to be in the same address space to connect, then the router forwards to the other network.

This command deletes a route:

# ip route del 192.168.120.0/24

In real life, you’re not going to be setting up routes manually like this, but rather using a router daemon and advertising your router via DHCP but understanding the fundamentals is key. Come back next week to learn how to set up a nice easy router daemon that does the work for you.

Learn more about Linux through the free “Introduction to Linux” course from The Linux Foundation and edX.

Security in the Modern Data Center

The National Institute of Standards and Technology, a division of the U.S. Department of Commerce, is well known in the security community for its standards and recommendations that guide many organizations towards secure culture, policies and technological infrastructure. Its recently publicized guidance, the Application Container Security Guide, analyzes the unique risks posed by containerized applications and advises organizations how to secure them. The first recommendation, “Tailor the organization’s operational culture and technical processes to support the new way of developing, running, and supporting applications made possible by containers,” sets the tone for analysis, implying that modern data centers require a major shift in enterprise strategy and means of securing them, in order to keep pace with the new methodologies of developing and running applications.

The document goes on to emphasize that securing the data center requires tools that were designed from the ground up for this purpose. The authors explain that existing security tools are simply not up for the task of securing the virtualization-based infrastructure, as they were designed before such an environment was envisioned.

Read more at The New Stack

Xen Project Member Spotlight: DornerWorks

We see virtualization becoming more and more of a necessity in the embedded world. As the complexity of processors increases, the difficulty of utilizing them increases. Processors, like the Zynq UltraScale+ MPSoC, that have a Quad-Core ARM Cortex-A53, a Dual-Core ARM Cortex-R5, and an FPGA in a single chip, can be difficult to manage. Virtualization provides a means to isolate out various pieces in a more manageable and effective way. Not only does the Xen Project Hypervisor help manage complexity, but it also can reduce size, weight, and power (SWaP), provide redundancy, address obsolescence of legacy systems, and more.

However, while the temptation is to use virtualization to create a single integrated platform for all computation, this approach could create a single point of failure unless it is mitigated by system wide redundancies.

Read more at Xen Project

EdgeX Foundry Continues Momentum with ‘California Code’ Preview

Only 3 months away from our first release, the EdgeX community has made available what we are calling the “California Preview.”  This preview is a collection of five key microservices written in Go that are drop in replacements for our Java microservices.  The work on the California release (not due until June) still continues, but we wanted to show the world that EdgeX was indeed going to be fast, small and still a flexible platform for building IIoT solutions – thus we named this a “preview” of what we hope to show in full by the California release.

In the preview, the core services (Core Data, Metadata, and Command) have been recreated in Go Lang, as well as the bulk of the Export Client and Export Distribution microservices.  Just how fast and how small has EdgeX gotten? Let’s take a look at some of the new EdgeX measurements.   

Read more at The Linux Foundation