Global open source communities often face language barriers, cultural differences, and other challenges. Here’s how to overcome them.
Global communities: 3 common challenges
Anyone who’s ever worked in a group knows that differences of opinion can be difficult to overcome. In online communities, language barriers, different time zones, and cultural differences can also create challenges.
At the time series-focused Influx Days in San Francisco, presenters offered many unique views of log data. From talks on better analyzing log streams to bitter warnings against identifying what’s “normal,” the one-day event featured a range of ways enterprises can apply new techniques. The goal: get their arms around the near-infinite supply of logging and monitoring data their systems generate.
Emily Nakashima, a front-end engineer at Honeycomb.io, gave a talk specifically targeted at bringing JavaScript front-end developers into the problem mitigation workflow. To do that, she said, you’ll need to extend your logging analysis all the way to the front-end JavaScript.
Her talk, titled, “What Your JavaScript Does When You’re Not Around,” offered many tips and hints for teams looking to bring front-end issue catching into the daily purview of JavaScript developers.
It was brought to my attention recently that there is a dearth of introductory educational material available about modern network load balancing and proxying. I thought to myself: How can this be? Load balancing is one of the core concepts required for building reliable distributed systems. Surely there must be quality information available? I searched and found the pickings are indeed slim. The Wikipedia articles on load balancing and proxy serverscontain overviews of some concepts but not a fluid treatment of the subject, especially as it pertains to modern microservice architectures. A Google search for load balancing primarily turns up vendor pages that are heavy on buzzwords and light on details.
In this post I attempt to rectify the lack of information by providing a gentle introduction to modern network load balancing and proxying. This is, frankly, a massive topic that could be the subject of an entire book. In the interest of keeping this article (somewhat) blog length, I try to distill a set of complex topics into a simple overview; depending on interest and feedback I will consider more detailed follow up posts on individual topics at a later point.
With a bit of background on why I wrote this out of the way — here we go!
Linus Torvalds doesn’t take a break, not even on New Year’s Eve, and he just announced the release of the sixth RC (Release Candidate) milestone of the upcoming Linux 4.15 kernel series.
It looks like the development of Linux kernel 4.15 wasn’t interrupted by the winter holidays, nor the new year’s celebrations, so public testers can now get their hands on the sixth Release Candidate, which brings lots of x86 updates, updated USB, RDMA, networking, and sound drivers, some perf tooling, as well as core networking and IRQ fixes.
“One last RC at the end of the year – and a Happy New Year to everybody,” says Linus Torvalds in the mailing list announcement.
Is your organization looking to build out an open source program or are you already managing one? If so, you’re probably already considering the kinds of tools and guidance that can make your program a holistic success. That is why, in this article series, we have been coveringtools for managing open source programsand providingadvice from leading experts.
Now, to take your program to the next level, we offer a free guide containing an essential open source reading list. This list can help any organization launch and maintain a thriving open source program.
Whether your budget permits you to attend large, global events or just small local shows, there’s a Linux and open source conference to suit everyone.
Even if you don’t live and breathe open source, I highly recommend you attend at least one conference that fits your schedule and travel budget. The technical know-how you gain can make your life easier, and it’s helpful to know what’s on the horizon. Sometimes, a single how-to presentation can save you a week of work or a panel discussion can help you formulate your company’s IT strategy—and that justifies the cost.
Plus, in the sense of enlightened self-interest, attending conferences is an investment in your own career: You need to keep your tech skills honed. Even introverts can get something out of the personal networking experience, which helps when you want to find your next job. You can’t beat the “hallway” track at a conference for learning what people really think about the latest and greatest programs. Webinars and online streaming of keynote speeches are all well and good, but nothing’s quite as rewarding as meeting people of like minds in real life.
How many times have you dived deep into Ubuntu (or a Ubuntu derivative), configuring things and installing software, only to find that your desktop (or server) platform isn’t exactly what you wanted. This situation can be problematic when you already have all of your user files on the machine. In this case, you have a choice, you can either back up all your data, reinstall the operating system, and copy your data back onto the machine, or you can give a tool like Resetter a go.
Resetter is a new tool (written by Canadian developer that goes by the name “gaining”), written in Python and pyqt, that will reset Ubuntu, Linux Mint (and a few other, Ubuntu-based distributions) back to stock configurations. Resetter offers two different reset options: Automatic and Custom. With the Automatic option, the tool will:
Remove user-installed apps
Delete users and home directories
Create default backup user
Auto install missing pre-installed apps (MPIAs)
Remove non-default users
Remove snap packages
The Custom option will:
Remove user-installed apps or allow you to select which apps to remove
Remove old kernels
Allow you to choose users to delete
Delete users and home directories
Create default backup user
Allow you to create custom backup user
Auto install MPIAs or chose which MPIAs to install
Remove non-default users
View all dependent packages
Remove snap packages
I’m going to walk you through the process of installing and using Resetter. However, I must tell you that this tool is very much in beta. Even so, resetter is definitely worth a go. In fact, I would encourage you to test the app and submit bug reports (you can either submit them via GitHub or send them directly to the developer’s email address, gaining7@outlook.com).
It should also be noted that, at the moment, the only supported distributions are:
Debian 9.2 (stable) Gnome edition
Linux Mint 17.3+ (support for mint 18.3 coming soon)
Ubuntu 14.04+ (Although I found 17.10 not supported)
Elementary OS 0.4+
Linux Deepin 15.4+
With that said, let’s install and use Resetter. I’ll be demonstrating on Elementary OS Loki.
Installation
There are a couple of ways to install Resetter. The method I chose is by way of the gdebi helper app. Why? Because it will pick up all the necessary dependencies for installation. First, we must install that particular tool. Open up a terminal window and issue the command:
sudo apt install gdebi
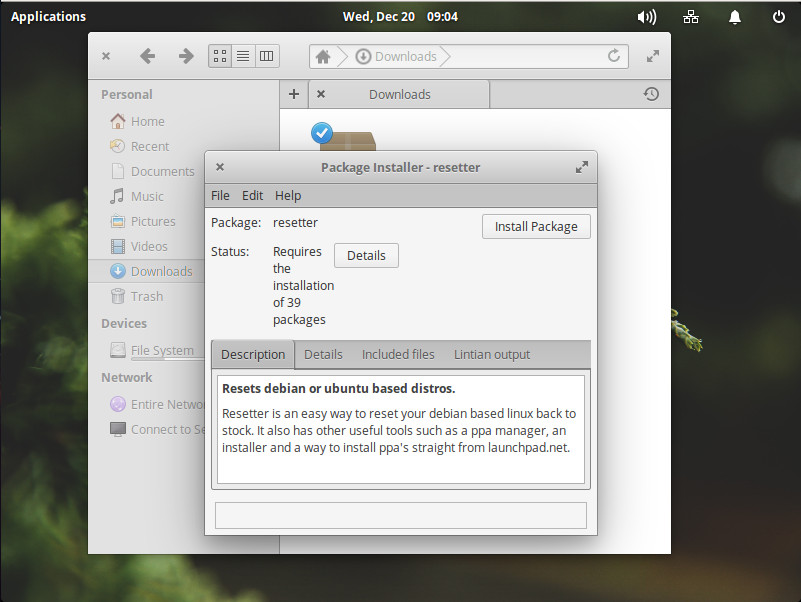
Once that is installed, point your browser to the Resetter Download Page and download the most recent version of the software. Once it has downloaded, open up the file manager, navigate to the downloaded file, and click (or double-click, depending on how you’ve configured your desktop) on the resetter_XXX-stable_all.deb file (where XXX is the release number). The gdebi app will open (Figure 1). Click on the Install Package button, type your sudo password, and Resetter will install.
Figure 1: Installing Resetter with gdebi.
Once Resetter is installed, you’re ready to go.
Using Resetter
Remember, before you do this, you must back up your data. You’ve been warned.
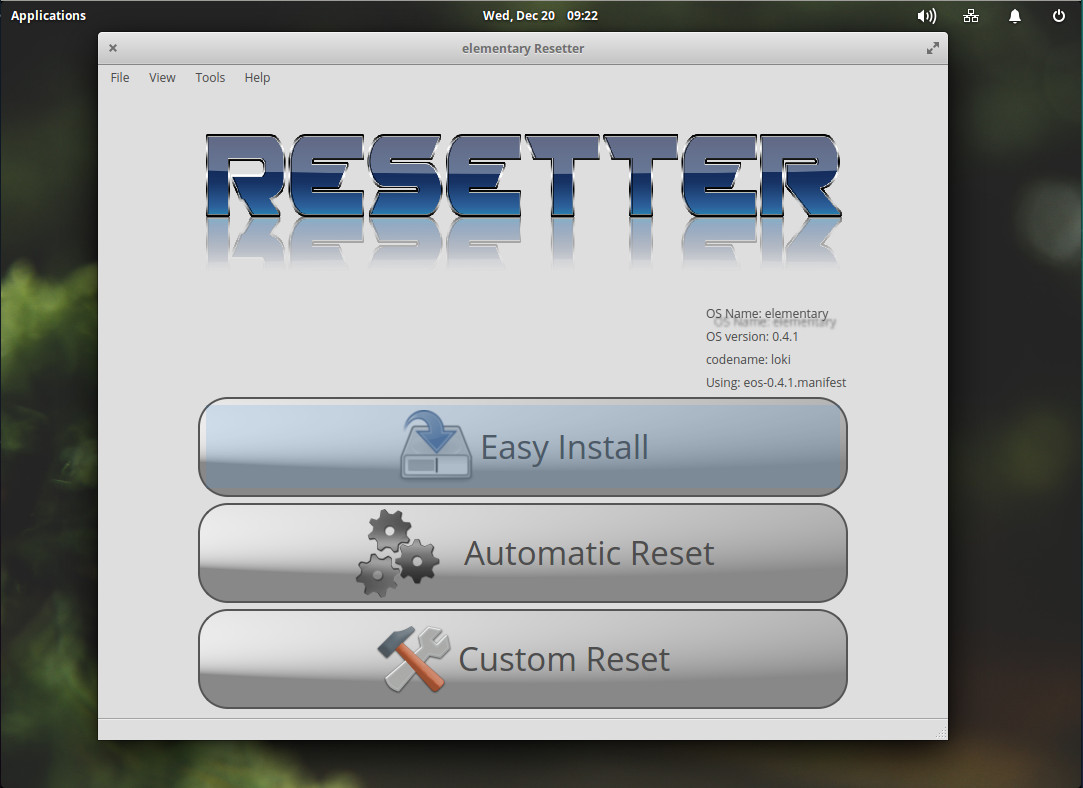
From your terminal window, issue the command sudo resetter. You’ll be prompted for your sudo password. Once Resetter opens, it will automatically detect your distribution (Figure 2).
Figure 2: The Resetter main window.
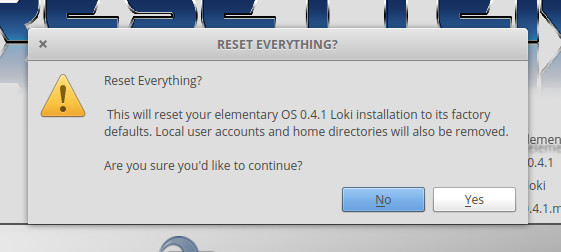
We’re going to test the Resetter waters by running an automatic reset. From the main window, click Automatic Reset. The app will offer up a clear warning that it is about to reset your operating system (in my case, Elementary OS 0.4.1 Loki) to its factory defaults (Figure 3).
Figure 3: Resetter warns you before you continue on.
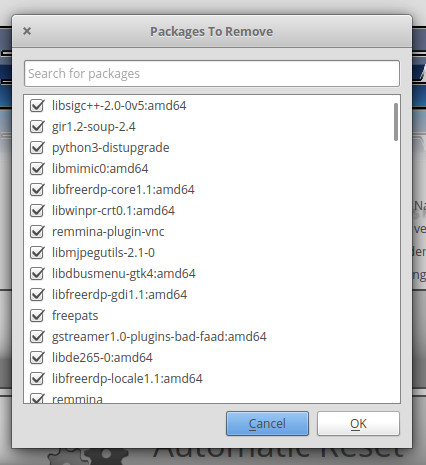
Once you click Yes, Resetter will display all of the packages it will remove (Figure 4). If you’re okay with that, click OK and the reset will begin.
Figure 4: All of the packages to be removed, in order to reset Elementary OS to factory defaults.
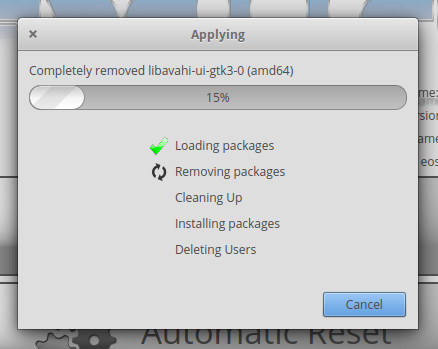
During the reset, the application will display a progress window (Figure 5). Depending upon how much you’ve installed, the process shouldn’t take too long.
Figure 5: The Resetter progress window.
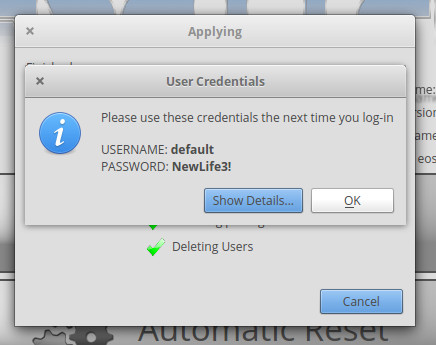
When the process completes, Resetter will display a new username and password for you to use, in order to log back into your newly reset distribution (Figure 6).
Figure 6: New username and password.
Click OK and then, when prompted, click Yes to reboot the system. Once you are prompted to login, use the new credentials given to you by the Resetter app. After a successful login, you’ll need to recreate your original user. That user’s home directory will still be intact, so all you need to do is issue the command sudo useradd USERNAME(where USERNAME is the name of the user). Once you’ve done that, issue the command sudo passwd USERNAME(where USERNAME is the name of the user). With the user/password set, you can log out and log back in as your old user (enjoying the same home directory you had before resetting the operating system).
My results
I have to confess, after adding the password back to my old user (and testing it by using the su command to change to that user), I was unable to log into the Elementary OS desktop with that user. To solve that problem, I logged in with the Resetter-created user, moved the old user home directory, deleted the old user (with the command sudo deluser jack), and recreated the old user (with the command sudo useradd -m jack).
After doing that, I checked the original home directory, only to find out the ownership had been changed from jack.jack to 1000.1000. That could have been fixed simply by issuing the command sudo chown -R jack.jack /home/jack. The lesson? If you use Resetter and find you cannot log in with your old user (after you’ve re-created user and given it a new password), make sure to change the ownership of the user’s home directory.
Outside of that on issue, Resetter did a great job of taking Elementary OS Loki back to a default state. Although Resetter is in beta, it’s a rather impressive tool. Give it a try and see if you don’t have the same outstanding results I did.
Learn more about Linux through the free “Introduction to Linux” course from The Linux Foundation and edX.
A range of open-source operating-system solutions are available for those confined to scaled-down dimensions—homing in on the best option does require some research, though.
Linux has become the de facto open-source operating system (OS), although there are niche alternatives like flavors of BSD (Berkeley Software Distribution). A variety of incarnations target minimal memory platforms such as Ubuntu Core/Snappy and Android Things.
Many commercial open-source solutions are available in this space, too, but they all require virtual memory-management-unit (MMU) hardware.
Right now I’m working on finishing up a zine about perf that I started back in May, and I’ve been struggling with how to explain all there is to say about perf in a concise way. Yesterday I finally hit on the idea of making a 1-page cheat sheet reference which covers all of the basic perf command line arguments.
All the examples in this cheat sheet are taken (with permission) from http://brendangregg.com/perf.html, which is a fantastic perf reference and has many more great examples.
Kata Containers were one of the exciting announcements from this year’s KubeCon. See how they work and how the makers are working with the community.
On Dec. 5, when the enthusiastic container community was getting ready for KubeCon, the OpenStack Foundation renewed its long-standing friendship with the announcement of a new effort called Kata Containers with the goal of unifying the speed and manageability of containers with the security advantages of virtual machines (VMs).