Home Blog Page 448

How to Install and Use Docker on Linux

Containers are all the rage in IT — with good reason. Containers are lightweight, standalone packages that contain everything needed to run an application (code, libraries, runtime, system settings, and dependencies). Each container is deployed with its own CPU, memory, block I/O, and network resources, all without having to depend upon an individual kernel and operating system. And that is the biggest difference between a container and a virtual machine; whereas a virtual machine is a full-blown operating system platform, running on a host OS, a container is not.

Containers allow you to expand your company offerings (either internal or external) in ways you could not otherwise. For example, you can quickly deploy multiple instances of NGINX (even with multiple stagings — such as development and production). Unlike doing this with Virtual Machines, containers will not put nearly the hit on your system resources.

Docker makes creating, deploying, and managing containers incredibly simple. What’s best is that installing and using Docker is second-nature to the Linux platform.

I’m going to demonstrate how easy it is to install Docker on Linux, as well as walking you through the first steps of working with Docker. I’ll be demonstrating on the Ubuntu 16.04 Server platform, but the process is very similar on most all Linux distributions.

I will assume you already have Ubuntu Server 16.04 up and running and ready to go.

Installation

Since Ubuntu Server 16.04 is sans GUI, the installation and usage of Docker will be handled entirely through the command line. Before you run the installation command, make sure to update apt and then run any necessary upgrades. Do note, if your server’s kernel upgrades, you’ll need to reboot the system. Thus, you might want to plan to do this during a time when a server reboot is acceptable.

To update apt, issue the command:

sudo apt update

Once that completes, upgrade with the command:

sudo apt upgrade

If the kernel upgrades, you’ll want to reboot the server with the command:

sudo reboot

If the kernel doesn’t upgrade, you’re good to install Docker (without having to reboot). The Docker installation command is:

sudo apt install docker.io

If you’re using a different Linux distribution, and you attempt to install (using your distribution’s package manager of choice), only to find out docker.io isn’t available, the package you want to install is called docker. For instance, the installation on Fedora would be:

sudo dnf install docker

If your distribution of choice is CentOS 7, installing docker is best handled via an installation script. First update the platform with the command sudo yum check-update. Once that completes, issue the following command to download and run the necessary script:

curl -fsSL https://get.docker.com/ | sh

Out of the box, the docker command can only be run with admin privileges. Because of security issues, you won’t want to be working with Docker either from the root user or with the help of sudo. To get around this, you need to add your user to the docker group. This is done with the command:

sudo usermod -a -G docker $USER

Once you’ve taken care of that, log out and back in, and you should be good to go. That is, unless your platform is Fedora. When adding a user to the docker group to this distribution, you’ll find the group doesn’t exist. What do you do? You create it first. Here are the commands to take care of this:

sudo groupadd docker && sudo gpasswd -a ${USER} docker && sudo systemctl restart docker

newgrp docker

Log out and log back in. You should be ready to use Docker.

Starting, stopping, and enabling Docker

Once installed, you will want to enable the Docker daemon at boot. To do this, issue the following two commands:

sudo systemctl start docker

sudo systemctl enable docker

Should you need to stop or restart the Docker daemon, the commands are:

sudo systemctl stop docker

sudo systemctl restart docker

Docker is now ready to deploy containers.

Pulling images

For Docker, images serve as the building blocks of your containers. You can pull down a single image (say NGINX) and deploy as many containers as you need from that image. To use images, you must first pull them onto your system. Images are pulled from registries and your Docker installation includes usage of the default Docker Hub — a registry that contains a large amount of contributed images (from official images to user-contributed).

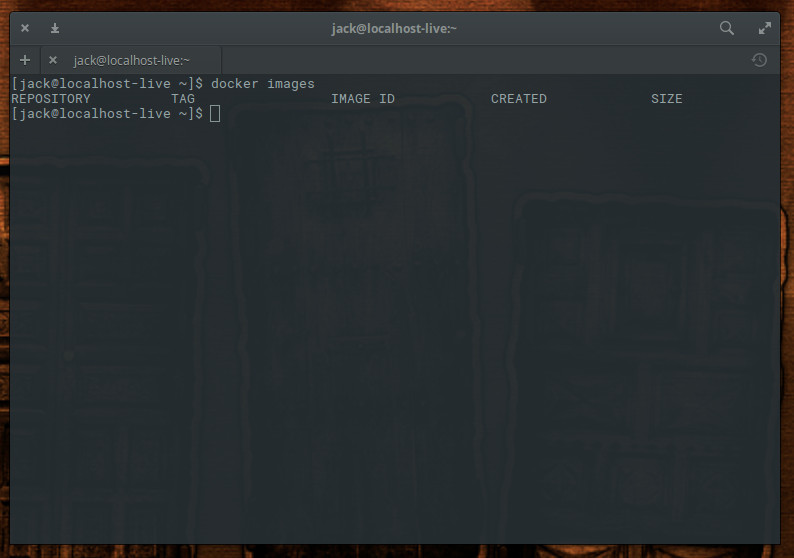
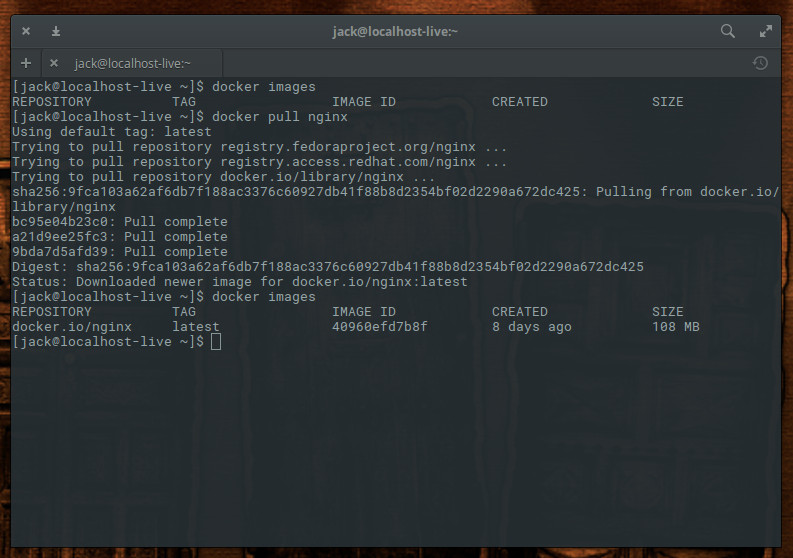
Let’s say you want to pull down an image for the Nginx web server. Before doing so, let’s check to see what images are already to be found on our system. Issue the command docker images and you should see that no images are to be found (Figure 1).

Figure 1: No images found yet.

Let’s fix that. We’ll download the Nginx image from Docker Hub with the command:

docker pull nginx

The above command will pull down the latest (official) Nginx image from Docker Hub. If we run the command docker images, we now see the image listed (Figure 2).

Figure 2: The NGINX image has been pulled down.

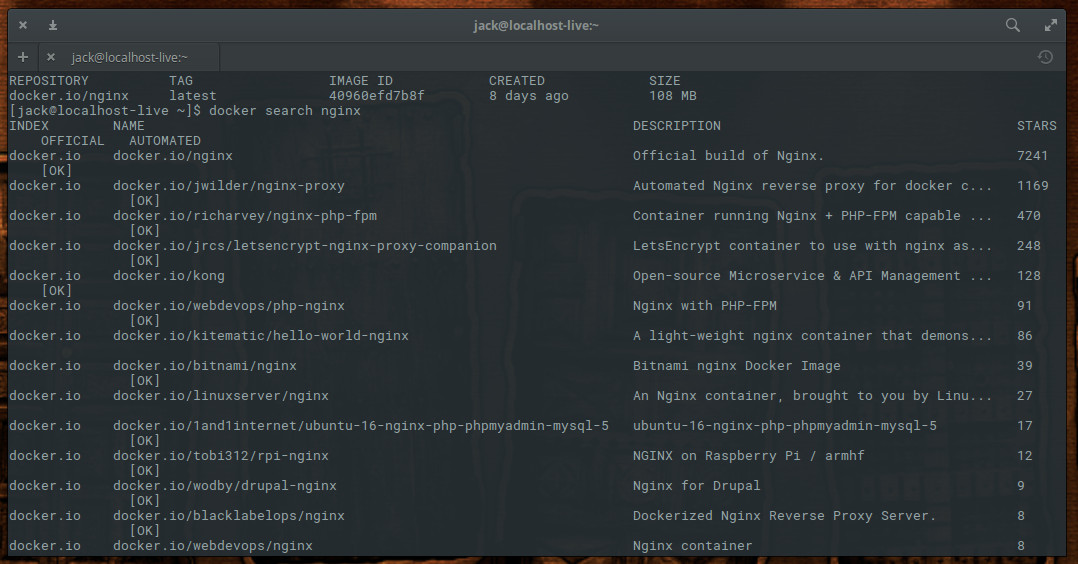
Notice I said “official” Nginx image? You will find there are plenty of unofficial Nginx images to be found on Docker Hub. Many of these unofficial images have been created to serve specific purposes. You can see a list of all Nginx images, found on Docker Hub, with the command

docker search nginx

As you can see (Figure 3), there are Nginx images to be had for numerous purposes (reverse proxy, PHP-FPM-capable, LetsEncrypt, Bitnami, Nginx for Raspberry Pi and Drupal, and much more).

Figure 3: NGINX variant images found on Docker Hub.

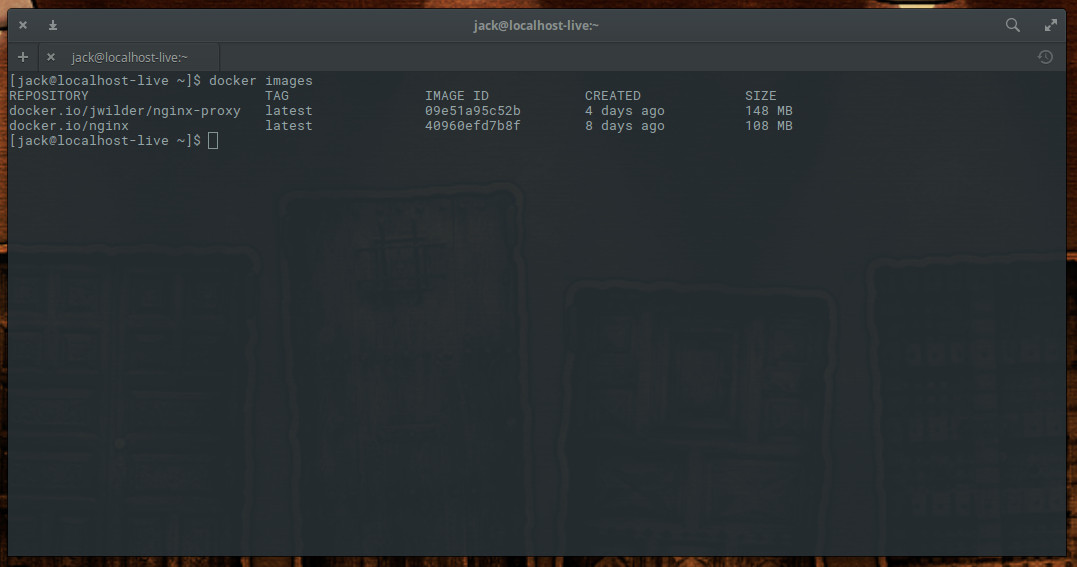
Say, for example, you want to pull down the Nginx image with reverse proxy functionality built in. That unofficial image is called jwilder/nginx-proxy. To pull that image down, issue the command:

docker pull jwilder/nginx-proxy

Issue the command docker images to see the newly pulled images (Figure 4).

Figure 4: Two different NGINX images, ready to be used.

As a word of caution, I recommend only working with the official images, as you cannot be certain if an unofficial image will contain malicious code.

You now have images, ready to be used for the deploying of containers. When next we visit this topic, we’ll begin the process deploying those containers, based on the Nginx image.

Docker is an incredibly powerful system that can make your job easier and your company more flexible and agile. For more information on what Docker can do, issue the command man docker and read through the man page.

Learn more about Linux through the free “Introduction to Linux” course from The Linux Foundation and edX.

Open Source Threat Modeling

What is threat modeling?

Application threat modeling is a structured approach to identifying ways that an adversary might try to attack an application and then designing mitigations to prevent, detect or reduce the impact of those attacks. The description of an application’s threat model is identified as one of the criteria for the Linux CII Best Practises Silver badge.

Why threat modeling?

It is well established that defense-in-depth is a key principle for network security and the same is true for application security. But although most application developers will intuitively understand this as a concept, it can be hard to put it into practice. After many years and sleepless nights, worrying and fretting about application security, one thing I have learned is that threat modeling is an exceptionally powerful technique for building defense-in-depth into an application design. This is what first attracted me to threat modeling.

Read more at The Linux Foundation

Open Source Networking Days: Think Globally, Collaborate Locally

Something that we’ve learned at The Linux Foundation over the years is that there is just no substitute for periodic, in-person, face-to-face collaboration around the open source technologies that are rapidly changing our world. 

This fall, we decided to take The Linux Foundation networking projects (OpenDaylight, ONAP, OPNFV, and others) on the road to Europe and Japan by working with local site hosts and network operators to host Open Source Networking Days in Paris, Milan, Stockholm, London, Tel Aviv, and Yokohama. This series of one-day events was a valuable opportunity for local ecosystems to meet and collaborate around the latest in open source networking. 

Read more at The Linux Foundation

The Open-Source Driving Simulator That Trains Autonomous Vehicles

Self-driving cars are set to revolutionize transport systems the world over. If the hype is to be believed, entirely autonomous vehicles are about to hit the open road.

The truth is more complex. The most advanced self-driving technologies work only in an extremely limited set of environments and weather conditions. And while most new cars will have some form of driver assistance in the coming years, autonomous cars that drive in all conditions without human oversight are still many years away.

One of the main problems is that it is hard to train vehicles to cope in all situations. And the most challenging situations are often the rarest. There is a huge variety of tricky circumstances that drivers rarely come across: a child running into the road, a vehicle driving on the wrong side of the street, an accident immediately ahead, and so on.

Read more at Technology Review

What Can The Philosophy of Unix Teach Us About Security?

In some sense, I see security philosophy gradually going the way of the Unix philosophy. More specifically, within the areas of security operations and incident response, I believe that this transition has been underway for quite some time. What do I mean by this?  Allow me to elaborate.

Whether the security team is in-house at a large enterprise or part of a managed services offering, the trend seems to be the same. Security teams have given up on building their workflow around a small number of “silver bullets” that claim to solve most of their problems. Instead, most security teams have started to go about it the other way. They build the workflow that works for their particular organization, based on their priorities and objectives. Then they turn their attention to finding solutions that address particular needs within the workflow.

Read more at Security Week

5 New & Powerful Dell Linux Machines You Can Buy Right Now

The land of powerful PCs and workstations isn’t barren anymore when we talk about Linux-powered machines; even all of the world’s top 500 supercomputers now run Linux.

Dell has joined hands with Canonical Inc. to give Linux-powered machines a push in the market. They have launched five new Canonical-certified workstations running Ubuntu Linux out-of-the-box as a part of the Dell Precision series. An advantage of buying these canonical-certified machines is that the users won’t have to worry about incompatibility with Linux.

Check out the specifications of these Dell Linux machines:

Read more at FOSSbytes

5 Coolest Linux Terminal Emulators

Sure, we can get by with boring old GNOME terminal, Konsole, and funny, rickety, old xterm. When you’re in the mood to try something new, however, take a look at these five cool and useful Linux terminals.

Xiki

Number one on my hit parade is Xiki. Xiki is the brainchild of Craig Muth, talented programmer and funny man (funny as in humorous, and possibly other senses of the word as well). I wrote about Xiki so long ago, in Meet Xiki, the Revolutionary Command Shell for Linux and Mac OS X. Xiki is much more than yet another terminal emulator; it’s an interactive environment for expanding the reach and speed of your command-line interface.

Xiki has mouse support and runs in most command shells. It has tons of on-screen help and is fast to navigate with the keyboard or mouse. One simple example of its speed is how it turbocharges the ls command. Xiki zooms through multiple levels in your filesystem without having to continually re-type ls or cd, or resort to clever regular expressions.

Xiki integrates with many text editors, provides a persistent scratchpad, has a fast search engine, and, as they say, much much more. Xiki is so featureful and so different that the fastest way to wrap your head around it is to watch Craig’s funny and informative videos.

Cool Retro Term

I dig Cool Retro Term (shown in main image above) for its looks, and also its usefulness. It takes us back to the era of cathode ray tube monitors, which wasn’t all that long ago, and which I have zero nostalgia for. Pry my LCD screens from my cold dead etc. It is based on Konsole, so it has Konsole’s excellent functionality. Change Cool Retro Term’s appearance from the Profiles menu. Profiles include Amber, Green, Pixelated, Apple ][, and Transparent Green, and all include a realistic scanline. Not all of them are usable, for example the Vintage profile warps and flickers realistically like a dying screen.

Cool Retro Term’s GitHub repository has detailed installation instructions, and Ubuntu users havethe PPA.

Sakura

When you want a nice lightweight and configurable terminal, try Sakura (Figure 1). It has few dependencies, unlike GNOME Terminal and Konsole, which drag in big chunks of GNOME and KDE. Most options are configurable from the right-click menu, such as tab labels, colors, size, default number of tabs, fonts, bell, and cursor type. You can set more options, for example keybindings, in your personal configuration file, ~/.config/sakura/sakura.conf.

Figure 1: Sakura is a nice, lightweight, configurable terminal.

Command-line options are detailed in man sakura. Use these to lauch Sakura from the command line, or use them in your graphical launcher. For example, this opens to four tabs and sets the window title to MyWindowTitle:

$ sakura -t MyWindowTitle -n 4

Terminology

Terminology comes from the lushly lovely world of the Enlightenment graphical environment and can be prettified all you want (Figure 2). It has a lot of useful features: independent split windows, open files and URLs, file icons, tabs, and gobs more. It even runs in the Linux console, without a graphical environment.

Figure 2: Terminology can run in the Linux console, without a graphical environment.

When you have multiple split windows each one can have a different background, and backgrounds are any media file: image files, video, or music. It comes with a bundle of dark themes and transparency, because who needs readability, and even a Nyan cat theme. There are no scroll bars, so navigate up and down with Shift+PageUp and Shift+PageDown.

There are multiple controls: a right-click menu, context dialogs, and command-line options. The right-click menu has the tiniest fonts in the universe, and Miniview displays a microscopic file tree. If there are options to make these readable I did not find them. When you have multiple tabs open click the little tab browser to open a chooser that scrolls up and down. Everything is configurable; consult man terminology for a list of commands and options, including a nice batch of fast keyboard shortcuts. Strangely, this does not include the following commands, which I found by accident:

  • tyalpha
  • tybg
  • tycat
  • tyls
  • typop
  • tyq

Use the tybg [filename] command to set a background, and tybg with no options to remove the background. Run typop [filename] to open files. tyls lists files in icon view. Run any of these commands with the -h option to learn what they do. Even with the readability quirks, Terminology is fast, pretty, and useful

Tilda

There are several excellent drop-down terminal emulators, including Guake and Yakuake. Tilda (Figure 3) is one of the simplest and most lightweight. After opening Tilda it stays open, and you display or hide it with a shortcut key. The tilda key is the default, and you can map any key you like. It’s always open and ready to work, but out of your way until you need it.

Figure 3: Tilda is one of the simplest and most lightweight terminal emulators.

Tilda has a nice complement of options, including default size and placement, appearance, keybindings, search bar, mouse hover, and tab bar. These are controlled with a right-click menu.

Learn more about Linux through the free “Introduction to Linux” course from The Linux Foundation and edX.

Cloud Native Storage: A Primer

We recently debated at a technical forum what cloud native storage is, which led me to believe that this topic deserves a deeper discussion and more clarity.

First though, I first want to define what cloud native applications are, as some may think that containerizing an application is enough to make it “cloud-native.” This is misleading and falls short of enabling the true benefits of cloud native applications, which have to do with elastic services and agile development. The following three attributes are the main benefits, without which we’re all missing the point:

  • Durability — services must sustain component failures
  • Elasticity — services and resources grow or shrink to meet demand
  • Continuity — versions are upgraded while the service is running

Read more at The New Stack

IT Disaster Recovery: Sysadmins vs. Natural Disasters

Businesses need to keep going even when faced with torrential flooding or earthquakes. Sysadmins who lived through Katrina, Sandy, and other disasters share real-world advice for anyone responsible for IT during an emergency.

When the lights flicker and the wind howls like a locomotive, it’s time to put your business continuity and disaster recovery plans into operation.

Too many sysadmins report that neither were in place when the storms came. That’s not surprising. In 2014, the Disaster Recovery Preparedness Council found that 73 percent of surveyed businesses worldwide didn’t have adequate disaster recovery plans.

“Adequate” is a key word. As a sysadmin on Reddit wrote in 2016, “Our disaster plan is a disaster. All our data is backed up to a storage area network [SAN] about 30 miles from here. We have no hardware to get it back online or have even our core servers up and running within a few days. We’re a $4 billion a year company that won’t spend a few $100K for proper equipment. Or even some servers at a data center. Our executive team said, ‘Meh what are the odds of anything happening’ when the hardware proposal was brought up.”

Read more at HPE

Top 10 Linux Tools

One of the benefits to using Linux on the desktop is that there’s no shortage of tools available for it. To further illustrate this point, I’m going to share what I consider to be the top 10 Linux tools.

This collection of Linux tools helps us in two distinct ways. It serves as an introduction to newer users that there are tools to do just about anything on Linux. Also, it reminds those of us who have used Linux for a number of years that the tools for just about any task is indeed, available.

Read more at Datamation