“This GitLab release provides capabilities to fully embrace the benefits of DevOps — specifically CI/CD and Kubernetes based application development,” said Sid Sijbrandij, CEO of GitLab. The sector is increasingly adopting cloud-native capabilities utilizing the Kubernetes open source container orchestration software in the market, he noted, resulting in an increasing need for automated processes. GitLab 10.0 steps in with both enterprise and community editions to fill that need.
Cloud native capabilities get a boost in GitLab 10.0 via expanded Kubernetes capabilities. With this latest integration, deploying to Kubernetes is designed to be a seamless process, utilizing GitLab CI to quickly way configure, deploy and utilize clusters regardless of where the server may be running. As part of its mission to be the development tool for Kubernetes and cloud-native software, GitLab has also joined forces with Cloud Native Computing Foundation (CNCF).
Node.js is much more than an application platform. In a 2016 Forrester report, the research firm talked with several Node.js users and developers to better understand the growth of Node within global enterprises across all a range of industries.
Forrester’s key takeaways:
Node.js Is Enterprise Ready: Node.js is no longer just a platform for supercool digital startups and web-scale companies.
Node.js Powers Digital Transformation: Digital transformations require large technology shifts. Node.js enables companies to reduce the risk of these transformations.
Node.js Is More Than An Application Platform: Node.js enables rapid experimentation with corporate data, application modernization, and even drives internet of things (IoT) solutions.
Edge computing is a “mesh network of micro data centers that process or store critical data locally and push all received data to a central data center or cloud storage repository, in a footprint of less than 100 square feet,” according to research firm IDC.
It is typically referred to in IoT use cases, where edge devices would collect data – sometimes massive amounts of it – and send it all to a data center or cloud for processing. Edge computing triages the data locally so some of it is processed locally, reducing the backhaul traffic to the central repository.
Typically, this is done by the IoT devices transferring the data to a local device that includes compute, storage and network connectivity in a small form factor. Data is processed at the edge, and all or a portion of it is sent to the central processing or storage repository in a corporate data center, co-location facility or IaaS cloud.
Today’s applications are arguably the equivalent of a Girl Talk album in code. They are made up of code that comes from a variety of sources. For instance, they may use one or more frameworks and libraries each of which may also may rely on hundreds of modules (ex. npm, Ruby gems). Even portions the “original” code in a project may have originally been copy/pasted from documentation, a tutorial or *gasp* StackOverflow.
Containers continue to be a hot topic. Some claim they are on the verge of a meteoric rise to dominate the data center. Others find them only suitable for cloud. And still others are waiting patiently to see if containers are the SDN of app infrastructure or not – highly touted by pundits but rarely put it into practice in production.
A quick perusal of research and surveys shows that containers certainly are gaining traction — somewhere.
5% of organizations want to adopt containers for deployment of traditional network hosted app services (F5 Networks State of Application Delivery 2017)
The Blockchain for Good Hackathon takes place Saturday, 30 September and Sunday, 1 October. Full agenda can be found here.
How many years has it been going?
This is the inaugural event.
What exciting things can people look forward to for the 2017 version?
Participating developers will work together with top coders, architects, and leading thinkers from Hyperledger and Accenture to build innovative solutions that can positively impact millions of lives and the environment.
Wait, Linux needs antivirus and anti-malware solutions? I thought it was immune to such things. Perhaps a bit of clarification is necessary here.
First and foremost, no operating system is 100 percent immune to attack. Whether a machine is online or offline, it can fall victim to malicious code. Although Linux is less prone to such attacks than, say, Windows, there is no absolute when it comes to security. I have witnessed, first hand, Linux servers hit by rootkits that were so nasty, the only solution was to reinstall and hope the data backup was current. I’ve been a victim of a (very brief) hacker getting onto my desktop, because I accidentally left desktop sharing running (that was certainly an eye opener). The lesson? Even Linux can be vulnerable.
So why does Linux need tools to prevent viruses, malware, and rootkits? It should be obvious why every server needs protection from rootkits — because once you are hit with a rootkit, all bets are off as to whether you can recover without reinstalling the platform. It’s antivirus and anti-malware where admins start getting a bit confused.
Let me put it simply — if your server (or desktop for that matter) makes use of Samba or sshfs (or any other sharing means), those files will be opened by users running operating systems that are vulnerable. Do you really want to take the chance that your Samba share directory could be dishing out files that contain malicious code? If that should happen, your job becomes exponentially more difficult. Similarly, if that Linux machine performs as a mail server, you would be remiss to not include AV scanning (lest your users be forwarding malicious mail).
With all of that said, what are your options? Let’s take a look at a few tools, offered for the Linux platform, that do a good job of protecting you (and your users) from viruses, malware, and rootkits.
ClamAV
Without a doubt, ClamAV is the most popular option for keeping viruses off of your Linux machines and out of your shared directories. There are a few reasons why ClamAV is so popular among the Linux crowd. First, it’s open source, which in and of itself is a big win. Second, it’s very effective in finding trojans, viruses, malware, and other threats. ClamAV features a multi-threaded scanner daemon that is perfectly suited for mail servers and on-demand scanning.
ClamAV can be run from command line or it with the ClamTK GUI. Both tools are easy to use and very dependable. Installing ClamAV is simple.
If you’re running a Debian-based desktop, you can install ClamTK (the GUI) with the command:
sudo apt install clamtk
There are also third-party tools that can be added (to include support for the likes of MTA, POP3, Web & FTP, Filesys, MUA, Bindings, and more).
Upon installation, the first thing you’ll want to do is update the signatures with the command sudo freshclam. Once that completes, you can scan a directory with the command:
clamscan -r -i DIRECTORY
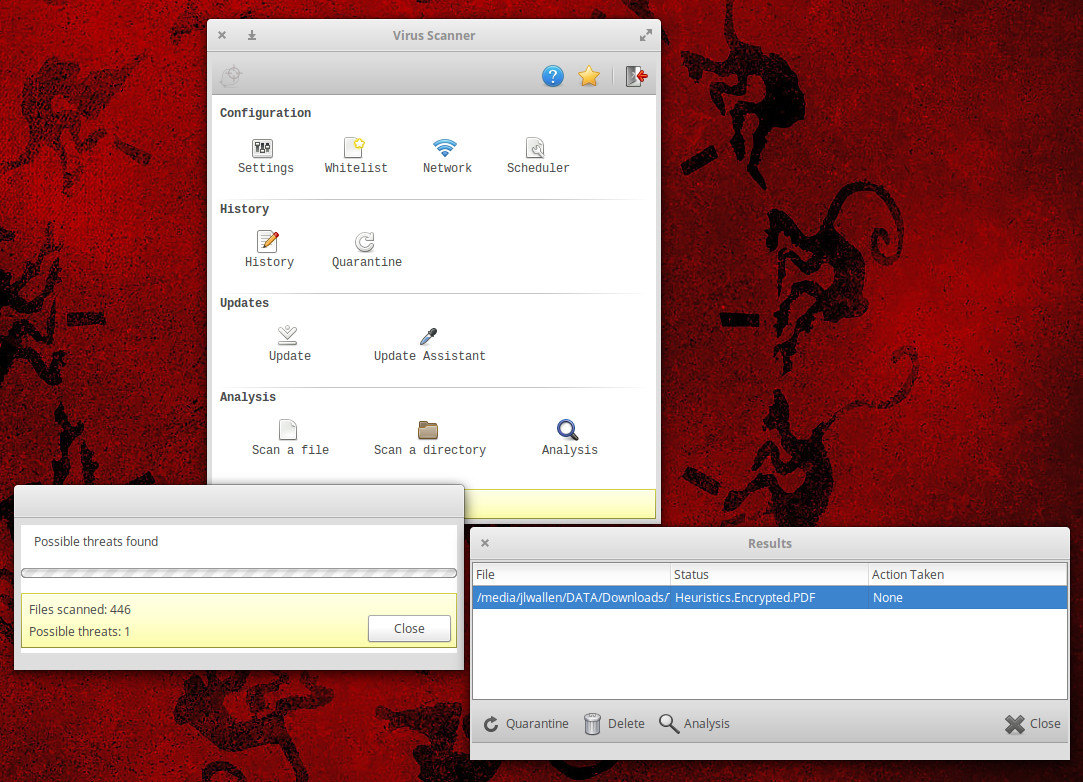
where DIRECTORY is the location to scan. The -r option means to recursively scan and the -i options means to only print out infected files. If you work with the GUI, it’s even easier. From the GUI you can run a scan and, should ClamAV find anything, act on it (Figure 1).
Figure 1: ClamAV found a file with possible malicious code.
The one caveat to ClamAV is that it does not include real-time scanning. In fact, if you’re not using the ClamTK GUI, then to create a scheduled scan, you must make use of crontab. With the ClamTK GUI, you can only set up a schedule for your user home directory.
Sophos
If you’re looking for a non-open source solution from a company that’s been in the antivirus sector for quite some time, Sophos offers a free Linux scanner that does an outstanding job. This particular solution does on-access and on-demand scans for viruses, trojans, and malware. To prevent your Linux machine from becoming a distribution point for malicious software, Sophos Antivirus for Linux detects, blocks, and removes Windows, Mac, and Android malware. What makes Sophos stand above ClamAV is the inclusion of a real-time scanner. For desktops that share a lot of files, that is a deal maker.
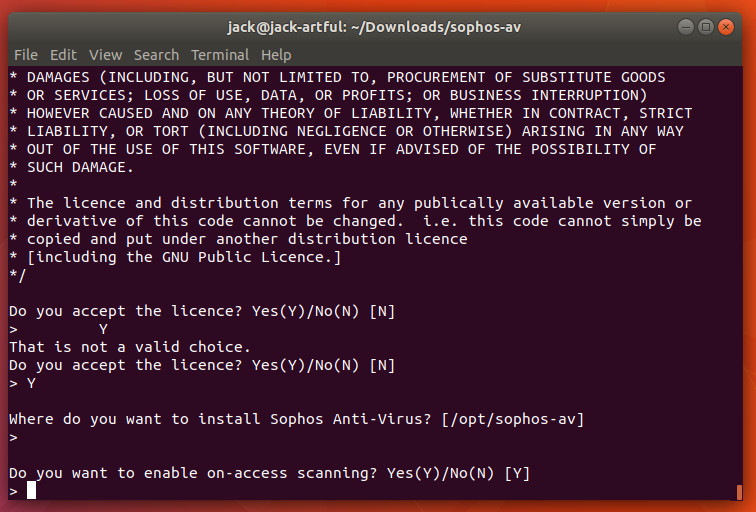
Once you’ve agreed to the Sophos license (and entered a bit of information), you can download the distribution-agnostic installer, extract the file, and install with the command sudo sh install.sh. During the installation (Figure 2), you’ll be asked if you want to enable on-access scanning (real-time).
Figure 2: Enabling real-time scanning for Sophos.
You will also be asked what type of auto-updating to be used for virus definitions. You can choose from Sophos servers, your own servers, or none. You can also choose to install the free or the supported version of Sophos as well as configure a proxy (if necessary).
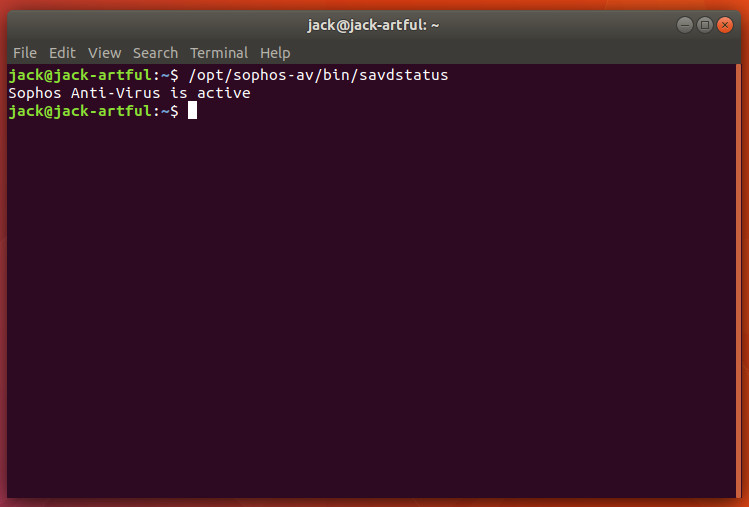
When the installation completes, Sophos is running and protecting your machine in real time. There is no GUI for Sophos, so you’re restricted to the command line. You can check to see if Sophos is running with the command:
/opt/sophos-av/bin/savdstatus
Upon issuing the command, you should see Sophos Anti-Virus is active (Figure 3).
Figure 3: On-access scanning is enabled.
If you want to run an on-demand scan, it is as simple as:
savscan DIRECTORY
Where DIRECTORY is the directory to be scanned.
chkrootkit and rkhunter
No tool is more important to the security of your Linux server than either chkrootkit or rkhunter. These particular tools check for the likes of:
System binaries for rootkit modification
If the interface is in promiscuous mode
lastlog deletions
wtmp deletions
Signs of LKM trojans
Quick and dirty strings replacement
utmp deletions
The chkrootkit tool can be installed on Debian-based systems with the following command:
sudo apt install chkrootkit
The rkhunter tool can be installed on CentOS-like systems with the commands:
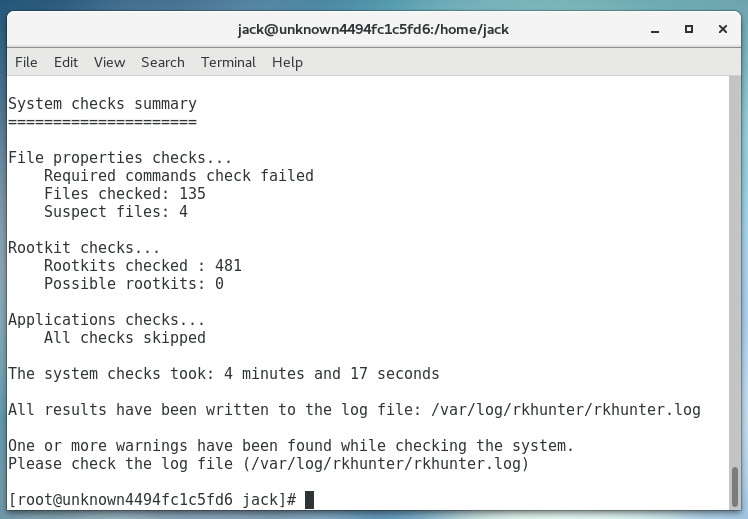
Once installed, the usage is very simple: Issue either sudo chkrootkit or sudo rkhunter -c. Both commands will dive into the system and check for any known rootkits. During the rkhunterscan, you will have to press Enter on your keyboard (when prompted), as it runs through the different stages of the check. When the scan completes, both tools will report back their findings (Figure 4).
Figure 4: The results of an rkhunter scan on CentOS 7.
Stay safe
There are plenty more options out there, but these four tools should go a long way to keep you safe. Whether you only need a command line antivirus/malware/trojan scanner, a GUI, or a tool to hunt for rootkits, you’re covered. Just don’t fall into the trap of thinking that, because you’re using Linux, you are perfectly safe…even without protection.
Learn more about Linux through the free “Introduction to Linux” course from The Linux Foundation and edX.
Speak the word “mainframe” to many millennial techies, and the first things that likely come to mind are in the form of grainy sepia photos of floor-to-ceiling, wall-to-wall computers with big spinning tapes. But that’s far from the reality of the modern mainframe.
Imagine instead up to 240 10-core, 5.2ghz processors, 32TB of RAIM (redundant array of independent memory), hardware-based encryption, and fully hot-swappable hardware components. Those are the specs of the newly released IBM z14 – a single machine that could replace the computing resources of an average corporate data center with room to spare.
The challenge this architecture ecosystem is facing is exactly the perception I kicked off with, and with that, the perception that building a career around such a platform is a mistake. But don’t tell that to the 15 interns who have come through The Linux Foundation’s Open Mainframe Project. With Linux and open source thriving on mainframe, being a “mainframer” has become an intriguing career for students. Just look at some of the work these students have done:
The first electric car was produced in the late 19th century, and by 1900 more than a quarter of cars were electric. Then the internal combustion engine took over, and for a century it dominated. Now, however, electric cars are making a comeback, and both manufacturers and governments are predicting the end of the internal combustion engine.
What happened? The technology used for electric cars improved dramatically, the ecosystem of charging points expanded massively, and the need to be green and energy efficient changed public perceptions.
The first computers were large, centralized, shared systems. Then personal computers emerged, followed by the client-server era, then the servers were linked together into clusters, and most recently networked into cloud systems in order to share data and meet increasing demands for processing power.
We are now seeing a resurgence of large, centralized, shared computer systems. Why? The technology being used for these systems has changed dramatically, the ecosystem of open source and commercial software has expanded greatly, and the need to be green and energy efficient has changed public perceptions.
Additionally, security is a top concern of CIOs; big data is growing exponentially, and IT is being asked to deliver actionable insights faster than ever.
This is where large, centralized, shared computer systems can have significant advantages. Security has a smaller perimeter to protect. Data can be stored in one database, without sharding. And applications can be located on the same system as the data, avoiding latency and network delays.
Technologies for Security, Speed and Scale
Two years ago at LinuxCon in Seattle, IBM announced LinuxONE – its enterprise Linux-only server. This year at Open Source Summit in Los Angeles, we showcased where LinuxONE is being used in practice, why the technology it’s built on is market-leading, and how it is able to address the key priorities of security, speed and scale. We also announced a new version of IBM LinuxONE – Emperor II. You can find out more at www.ibm.com/linuxone.
The unique and breakthrough security technology for LinuxONE is the IBM Secure Service Container. This provides a framework for securely deploying and running software appliances. Building on the logical partitions (LPARs) of LinuxONE which provide peer isolation certified at EAL5+, the Secure Service Container also pervasively encrypts the data, validates the appliance code at boot time, and protects against the misuse of privileged user credentials by internal or external threats with the isolation of the data and applications from shell or command line access.
In the future, it is planned to integrate Docker and open-source container technologies with the IBM Secure Service Container framework to create a highly secure environment for building and deploying applications that embrace cloud native and cloud ready application development tooling and practices. A beta of this technology integration will be available for user engagement via http://ibm.biz/sscbeta.
The new IBM LinuxONE Emperor II is based on IBM Z technology and uses the industry’s fastest commercially available microprocessor, running at 5.2GHz. Combined with instruction-set optimization and capabilities such as pauseless garbage collection, this delivers industry-leading speed including 2.6x better performance for Java workloads.
Up to 170 cores and up to 32TB of memory then enable IBM LinuxONE to deliver extreme scalability, able to support up to two million Docker containers, a 17TB MongoDB database on a single system, and up to 377 billion database transactions per day.
IBM LinuxONE in practice
During the IBM keynote at Open Source Summit, we shared the story of The Plastic Bank – a social enterprise that is both reducing ocean pollution and helping to address global poverty, by providing the ability for people in developing nations to recycle plastic in exchange for digital tokens that they can use to buy goods.
The Plastic Bank needed to provide a highly secure, auditable system that could scale exponentially from Day One. They chose to work with systems integrator and managed service provider, Cognition Foundry, and IBM to run Blockchain on IBM LinuxONE. You can find out the reasons behind their choice in a blog by The Plastic Bank’s Shaun Frankson.
Like electric cars, we believe that highly secure, highly scalable and highly engineered Linux servers have the power to transform the market and change the world. To find out more, visit the IBM LinuxONE news page at www.ibm.com/linuxone/news and read the analyst reports.
Adam Jollans is currently a portfolio marketing manager in the worldwide LinuxONE marketing team, responsible for developing the marketing strategy for IBM’s LinuxONE server and its ecosystem.
With microservice architecture where it is today, the gap between the good, the bad, and the ugly, is now enormous in terms of being able to deliver high-quality software with speed and efficiency. In fact, the difference is so huge now that it was demonstrated by Bob Wise, CTO of Samsung’s cloud native computing team in a talk that showed high-performance organizations have 200 times more frequent deployments, 24 times faster recovery from failure, three times lower change failure rate and 2,555 times shorter lead times than low-performance organizations. That’s a huge difference, to say the least, and if your organization is on the lower end of that spectrum, the time to panic was yesterday.