Thriving open source projects have many users, and the most active have thousands of authors contributing. There are now more than 60 million open source repositories, but the vast majority are just a public workspace for a single individual. What differentiates the most successful open source projects? One commonality is that most of them are backed by either one company or a group of companies collaborating together.
So, tracking the projects with the highest developer velocity can help illuminate promising areas in which to get involved, and what are likely to be the successful platforms over the next several years.
Rather than debate whether to measure high-velocity projects via commits, authors, or comments and pull requests, we use a bubble chart to show all 3 axes of data, and plot on a log-log chart to show the data across large scales.
Sysadmins are increasingly looking to expand their skillsets and carve out new opportunities. With that in mind, many sysadmins are looking to the world of DevOps. At lots of organizations, DevOps has emerged as the most effective method for application delivery, including in the cloud.
One of the drivers of the DevOps movement is that organizations simply have limits on the number of IT staffers, sysadmins, and developers that they can employ. Cross-pollination of traditional skillsets makes good business sense. And, as Jeff Cogswell has noted, “The line between hardware and software is more blurry than it used to be.”
Cogswell also laid out a good recipe for what specific skills to master in order to meet DevOps goals:
Learn what virtualization is and how, through software alone, you can provision a virtual computer and install an operating system and a software stack.
Study emerging open source platforms and frameworks, such as OpenStack.
Learn network virtualization.
Learn to use configuration management tools, such as Puppet and Chef.
All of these pursuits can help sysadmins appeal to organizations looking to create more collaborative and efficient working environments. Additionally, as mentioned earlier, fluency and facility with emerging cloud, virtualization, and configuration management tools can make a substantial compensation difference for sysadmins.
Training options
Sysadmins interested in becoming more fluent with DevOps skills and practices can start by exploring Dice’s Skills Center. A look there makes it clear that skillsets surrounding configuration management tools, containers, and open platforms are much in demand. Savvy sysadmins can combine existing competencies with these skillsets and move the needle.
Flexible training options are available for these tools. For example, if you just want to take Puppet for a test drive within a virtual machine, you can do so here, or there are instructor-led and online training options detailed on the same page. For example, you can chart a learning roadmap for Puppet, find in-person or online training options for Chef, or sample some of the available online tutorials.
A great way to learn more about cloud skills is to open an account on Amazon Web Services and work with EC2 technology. OpenStack training options also abound. The Linux Foundation, for example, offers an OpenStack Administration Fundamentals course, which serves as preparation for certification. The course is available bundled with the COA exam, enabling students to learn the skills they need to work as an OpenStack-skilled administrator and get the certification to prove it.
Finally, scripting and development skills can also expand a sysadmin’s horizons and fit in with organizational DevOps goals. Scripting skills, from Python to Perl, are a valuable part of sysadmin’s toolkit. The Linux Foundation offers coursework in this area, too, including Developing Applications for Linux and Linux Performance Tuning. Additionally, The Foundation offers an Introduction to DevOps course that is worth exploring.
In the next article, we will explore specific professional certifications and relevant training to help you move to the next level.
Another way to evaluate GitHub organizations is based on their activity. Open Hub data indicates that 61 percent of the most active organizations on GitHub organizations are commercial enterprises. Most of these companies are working on projects where almost all of the contributors are also employees. Non-profit organizations like those supporting Linux and Kubernetes on average have the highest number of commits. Education organizations have the fewest because many of the projects they maintain are just ways to manage syllabi and homework assignments.
Ansible is designed as the simplest deployment tool that actually works. What that means is that it’s not a full programming language. You write YAML templates that define tasks and list whatever tasks you need to automate your job.
Most people think of Ansible as a souped-up version of “SSH in a ‘for’ loop,” and that’s true for simple use cases. But really Ansible is about tasks, not about SSH. For a lot of use cases, we connect via SSH but also support things like Windows Remote Management (WinRM) for Windows machines, different protocols for network devices, and the HTTPS APIs that are the lingua franca of cloud services.
In a cloud, Ansible can operate on two separate layers: the control plane and the on-instance resources. The control plane consists of everything not running on the OS.
In today’s data networks, traffic analysis — determining which links are getting congested and why — is usually done by computers at the network’s edge, which try to infer the state of the network from the times at which different data packets reach their destinations.
If the routers inside the network could instead report on their own circumstances, network analysis would be much more precise and efficient, enabling network operators to more rapidly address problems. To that end, router manufacturers have begun equipping their routers with counters that can report on the number of data packets a router has processed in a given time interval.
But raw number counts are only so useful, and giving routers a special-purpose monitoring circuit for every new measurement an operator might want to make isn’t practical. The alternative is for routers to ship data packets to outside servers for more complex analysis, but that technique doesn’t scale well.
We look at some tools that can help take the pain out of managing plugins.
The Vim text editor [1] is one of the most popular pieces of free software ever written. Since its first release in 1991, Vim has become available for all major operating systems. It is installed by default on most Linux distributions, and, in the 2016 LinuxQuestions Reader Choice Awards, outpolled its long-time rival Emacs by more than three to one – being the first choice of more than 30 percent of responders [2]. Much of this popularity is due to the degree of customization created by its plugins – almost 1,600, according to the VimAwesome site [3], and even that number may be low.
Most users, of course, use fewer than a dozen Vim plugins. However, even that number can be difficult to delete, although that is probably unnecessary with a recent version of Vim. The truth is, Vim’s original design was not intended for plugins.
First, if you are not sure what Kafka is, see this article.
Kafka consists of records, topics, consumers, producers, brokers, logs, partitions, and clusters. Records can have keys (optional), values, and timestamps. Kafka records are immutable. A Kafka Topic is a stream of records ("/orders", "/user-signups"). You can think of a topic as a feed name. A topic has a log which is the topic’s storage on disk. A topic log is broken up into partitions and segments. The Kafka Producer API is used to produce streams of data records. The Kafka Consumer API is used to consume a stream of records from Kafka. A broker is a Kafka server that runs in a Kafka cluster. Kafka brokers form a cluster. The Kafka cluster consists of many Kafka brokers on many servers. Broker some times refer to more of a logical system or as Kafka as a whole.
Kafka uses ZooKeeper to manage the cluster. ZooKeeper is used to coordinate the brokers/cluster topology. ZooKeeper is a consistent file system for configuration information. ZooKeeper is used for leadership election for broker topic partition leaders.
Unlike servers or networking equipment, which are typically hacked through isolated access points and exist in sandboxed and supervised environments, IoT devices are more vulnerable to malevolent threat actors.
The underlying risk to a larger network
If one device is compromised, it’s next to impossible for a vendor to issue an OTA and update millions of devices. An insecure device in a network is enough to put the whole network and the devices connected to it in jeopardy: servers, smartphones, and desktops in addition to IoT devices, letting a single device to compromise confidential data from bank and health information.
Vendors are startups and SMBs
IoT companies are mostly startups and SMBs and have enough fund only to back their R&D and marketing team. They don’t have the funds to hire an army of security experts and ethical hackers to ensure secure deployments. As an alternative, they bake security features in IoT’s software environment that is often outsourced to a enterprises app development company in Asia Pacific to cut cost and boost margin in a hyper competitive market. Many of the IoT devices on today’s shelves are by necessity inexpensive to manufacture, which means companies are less likely to spend high dollar on security throughout the development process.
The security Surprises
I do laundry every Sunday afternoon. One fine day my smart washing machine did not work. I unlocked my iPhone and tried to reset it; it did not. The very moment the machine sent me a notification “We hacked your machine and it will only work with our detergent now”. So I ordered a year’s supply of the detergent even when I did not want to.
This did not happen with me. But it might.
A few months ago, a group of naysayers hijacked a smart refrigerator to make it show pornographic spam while making ice cubes. Baby monitors can be turned into eavesdropping devices. CIA tools can hack IoT devices, such as Samsung SmartTVs, and turn them into a bugging device.
Gartner, Inc. forecasts that 6.4 billion connected things are in use worldwide in 2016 and will reach 20.8 billion by 2020.
The two categories of security threats
Threats to IoT can be divided into two categories. First, devices are taken over to do something they are not intended to do, like a home surveillance system that uploads photos to Instagram every minute
Second, devices can be commandeered to do precisely what they are supposed to do but with a catch. A hijacked Nest will set room temperature beyond human tolerance limit.
Vendors are doing their bit from putting end point security suites to data encryption. The question is, is this enough?
1. The everyday security
Defending and fortifying the network connecting IoT devices to back-end systems over the internet, IoT network security, owing to lack of common standards and protocols unlike traditional network security devices poses significant problems and larger difficulties.
An everyday endpoint security suite with antivirus, antispyware and firewalls and intrusion prevention and detection systems shall help.
2. Passwords, biometrics and beyond
Letting users to authenticate IoT devices from a username and password combination to more sophisticated verification mechanisms such as two-way authentication, digital certificates, retina and fingerprint scanners.
The catch is IoT authentication scenarios are not man-to-machine but machine-to-machine. Biometric methods can only stop a person from accessing the IoT device, not another machine or ‘talking’ smart device.
3. Encrypting data and communication
Encrypting data stored in an IoT device, on cloud and in transit will ensure that an unsolicited device or human can’t get access to it. Standard cryptographic algorithms ensure data integrity and avert data sniffing by hackers.
Again, IoT fragmentation confines standard encryption methods and procedures in IoT implementation.
4. Public Key Infrastructure
Offering comprehensive cryptographic key and life-cycle capabilities, X.509 digital certificate and providing public/private key generation, delivery, supervision, and cancelation.
The specification of low-cost IoT devices may confine or avert possibility to employ Public Key Infrastructure.
Vendors for the sake of security must start including Digital certificates hardcoded to IoT devices at the time of distribution and letting an authorized third party IoT device activate it at the time of authentication. DigiCert, and Gemalto can help.
5. AI and Machine Learning
Gathering, combining, monitoring, and standardizing data from various IoT devices in a system and offering disallowed reporting and warning on specific events, particularly when they fall outside the purview of established policies.
Artificial intelligence assisted data mining will give way to more analytical modeling and glitch detection, but these abilities are still evolving.
IoT security analytics will gradually be needed to sense IoT-specific attacks and intrusions that are not recognized by old-school intrusion prevention system like an end point security suite.
6. API Security
The data to and from IoT devices must be authenticated before acquiring any actionable value. The data can be from a database, and mobile apps using familiar REST-based APIs.
API security will ensure only approved devices, 3rd party vendors, and mobile application are interacting with APIs, perceiving upcoming threats and attacks against particular APIs, defending the integrity of data in transit.
Will my washing machine ask for a ransom?
The ongoing evolution of IoT-specific security threats will certainly force innovation in this space. Newer IoT-specific security technologies will appear soon.
It’s authoritative for digital businesses today to balance the business goals that IoT-connected products can bring with the recognition that the smart devices have turn out to be a striking attack plane for pranksters, hackers and even cybercriminals looking to create nuisance, disruption and gain access to sensitive data.
Remember when you first started out with Linux? Depending on the environment you’re coming from, the learning curve can be somewhat challenging. Take, for instance, the number of commands found in /usr/bin alone. On my current Elementary OS system, that number is 1,944. Of course, not all of those are actual commands (or commands I would use), but the number is significant.
Because of that (and many other differences from other platforms), new users (and some already skilled users) need a bit of help now and then.
For every administrator, there are certain skills that are must-have:
Understanding of the platform
Understanding commands
Shell scripting
When you seek out assistance, sometimes you’ll be met with RTFM (Read the Fine/Freaking/Funky Manual). That doesn’t always help when you have no idea what you’re looking for. That’s when you’ll be glad for apps like Guide to Linux.
Unlike most of the content you’ll find here on Linux.com, this particular article is about an Android app. Why? Because this particular app happens to be geared toward helping users learn Linux.
And it does a fine job.
I’m going to give you fair warning about this app—it’s not perfect. Guide to Linux is filled with broken English, bad punctuation, and (if you’re a purist) it never mentions GNU. On top of that, one particular feature (one that would normally be very helpful to users) doesn’t function enough to be useful. Outside of that, Guide to Linux might well be one of your best bets for having a mobile “pocket guide” to the Linux platform.
With this app, you’ll enjoy:
Offline usage.
Linux Tutorial.
Details of all basic and advanced Linux commands of Linux.
Includes command examples and syntax.
Dedicated Shell Script module.
On top of that, Guide to Linux is free (although it does contain ads). If you want to get rid of the ads, there’s an in-app purchase ($2.99 USD/year) to take care of that.
Let’s install this app and then take a look at the constituent parts.
Installation
Like all Android apps, installation of Guide to Linux is incredibly simple. All you have to do is follow these easy steps:
Open up the Google Play Store on your Android device
Search for Guide to Linux
Locate and tap the entry by Essence Infotech
Tap Install
Allow the installation to complete
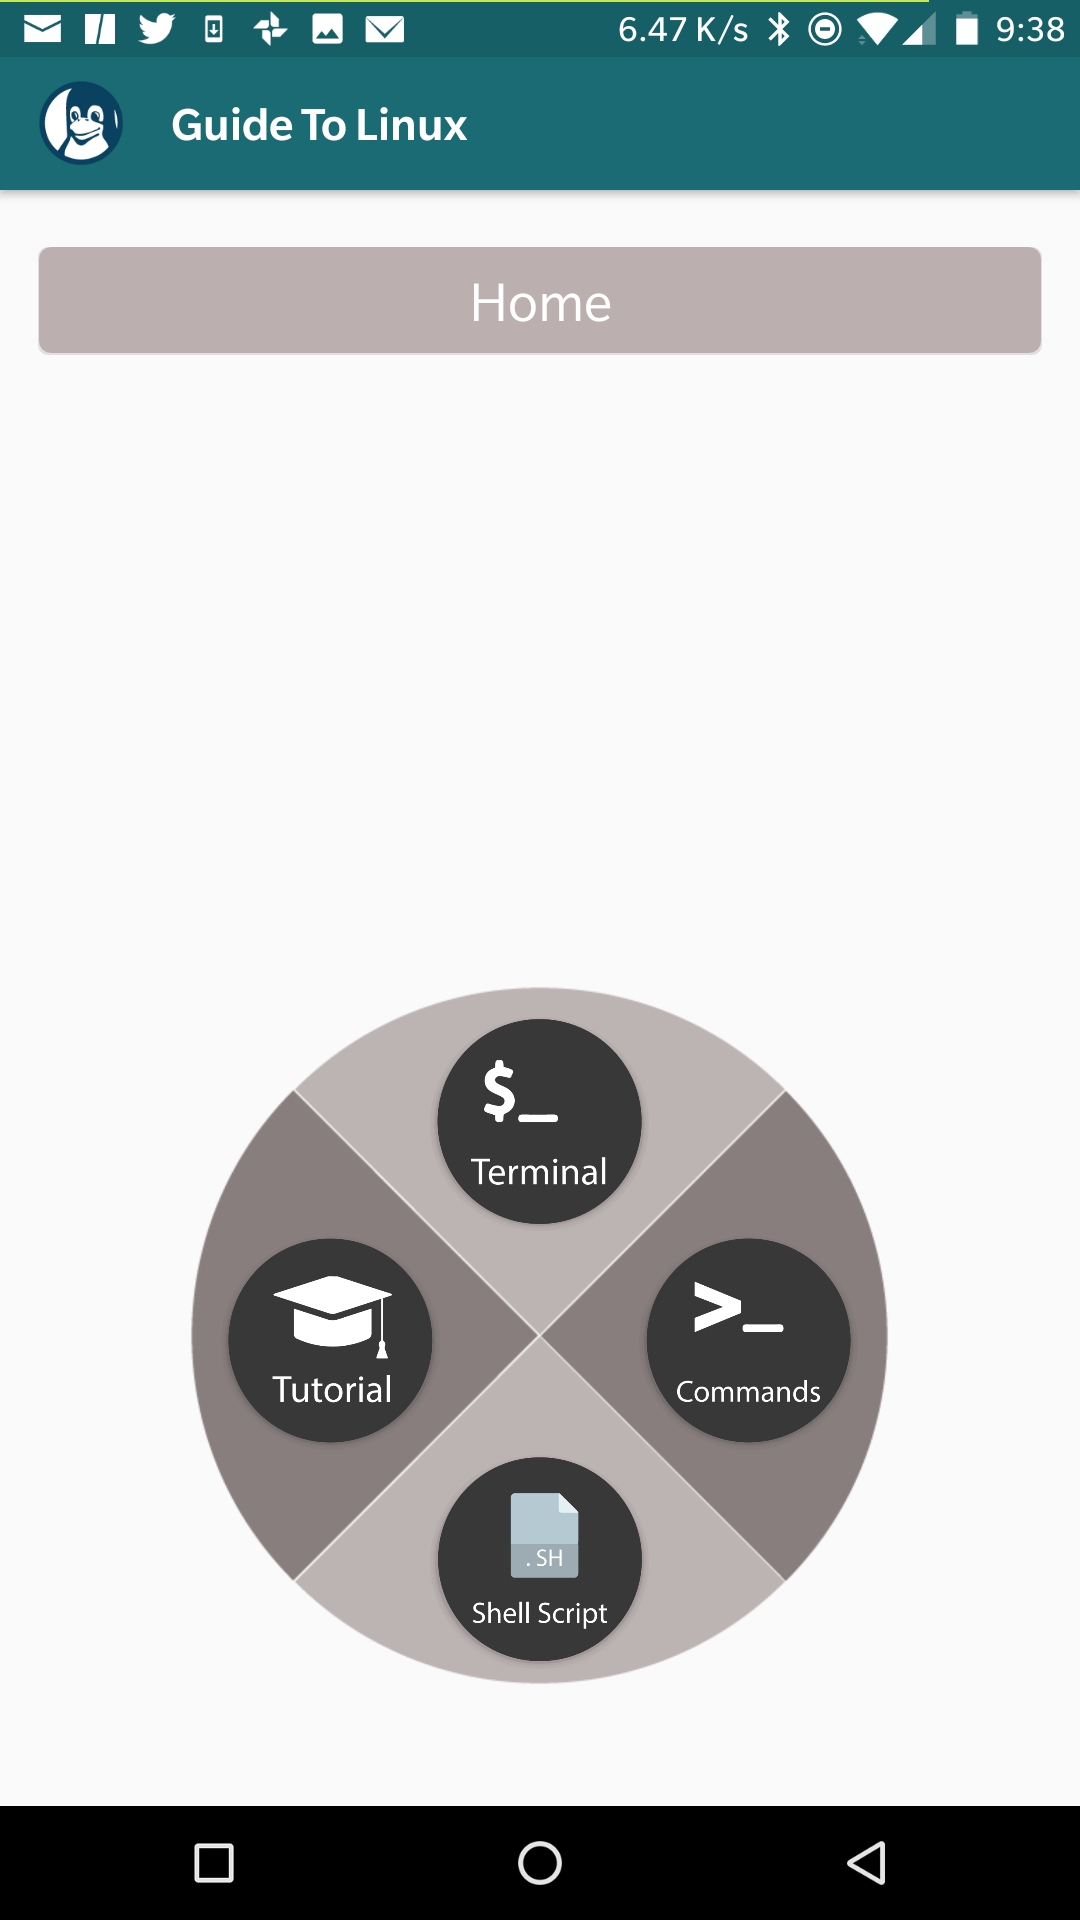
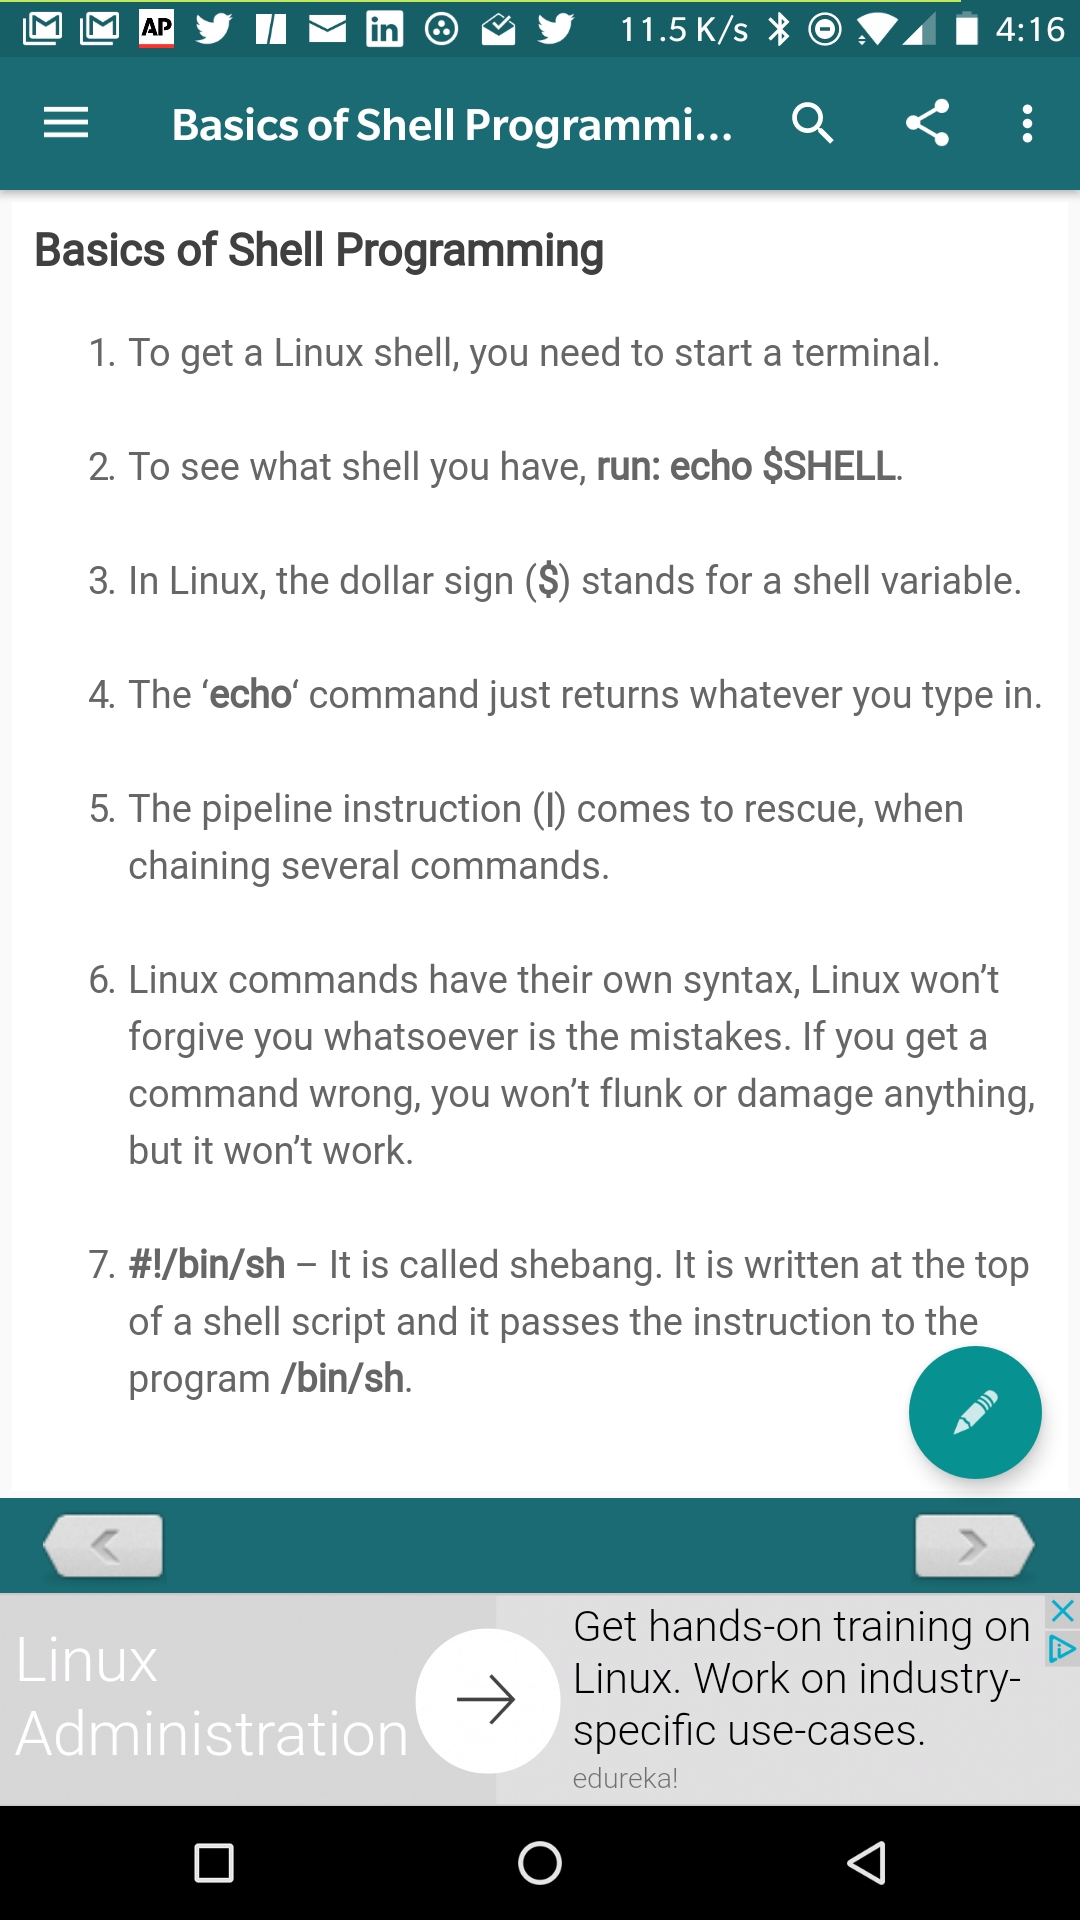
Figure 1: The Guide to Linux main window.
Once installed, you’ll find the launcher for Guide to Linux in either your App Drawer or on your home screen (or both). Tap the icon to launch the app.
Usage
Let’s take a look at the individual features that make up Guide to Linux. You will probably find some features more helpful than others, and your experience will vary. Before we break it down, I’ll make mention of the interface. The developer has done a great job of creating an easy-to-use interface for the app.
From the main window (Figure 1), you can gain easy access to the four features.
Tap any one of the four icons to launch a feature and you’re ready to learn.
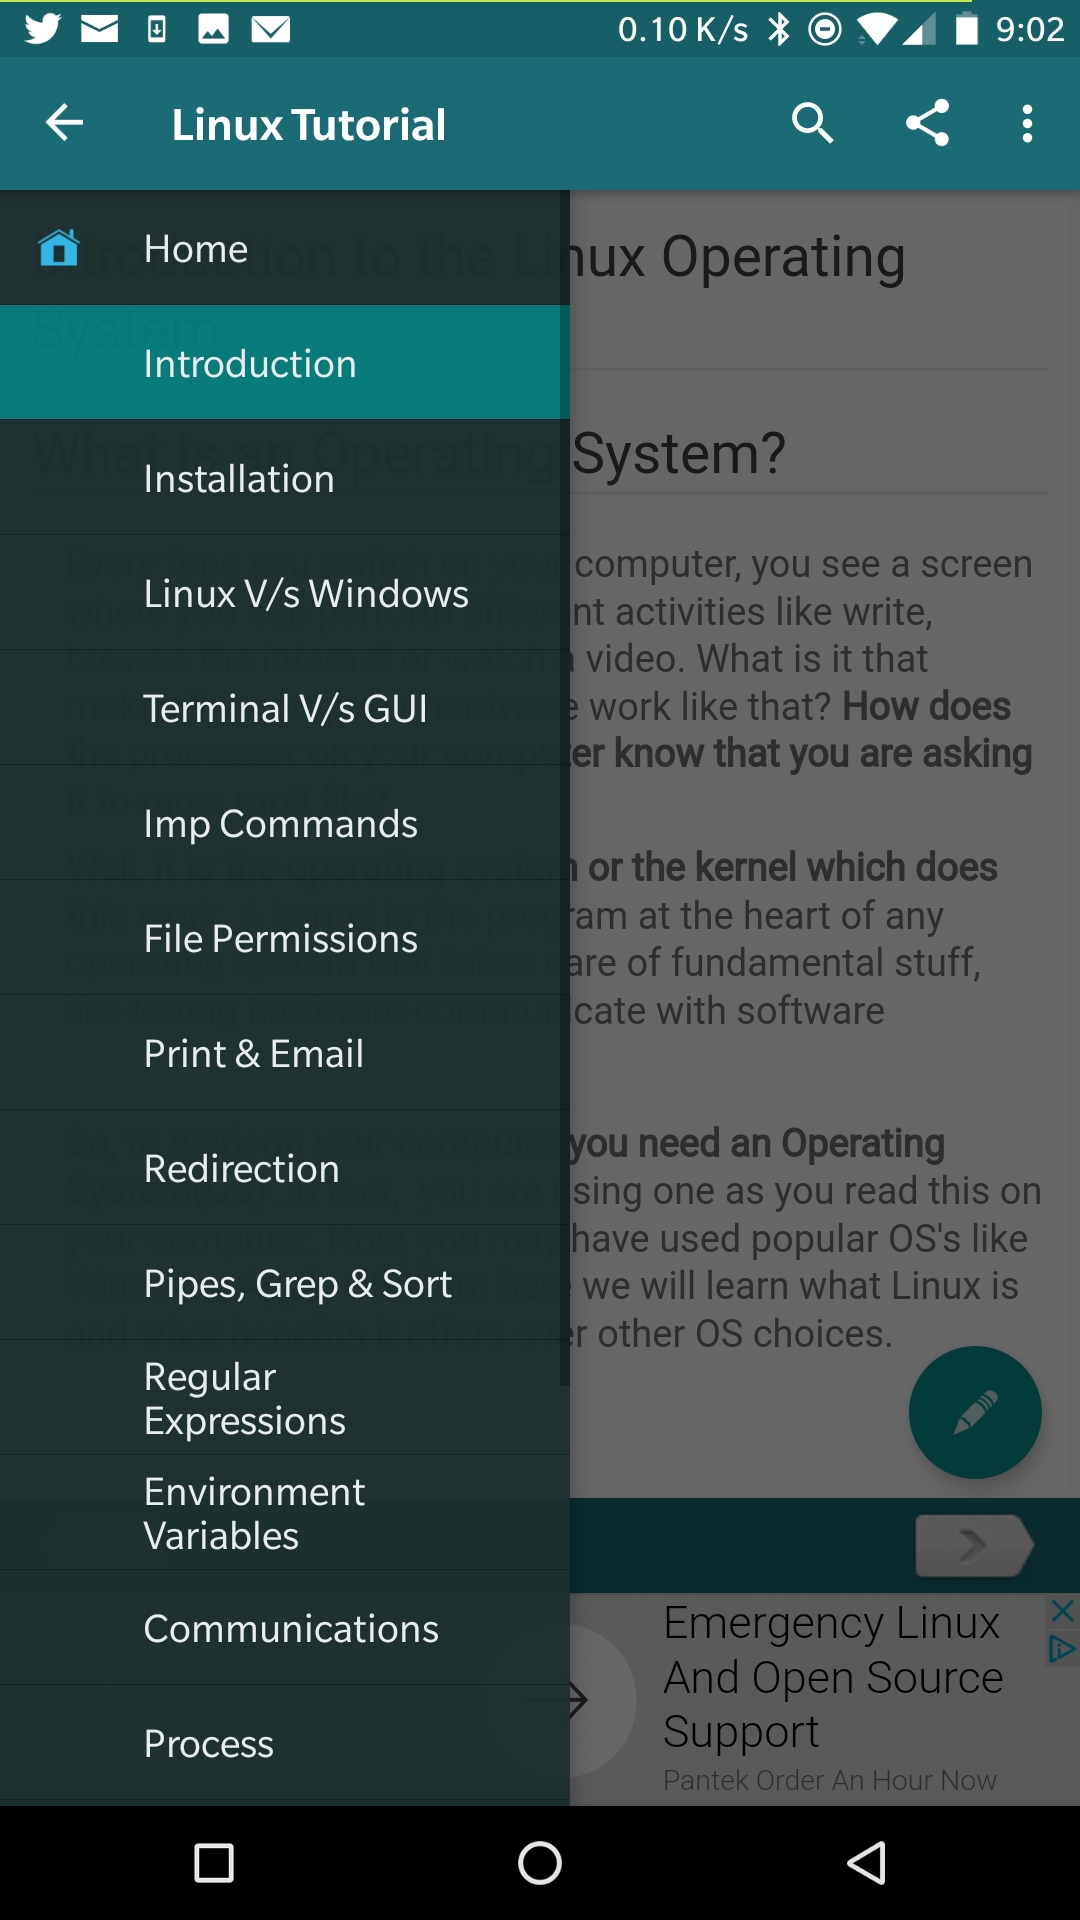
Figure 2: The tutorial begins at the beginning.
Tutorial
Let’s start out with the most newbie-friendly feature of the app—Tutorial. Open up that feature and you’ll be greeted by the first section of the tutorial, “Introduction to the Linux Operating System” (Figure 2).
If you tap the “hamburger menu” (three horizontal lines in the top left corner), the Table of Contents are revealed (Figure 3), so you can select any of the available sections within the Tutorial.
Figure 3: The Tutorial Table of Contents.
Unless you haven’t figured it out by now, the Tutorial section of Guide to Linux is a collection of short essays on each topic. The essays include pictures and (in some cases) links that will send you to specific web sites (as needed to suit a topic). There is no interaction here, just reading. However, this is a great place to start, as the developer has done a solid job of describing the various sections (grammar notwithstanding).
Although you will see a search option at the top of the window, I haven’t found that feature to be even remotely effective—but it’s there for you to try.
For new Linux users, looking to add Linux administration to their toolkit, you’ll want to read through this entire Tutorial. Once you’ve done that, move on to the next section.
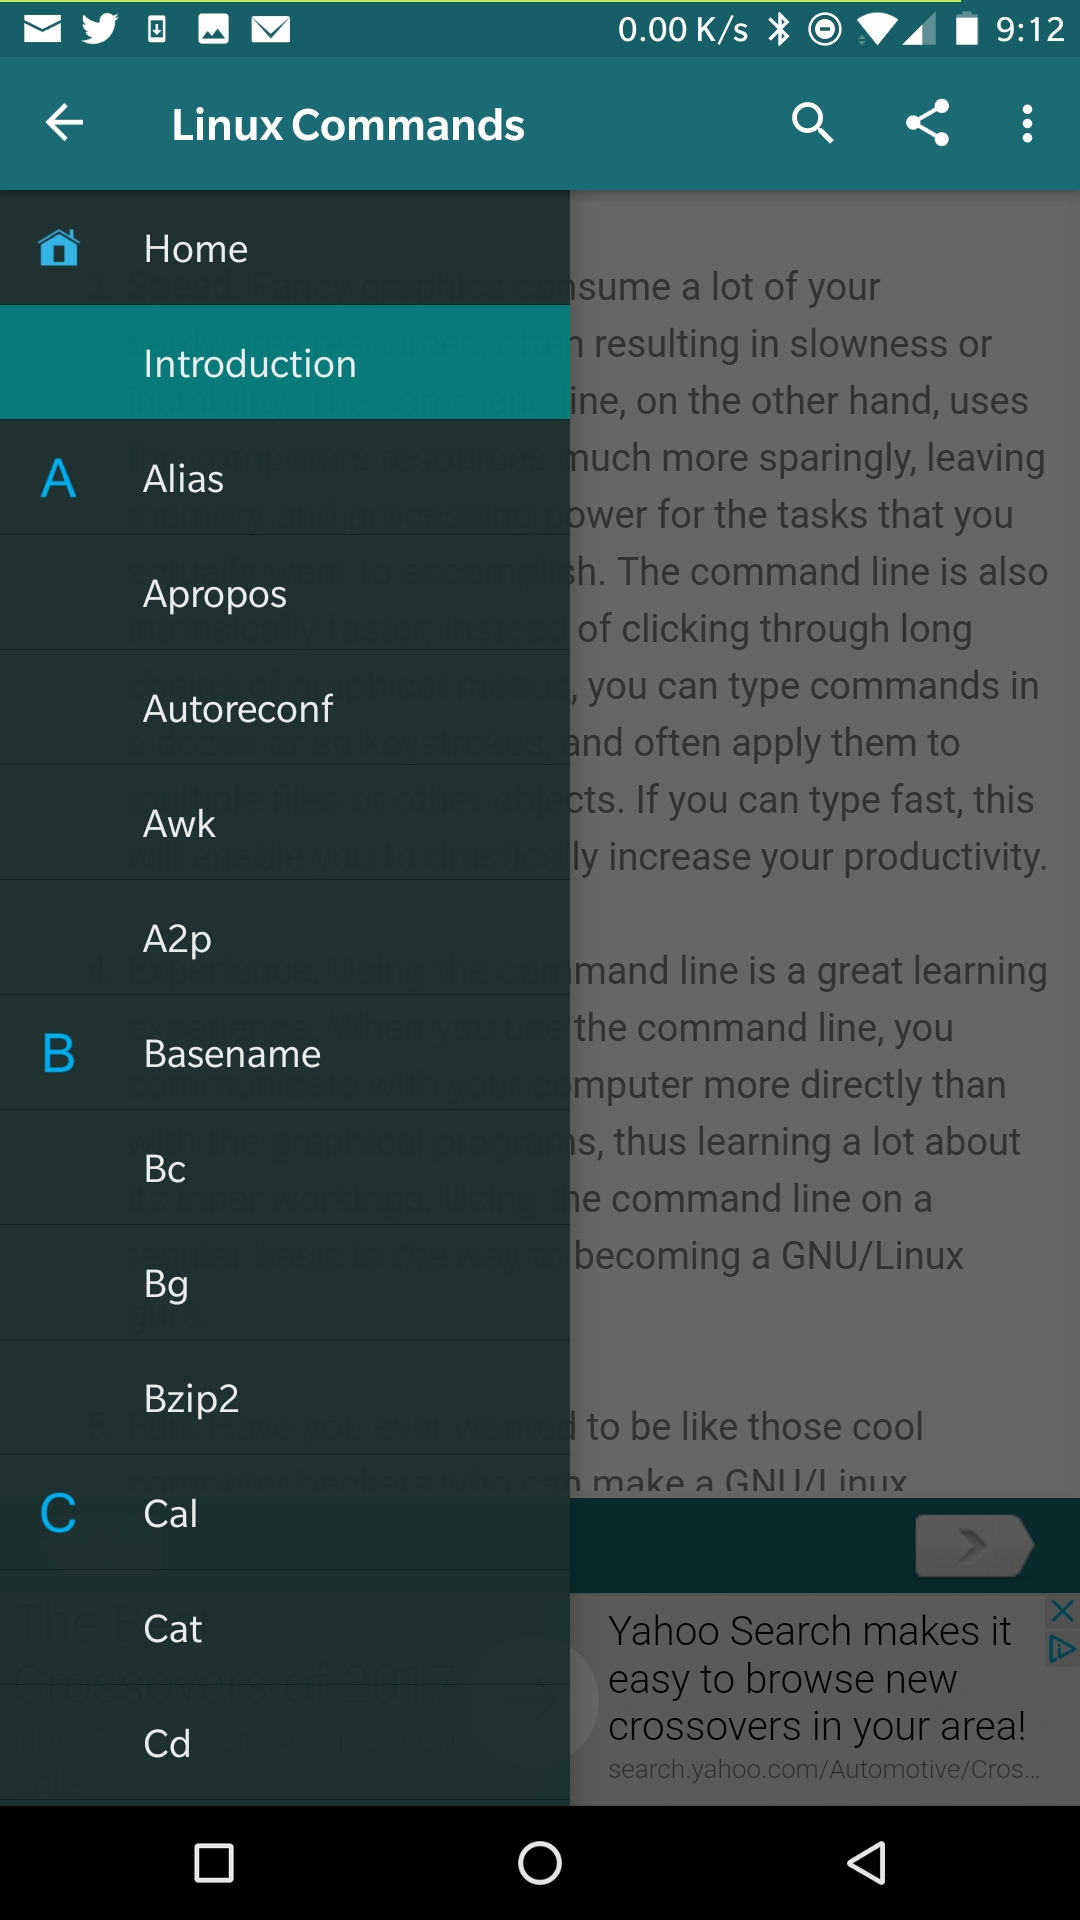
Commands
The Commands feature is like having the man pages, in hand, for many of the most frequently used Linux commands. When you first open this, you will be greeted by an introduction that explains the advantage of using commands.
Figure 4: The Commands sidebar allows you to check out any of the listed commands.
Once you’ve read through that you can either tap the right-facing arrow (at the bottom of the screen) or tap the “hamburger menu” and then select the command you want to learn about from the sidebar (Figure 4).
Tap on one of the commands and you can then read through the explanation of the command in question. Each page explains the command and its options as well as offers up examples of how to use the command.
Shell Script
At this point, you’re starting to understand Linux and you have a solid grasp on commands. Now it’s time to start understanding shell scripts. This section is set up in the same fashion as is the Tutorial and Commands sections.
You can open up a sidebar Table of Contents to take and then open up any of the sections that comprise the Shell Script tutorial (Figure 5).
Figure 5: The Shell Script section should look familiar by now.
Once again, the developer has done a great job of explaining how to get the most out of shell scripting. For anyone interested in learning the ins and outs of shell scripting, this is a pretty good place to start.
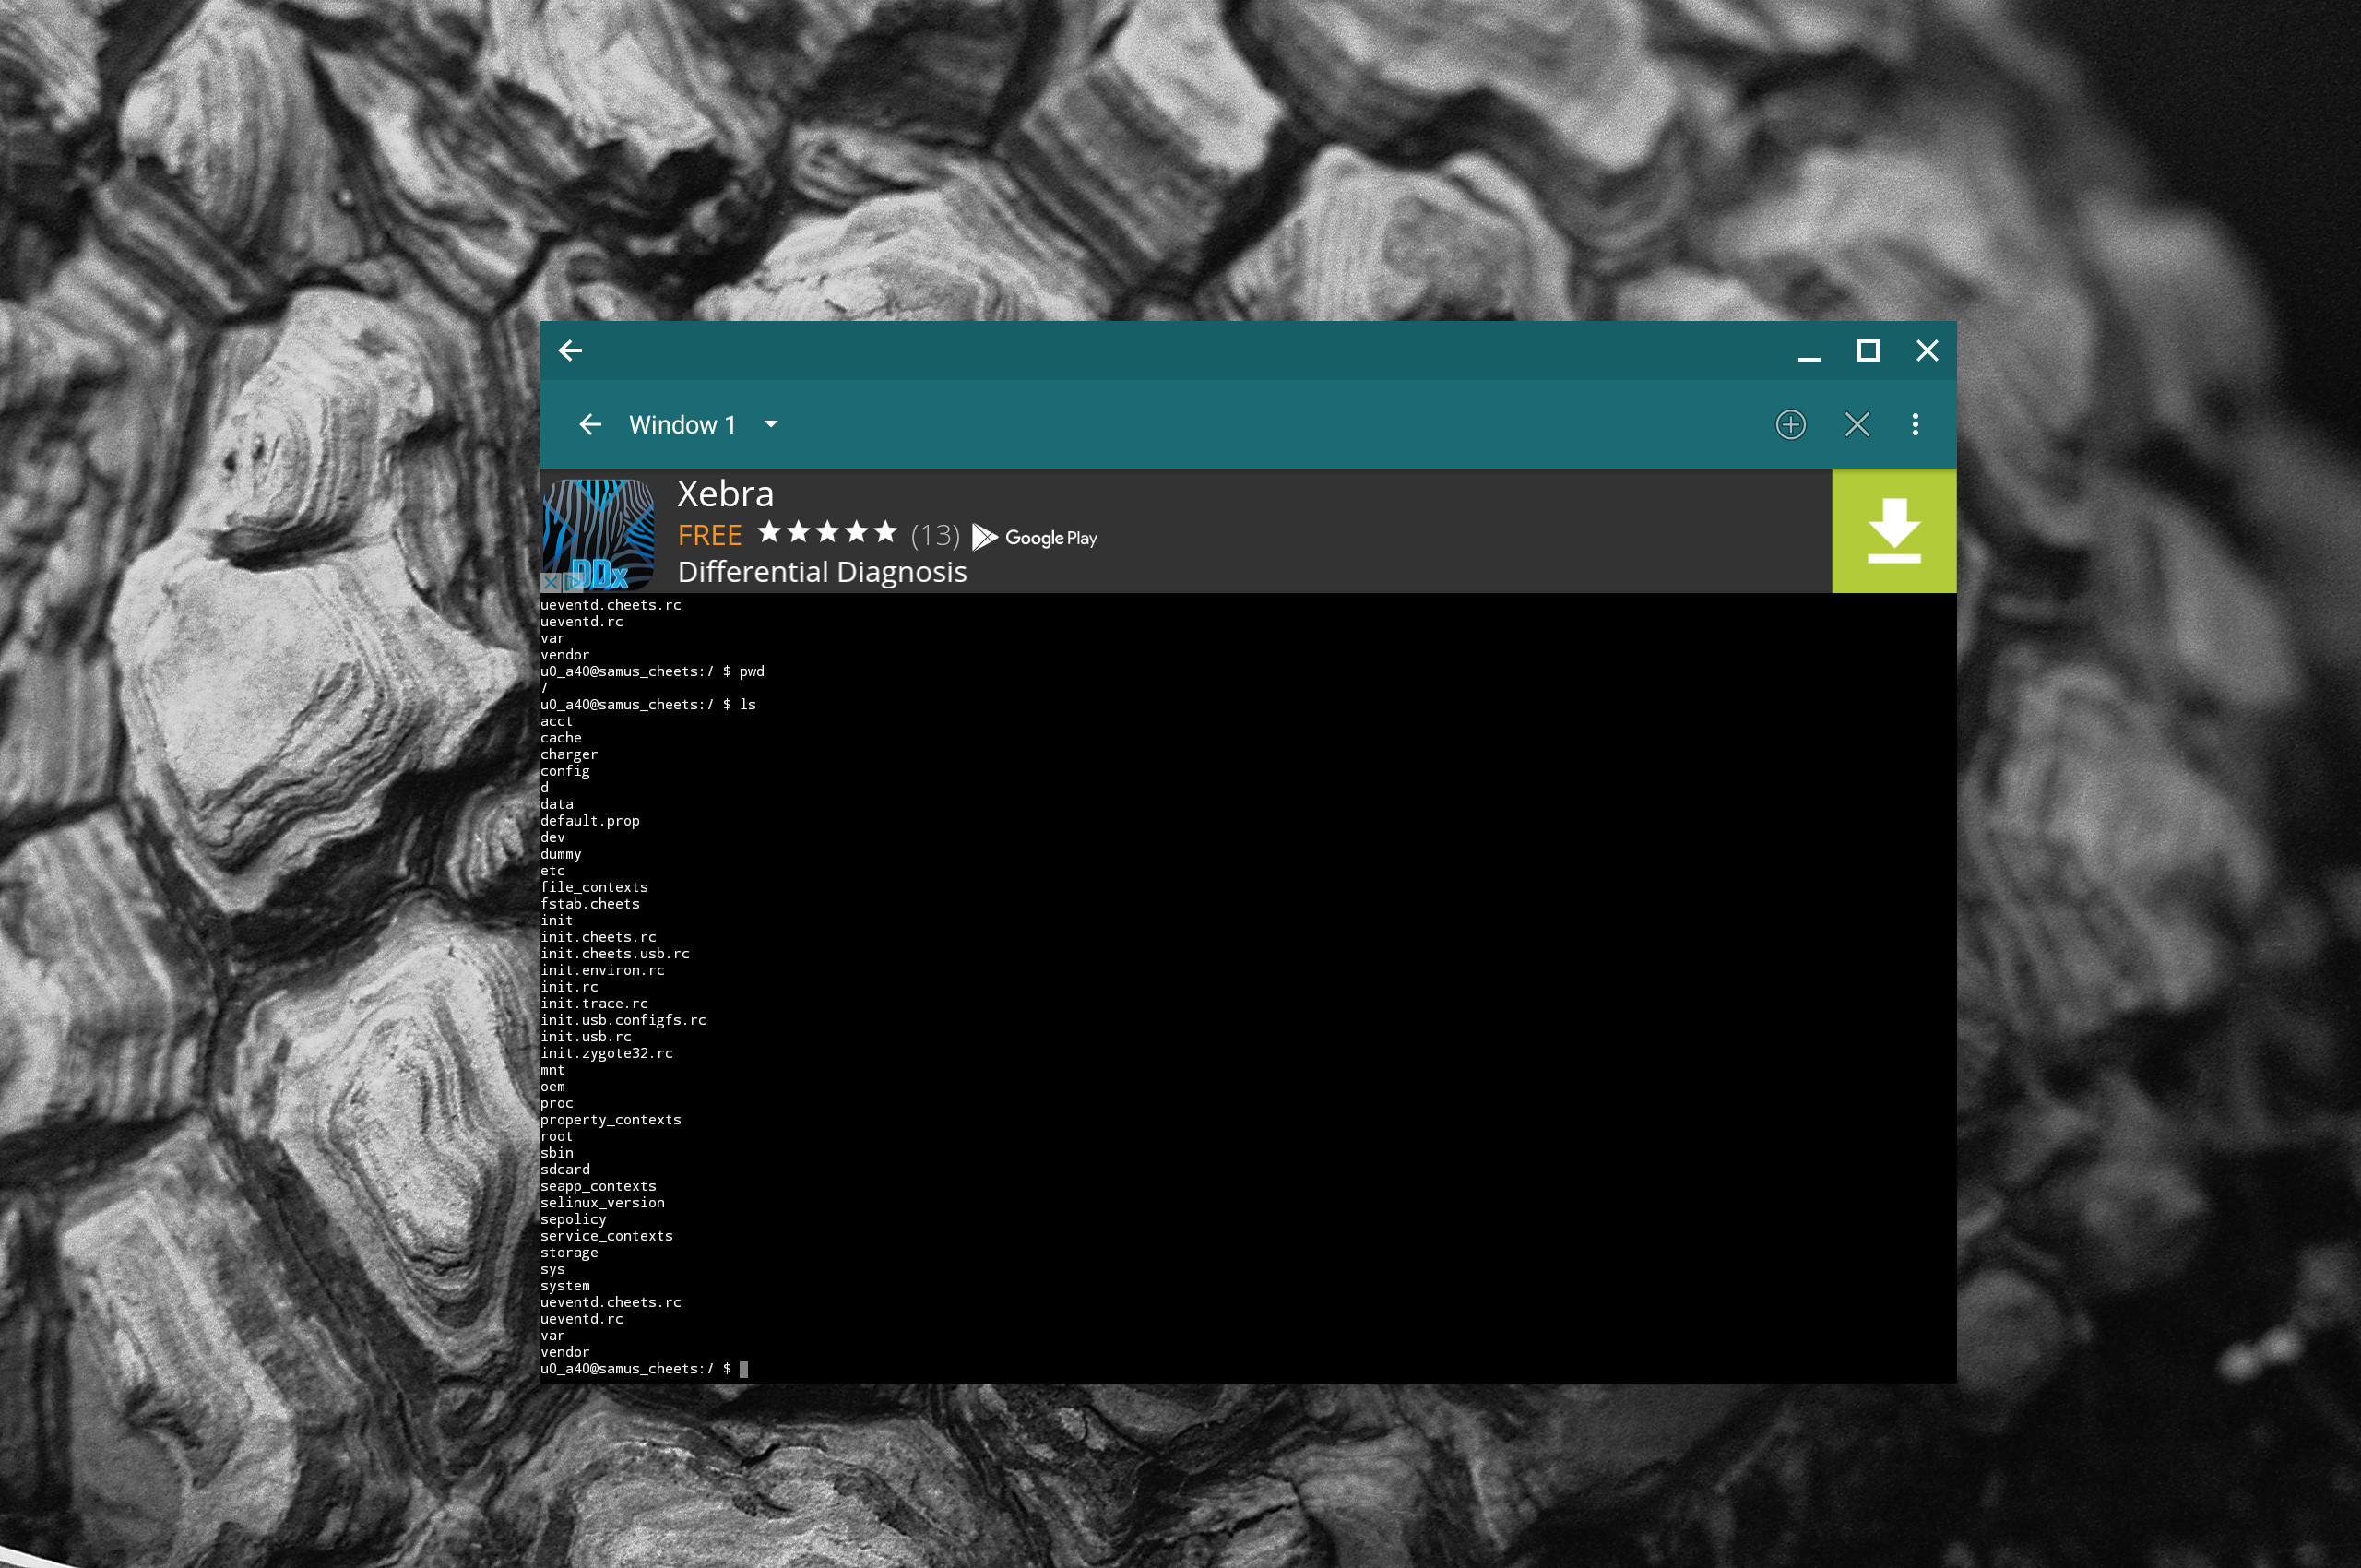
Terminal
Now we get to the section where your mileage may vary. The developer has included a terminal emulator with the app. Unfortunately, when installing this on an unrooted Android device, you’ll find yourself locked into a read-only file system, where most of the commands simply won’t work. However, I did install Guide to Linux on a Pixel 2 (via the Android app store) and was able to get a bit more usage from the feature (if only slightly). On a OnePlus 3 (not rooted), no matter what directory I change into, I get the same “permission denied” error, even for a simple ls command.
On the Chromebook, however, all is well (Figure 6). Sort of. We’re still working with a read-only file system (so you cannot actually work with or create new files).
Figure 6: Denied!
Remember, this isn’t actually a full-blown terminal, but a way for new users to understand how the terminal works. Unfortunately, most users are going to find themselves frustrated with this feature of the tool, simply because they cannot put to use what they’ve learned within the other sections. It might behoove the developer to re-tool the terminal feature as a sandboxed Linux file system, so users could actually learn with it. Every time a user would open that tool, it could revert to its original state. Just a thought.
In the end…
Even with the terminal feature being a bit hamstrung by the read-only filesystem (almost to the point of being useless), Guide to Linux is a great tool for users new to Linux. With this guide to Linux, you’ll learn enough about Linux, commands, and shell scripting to feel like you have a head start, even before you install that first distribution.
Learn more about Linux through the free “Introduction to Linux” course from The Linux Foundation and edX.
The Linux Foundation has released their anticipated annual report for job seekers and hiring managers containing key info on in-demand skills and outlook. More top stories and open source opinion articles in this week’s digest
1) The Linux Foundation’s 2017 Jobs Report (#OSSJobs) has been released and the findings are illuminating for seekers and hiring managers alike.
3) “Microsoft and Red Hat are expanding the parameters of a relationship first struck in 2015, bringing Azure and SQL Server closer to Red Hat’s container orchestration product.”