Containers can simulate real-life workloads for enterprise applications without the high cost of other solutions.
Software performance and scalability are frequent topics when we talk about application development. A big reason for that is an application’s performance and scalability directly affect its success in the market. An application, no matter how good its user interface, won’t claim market share if its response time is sluggish.
This is why we spend so much time improving an application’s performance and scalability as its user base grows.
A compiler is just a program that translates other programs. Traditional compilers translate source code into executable machine code that your computer understands. (Some compilers translate source code into another programming language. These compilers are called source-to-source translators or transpilers.) LLVM is a widely used compiler project, consisting of many modular compiler tools.
Traditional compiler design comprises three parts:
When a radically different technology comes along it usually takes time before we figure out how to apply it. When we had steam engines running factories there was one engine in each factory with a giant driveshaft running through the whole factory. When the electric engine came along people started replacing the giant steam engine with a giant electric motor. It took time before people understood that they could deploy several small motors in different parts of the factory and connect electric cables rather than having a common driveshaft. It takes time to understand the technology and its applicability.
The situation with unikernels is similar. We have this new thing and to some extent we’re using it to replace some general purpose operating system workloads. But we’re still very much limited by how we think about operating systems and computers.
Generally, computer code is written without any formal processes, and the main metric for testing it is simply trying it out and seeing whether it or not works. Testing does not necessarily guarantee all the bases have been covered that might occur at runtime, or that it would prevent a malicious attacker who reads the program from devising something clever with which to undermine it. Formal software verification relies on mathematical theorems and reasoning and uses deductive techniques to check the most critical aspects of a system. Proponents say this technique is making hacker-proof software possible.
“A lot of the ways attackers take over programs on machines and the Internet is by exploiting security vulnerabilities, and there are many kinds, such as the buffer overrun vulnerability, to which safe languages are just immune,” notes Andrew Appel, professor of computer science at Princeton University, who is considered an expert in the program verification field.
Formal software verification uses methods that don’t rely on running the program; rather, they analyze program text to prove things about its behavior on any possible input.
This week in open source news, AGL reveals new infotainment platform, mainstream enterprises derive the most benefit from OSS, and more! Read on to stay on top of the latest open source news.
1) Automotive Grade Linux (AGL) recently revealed the latest infotainment platform along with a new Virtualization Expert Group (EG-VIRT) to develop a virtualized architecture.
2) “Combing through the last few quarters of earnings transcripts, it’s clear that open source has arrived…but to very different destinations, depending on the company.”
Ask a developer to name their most important tools and very often the reply will include Git. There’s a good reason for that: Git is one of the most widely used distributed version control systems. Git can be set up as a local repository, used on a LAN, or used via the official, global service. With Git you can do things like add access control to your code, display the contents of a Git repository (via the web), and manage multiple repositories.
Most users (especially of the Linux variety) work with Git through the command line—with good reason. The Git command-line tools are second nature to Linux users; and considering that most developers working on the Linux platform are already acclimated to the command line, it’s efficient. However, not every user wants to spend all of their Git time working within the terminal. Fortunately, for those users, there are plenty of various GUI tools that can help you get your Git on. Not all of these tools are created equal, so what you use will depend upon your needs.
I want to highlight three such tools—centered on file manager/desktop integration. How you use Git (and how you need it integrated into your desktop) will determine what tool is best for you.
First, we’ll talk about tools that integrate into your file manager. For this, I’m going to focus on the GNOME and KDE desktops (as these two offer the best integration environments). Next, we’ll discuss a very powerful tool that does a great job of integrating into the Linux desktop and connecting with your remote Git account.
With that said, let’s take a look at two very handy tools that integrate into file managers.
RabbitVCS-git
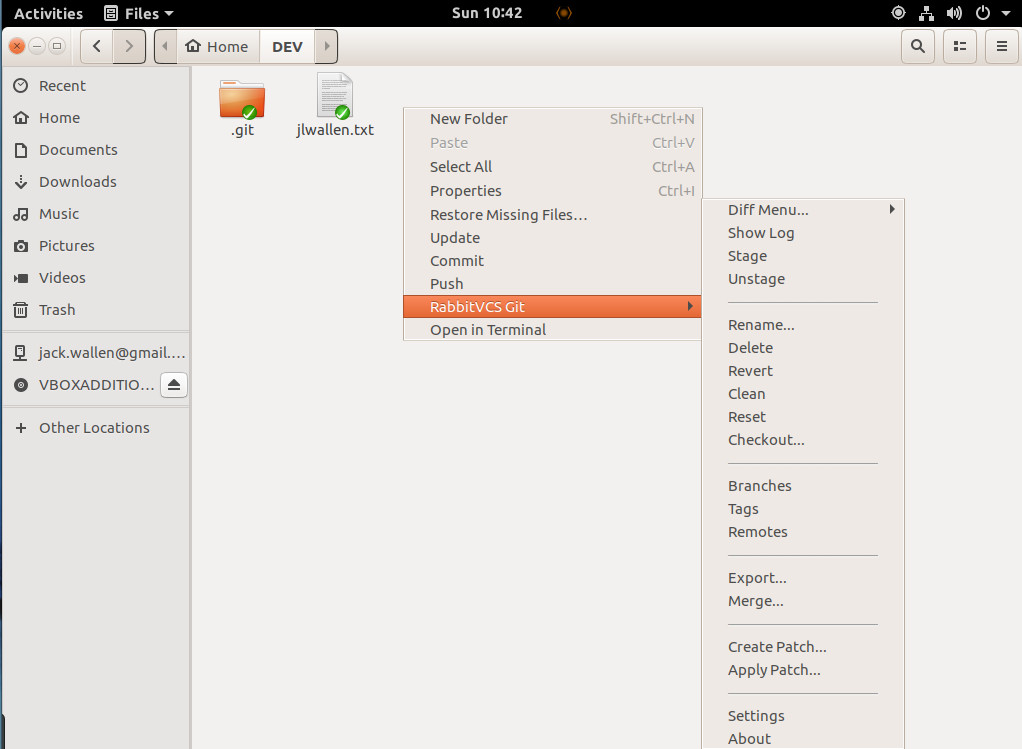
If you use GNOME, chances are you use Nautilus. If you use Nautilus and work with Git, you’re going to want to install one of the best Linux desktop integration tools for Git—RabbitVCS-git. RabbitVCS-git is an SCM client that integrates itself with the Nautilus file manager to manage local Git or SVN repositories.
To install RabbitVCS-git on Ubuntu (or a Ubuntu derivative), issue the following commands from the terminal window:
Once installed, logout of GNOME and log back in. Open up Nautilus and navigate to any project folder, and right-click a blank spot to reveal the RabbitVCS-git contextual menu (Figure 1).
Figure 1: The RabbitVCS-git contextual menu within Nautilus.
At this point, you can begin to work with a very well done bit of Git integration with Nautilus.
Git in KDE
The KDE file manager, Dolphin, offers Git integration by way of a plugin. Before you attempt to use the plugin, you might have to install it. Open up a terminal window and issue the command:
sudo apt-get install dolphin-plugins
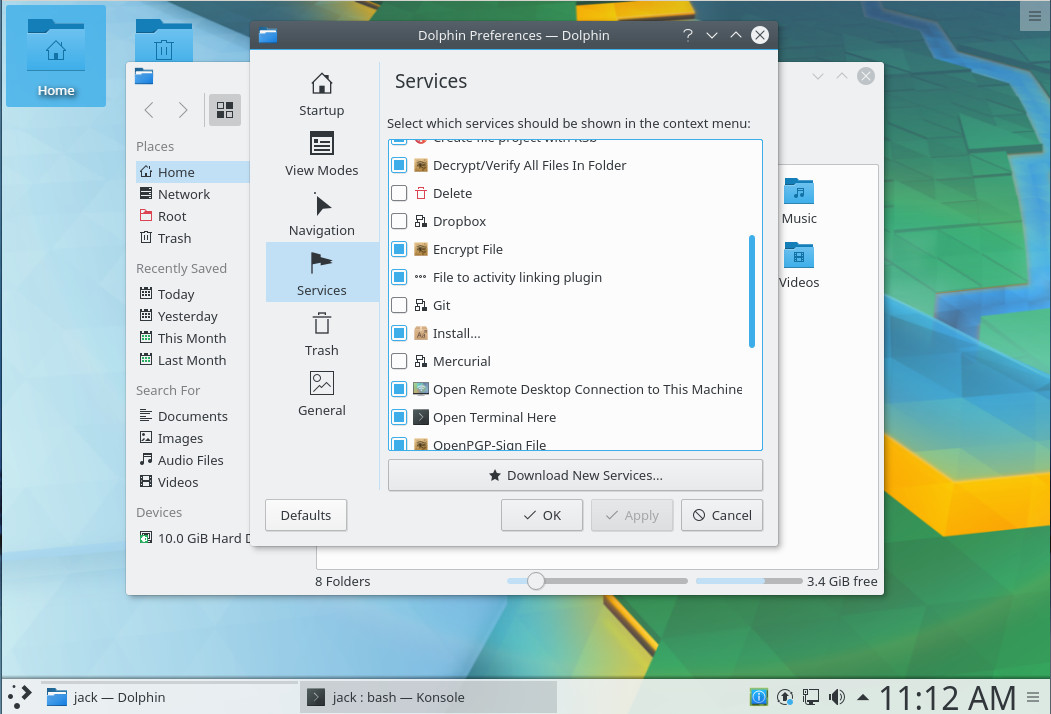
Once that command completes, open up Dolphin and then click the Control button > Configure Dolphin. Click on the Services tab, scroll down until you find Git, and click to enable (Figure 2).
Figure 2: Adding the Git plugin to Dolphin.
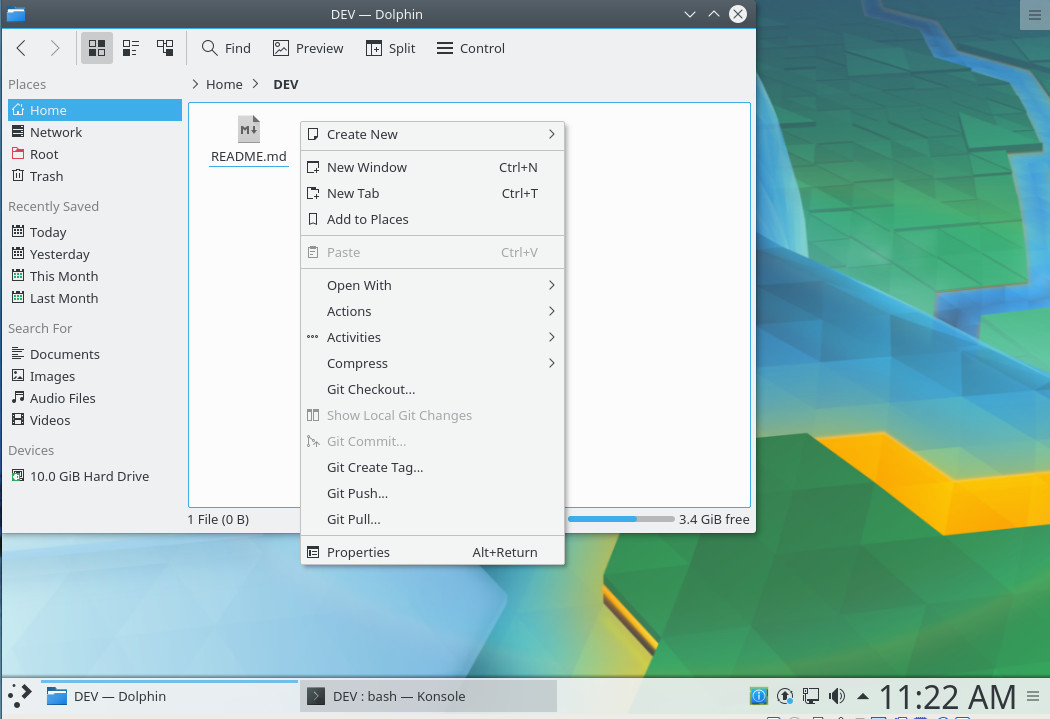
With Git checked, click OK and then, when prompted, click to restart Dolphin. There is one thing to note: Installing the Dolphin plugins package does not install git. If you haven’t installed the git package (which I assume you already have), you’ll need to do so before Dolphin can actually work with Git. You will also have had to create a new repository from the command line and do a first commit. Once you’ve taken care of that, you will see the Git-related right-click context menu entries in Dolphin (Figure 3).
Figure 3: The Dolphin context menu showing our new Git entries.
From that context menu, you can checkout, show local changes, commit, create tags, push, and pull.
SparkleShare
Now we’re going to venture into the realm of something a bit more powerful than simple file manager integration. The tool I want to demonstrate is SparkleShare, a unique self-hosted service that allows you to do file syncing/sharing, as well as version control, client-side encryption, and (to the point) connect and sync with your GitHub account.
SparkleShare is available from within the standard repositories, so to install (I’ll be demonstrating this on Linux Mint, using the Cinnamon desktop), the following steps will do the trick:
Open a terminal window.
Update apt with the command sudo apt-get update.
Type your sudo password and hit Enter.
Once the update completes, issue the command sudo apt-get install -y sparkleshare.
Allow the installation to finish.
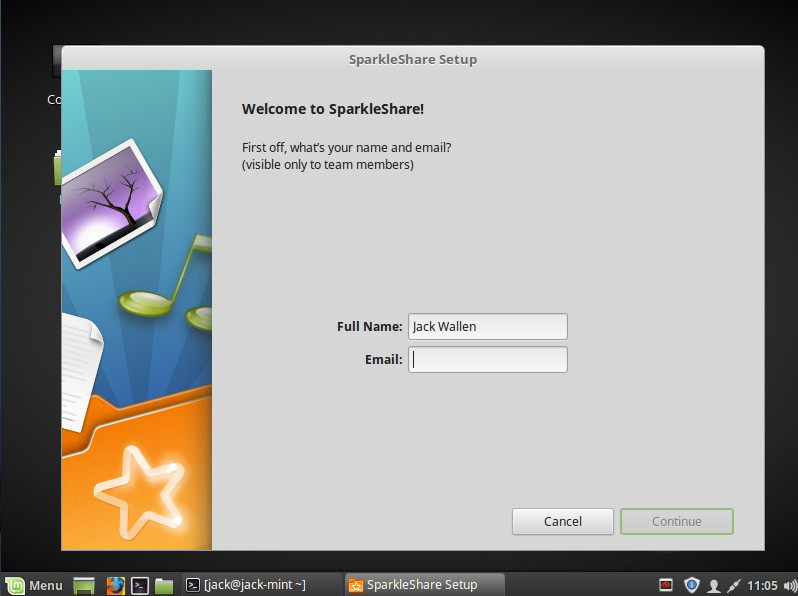
Once the installation is done, go to your desktop menu and search for the SparkleShare entry. Upon first run, you will be prompted for a name and email address (Figure 4).
Figure 4: Adding a name and email to SparkleShare.
Click Continue and then either view the tutorial or click to skip. You will be given a unique Client ID (an ssh-rsa key). Copy and save that key. Click the Finish button. Before you continue on with the SparkleShare GUI setup tool, you need to configure your GitHub account with your SparkleShare ssh-rsa pub key. To do this, follow these steps:
Open a terminal window.
Issue the command cd ~/.config/sparkleshare.
Find the name of your .pub key with the command ls (it will end in .pub).
Open the pub key with a text editor and copy the contents.
Open your GitHub account in your desktop browser.
Go to Settings | SSH and GPG keys.
Click New SSH Key.
Title the key SparkleShare.
Copy the contents of your SparkleShare pub key into the Key text area (Figure C).
Click Add SSH Key.
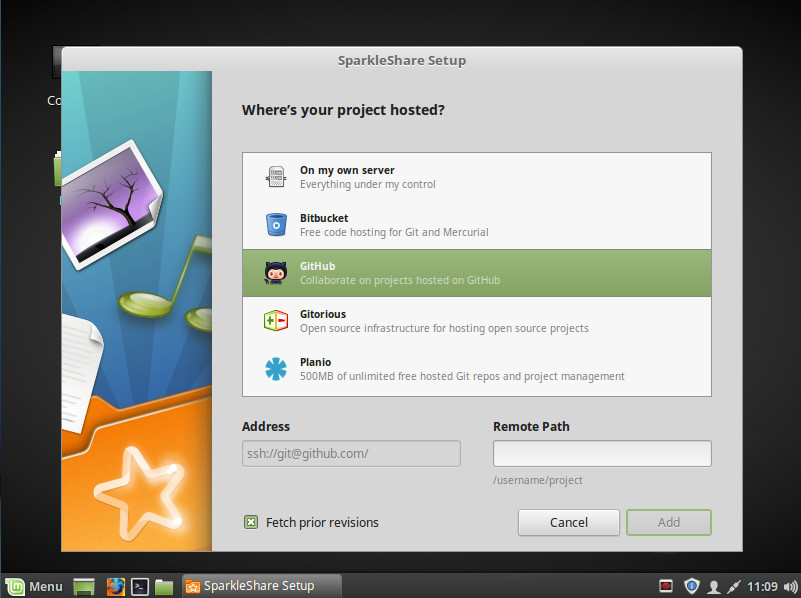
With the key in place, you can finish up the SparkleShare GitHub connection. You will see a new icon in your system tray; click that icon and then select SparkleShare > Add Hosted Project. Select GitHub from the list and then fill out the Remote Path section in the form /gitusername/repository (Figure 5).
Figure 5: Connecting SparkleShare to your GitHub account.
SparkleShare will automatically sync the repository to your desktop, where you can start to work locally on your project, knowing the files will seamlessly sync back to your GitHub account.
Git integration made easy
And there you have it, Git integration into your Linux desktop made easy. If you’re a developer who works on the Linux desktop, and you use Git, you’ll want to try one of these three tools. Yes, there are full-blown Git GUIs for Linux (such as Giggle, Git GUI, Git-Cola, Smart Git, and many more), but if you’re looking for easy file manager or desktop integration, look no further than these options.
Learn more about Linux through the free “Introduction to Linux” course from The Linux Foundation and edX.
Interest in blockchains is at an all-time high, but there are still plenty of technical issues to solve, especially for enterprises that want to adopt this technology for smart contracts and other use cases. For them, issues like throughput, latency, governance and confidentiality are still major stumbling blocks for using blockchains. With its new Coco Framework, Microsoft wants to solve these issues and make blockchains more suitable for the enterprise.
In an interview earlier this week, Microsoft’s CTO for Azure (and occasional novelist) Mark Russinovich told me the company is seeing a lot of interest in blockchain technology among its users. They like the general idea of a distributed ledger, but a system that can only handle a handful of transactions a second doesn’t work for them — what they want is a technology that can handle a thousand or more transactions per second.
The Coco Framework solves these fundamental issues with blockchains by introducing a trusted execution environment (TEE).
If you have ever wanted to use the wifi at a coffee shop or library, you have probably had to click through a screen to do it. This screen might have shown you the network’s Terms of Service and prompted you to click an “I agree” button. Depending on where you were, it might have asked you for information about yourself, like your email, social media accounts, room number (in a hotel), account number (in a library), or other identifying information. Sometimes you even have to watch a short video or ad before wifi access is granted.
These kinds of screens are called captive portals, and they interfere with wireless security without providing many user benefits.
Today, let’s talk about Kubernetes private/public keys & certificate authorities!
This blog post is about how to take your own requirements about how certificate authorities + private keys should be organized and set up your Kubernetes cluster the way you need to.
The various Kubernetes components have a TON of different places where you can put in a certificate/certificate authority. When we were setting up a cluster I felt like there were like 10 billion different command line arguments for certificates and keys and certificate authorities and I didn’t understand how they all fit together.
Hykes likes to try new ideas and new things. “If they work I keep it. If it doesn’t work I try something else,” said Hykes. At Docker, they call themselves builders. “We like to build new things and if they’re useful we build more of them and if they’re not useful we try something else. It’s almost like a way of life.”
He believes that the open-source community traditionally has been a home for that kind of approach. It’s always been attractive for builders to work in an environment where there’s a direct feedback loop.
“It’s you, your code and either it works or it doesn’t. Either people adopt it or not. There’s less layers of indirection and ambiguity. I think that’s attractive to a lot of open-source contributors. We’re trying to follow that philosophy,” said Hykes.