RESTful services have been popular for quite some time now. They are widely-used, primarily for improved performance, ease of use and maintenance. Swagger is a popular API for documenting your RESTful Web APIs. You need some way to document your RESTful services to know the endpoints and the different data models used in the request and response payloads. This article presents a discussion on how we can use Swagger to document our Web APIs easily.
What is Swagger? Why is it needed?
Swagger is a framework that can be used for describing and visualizing your RESTful APIs. Swagger provides a simple, yet powerful, way to represent your RESTful APIs so that the developers using those APIs can understand the endpoints and the request and response payloads in a much better way. The success of your API largely depends on proper documentation as proper documentation helps the developers understand ways to consume your API better. Here’s exactly where Swagger comes to the rescue.
As part of its goal to cultivate more diverse thoughts and opinions in open source, the April Women in Open Source webinar will discuss why publishing your own research, technical work and industry commentary is a smart move for your career and incredibly beneficial to the industry at large.
In this webinar, learn how to get started, good topics to write about and how to contribute to magazines, journals and new publishing platforms like Medium. “Why and How To Publish Your Work and Opinions” will be held Thursday, April 27, 2017, at 9 a.m. Pacific Time.
Designed to share both inspirational ideas and practical tips the community can immediately put into action, the webinar will provide examples of women in open source who have successfully published their technical work and viewpoints, as well as identify influential publications to target. So mark your calendars!
Register today for this free webinar, brought to you by Women in Open Source.
As the community manager and an editor for Opensource.com, Rikki helps grow and oversee a community of moderators, contributors, and participants. Opensource.com attracts more than 1 million pageviews each month, with articles contributed by the open source community and community moderators.
Libby oversees content strategy for The Linux Foundation, including Linux.com and its newsletter, managing a team of freelance writers and editors. In addition, she writes and edits content for the site.
For news on future Women in Open Source events and initiatives, join the Women in Open Source email list and Slack channel. Please send a request to join via email to sconway@linuxfoundation.org.
In our first three installments in this series, we learned what Kubernetes is, why it’s a good choice for your datacenter, and how it was descended from the secret Google Borg project. Now we’re going to learn what makes up a Kubernetes cluster.
A Kubernetes cluster is made of a master node and a set of worker nodes. In a production environment these run in a distributed setup on multiple nodes. For testing purposes, all the components can run on the same node (physical or virtual) by using minikube.
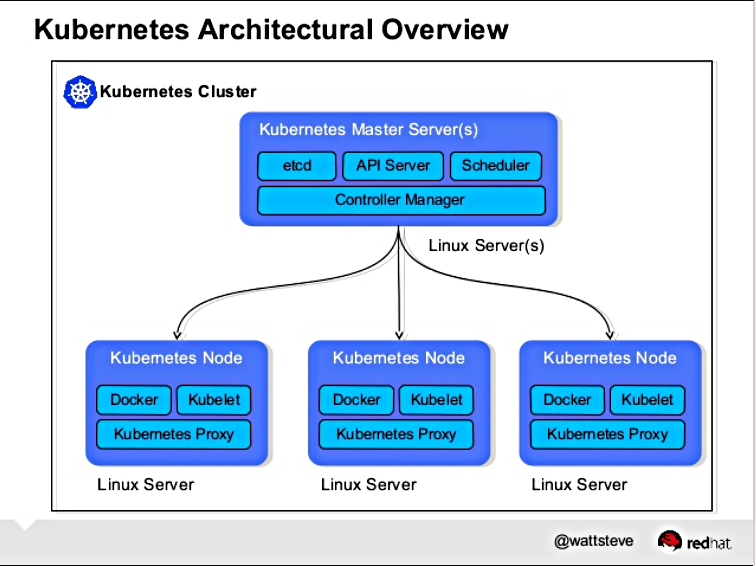
Kubernetes has six main components that form a functioning cluster:
API server
Scheduler
Controller manager
kubelet
kube-proxy
etcd
Each of these components can run as standard Linux processes, or they can run as Docker containers.
Figure 1: Kubernetes Architectural Overview (by Steve Watt, Red Hat).
The Master Node
The master node runs the API server, the scheduler, and the controller manager. For example, on one of the Kubernetes master nodes that we started on a CoreOS instance, we see the following systemd unit files:
core@master ~ $ systemctl -a | grep kube
kube-apiserver.service          loaded active  running Kubernetes API Server
kube-controller-manager.service loaded active  running Kubernetes Controller Manager
kube-scheduler.service          loaded active  running Kubernetes Scheduler
The API server exposes a highly-configurable REST interface to all of the Kubernetes resources.
The Scheduler’s main responsibility is to place the containers on the node in the cluster according to various policies, metrics, and resource requirements. It is also configurable via command line flags.
Finally, the Controller Manager is responsible for reconciling the state of the cluster with the desired state, as specified via the API. In effect, it is a control loop that performs actions based on the observed state of the cluster and the desired state.
The master node supports a multi-master highly-available setup. The schedulers and controller managers can elect a leader, while the API servers can be fronted by a load-balancer.
Worker Nodes
All the worker nodes run the kubelet, kube-proxy, and the Docker engine.
The kubelet interacts with the underlying Docker engine to bring up containers as needed. The kube-proxy is in charge of managing network connectivity to the containers.
core@node-1 ~ $ systemctl -a | grep kube
kube-kubelet.service loaded active running Kubernetes Kubelet
kube-proxy.service   loaded active running Kubernetes Proxy

core@node-1 ~ $ systemctl -a | grep docker
docker.service loaded active running Docker Application Container Engine
docker.socket  loaded active running Docker Socket for the API
As a side note, you can also run an alternative to the Docker engine, rkt by CoreOS. It is likely that Kubernetes will support additional container runtimes in the future.
Next week we’ll learn about networking, and maintaining a persistency layer with etcd.
Serverless computing and Docker are fast turning into seatmates. Where you find one, you’ll find the other.
Case in point: Hyper.sh, a container hosting service that uses custom hypervisor technology to run containers on bare metal, has introduced Func, a Docker-centric spin on serverless computing.
No one likes to admit it but most of what has passed for IT security in the enterprise has historically been rudimentary at best. Most organizations physically segmented their networks behind a series of firewalls deployed at the edge of the network. The trouble is that once malware gets past the firewall it could move laterally almost anywhere in the data center.
With the rise of network virtualization, a new approach to microsegmenting networks is now possible. The new approach involves using microsegmenting to prevent malware from laterally generating East-West traffic across the data center. Instead of a physical instance of a firewall, there is now a virtual instance of a firewall that is simpler to provision and update.
Over the past two and a half years, I’ve led a project at IBM that deployed a new set of tools to help improve the company’s product development efforts. What is the benefit of providing better tools to employees? A first answer is that it helps increase employee productivity. While this is true and part of the answer, it is much too narrow. The broader answer is that giving employees great tools is an excellent way to concretely affect positive culture change.
In this article I’ll summarize what the team did and what I learned.
Intel has cut funding for an effort it launched two years ago with Rackspace to encourage the use of OpenStack software technology by big business customers that want more flexible and cheaper data center infrastructure.
The two companies announced the joint effort, called the OpenStack Innovation Center, in July 2015. A source close to the effort said initial funding was supposed to last through 2018, but Intel pulled it early.
Intel and Rackspace disclosed the decision internally on Tuesday, the source said.
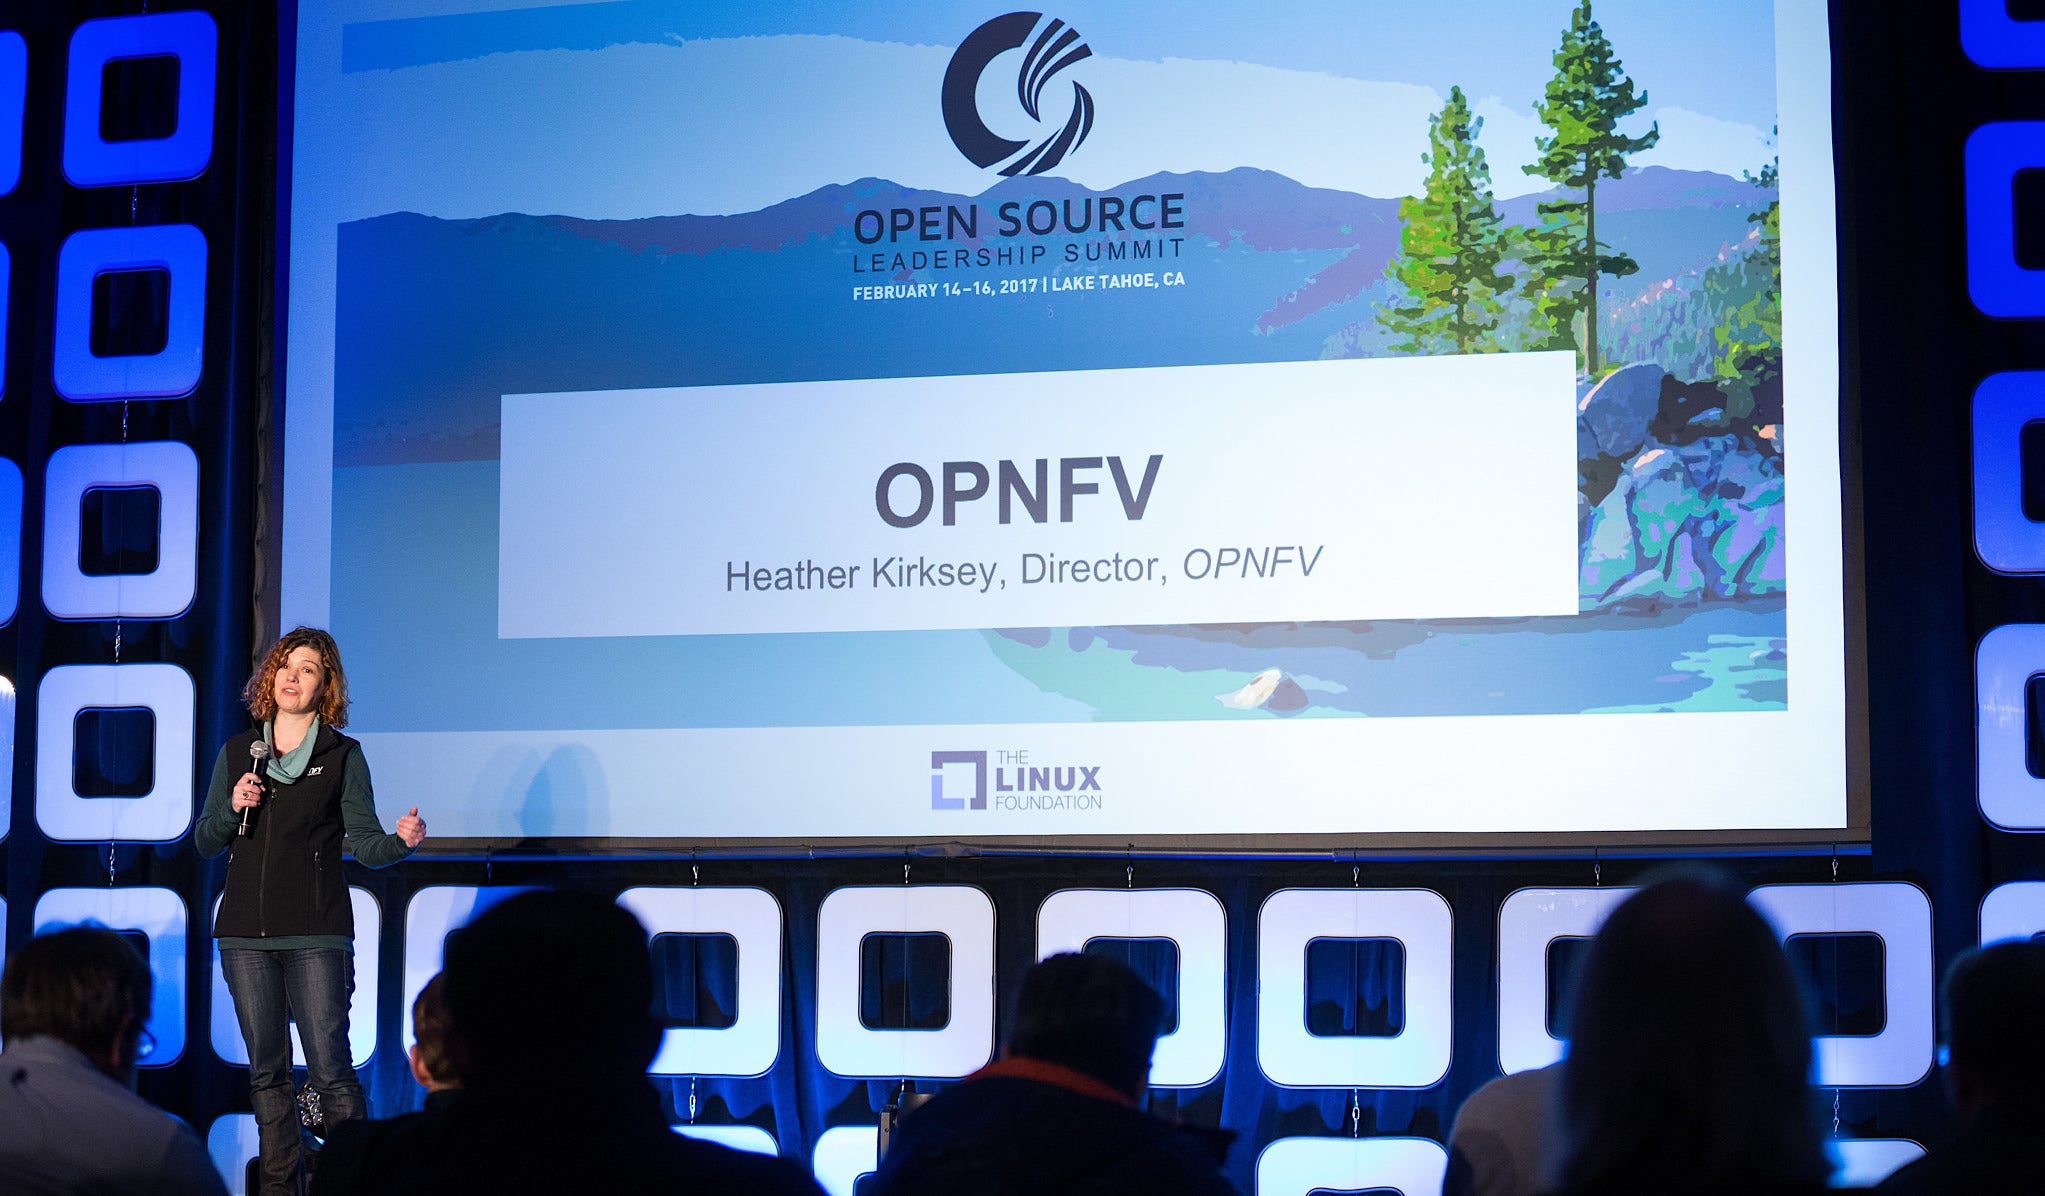
This week in open source and Linux news, The Linux Foundation/OPNFV’s very own Heather Kirksey is recognized for her leadership as a finalist in Light Reading’s WiC awards, Ubuntu’s uncertainty grows, and more. Read on to say current in developing OSS stories!
1) The Linux Foundation/OPNFV’s Heather Kirksey is a finalist in Light Reading’s Women in Comms Leading Lights awards!
If you’re a DBA, chances are you do most of your database administration via the command line. But when you have a number of databases to work with, running on multiple database servers, a GUI would certainly come in handy. Of course, you could always install phpMyAdmin on each server, but then you’re having to log into a different web interface for each machine. What if you could have a single point of entry for every MySQL database you administer? If that’s something you’re looking for, then you might want to give MySQL Workbench a try.
MySQL Workbench is a unified GUI for database architects, developers, and DBAs, that makes administering multiple databases (from multiple hosts) significantly more efficient. With this tool you can get an at-a-glance for the database server’s status, client connections, and server variables; manage users and privileges; export/import data; run queries; create new schema; inspect objects; create tables; create views; create stored procedures and functions; search table data; and more. MySQL Workbench is a powerhouse tool for developers and administrators. And with MySQL Workbench, you can also migrate Microsoft SQL Server, Microsoft Access, Sybase ASE, PostreSQL, and other RDBMS tables, objects, and data to MySQL with ease.
I want to walk you through the installation of MySQL Workbench as well as the steps necessary on your MySQL servers to enable connection from the new tool. I’ll be demonstrating this on a Ubuntu 16.10 desktop connecting to a Ubuntu 16.04 server. The same results can be had on different Linux distributions, only the steps may require alteration (depending upon your choice of platform).
Installing MySQL Workbench
Before you continue, know that in order to download an installation file for this tool, you do have to register for an Oracle account (both the tool and the account are free). Head over to the official MySQL Workbench download page, select your platform, click Download, and then log into your Oracle account. Once logged in, your download should start. Save the file to~/Downloads.
The installation of MySQL isn’t challenging, but it will fail. Don’t worry, that failure is easy to fix. To start the installation, open up a terminal window and then change into the ~/Downloads directory with the command:
cd ~/Downloads
To run the initial installation, issue the command:
sudo dpkg -i mysql-workbench-community-*.deb
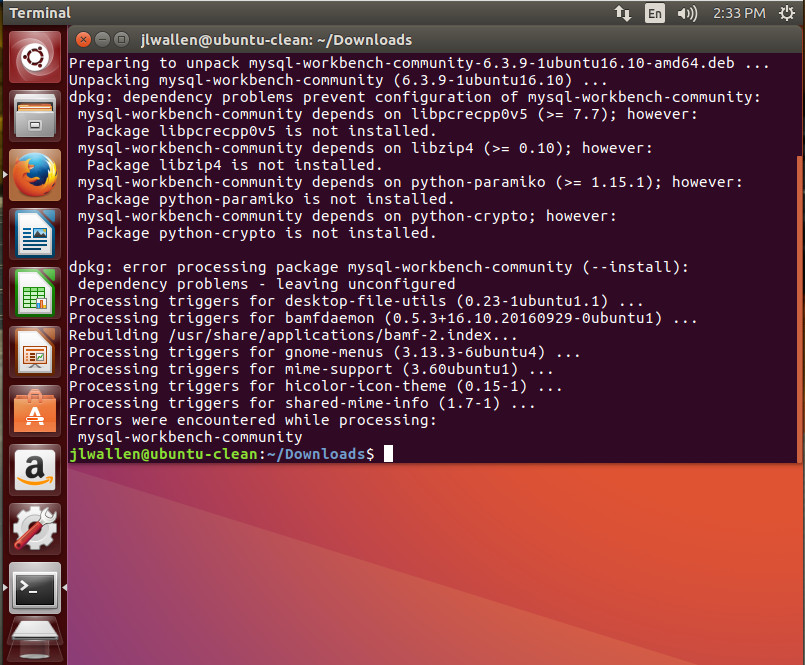
That installation will error out (Figure 1).
Figure 1: The errors reported from the initial installation of MySQL Workbench.
To fix these problems, issue the command:
sudo apt-get install -f
The above command will resolve all of the missing dependencies, which may (or may not exist, depending on your platform) include:
libglibmm-2.4-1v5
libgtk-3-0
libgtkmm-3.0-1v5
libpangomm-1.4-1v5
libpcrecpp0v5
libpng16-16
libsigc++-2.0-0v5
Once apt-get fixes the dependency errors, you are good to run MySQL Workbench from your desktop menu. However, before you use it to connect to your MySQL server, you might have to configure your server for remote connections.
Configuring your MySQL server for remote connections
If you haven’t configured your MySQL servers for remote connection, MySQL Workbench will fail to connect. There are two configurations to be taken care of. The first is to configure your MySQL database to allow connections other than 127.0.0.1. To do this you must log into your MySQL database server and open the /etc/mysql/mysql.conf.d/mysqld.cnffile for editing. With that file open, look for the line:
bind-address 127.0.0.1
Change the above line to:
bind-address 0.0.0.0
Save and close the mysqld.cnf file and restart the MySQL server with the command:
sudo systemctl restart mysql.service
Now that your server is open to remote connections, you need to enable it to allow connections with a specific user from a specific address. This is done from the MySQL command prompt. Issue the command:
mysql -u root -p
NOTE: You can substitute root for whatever user happens to be your MySQL admin account.
When prompted, enter the root password and you’ll find yourself at the MySQL prompt. Here you need to execute a command that will allow your admin user to connect to the server via MySQL Workbench. Let’s say that user is root, the IP address you’ve installed MySQL Workbench on is 192.168.1.139, and you want to allow access to all databases on the server. The command for this would be:
GRANT ALL ON *.* TO 'root'@'192.168.1.139' IDENTIFIED BY ‘PASSWORD' WITH GRANT OPTION;
Where PASSWORDis the actual password for the admin user.
Once you’ve successfully executed the above command, issue the command exit;to leave the MySQL Prompt.
You can now connect MySQL Workbench to that MySQL server.
Connecting MySQL Workbench to your server
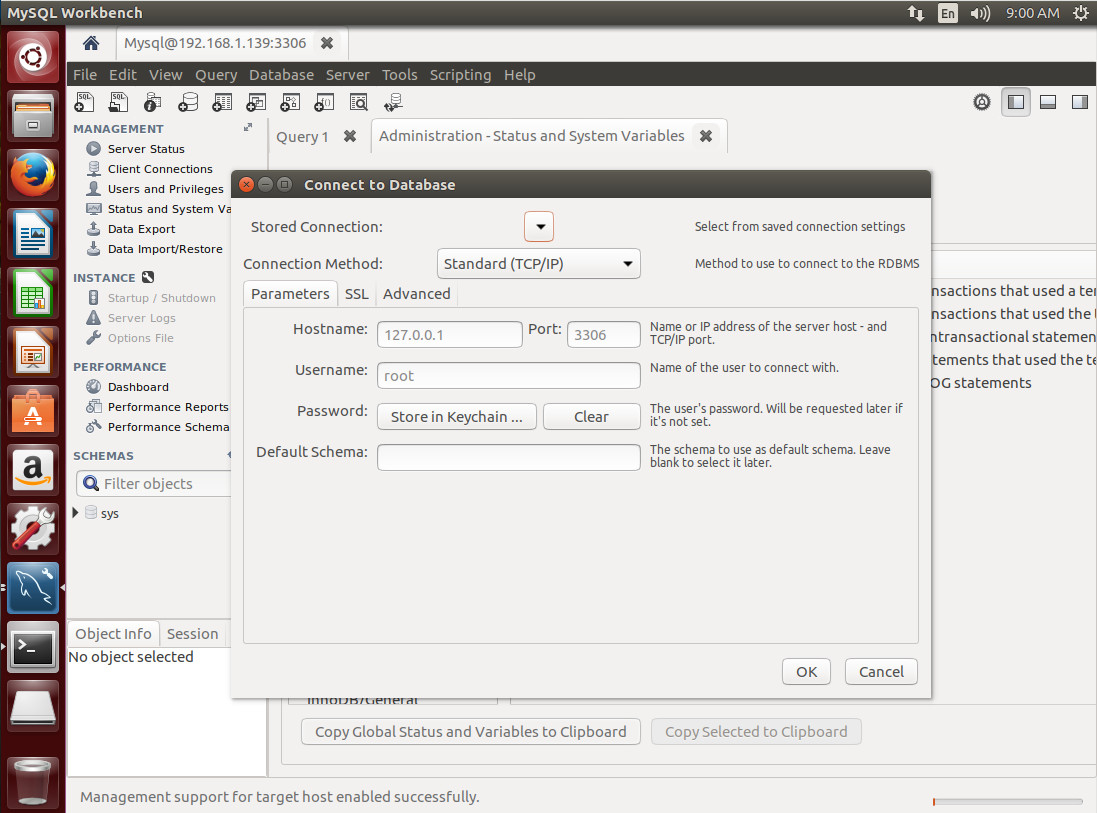
Open up the MySQL Workbench app and then click Database > Connect to database. In the resulting window (Figure 2), fill out the details for your connection.
Figure 2: Connecting to a remote server with MySQL Workbench.
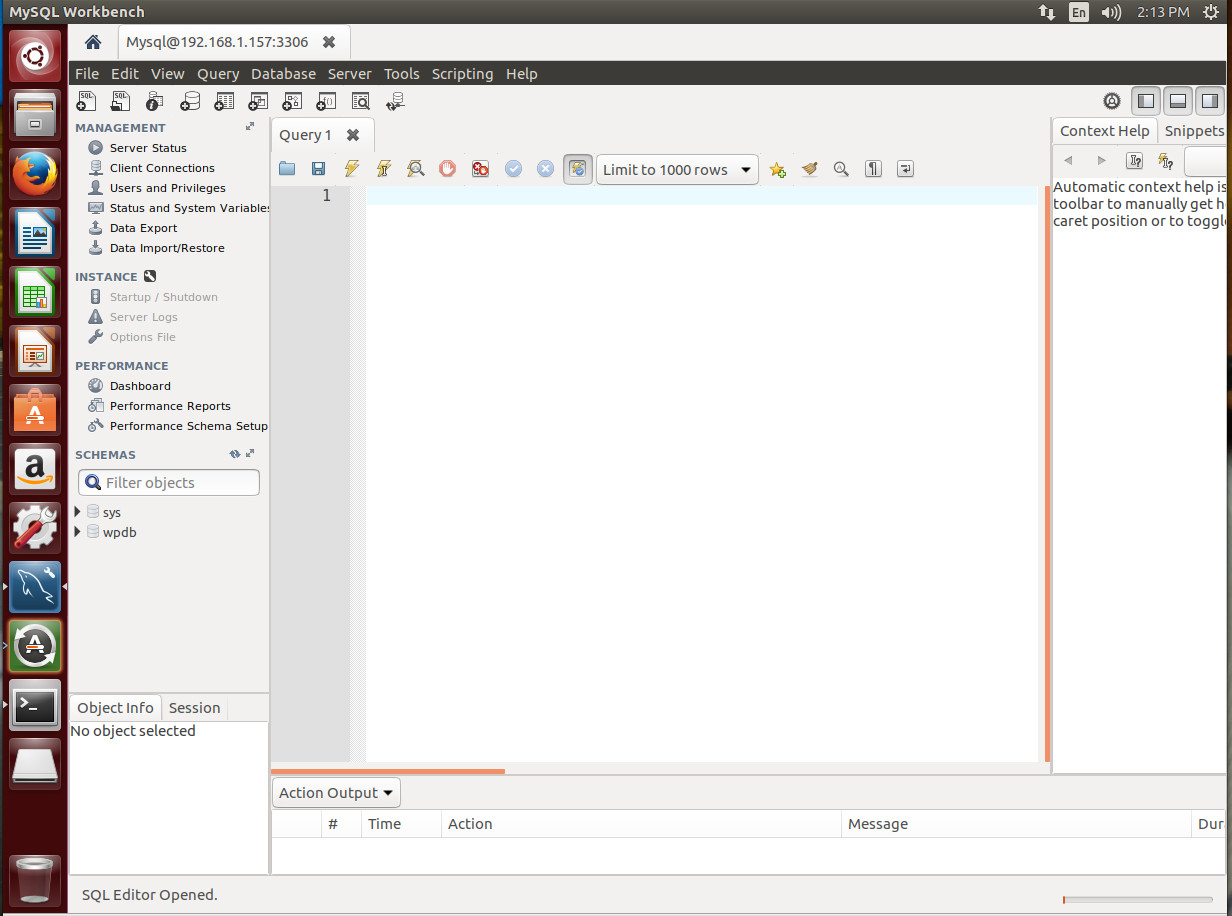
Click OK and you will prompted for the MySQL user password. Once a successful authentication occurs, you will find yourself on the main page for the connection (Figure 3), where you can take care of any number of tasks. Figure 3: The main page for the MySQL Workbench server connection.
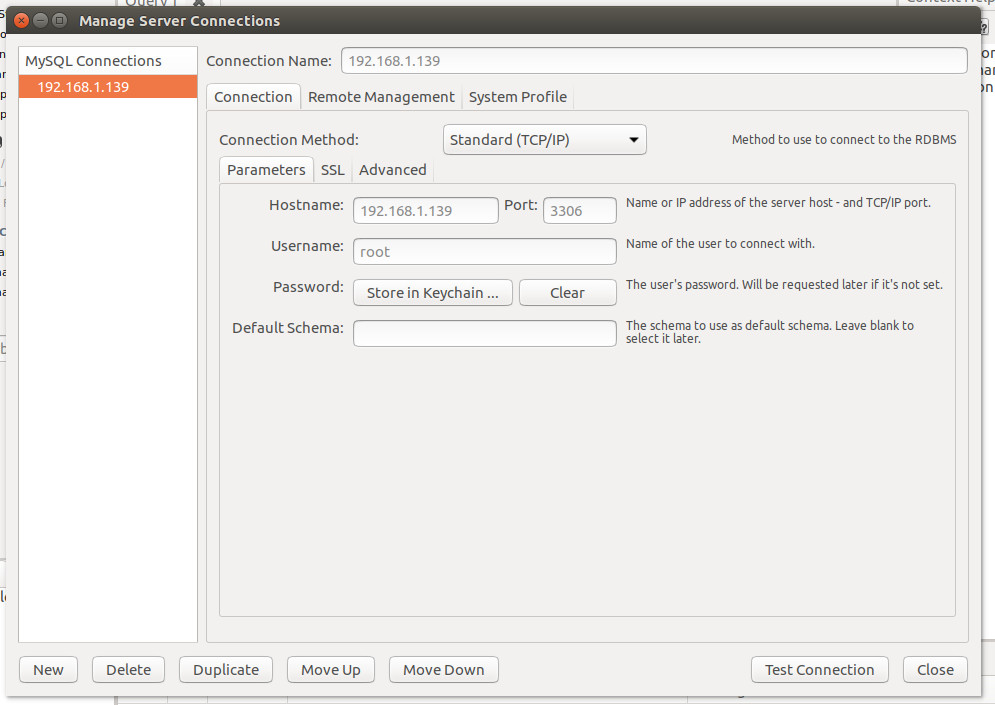
The above method for connection creates a one-time connection. If you know you’ll be connecting to this particular server frequently, you’ll want to instead create the connection through Database > Manage Server Connections. In that resulting window (Figure 4), click New, fill out the necessary details for the connection (making sure to give the connection a name), click Test Connection, enter the remote MySQL admin user password, and click OK. If the connection succeeds, click OK a second time, and click Close.
Figure 4: Creating a new connection that will be saved in the Manage Server Connections window.
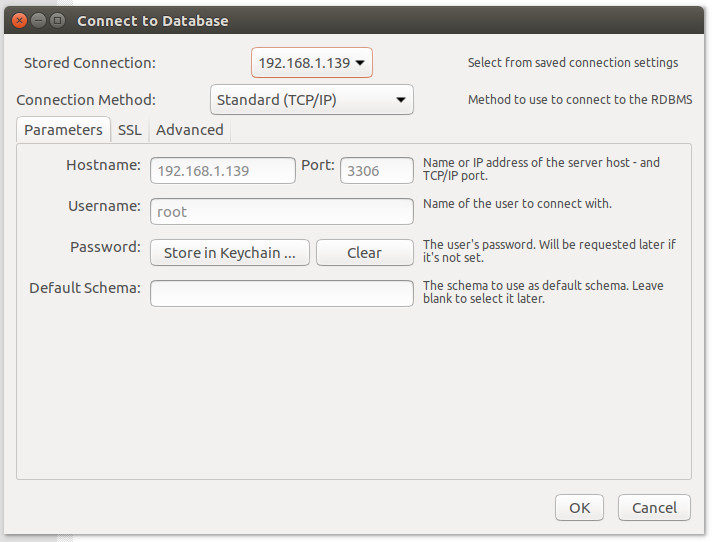
Once you close out that window, the connection will be saved. You can then go to that connection by clicking Database > Connect to Database, and select the server you wish to connect to from the Stored Connection drop-down (Figure 5). Figure 5: Connecting to a previously configured server.
At this point, you can start creating, administering, and managing your databases with the help of a very powerful (and user-friendly) GUI.
The MySQL Workbench is just one of a few GUI tools that can help make your MySQL database administration significantly more efficient. Give this tool a try and see if it doesn’t very quickly become your daily driver.
Learn more about Linux through the free “Introduction to Linux” course from The Linux Foundation and edX.