Docker-Compose is a command line tool for defining and managing multi-container docker applications. Compose is a python script, it can be installed with the pip command easily (pip is the command to install Python software from the python package repository). With compose, we can run multiple docker containers with a single command. It allows you to create a container as a service, great for your development, testing and staging environment.
In this tutorial, I will guide you step-by-step to use docker-compose to create a LEMP Stack environment (LEMP = Linux – Nginx – MySQL – PHP). We will run all components in different Docker containers, we set up a Nginx container, PHP container, PHPMyAdmin container, and a MySQL/MariaDB container.
This page shows you how to orchestrate the deployment and management of an insecure 3-node CockroachDB cluster with Kubernetes, using the beta StatefulSet feature.
Running a stateful application such as CockroachDB on Kubernetes requires using some of Kubernetes’ more complex features at a beta level of support. There are easier ways to run CockroachDB on Kubernetes for testing purposes, but the method presented here is destined to become a production deployment once Kubernetes matures sufficiently.
Deploying an insecure cluster is not recommended for data in production. We’ll update this page after improving the process to deploy secure clusters.
Elasticsearch is an open source search engine based on Lucene, developed in java. It provides a distributed and multitenant full-text search engine with an HTTP Dashboard web-interface (Kibana) and JSON documents scheme. Elasticsearch is a scalable search engine that can be used to search for all types of documents, including log file. Elasticsearch is the heart of the ‘Elastic Stack’ or ELK Stack.
Logstash is an open source tool for managing system events and logs. It provides real-time pipelining to collect data. Logstash will collect the log or data, convert all data into JSON documents, and store them in Elasticsearch.
Kibana is a data visualization interface for Elasticsearch. Kibana provides a pretty dashboard (web interfaces), it allows you to manage and visualize all data from Elasticsearch on your own. It’s not just beautiful, but also powerful.
In this tutorial, I will show you how to install and configure Elastic Stack on a single Ubuntu 16.04 server for monitoring server logs and how to install ‘Elastic beats’ on client PCs with Ubuntu 16.04 and CentOS 7 operating system.
This guide is intended to be a quick guide for first time Docker users, detailing how to spin up a container to run simple tests in. This is definitely not meant to be an exhaustive article by any means! There’s tons of documentation for Docker online, which can be a little daunting, so this is just meant to be a super short walk-through of some really basic commands.
For the SRE part of the Holberton School curriculum, we’re required to write several Bash scripts that essentially provision a fresh Ubuntu 14.04 Docker container with a custom-configured installation of Nginx. The scripts are checked by an automated system that spins up a container, runs our script inside of it, and grades us based on the expected result. So obviously, the best way to check our work is to spin up a container ourselves and run the script!
First, let’s run a new container with `docker run`, using sudo to run as root. Docker will need root permissions to run and do magical container things. There’s a lot of arguments to the docker run command, so I’ll break them down real fast:
-t: Creates a psuedo-TTY for the container.
-d: Detaches the container to start. This leaves the container running in the background, and allows you to execute additional commands, or use docker attach to reattach to the container.
–name: Assigns the container a name. By default, containers are assigned a unique ID, and a randomly generated name. Assigning it a name can make life a little easier, but it isn’t necessary.
-p: Publishes a port. The syntax is a little tricky at first. Here we use 127.0.0.1:80:80, and this binds the port 80 on the container to port 80 on 127.0.0.1, the local machine. This means the port will be published to the host, but not the rest of the world. If we used -p 8080:80, this would bind container port 8080 to 80 to your external IP address, and you’d be able to get there from outside the localhost (if there’s no firewall, etc. blocking access). We can also use -p 8080, which would bind port 8080 on the container to a random port on the host, or specify a range of hosts. Check the docker-run man page for more!
Then, we run `docker ps`. The output shows us any currently running containers, and gives us the id, name, and command the container is running.
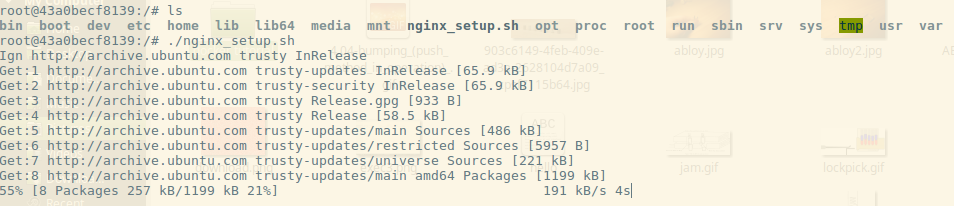
Before we can do anything else, we need to copy our script into the Docker container. Luckily, this is easy.
Running `docker cp` allows us to copy a file from the local host to the container, or vice-versa. The syntax is `docker cp <source> <destination>`, and to specify the location in the container, you simply use `container-name:location`. So here, `docker cp nginx_setup.sh testing:/` will copy the file nginx_setup.sh in the current host folder to the root directory of the container named testing.
Now, let’s get inside the container, and see if our script actually works. We’ll do this with `docker exec`.
If you haven’t guessed, `docker exec` executes a command inside a currently running container. There are two flags being used, similar to the ones I used for `docker run`:
-i: Interactive. Keeps STDIN open even when not attached.
-t: Allocates a false TTY, just like run.
So `docker exec -it 43a0 /bin/bash` executes /bin/bash inside the container 43a0. As you can see from the output of `docker ps`, that’s the start of the container ID of the container we named testing. We can use either the ID or name to refer to specific containers.
So now that we’re in a Bash shell, let’s check out our script.
Running ls in the root directory, we can see the script I copied over, nginx_setup.sh. It’s just a simple script to run `apt-get update`, install a few packages (including Nginx), and set up a Nginx web server. Here we can see all I have to do is execute it like normal, and the script starts going. By default, when we execute /bin/bash in the container, we’re starting as root, so no need for `sudo`.
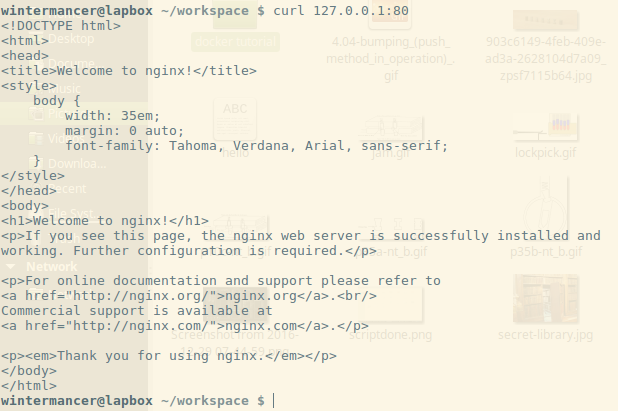
Once the script finishes, let’s check the output! The whole reason we’re doing this, right?
I run `service nginx status`, and I can see that my script was at least partially successful. The Nginx service is running. I check the /etc/nginx/nginx.conf file and see that my script successfully set the configuration for me. But that doesn’t prove that we have a running web server. I’ve left Nginx running on the standard port, 80, the same one we published with -p when we initially ran the container. So let’s pop out of the server and see if we can use curl to check if the container is running.
We exit out, and I run `docker ps` to show you two things. The container is still running, and as a reminder, it shows you that port 80 is published to 127.0.0.1:80. So let’s see if we can curl our container.
I run curl, and lo-and-behold, the default Nginx landing page! Mission accomplished, my script works. Now, I’m done with this Docker container, so I’m going to use `docker rm` to shut it down.
Since the container is still running, I have to use the -f flag to ‘force’ its removal. -f simply sends SIGKILL to the container. After we run it, the container is spun back down, and we’re done testing.
In closing, I hope this draws some attention to how easy it can be to use Docker for simple testing, once you understand the lay of the land. Docker Training has some great resources with free self-paced online courses that can help expand your knowledge a little further, and the Docker community is full of helpful folks!
Tim Britton is a full-stack software engineering student at Holberton School and a wannabe Docker evangelist! You can follow him on Twitter or on Github.
OPNFV, an integrated open platform for facilitating network functions virtualization (NFV) deployments, recently had a chance to participate in the first ETSI NFV Plugtests, held Jan. 23 to Feb. 3 in Madrid, Spain. Designed to perform interoperability testing among different telco vendors and open source providers, the event brought together a diverse group of industry representatives—including those from several open source organizations—ready to get their hands dirty and dive into interoperability testing. Participation in these types of test sessions, particularly in conjunction with others organizational players in the ecosystem (in this case, ETSI), shows that via greater interoperability, OPNFV is ready for complex deployments that ultimately bring the industry closer to a truly plug-and-play, end-to-end virtual network.
Representatives from OPNFV member organizations Ericsson and Intel were on-site to conduct a series of tests leveraging OPNFV as an NFV platform under different deployment scenarios. Combined, both groups executed 32 successful, approved tests with OPNFV in just under 10 days –an incredible feat! (For a test session report to be “approved,” it needed to be performed by a Management and Orchestration (MANO) provider with a VNF on a particular VIM & NFVi. All three parties—the MANO, VNF and VIM & NFVI providers—needed to approve the report to merit successful completion.)
The OPNFV project itself, as well as Ericsson and Intel, are very pleased with outcome, which speaks to the value of the OPNFV community’s efforts in the broader NFV landscape. Participation in the ETSI Plugtests (as well as OPNFV’s own Plugfests) is a great starting point to broaden OPNFV’s testing scope and capabilities across the industry, learning new lessons each time.
While the teams were able to accomplish a great deal during the event, there is still much to be done. For example, there were additional tests focused on specific hardware capabilities that the team was not able to execute due to incompatibilities of the virtualized system, as well as a failed attempt to run an additional OPNFV service function chaining (SFC) deployment but did not have the time. In the future, a longer pre-testing phase should allow more time to prepare the proper configuration, any needed workarounds, and have additional discussions with supporting vendors.
All in all, it was a successful 10 days and the OPNFV technical community is happy with what was accomplished. This has been a great achievement for the OPNFV project since it demonstrates maturity of the OPNFV platform, which is now ready for complex deployments. Moreover, it is a clear demonstration that open source Management and Orchestration (MANO) projects are ready to integrate with OPNFV. Additionally, Ericsson was approached by several VNF providers who asked for help with side testing—a testament to a streamlined process.
More details on the OPNFV test sessions that took place during the ESTI Plugtests are outlined on the OPNFV blog.
One of the leading items on embedded developers’ to-do lists these days is to add Amazon’s Alexa voice agent to a hacker board or another Linux device. Of course, you could simply buy an Alexa-enabled Amazon Echo speaker system for $180 — or a non-speaker Amazon Echo Dot for only $50 — but what fun is that? For some, the goal is to recreate the basic Alexa Skills of ordering pizza or asking random question like which countries were finalists in the 2014 World Cup. Others want to go a step further and use Alexa to voice activate robots, smart home devices, dashboard interfaces, and other gizmos using technologies like MQTT. From a hacking perspective, the first stage is easy, said PTR Group CTO and Chief Scientist Mike Anderson at Embedded Linux Conference 2017 in February.
The main challenge, Anderson explained in “Making an Amazon Echo Compatible Linux System,” is correctly interpreting Amazon’s sometimes convoluted menus for certifying and connecting the device. The presentation takes you step-by-step through the process of using a Raspberry Pi to register with Amazon Voice Services (AVS) and set up new skills in the Alexa Skills Kit.
Anderson investigated Alexa when a customer asked about voice-enabling plumbing fixtures. Although it may be a while “before we can say ‘Alexa — clean my toilet,’” he said, there are plenty of tasks that could benefit from a hands-free interface, such as home automation. “Of course, there used to be this thing called a light switch that seemed to work pretty well,” he added. “Alexa is the intelligent agent you didn’t know you wanted or needed. Some of my neighbors come over to my house just to ask it stupid questions.”
You can do similar things using AI voice agents such as Apple’s Siri, Microsoft Cortana, and Google Now, but usually only on your mobile device. In any case, Alexa seems a bit more mature, and it’s certainly more accessible to Linux developers. By opening Alexa up to third-party developers and allowing free educational and hobbyist use, Amazon has helped solidify Alexa’s lead in the market.”
Several thousand Alexa Skills – new voice commands and response connections – are already available, including many publicly available Skills like calling an Uber. When you say the right wake word, the Echo device sends the audio to the cloud, which processes the audio, figures out what skill it’s related to, and sends back the appropriate response.
After buying an Echo Dot and playing around with it, Anderson decided to set up his own Echo-like Alexa environment on his Raspberry Pi 3 based Pi-top laptop. He started by studying an iFixit teardown of the Echo Dot, which revealed that the Dot runs on a low-end, Cortex-A8-based TI DaVinci DM3725, similar to the TI SoC on the BeagleBone Black.
“So the Echo Dot is basically a BeagleBone with lots of audio processing cleanup technology,” said Anderson. Because the bulk of Alexa’s processing happens in Amazon’s cloud-based AVS, the voice agent can run on a numerous, low-end Linux home automation hubs and hacker boards. In fact, the Raspberry Pi 3’s quad-core SoC and 1GB of RAM are overkill.
The first challenge in developing an Alexa device is provisioning it to connect to the Internet and to AVS. The Pi-top makes this easier by offering a keyboard and trackpad, but many device targets lack those niceties. Aside from voice, the only other input on an Echo Dot is a button that wakes Alexa.
To use Alexa, the target must have a mic, a speaker, and WiFi. The Raspberry Pi 3 provides the WiFi and the audio circuitry, but the audio is unamplified. To address this, Anderson opted for a cheap Bluetooth speaker/mic add-on but then wished he had gone for a wired device. “There’s a bit of latency in waking up the Bluetooth mic, so you wait before you can give the command,” he said.
Setting up a device on AVS
The next step was to register as a developer at Amazon, which Anderson did from Raspbian. You could use something like Ubuntu MATE, but with Raspbian, there’s a handy Alexa sample app, and “you’ll find more online help.”
Anderson chose Node.js with JavaScript to develop Alexa Skills. The platform also supports Java 8. In either case, the code runs in the cloud, and it runs as a remote procedure call instead of a VM, which makes things easier, said Anderson.
The first job was to download the Alexa Sample Application from the GitHub repo, which “brings down all the sources for audio, wake word, and client,” explained Anderson. The device then connects to Amazon AWS, so you can “pull down credentials.”
Within the cloud-based AVS service, you can click on Alexa and register the product type. “You give your device an ID and go to a security profile screen where they ask for a name and a description,” said Anderson. “I just entered ‘Pi Laptop.’”
Amazon then generates a series of credentials that you copy into your build environment. Along the way, Amazon asks if you want access to Amazon Music Services. If so, you need to fill out another form.
Every time you ask Alexa a question, AVS pings a separate security server for the credentials, which requires the use of redirect URLs. “In the security profile setup process, there’s an option that asks if you want to edit a redirect URL,” said Anderson. This stumped Anderson for a while until he realized it was “asking for the port number of the connection to Amazon.” He finally found the origin URL (https://localhost:3000) and the return URL (https://localhost:3000/authresponse) that does the authentication.
Once the software is configured and installed with secure credentials, you must load the services needed to get to AVS: the web service, sample app, and wake-word engine. Anderson explained how to go to alexa-avs-sample-app/samples directory and start the web service, and how to register and provision the device.
After more menus and prompts, you move to the next phase of initializing a wake word engine. Anderson used KITT.AI, which he said worked better for him than the alternative. After that came the process of setting up the WiFi and IP interfaces. Anderson did this with TightVNC Server along with Avahi daemons. He also explained how to set up new Skills in AWS, and addressed issues like when to choose between a public or private designation.
All these steps involved “a little bit of hacking, but they’re not that hard,” he said. “Once you’ve done all the admin stuff, the code is not complicated, especially with Node.js. The main problem I had was with Amazon’s frequent time-outs.”
Anderson noted that his Alexa enabled Pi-top sometimes responds to a word other than the wake-word. Choosing a good wake-word helps, but it really comes down to the microphone. “The Echo Dot has six different mics and provides a lot of extra audio processing,” he said. “What I really need is a steerable phase array of microphones with beam forming for echo cancellation. Maybe I’ll tell you about it at next year’s talk.”
Anderson plans to move forward on Alexa-enabling a robot, but he seems ambivalent about whether he will make much use of Alexa at home. The lack of security is the biggest issue, said Anderson, who at last year’s ELC conference gave a new presentation on embedded Linux security.
“The downside of these systems is that they’re always listening, waiting for that wake word, and they’re always connected to the cloud,” said Anderson. “It’s kind of cool, but being a security guy, it makes me kind of nervous. I leave it unplugged most of the time.”
Connect with the Linux community at Open Source Summit North America on September 11-13. Linux.com readers can register now with the discount code, LINUXRD5, for 5% off the all-access attendee registration price. Register now to save over $300!
“Virtual reality (VR) is nothing new — people have been experimenting with it for decades. But only recently, we have come to terms with having commercial hardware like Oculus or HTC Vive to experience and enjoy VR content within our home,” says Rabimba Karanjai, a full-time graduate researcher and Mozilla contributor, who will be speaking about virtual reality development at the upcoming Open Networking Summit.
Such commercial devices have transformed how we consume VR experience; however, Karanjai explains, “all of these hardware devices come with their own SDK, their own set of rules to create VR applications and walled gardens in which to actually publish these games, stories, and applications.”
Rabimba Karanjai, full-time graduate researcher and Mozilla contributor
WebVR — an experimental JavaScript API — seeks to address these limitations and open up development by providing interfaces to let developers build VR experiences in the browser. We spoke with Karanjai to learn more.
Linux.com: Can you give our readers some background on WebVR? What’s the current state of development?
Rabimba Karanjai: We needed an open space, open standard to build and shape our virtual reality experience. And what better and mature open platform is out there than the World Wide Web? WebVR is there to make the experience truly global, cross-platform, and easy to approach.
So what is WebVR? Hardware that enables virtual reality applications requires high-precision, low-latency interfaces to deliver an acceptable experience. Other interfaces, such as device orientation events, can be repurposed to surface VR input, but doing so dilutes the interface’s original intent and often does not provide the precision necessary for high-quality VR. The WebVR API provides purpose-built interfaces to VR hardware to allow developers to build compelling, comfortable VR experiences within the browser.
WebVR is an experimental JavaScript API that provides access to virtual reality devices, such as the Oculus Rift, HTC Vive, Samsung Gear VR, or Google Cardboard, in your browser. Suddenly now you can build VR experience and applications which can work inside your browser and hence doesn’t depend on specifically one hardware or software. The WebVR API Spec is still in draft stage and constantly evolving. I encourage you to have a look at it here and also in the W3C working group.
Linux.com: Can you describe some potential applications?
Karanjai: The applications as it stands are limitless. The most common use case we have been watching from the demos and code contributions mostly revolve around creating immersive experience based on VR. We have contributors building immersive stories with it, a virtual world where you can actually experience the story. A very interesting field is we see a lot of game development attempts with immersive content coming up.
Also, we have A-Painter where you can paint in 360 degree virtual world and webVR enables you to share those painting and experiences with others with just a web URL, which you can essentially tweet or share. And the person will be able to immediately immerse and go into the virtual scene. We have A-Blast, a virtual single person shooter game, metaverse, a universe of Web Virtual reality objects, panorama and 360 degree viewers. Use case varies from having realtime virtual reality collaborative classrooms to having immersive meetings in virtual space.
We have applications of VR in ranging from educating people to military and training purposes, too. So what is possible with WebVR is truly limitless. We have a blog at https://aframe.io/blog/ where we showcase the newest creations from our contributors at a weekly basis.
Linux.com: What is A-Frame and how does it facilitate development of VR applications?
Karanjai: A-Frame is a web framework for building virtual reality experiences. It was started by Mozilla VR to make WebVR content creation easier, faster, and more accessible. A-Frame is aimed squarely at the web developer community, the vast majority of whom have been frozen out of WebVR development because they don’t know WebGL, the powerful but complex 3D API that WebVR runs on.
A-Frame lets you build scenes with just HTML while having unlimited access to JavaScript, three.js and all existing Web APIs. A-Frame uses an entity-component-system pattern that promotes composition and extensibility. It is free and open source with a welcoming community and a thriving ecosystem of tools and components.
The motivation behind A-Frame was to bring the barrier of entry down for creation of more WebVR content. A-Frame essentially makes it very easy to rapidly prototype and create WebVR content without going into the nitty gritty of three.js. Developers can concentrate more on creating content using predefined entity and components and as well as create their own which can be reused later. They can also choose to use components made by community and quickly build their vr experience. We already have a NPM style A-Frame component system in place here, which will be the home of all verified and curated A-Frame components in future.
Linux.com: Are there particular challenges facing the project, or successes that you’d like to share?
Karanjai: WebVR is a living standard and a lot of things are being changed and worked upon. Those changes reflect what gets into A-Frame. We actually had a remarkable number of contributors onboard in such a short amount of time and a lot of very interesting projects, talks and scenes have come up from the awesome community. We try to maintain a curated list of those in a GitHub repository here.
Linux.com: What’s ahead for WebVR?
Karanjai: We have exciting times ahead for WebVR. With Oculus, HTC Vive, and Daydream all supporting interactions, now you can not only experience the virtual reality but also interact with the elements in it. This interaction opens up a universe of possibilities and opportunities. With room-scale VR, we can now track a user’s position as well as movement in a virtual space. And it makes it much exciting to mash up this with the power of open web and APIs we already have at our disposal. We can mash up a VR model with knowledge-based APIs, YouTube APIs, and even a IoT device like Raspberry Pi to have your own virtual living assistant whom you can actually see and can interact with. You can mash these models up with WebRTC based communication or firebase to have real-time interaction and multi-user experience where the users literally need to enter a same URL or chatroom kind of experience.
We already have a lot of users trying to mash up mobile camera overlaying with VR objects to create an augmented reality-like experience as you can see here, and you can see how quickly you can prototype those here. We have just scratched the surface of what is possible. You can see a lot of inspiring and awesome examples of what everyone is imagining and prototyping in the aframe.io/blog. This is the most exciting time to get involved in the WebVR and A-Frame community!
Rabimba Karanjai is a full-time graduate researcher, part-time hacker, and FOSS enthusiast. He used to write code for IBM Watson and do a bunch of other things at their lab. At present, he’s crawling his way toward a PhD at Rice University. He contributes with Mozilla WebVR, Security and Emerging Technologies team and is a Mozilla TechSpeaker. His interests include performance optimization and exploiting parallelization for VR applications, as well as privacy and security. He generally blogs at blog.rabimba.com and can be contacted @rabimba.
Open Networking Summit April 3-6 in Santa Clara, CA features over 75 sessions, workshops, and free training! Get in-depth training on up-and-coming technologies including AR/VR/IoT, orchestration, containers, and more.
Linux.com readers can register now with code LINUXRD5 for 5% off the attendee registration. Register now!
App Engine is Google’s platform-as-a-service for building application backends without having to worry about maintaining a complex infrastructure.
The big news is that App Engine now supports any programming language, so a developer can create the app in whatever language they are comfortable using. Google sees this as a game changer, making the platform more open, which is a big theme with the company as it transitions to try and lure enterprise customers to Google Cloud Platform in general.
Sam Ramji, VP of product management at Google points out that App Engine was initially an entirely closed environment. “What we are launching is an open generation of App Engine,” Ramji said.
Henrik Johansson, senior developer at Eniro, gives a glowing review of the ScyllaDB database system for its part of a microservice-based pipeline used at the Swedish search and directory assistance company where he works.
Eniro initially used Redis for what seemed like a simple task: relate a large set of transient identifiers A to another large set of other identifiers B. Its previous experience with MongoDB and PostgreSQL had brought problems with scaling though, and though Redis was fast and stable for a time with this project, latency eventually became a problem.
A combination of the programming language Go, the web framework Echo, the open source messaging system NATS and ScyllaDB proved fast, with low latency and requiring no extra tuning, he explained in a blog post.
As the IT world is turning toward Linux for many projects, Microsoft has come up with a new offering to tap into this growing market. Bash on Windows is the answer. Here we guide you through installing Bash on Windows and give you a taste of what you can do—and why you would do it—in the Linux command line.
An overview of Bash on Windows
Bash on Windows is a new feature added to Windows 10. Microsoft has teamed up with Canonical, aka the creators of Ubuntu Linux, to build this new infrastructure within Windows called the Windows Subsystem for Linux (WSL).