On the previous posts we talked about some of the basic Linux commands, and today we continue our journey and we will talk about something very important in Linux which is Environment Variables
So what are Environment Variables and where it is and the benefit of knowing it?
Well the bash shell we use to run our commands uses a feature called Environment Variables to store some values which is required by the running programs or scripts from that shell, actually this is a very handy way to store persistent data and make it available for any script or a program when you run it from the shell
There are two types of environment variables in the bash shell:
Global variables
Local variables
Global variables are visible from the shell session and for any running process that run from the shell.
Local variables are visible in the shell that creates them.
As operating systems, Linux/Unix put the user’s privacy and safety above all. While this has resulted in a product that many people swear by, it’s also led to certain features that may not be easy to discern at first sight. For instance, the possibility of password protecting directories without using encryption is something that many people don’t know about. While encrypting is definitely useful, it also has certain issues associated with it, including:
1. Decreased performance
No matter how strong your system is, opening encrypted folders tends to take up a considerable amount of resources, resulting in a slower and more cumbersome computer that’s not always fun to use.
2. Encryption prevents the folder’s contents from being searchable/indexed
By its very nature, encryption hides content. Therefore, the files inside the folder you’ve encrypted will not show up on any search or index attempts, which can be quite annoying when you’re looking for something specific.
As you can see, there are a number of issues that pop up whenever encryption is involved. While this kind of protection is necessary for sensitive material, a simple password would be enough to deter strangers from accessing folders of lesser importance. Luckily, Linux/Unix allow for this kind of password protection system as well, as evidenced by the following methods:
1. Changing file permissions
By modifying the permissions of certain files and folders, you can control who gets to access them. This way, they will only be readable by their owner. Anyone who’d want to change these permissions would have to type in a password, or sudo as root, which also requires a password. To change the permissions, just use the “chmod og-rwx filename” command on all the files you want to restrict access to.
2. Create a new user
You can also choose to create a new user for all your protected files and directories. Simply employ the “chown $newuser filename directoryname” and “chmod og-rwx filename directoryname” commands, taking care to replace “$newuser” with the new user account name. By using this method your files will be safe even if you forget to log out for any reason.
The methods described above do a good job of protecting your folders from unwarranted intrusions without resorting to encryption. Of course, a password protection system would be nothing without a good password, so take the time to come up with something that’s easy to remember for you, but hard to guess for others. Ideally, you should shy away from using information about yourself as a base for any password, since such passwords can rather easily be detected through some basic social engineering techniques. In fact, for most people nowadays it’s much easier to simply use a good password generator instead. These can be readily found online and generate passwords that are much harder to guess. Just be sure to write them down somewhere or use a dedicated password manager, lest you risk getting locked out of your own accounts.
That concludes our quick guide on how to password protect a folder on Linux/Unix the easy way. Keep in mind that this method is only recommended for sheltering low-priority folders, with encryption still being an irreplaceable tool when it comes to more important content.
This week in open source and Linux news, open source industry leaders and executives have been vocally against President Trump’s immigration ban, the newly-announced KDE laptop could cost you more than 1.3k, and more! Keep reading to stay on top of this busy news week.
Open source leaders such as Jim Zemlin and Abby Kearns voice objection to President Trump’s immigration ban in official organization statements.
1) Open source industry leaders- including Jim Zemlin, Jim Whitehurst, and Abby Kearns- are firing back at President Trump’s immigration ban with firm opposition.
This talk from Node.js Interactive provides concrete knowledge of what going serverless really means, so you can decide if it makes sense for your own infrastructure.
Linux is well known for being a highly secure platform. One of the reasons for said security is the Netfilter system. For those that don’t know, Netfilter is a framework, provided by the Linux kernel, that allows for various networking operations, such as packet filtering, network address translations, port translation, and the ability to block packets from reaching specific locations. For most distributions, Netfilter is implemented through the user-space application, iptables. Although many would agree thatiptables is the most powerful security tool you can work with, along with that power comes a level of complexity that stumps many an IT administrator.
That’s where the likes of Shorewall comes into play. Shorewall is an open source firewalling tool that not only makes the task of network security easier, it also allows for much easier handling of zones. Shorewall uses zones to define different portions of a network. Say, for instance, you want to create a private internal network that can only be accessed by specific machines, a guest network that can be accessed by anyone, a network dedicated to production machines, and a network that can be accessed from machines outside your Local Area Network (LAN). With Shorewall, you can easily do this.
How Shorewall works
Shorewall is a high-level configuration tool for Netfilter. Shorewall works by reading configuration files (with the help of iptables, iptables-restore, ip, and tc) found in /etc/shorewall. The primary files used are:
Interfaces — defines the physical networking interfaces to be used
Policy — defines the high-level policy for connections between zones
Rules — defines connection establishment by defining exceptions to the policy file
Zones — defines your network zones
Shorewall can be used on a dedicated firewall system, a multi-function gateway, a router, a server, or a standalone system. One thing to note is that Shorewall is not a daemon. Once Shorewall has done its job configuring the networking subsystem (by way of the configuration files above), it’s job is done. You will not find a Shorewall process running in the background. Shorewall can also handle systems with multiple IP interfaces/addresses.
For the sake of simplicity, I’m going to walk you through setting it up on a system with a single IP address and single interface to allow SSH traffic to come in from an external address. NOTE: This sample would also require you to set up your external-facing modem to route traffic properly (otherwise, the packets wouldn’t even make it to the Shorewall-enabled system.
With that said, let’s install Shorewall and set up a basic configuration.
Installation
The installation of Shorewall is actually quite simple. I’ll demonstrate on an Ubuntu Server system, but the installation on CentOS or other system is similar (using a different package manager, of course). For installation, just open up a terminal window and issue the following two command:
sudo apt-get update
sudo apt-get install shorewall
Once the installation finishes, you need to set Shorewall to run. To do this, open up the file /etc/default/shorewall and set startup=0 to startup=1. Save and close that file.
Out of the box, Shorewall doesn’t add configuration files to the default directory (/etc/shorewall). Instead, you must copy the necessary files from one of the following directories:
At this point, you’re now ready to configure Shorewall.
Configuring for SSH
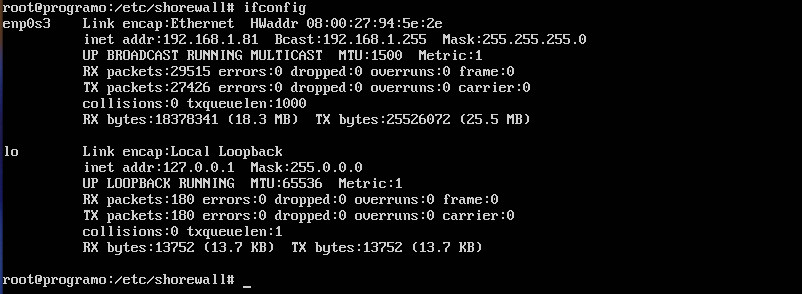
For our example, suppose we want to restrict secure shell access such that server at IP address 192.168.1.81 can only be reached by server at the 192.168.1.162 address. To do this, we have to work with the zones, interfaces, policy, and rulesfiles. To complete this action, you’ll have to know the name of your interface to be used. This information can be discovered by issuing the ifconfig command (Figure 1).
Figure 1: Our interface name is enp0s3.
We’ll first create a new zone and call it loc (for local traffic). Open up the /etc/shorewall/zones file and add the following two lines to the bottom:
net ipv4loc ipv4
Save and close the file.
Now let’s open up the /etc/shorewall/interfaces file for editing and add the following to the bottom:
loc enp0s3
Save and close that file.
Next we open the /etc/shorewall/policyfile and add the following line ABOVE the second to last line:
locnetACCEPT
The last three lines of this file should now read:
locnetACCEPT# THE FOLLOWING POLICY MUST BE LASTallallREJECTinfo
Save and close that file.
Now we must edit the /etc/shorewall/rulesfile. This is one of the most important (and challenging) of the files to be edited. Remember, we are wanting to secure shell from 192.168.1.162 into 192.168.1.81. At the bottom of the rules file, you’ll need to add the following two lines:
The DNAT entry is used for port forwarding. Without this entry, Shorewall would not know where to send the ssh request to.
Save and close that file.
Checking and restarting
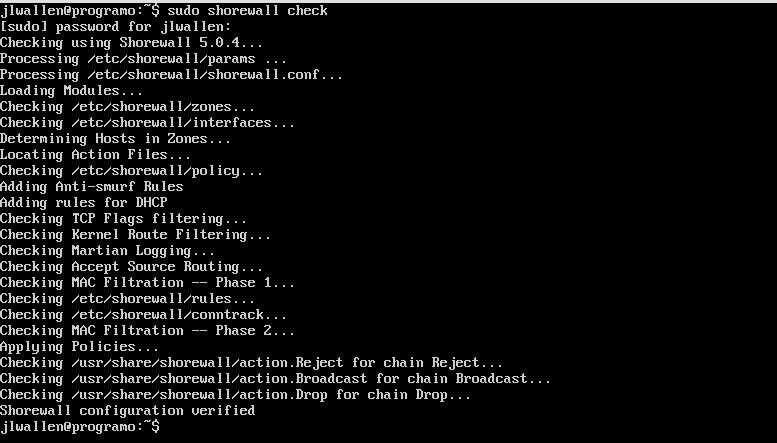
After you’ve configured and saved all your files, you need to run a check on them. Fortunately, Shorewall has a built-in checking tool. From a terminal window, issue the command sudo shorewall check. Shorewall will run through all of your config files to make sure there are no problems (Figure 2). Figure 2: Checking for issues with the Shorewall check tool.
If no problems are found, clear Shorewall with the command sudo shorewall clearand then restart Shorewall with the command sudo shorewall restart.
At this point, you should now be able to secure shell into the 192.168.1.81 server from the machine at IP address 192.168.1.162.
Keep going
At this point, you have a basic understanding of how Shorewall works. It would behoove you to read through the crucial man pages:
man shorewall-zones
man shorewall-policy
man shorewall-rules
With the basic information you have, and the information available in the man pages, you should be able to make Shorewall do exactly what you want. Keep your systems safe, route your traffic as you need, and keep going with Shorewall.
Stay one step ahead of malicious hackers with The Linux Foundation’s Linux Security Fundamentals course. Download a sample chapter today!
A short outage this week on the GitLab hosted code service struck a combination of fear and sympathy across the tech community and offered a sharp reminder of the importance of testing your backups again and again (and again).
On Tuesday, a GitLab administrator had accidentally erased a directory of live production data during a routine database replication. In the process of restoring from the last backup, taken six hours prior, the company had discovered that none of its five backup routines worked entirely correctly. The incident report, which GitLab posted online, noted that erasure affected issues and merge requests but not the git repositories themselves.
Although Serverless has become a bit of a buzzword recently, Steven Faulkner, Director of Platform Engineering at Bustle, disagrees that it is just a fad. In his talk at Node.js Interactive, he points out that much of the faults that people find in Serverless — that it doesn’t scale, that it is not production ready, that it’s too slow and expensive — are provenly false.
Faulkner has made Serverless the backbone for Bustle’s content since it became a thing a couple of years ago. This means he is in charge of all things back-end, but does a lot of front-end work, too. At Bustle, one of the largest women’s media properties online, they use serverless for 99 percent of the requests. This translates to between 10 and 20 million calls per day. Serverless has a latency of less than 200ms average, and it costs less than than their EC2 (Amazon Elastic Compute Cloud) base setup.
Serverless 101
Faulkner also addresses some of the misconceptions surrounding Serverless. The first is, admittedly, down to the name of the concept itself. Serverless is a misnomer because, clearly, there are still servers deep down somewhere.
However, Serverless is the result of answering the question “What if we abstracted all the servers away?” — that is, what happens when you create a service that relieves the developers and admins from having to worry about the underlying server? Serverless implements “anything and everything as a Service,” which is not a new concept.
Faulkner says Serverless is really about Functions as a Service (FaaS). The core tenants of FaaS are that code is only run when needed, you only pay when code is run, and you are not bothered with the details, in fact, your app is a function that sits between the request from and the response to the user:
requestyourApp()response
There are several providers offering Serverless-Function as a Service. For example, Microsoft Azure has Azure Functions and Google has Cloud functions. IBM has an open source service called OpenWhisk. Faulkner, however, Faulkner thinks Amazon Web Services is ahead of everyone else in this arena and described some examples in his talk.
Why Use Serverless
Faulkner says there are several advantages to deploying web apps to a Serverless service. Despite what many think, Serverless does not mean NoOps; it means Less Ops. Serverless also scales, in the sense that fewer things change between when you have 1 request per second, and when you have 1000 requests per second.
Price is another factor. You only pay when somebody is using your code. This means you can maintain legacy services that you are not sure you should turn off quite yet, or you can deploy services you are not sure will be successful at zero cost.
But even when your code is running, it is still cheaper. Faulkner says that an API he uses to trail all the user tracking and event tracking on the Bustle website and then route it where it’s meant to go costs $2500 month on EC2. On Lambda/API Gateway only $400 month.
For developers, it is easier to iterate at function-based level rather than on your whole application, and Serverless allows for single function deployments. This means you can do things very quickly by re-writing one single function and you can deploy it without affecting the whole. Amazon’s service also makes for quicker deployments because you can deploy 50 functions and alias them all at once.
Why Not Use Serverless
There are, however, also several reasons why you may not want to use a Serverless service like Amazon’s. There is, for example, the risk of becoming locked in. Migrating from a Serverless FaaS can be a minefield, but, according to Faulkner, from Amazon it is not that hard. He has a chunk of code 9 lines, an Express server, that calls the Lambda functions if you have to migrate.
Another problem is running cold functions. If you’re doing something outside the function, like loading a bunch data before the first time your function runs, this can delay the first run an unacceptably long time. Amazon solves the problem by running all your functions within 3.5 hours of the upload.
Testing is yet another area that can cause problems. Testing individual functions is not too difficult according to Faulkner. But when you want to do integration testing across all of your functions, that is still painful.
Serverless at Bustle
At Bustle, the front-end serves up HTML and JavaScript through the API gateway. The application reads some static assets through S3 and uses Lambda for SSR (Server Side Rendering) to generate the actual pages.
On the back-end, Bustle uses GraphQL to fetch most of the data. The JSON generated by GraphQL is processed through API Gateway and Lambda, which are talking to dynamodb or redis, with some PostgreSQL thrown into the mix.
Tools
Despite all its advantages, if you are deploying more than two functions, it is very painful to deploy your stuff manually. That’s where the tooling comes in. Faulkner mentions Serverless Framework, node-lambda, apex, claudia.js as tools to check out. But, he also recommends his own open source tool, shep, which will allow you to build and deploy your serverless applications to Amazon’s Lambda with a few simple commands.
For more examples and details, watch the complete presentation below:
If you are interested in speaking or attending Node.js Interactive North America 2017 – happening in Vancouver, Canada next fall – please subscribe to the Node.js community newsletter to keep abreast with dates and time.
Unemployment rates in the IT industry are still hovering at historic lows, and some roles — like network and security engineers and software developers — are showing unemployment rates of around 1 percent. A recent survey from Robert Half Technology showed that the majority of CIOs will either expand their IT teams or focus on filling out vacant roles, while the 2017 IT Forecast from TEKsystems shows that confidence is high and IT budgets are rebounding. Overall, it’s a fairly rosy outlook for IT professionals this year, especially those with specific skill sets. Here, our experts tell us which skills will be hottest in 2017.
A team made of former Cisco and Nuage Networks veterans has developed an open source project it released this week named Trireme that takes an application-centric approach to securing code written in containers.
Trireme is deigned to work with Docker containers and integrates with Kubernetes, the open source container orchestration platform. Reuven Cohen, who was formerly at Citrix and now runs development at Aporeto, says the goal of Trireme was to develop an agile security platform that doesn’t come with the complexities of managing network-based security mechanisms. “Aporeto Trireme attaches security to the application by authentication and authorization,” the project’s web site explains. “This method is simple, scalable, and network-agnostic.”
Ready to give your old computer a new lease on life? Even if it’s several years old and slow as molasses, you don’t have to consign it the junk heap. Instead, install a new operating system and put it back into the rotation. Forget Windows, though: Linux is an open-source (and free) OS that’s just as capable, but with lower system requirements and fewer security issues. Deploy it and your old desktop or laptop will feel very much like new.
For most users venturing down this road for the first time, the biggest challenge lies in deciding which version (aka distribution, or “distro”) of Linux to choose. There are literally hundreds of them, all with similar underpinnings but often vastly different user interfaces, application bundles, update frequency, support options and so on. So how do you pick?