The most popular way to circumvent censorship is with a VPN (Virtual Private Network).
As the name suggests, a virtual network allows you to connect to another server and establish an encrypted tunnel between it and your internet-capable device.
The Mirai botnet? Just the “tip of the iceberg” is how security bods at this week’s linux.conf.au see the Internet of Things.
Presenting to the Security and Privacy miniconf at linux.conf.au, embedded systems developer and consultant Christopher Biggs pointed out that Mirai’s focus on building a big DDoS cannon drew attention away from the other risks posed by insecure cameras and digital video recorders.
IoT offers a full suite of risks, he said: a perpetrator could just as easily use badly-secured cameras or recorders to stalk a victim, or download videos for blackmail. There’s a huge potential for mass data collection by someone driving around “sniffing for vulnerable devices”, and there’s plenty of scope for unauthorised control.
In order to be suitable for business class use, particularly in regards to replacing outdated, clumsy, and prone-to-failure business presentation methods, a product must be versatile. This product must be secure. Most importantly, this product must be sized conveniently for the frequent traveling the average businessman endures. To the surprise of, perhaps everyone, this could be where Google’s Chromecast comes in.
What was previously thought only as a consumer streaming device, capable only of streaming Netflix, HBO, YouTube or your favorite MLB, NBA, or various sporting events, the Google Chromcast, which can be purchased for a very competitive $35, is capable of much more.
The Chromcast, weighing in at 1.2 Oz, built in a circular shape reminiscent of a puck, can fit into virtual any laptop bag, carry-on, or luggage has the ability to stream any web page accessible via Google’s Chrome browser to any screen or monitor with an HDMI input. That’s big. Huge, in fact.
Why is this such a big deal? It’s the ease-of-use. It’s Google’s dedication to seamless functionality. It’s the difference between a ten (or more) minute delay due to technical difficulties brought on by convoluted projector settings and a knock out of a presentation with near zero delay between screen and laptop throughout. The Chromecast discovers your Wi-Fi network, and once connected to your chosen device, be it a laptop, tablet, or phone, everything is ready to go.
Beyond the ease-of-use, it wouldn’t take one long to conceptualize what’s possible by simply streaming Chrome browser tabs. There is countless web apps available tailor-made for business use. Go-To-Meeting (gotomeeting.com), for instance, makes hosting meetings with remote employees easier than ever, or, if everyone is in the room, Creately, will ensure that your business plans are brilliantly visualized, with the ability to access cloud-stored flowcharts that your entire team can access and corroborate notes on.
Of course, the benefits don’t end with streaming Chrome tabs, as there is a selection of Google’s business wise apps, including Google’s Docs, and Slides apps; respectively, these two apps are entirely cloud based, and more and more comparable to their competing Microsoft Word apps as time goes on.
For all the business teams out there, looking for ways to everyone in the room to contribute to a conference, you may be excited to find out that anyone in the room with Chromecast installed on their PC or mobile devices can share their screen, as well. A simple click or touch of the casting button in the app will immediately place what is on their screen into the visual conversation. This could be especially useful for anything ranging from note sharing to swapping to an entirely different presentation within the blink of an eye.
There has to be a catch, right? With all of these fantastic business features at your fingertips, all just by inserting a simple HDMI dongle, foregoing countless cables in the process, there has to be some reason why there aren’t more business users raving about Google and their Chromecast, and as sad as it is to declare, there are a few choice issues holding the Chromecast back from being a true business class product.
For starters, as ready as the Chromecast is for presentation primetime, it is prone to infrequent, and sometimes frequent, slowdowns when the Chromecast is on a network with many connected users. This can be remedied by Chromecast’s guest mode, allowing each user to connect via their own networks, if available (a big if, indeed).
Unfortunately, those won’t be the only network roadblocks that will occur, a much bigger issue will be the Chromecast’s willingness to connect to your highly sensitive corporate network to begin with. The Chromecast makes itself known to any network via specific ports, meaning it requires a network which is somewhat open, for instance, your average home connection. As we all know, corporate connections are not, and cannot function in this manner. So, unless one has access to opening network ports, similar to how Cisco instructs with their equipment, your Chromecast business plans may just be on hold until Google provides a solution.
However, if at all able to leap through those network related pitfalls, the Google Chromecast could very well be exactly what you and your business partners are looking for. Broadband for business has many benefits and you don’t have to use them all, but when it comes to presentation solutions, for as reasonably priced, or as adequately sized for travel, there really are no options quite as well suited for the job.
In this tutorial we will show you how to install and configuration Webmin on Ubuntu 16.04. For those of you who didn’t know, Webmin is a free control Panel for managing VPS. Webmin is a web based interface which is used to manage VPS web hosting server. With the help of webmin you can setup user account, apache, dns and file sharing and other actions. Webmin very suitable for beginners who do not know much about the unix or linux command line.
This article assumes you have at least basic knowledge of linux, know how to use the shell, and most importantly, you host your site on your own VPS. The installation is quite simple and assumes you are running in the root account, if not you may need to add ‘sudo’ to the commands to get root privileges. I will show you through the step by step installation Webmin on a Ubuntu 16.04 LTS (Xenial Xerus) server.
This is a simple application which enables the control of a GPIO line via a web browser. To toggle the line HIGH/LOW, click on a rectangle. This app can be used to control a relay Tibbit, a LED Tibbit, or some other “output” Tibbit.
The app utilizes a popular socket.io library to facilitate a connection without interruption between the TPS and the browser, as well as the AngularJS V1.x.x front-end framework that makes the development of single-page applications simple.
git clone https://github.com/tibbotech/tps-gpio-tutorials
cd tps-gpio-tutorials
npm install .
cd one-led
Launch the app:
node server
server.js
Comments in the code explain how it works
// Requires HTTP as WebSocket server modules
const express = require("express");
const app = express();
const http = require('http').Server(app);
const io = require('socket.io')(http);
const gpio = require("@tibbo-tps/gpio");

// Serves static assets from the 'public' folder
app.use("/", express.static('public'));

const led = gpio.init("S15A");

if(led.getDirection() === "input"){
    led.setDirection('output');
    led.setValue(1);
}

// Listens to the incoming WebSocket connection
var clients = io.on('connection', function(socket){
    // When the connection is established
    console.log('USER CONNECTED');

    // Reads I/O line state..
    // ..and broadcasts it to all the connected clients
    var value = led.getValue();

    clients.emit('tps:state:changed', value);

    // When any of the connected clients require a change of the line state
    socket.on('web:state:changed', function(value){
        // Changes the line state...
        led.setValue(value);

        //.. and broadcasts it to all the clients
        clients.emit('tps:state:changed', value);
    });

    socket.on('disconnect', function(){
        console.log('USER DISCONNECTED');
    });
});

// Runs HTTP server on :3000 port
http.listen(3000,function(){
    console.log("LISTENING");
});
Web client
index.html
Comments in the code explain how it works:
<html lang="en">
    <head>
        <meta charset="UTF-8">
        <title>Title</title>
        <script type="text/javascript" src="https://cdnjs.cloudflare.com/ajax/libs/socket.io/1.4.8/socket.io.min.js"></script>
        <script type="text/javascript" src="https://cdnjs.cloudflare.com/ajax/libs/angular.js/1.5.0/angular.min.js"></script>
        <script type="text/javascript" src="client.js"></script>
        <link href="main.css" rel="stylesheet" type="text/css"/>
    </head>
    <body ng-app="leds"> <!-- The ng-app directive bootstraps your Angular application -->

    <!-- The ng-controller directive attaches controller to a view -->
    <!-- The ng-hide directive hides DOM element depending on the 'locked' varibale -->
    <svg version="1.1" xmlns="http://www.w3.org/2000/svg" x="0px" y="0px" width="110px" height="110px" xml:space="preserve"
                ng-controller="ledsController"
                ng-hide="locked">

                <!-- The ng-class directive changes class of the DOM element depending on the 'state' variable -->
        <!-- The ng-click directive evokes the function on click by DOM element -->
                <g transform="translate(5,5)" class="led-icon">
                    <rect width="100" height="100" class="frame"></rect>
                    <rect x="10" y="10" width="80" height="80"
                        class="led"
                        ng-class="(state ? 'on' : 'off')"
                        ng-click="switch()">
                    </rect>
                </g>
            </svg>
    </body>
</html>
client.js
Comments in the code explain how it works:
angular.module('leds', [])
    .controller('ledsController', function($scope) {
        var socket = io(); //

        $scope.locked = true; // Disables the view by default

        socket.on('connect', function () { // On connection established
            $scope.locked = false; // Enables the view
            $scope.$apply(); // Re-renders the view
        });

        socket.on('disconnect', function () { // Hides everything on disconnect
            $scope.locked = true;
            $scope.$apply();
        });

        socket.on('tps:state:changed', function (value) { // Catches the 'tps:state:changed' event
            $scope.state = value == 0;
            $scope.$apply();
        });

        $scope.switch = function() { // Sends the inversed value of the 'state' variable
            console.log($scope.state ? 1 : 0);
            socket.emit('web:state:changed', $scope.state ? 1 : 0);
        }
    });
In this presentation, kernel hacker Jan Lübbe will explain why apparently reasonable approaches to long-term maintenance fail and how to establish a sustainable workflow instead.
The good old days when security breaches only happened to Windows folk arefading fast. Malware hackers and denial of service specialists are increasinglytargeting out of date embedded Linux devices, and fixing Linux security vulnerabilities was the topic of several presentations atthe Embedded Linux Conference Europe (ELCE) in October.
One of the bestattended was “Long-Term Maintenance, or How to (Mis-)Manage Embedded Systemsfor 10+ Years” by Pengutronix kernel hacker Jan Lübbe. After summarizing the growing security threats in embedded Linux, Lübbe laidout a plan to keep long-life devices secure and fully functional. “We need tomove to newer, more stable kernels and do continuous maintenance to fixcritical vulnerabilities,” said Lübbe. “We need to do the upstreaming andautomate processes, and put in place a sustainable workflow. We don’t have anymore excuses for leaving systems in the field with outdated software.”
As Linux devices grow older, traditional lifecycle procedures are no longer upto the job. “Typically, you would take a kernel from a SoC vendor or mainline,take a build system, and add user space,” said Lübbe. “You customize that andadd an application, and do some testing and you’re done. But then there’s amaintenance phase for 15 years, and you better hope you have no platformchanges, or want to add new features, or need to apply regulatory changes.”
All these changes increasingly expose your system to new errors, and requiremassive updates to keep in sync with upstream software. “But it’s not alwaysunintentional errors that occur in the kernel that lead to problems,” saidLübbe. “These vendor kernels never went through the mainline communityreview process,” he added, noting the backdoor found last year in an Allwinner kernel.
“You cannot trust that your vendor will do the correct thing,” continued Lübbe.“Maybe only one or two engineers looked at that backdoor code. That would neverhappen if the patch was posted on a Linux kernel mailing list. Somebody wouldnotice. Hardware vendors don’t care about security or maintenance. Maybe youget an update after one or two years, but even then it usually takes yearsbetween the time they start developing based on one fixed version to the point theydeclare it stable. If you then start developing on that base, you add maybeanother half a year, and it’s even more obsolete.”
Increasingly, embedded developers working with long-life products build on LongTerm Stable (LTS) kernels. But that doesn’t mean your work is done. “After aproduct is released, people don’t often follow the stable release chainanymore, so they don’t apply the security patches,” said Lübbe. “You’re gettingthe worst of both worlds: an obsolete kernel and no security. You don’t get thebenefit of testing by many people.”
Lübbe noted that Pengutronix customers that used server-oriented distributionslike Red Hat often ran into problems due to the rapid rate of customizations,as well as deployment and update systems that assume a sysadmin is on duty.
“The updates can work for some things, especially if they are x86, but eachproject is basically on its own to build infrastructure to update to newreleases.”
Many developers choose backporting as a solution for updating long-lifeproducts. “It’s easy in the beginning, but once you are no longer in the project’smaintenance window, they don’t tell you if the version you use is affected by abug, so it becomes much more difficult to find out if a fix is relevant,” saidLübbe. “So you pile up patches and changes and the bugs accumulate, and youhave to maintain them yourself because no one else is using those patches. Thebenefits of using open source software are lost.”
Follow Upstream Projects
The best solution, argues Lübbe, is to follow releases maintained by upstreamprojects. “We’ve mostly focused on mainline based development, so we have aslittle difference as possible between the product and the mainstream kernel andother upstream projects. Long-term systems are well supported in mainline. Mostsystems that don’t use 3D graphics can run very few patches. Newer kernel versions alsohave lots of new hardening features that reduce the impact ofvulnerabilities.”
Following mainline seems daunting to many developers, but it’s relativelyeasy if you implement procedures from the start, and then stick to them, saidLübbe. “You need to develop processes for everything you do on the system,” hesaid. “You always need to know what software is running, which is easier when you use a good build system. Each software release should define the complete system so you canupdate everything in the field. If you don’t know what’s there, you can’t fixit. You also want to have automated testing and automated deployment of updates.”
To “save an update cycle,” Lübbe recommends using the most recentLinux kernel when you start developing, and only moving to a stable kernel whenyou enter testing. After that, he suggests updating all the software in thesystem, including kernel, build system, user space, glibc, and components likeOpenSSL every year, to versions that are supported by the upstream projects for the restof the year.
“Just because you update at that point doesn’t mean you need todeploy,” said Lübbe. “If you see no security vulnerabilities, you can just putthe patch on the shelf and have it ready if you need it.”
Finally, Lübbe recommends looking at release announcements every month, andchecking out security announcements on CVE and mainline lists every week. Youonly need to respond “if the security announcement actually affects you,” headded. “If your kernel is current enough, it’s not too much work. You don’twant to get feedback on your product by seeing your device in the news.”
Embedded Linux Conference + OpenIoT Summit North America will be held on February 21 – 23, 2017 in Portland, Oregon. Check out over 130 sessions on the Linux kernel, embedded development & systems, and the latest on the open Internet of Things.
Linux.com readers can register now with the discount code, LINUXRD5, for 5% off the attendee registration price. Register now>>
Companies or organizations that don’t have a strong open source compliance program often suffer from errors and limitations in processes throughout the software development cycle that can lead to open source compliance failures.
The previous articlein this series covered common intellectual property failures. This time, we’ll discuss the four common open source license compliance failures and how to avoid them.
License compliance problems are typically less damaging than intellectual property problems, as they don’t have the side effect of forcing you to release your proprietary source code under an open source license. But license compliance failures may still have serious consequences including:
An injunction preventing a company from shipping a product until source code is released.
Support or customer service headaches as a result of version mismatches (as a result of people calling or emailing the support hotline and inquiring about source code releases).
Embarrassment and/or bad publicity with customers and open source community.
4 Common OS License Compliance Failures
Problem #1: Failure to publish or make available source code packages as part of meeting license obligations
How to avoid it:Follow a detailed compliance checklist to ensure that all compliance action items have been completed when a given product, application, or software stack is released into the market.
Problem #2: Failure to provide correct version of the source code corresponding to the shipped binaries.
How to avoid it:Add a verification step into the compliance process to ensure that you’re publishing the version of source code that exactly corresponds to the distributed binary version.
Problem #3: Failure to release modifications that were introduced to the open source software being incorporated into the shipping product.
How to avoid it:
Use a bill of material (BOM) difference tool that allows the identification of software components that change across releases
Re-introduce the newer version of the software component in the compliance process
Add the “compute diffs” of any modified source code (eligible for open source distribution) to the checklist item before releasing open source used in the product.
Problem #4: Failure to mark open source code that has been changed or to include a description of the changes.
How to avoid it:
Add source code marking as checklist item before releasing source code to ensure you flag all the source code introduced to the original copy you downloaded
Conduct source code inspections before releasing the source code
Add a milestone in the compliance process to verify modified source code has been marked as such
Offer training to staff to ensure they update the change logs of source code files as part of the development process.
The most important outcome of non-compliance cases has been that the companies involved ultimately had to comply with the terms of the license(s) in question, and the costs of addressing the problem after the fact has categorically exceeded those of basic compliance.
Therefore, it is really a smart idea to ensure compliance before a product ships or a service launches. In part 6 of this series, we’ll cover some of the top lessons learned in achieving open source compliance that open source professionals need to know.
Download the free e-book, Open Source Compliance in the Enterprise, for a complete guide to creating compliance processes and policies for your organization.
Debian/Ubuntu have long been my primary Linux distributions, although like all good Linux users I have used Fedora, CentOS, Gentoo, Red Hat, Slackware, Arch Linux, Mageia, and other Linux distributions because why not? It is a feast of riches and the best playground there is.
I became a SUSE employee recently, so naturally I’ve been spending more time with openSUSE. openSUSE is sponsored by SUSE, and it is an independent community project. There are two openSUSE flavors: Tumbleweed and Leap. Tumbleweed is a bleeding-edge rolling release, containing the latest software versions. Leap is more conservative, and it incorporates core code from SUSE Linux Enterprise Server (SLES) 12. Both are plenty good for everyday use.
openSUSE is an RPM-based distro so you can use your favorite RPM commands. YaST (Yet another Setup Tool) is one of the most famous, or infamous, SUSE tools. YaST supports nearly every aspect of systems administration: hardware configuration, server management, software management, networking, user management, virtualization, security…you name it, it’s probably in YaST. YaST has both a graphical and console interface. YaST is vast.
I prefer less monolithic apps, and openSUSE has another tool for package and software repository management, zypper. I like zypper. It’s fast and does the job. zypper is command-line only so you have only one interface to learn, which is something I highly approve of. Many of zypper's commands have easy-to-remember shortcuts such as se for search, in for install, and rm for remove.
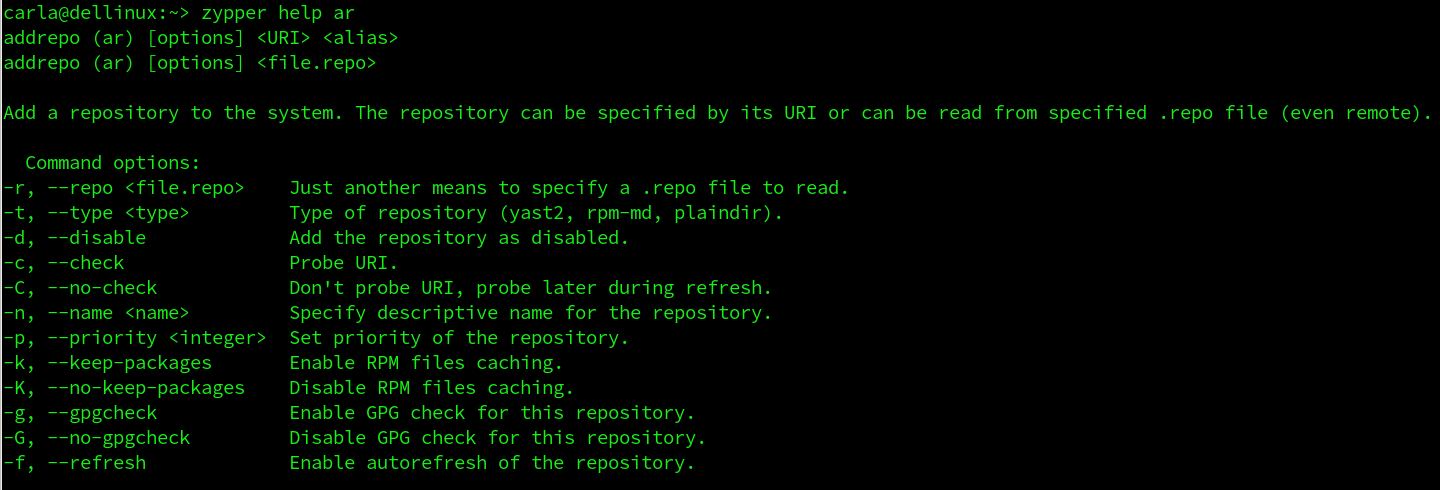
Help
Run zypper help for a command listing, zypper help [command name] to get additional information on any command, and man zypper for detailed help.
Run zypper help for a command listing.
Repository Management
Remember the olden days of distro-only repositories, with few third-party repos to choose from? If your particular Linux distribution did not package an application that you wanted, or did not maintain an up-to-date version your only option was compiling from source code. When Ubuntu created Personal Package Archives (PPAs) the floodgates opened and now third-party and special-purpose repos are everywhere.
openSUSE ships with a batch of configured repositories (see Package repositories for lists of official and third-party repos). Not all of them are enabled. You can see a table with enabled/disabled status, and also generate a table with additional information such as the repository URLs:
zypper lr
zypper lr -d
Enable and disable an installed repo, without removing it:
zypper mr -e repo-debug
zypper mr -d repo-debug
Remove and add a repo:
zypper rr repo-debug
zypper ar -name "repo-debug" http://download.opensuse.org/debug/distribution/leap/42.2/repo/oss/
The --name is required and arbitrary, so you call it anything you want. You can refresh all repositories, or selected repos:
Generate a table of all packages in a repo, and their installed status:
zypper se --repo openSUSE-Leap-4.2-Update
zypper won’t list the files in installed packages, but good old rpm will, like this example for python:
rpm -qi python
Clear your local package cache to force fresh package downloads:
zypper clean
Search For Packages
zypper's search function is fast and easy. You can run a simple name search, see version, architecture, and repository, and search for installed and uninstalled only, like these examples for tiff:
zypper se tiff
zypper se -s tiff
zypper se -i tiff
zypper se -u tiff
You can search for the exact package name, which is great for excluding giant listings of libraries and plugins:
zypper se -x tiff
Name specific repositories to search in:
zypper se --repo openSUSE-Leap-4.2-Update tiff
Install Packages
Installing packages is easy peasey, so let’s install digiKam:
zypper in digikam
Install digiKam from a special repository:
zypper in --repo myspecialrepo digikam
Do a dry-run before installation:
zypper in -D --repo myspecialrepo digikam
Download the package without installing it:
zypper in -d --repo myspecialrepo digikam
Remove Packages
Getting rid of packages is just as easy. We don’t want digiKam anymore (which is silly, because everyone wants digiKam):
zypper rm digikam
Do a dry-run first:
zypper rm -D digikam
Remember when there were flamewars over dependency-resolving package managers like apt-get, Yum, and zypper, like having automatic dependency-resolution was a bad thing? We sure were weird back then. See Using Zypper for more help and some advanced usage.
Learn more about Linux through the free “Introduction to Linux” course from The Linux Foundation and edX.
Recently I did an experiment: Can we build Docker images for ARM on ordinary cloud CI services that only provide Intel CPU’s?
The idea was to get rid of self hosted CI build agents that you have to care for. If you want to provide an ARM Docker image for an open source project your task is to build it and not to setup and maintain a whole pipeline for it.
We at Hypriot have created several Dockerfiles for open source tools like MySQL, Træfɪk or Node.js to make them available as Docker images for your ARM devices.