How we use computing infrastructure has changed drastically over the past two decades, moving from buying physical servers to having tools and technologies that make it easy for companies and individual developers to deploy software in the cloud. In his LinuxCon Europe keynote, Dan Kohn, Executive Director of the Cloud Native Computing Foundation (CNCF), provided us with a brief history of the cloud and how CNCF fits with where we are now.
Kohn starts with the year 2000, when you had to buy physical servers before you could deploy a new application, and if you needed more capacity, you bought more servers. In 2001, VMware “had the relatively brilliant idea of virtualizing that server so that each application could have it’s own virtual environment and you could have multiple different applications sharing the same physical server,” Kohn said. Moving on to 2006, Amazon popularized the idea that you could rent your servers by the hour, instead of buying them, and you don’t need to buy more capacity until you actually need it, which can save companies quite a bit of money. In 2009, Heroku made it easy for developers to deploy applications “without having to think of all the details about operating systems and versioning and keeping things up to date, and you didn’t necessarily need to hire the ops staff,” Kohn says.
Next, Kohn shifts from talking about proprietary technologies that shaped the history of the cloud and on to open source solutions, starting with OpenStack in 2010, which provides open source Infrastructure as a Service (IaaS) solutions based on VMs that compete with AWS and VMware. Cloud Foundry came along in 2011 to compete with Heroku to provide an open source Platform as a Service (PaaS) using containers. Jumping to 2013, Docker emerged to take technologies that have been around for years and combine them with better user interfaces and marketing, thus bringing containers to the masses.
This brings us up to the present with the 2015 formation of the Cloud Native Computing Foundation (CNCF). Kohn says that “cloud native computing uses an open source software stack to segment applications into microservices, packaging each part into its own container and dynamically orchestrating those containers to optimize resource utilization.” The value propositions from cloud native computing include isolation, no lock-in, unlimited scalability, agility and maintainability, improved efficiency and resource utilization, and resiliency.
To learn more about how you can host your project at CNCF or get more involved in the project, you can visit the CNCF website and watch the video of Kohn’s entire keynote presentation.
Interested in speaking at Open Source Summit North America on September 11 – 13? Submit your proposal by May 6, 2017. Submit now>>
Not interested in speaking but want to attend? Linux.com readers can register now with the discount code, LINUXRD5, for 5% off the all-access attendee registration price. Register now to save over $300!
Conky is a system monitor that can display information about your CPU, memory, swap, disk space, temperature, top, upload, download, system messages… the list goes on and on.
Microsoft announced support for the Unix Bash shell on Windows, providing developers and administrators with an important tool for managing Unix and Linux servers.
Secondly, where there had been a void in the area of management and network orchestration (MANO), suddenly there was a glut. Two competing groups established MANO open source projects. And a service provider, AT&T, even jumped into the open source MANO fray.
In our annual list of the year’s top open source projects, we look back at popular projects our writers covered in 2016, plus favorites our Community Moderators picked. We continue to be impressed with the wonderful open source projects that emerge, grow, change, and evolve every year. Picking 10 to include in our annual list of top projects is no small feat, and certainly no list this short can include every deserving project.
To choose our 10, we looked back at popular open source projects our writers covered in 2016, and collected suggestions from our Community Moderators. After a round of nominations and voting by our moderators, our editorial team narrowed down the final list.
So here they are, our top 10 open source projects of 2016:
If Santa didn’t come by last night, we’d like to inform you that Linus Torvalds announced the availability of the first Release Candidate (RC) build of the upcoming Linux 4.10 kernel as a Christmas present to Linux geeks around the world.
If you’re watching the Linux kernel scene, you probably know that there have been two weeks since the launch of the Linux 4.9 kernel, which appeared to be the biggest kernel version ever released. This means that the merge window for Linux kernel 4.10, which is not as big as Linux kernel 4.9 was, is now officially closed and it’s time for us to test drive the RC1 milestone.
“It’s Christmas Day, and it’s two weeks since the merge window opened. Thus, the merge window is now closed,” said Linus Torvalds.
Cyanogen Inc. has finally delivered a bullet to the brain – of CyanogenMod. After years of tumultuous turnovers in the company, Cyanogen recently announced that the company would consolidate all of their efforts into a new Cyanogen Modular OS program.
It appears that Cyanogen Inc. pulled the plug on CyanogenMod a bit earlier than expected. See the Addendum at the end of the article for archived links.
As evidence of just how hot serverless computing appears to be for developers in the cloud, IBM has added a slew of new features to its Bluemix OpenWhisk platform. Big Blue introduced the OpenWhisk platform at its InterConnect 2016 conference in Las Vegas in February. Since then the technology has caught on with developers, many of whom are attracted to it due to its openness, IBM said.
To make OpenWhisk even more attractive, IBM is making it easier for developers to rapidly debug code, more tightly integrate with third party tools and open communities, and adopt a broader range of programming languages. Indeed, since the launch, IBM has continued to expand the ecosystem for OpenWhisk as well as add new features and services such as instant debugging for Node.js, Python and Swift actions, as well as support for new runtimes such as Java, Node v6, Python and Swift v3.
Following below is instack-virt-setup deployment creating rout-able control plane via modified ~stack/undercloud.conf setting 192.168.24.0/24 to serve this purpose.
It also also utilizes RDO Newton “current-passed-ci” trunk and corresponding TripleO QuickStart pre-built images, which are in sync with trunk as soon as appear to be built during CI. TripleO QS itself seems to be under heavy development almost all the time even for Newton stable branch.
The Zephyr Project is still a babe in the technological woods, so it’s only fitting that the open source real-time operating system is driving an innovative wearables solution that aims to improve healthcare for infants. At the recent Embedded Linux Conference Europe, Teresa Cauvel, CTO and co-founder of Chicago-based neonatal health technology startup Neopenda, explained how her company built a neonatal monitoring bracelet for hospitals in the developing world using an Intel Curie module running Zephyr. The complete talk, called “Leveraging IoT Biometrics and Zephyr RTOS for Neonatal Nursing in Uganda” can be seen in the video link below.
Cauvel and co-founder and CEO Sona Shah came up with the idea for Neopenda as graduate students in biomedical engineering at Columbia University. The partners hoped that a new U.N. Sustainable Development goal for ending preventable deaths of under 5-year-olds by 2030 would provide numerous opportunities for technological innovation. “With IoT we can reimagine what’s possible in global health,” Cauvel told the ELCE audience.
Cauvel and Shah decided to develop a wearable for neonatal patients in the first 28 days after birth. They focused on developing countries where 98 percent of preventable neonatal deaths occur and where every year 46 million newborns have complications at or around birth that require special care and treatment. Some 3 million newborns die from these complications. However, 80 percent of the victims die from preventable causes or could have saved by affordable treatments. “Reducing infant mortality is a solvable problem,” said Cauvel.
The problem is being attacked on several levels, from improving transportation to hospitals to developing better treatments for pre-term birth, birth asphyxia, and severe infections. Neopenda is focusing on improving pediatric hospital care. When researching the problem in Uganda in 2015 with the help of the Uganda Paediatric Association, the co-founders discovered there were large unmet needs in monitoring and diagnosis.
“Early detection of distress is really key in newborn care,” said Cauvel. “We want to help staff better manage a large quantity of patients. There are so many critically ill newborns that need care and not nearly enough nurses, doctors, equipment, and supplies. Typically, you might see two nurses responsible for 50 to 75 babies. Standard equipment like vital signs monitors is often prohibitively expensive.”
In early 2016, the partners founded Neopenda with the help of a Kickstarter campaign, as well as grants from Cisco and Vodafone. They started working on a prototype for a wearable vital signs monitor designed for newborns in low resource hospitals. The wearable, which is due to enter trials in Uganda in 2017, is strapped to infants’ foreheads, and measures heart rate, respiratory rate, blood oxygen saturation, and temperature.
“These are all of critically important vitals to track in newborns,” said Cauvel. “They show danger signs when conditions are changing, and help monitor health status.”
The biometrics devices wirelessly communicate to the central monitor, which can be a laptop, tablet, or smartphone, where results are displayed with visualizations. “Health workers can view the status of all the babies and be alerted in real time when newborns are in distress,” said Cauvel. “It helps the staff triage while also providing more detailed information to guide treatment and diagnosis.”
Prototyping: From Arduino to Curie
In choosing a technology platform, Cauvel and Shah had several key requirements: The device needed to run on batteries using minimum power, and be rugged enough to resist dust, heat, humidity, and wear and tear. It needed good support for wireless and sensor technology, and be sufficiently scalable to support larger hospitals as well as clinics. It also had to be highly affordable. Neopenda aims to reduce the cost to about $50 per wearable, which is very low for medical monitoring devices.
The initial prototype was built around an Arduino Uno, followed by a model that used the Uno’s ATMega328 MCU breadboarded with WiFi and the most essential components. Power considerations led quickly to swapping WiFi for Bluetooth Low Energy (BLE), which also raised fewer questions about radiation risks.
The current iteration uses the Intel Curie module, which runs Zephyr on an x86-compatible Intel Quark SE CPU. The dime-sized Curie offers the advantage of being smaller, more affordable, and more power efficient than an Arduino. It also furnishes an ARC EM4-based sensor subsystem and a built-in BLE radio, and its 80KB of SRAM makes it more suitable for complex BLE applications.
The Curie’s interfaces between these components and the Quark SE saved a lot of time, as did the availability of a Curie-equipped Intel Arduino 101 board, used for prototyping. Meanwhile, the Curie’s pattern matching engine and 6-axis sensor may hold potential for future applications, said Cauvel.
The ARC subsystem controls the Curie’s 12-bit ADC, which “enables us to make accurate DSP measurements,” said Cauvel. The device incorporates a LilyPad MCP9700 temperature sensor, as well as a pulse sensor from pulsesensor.com. Neopenda developed an algorithm that derives the respiratory rate from the pulse rate.
For pulse oximetry, the developers breadboarded a sensor using red and infrared LEDs with a TSL235 light-to-frequency converter. To generate a blood oxygen saturation measurement from this setup, “we multiplexed between the two LEDs to calculate the absorption ratio, and used the GPIO driver and its callback API to calculate frequency,” explained Cauvel.
Zephyr played a key role in the success of the wearable prototype, thanks to its modularity, support for constrained systems, and more advanced capabilities compared to the Arduino IDE. “Zephyr turned out to be a big step up from Arduino because it supports the ARC core, the DSP subsystem, and the x86 host concurrently,” said Cauvel. “Zephyr also supports multi-fibers and interrupts for complex sensor manipulation and communication so it can cleanly handle the data coming in from different sensors simultaneously.”
The developers also benefited from “Zephyr’s rich support for drivers and sensors, as well as sample code and a reliable SDK with cross tool chain,” said Cauvel. “There was already a BSP supporting the Arduino 101 with tool chain to compile for the DSP subsystem in the ARC processor and the host processor. This enabled quick installation of the compiler and tool chain in just a couple of hours, and with the help of the Eclipse IDE, we were able to get the GDB debugger working with DSP and host.”
Cauvel went into more detail about various past and current modifications of each sensor algorithm. Currently, most sensor readings are close to the reliability range of expensive commercial sensors, except for respiratory. “We may need to add Fourier transforms to get better accuracy on respiratory,” said Cauvel. The company has also developed an Android app that interprets the BLE signals and displays data and visualizations.
Cauvel is confident the device will be ready for trials in Uganda in 2017. Neopenda is working on getting a CE mark for certification, and they will need to get approval of the government of Uganda. The plan is to expand in East Africa and beyond. Soon, Cauvel hopes to give thousands of newborns in low resource settings “the healthy start they deserve.”
Watch the complete presentation:
Embedded Linux Conference + OpenIoT Summit North America will be held on February 21 – 23, 2017 in Portland, Oregon. Check out over 130 sessions on the Linux kernel, embedded development & systems, and the latest on the open Internet of Things.
Linux.com readers can register now with the discount code, LINUXRD5, for 5% off the attendee registration price. Register now>>
Yes, my fellow penguins, it is time for the annual ritual of having fun with silly Linux holiday commands! The fun of being a grownup is you get to make your own observances, and Linux silliness is one of mine. Without further ado let us plunge into our maelstrom of Linux holiday delights.
No More Alek’s Controllable Christmas Lights for Celiac Disease
One of my essential holiday activities was promoting and playing with Alek’s Controllable Christmas Lights for Celiac Disease, by Alek Komarnitsky (Figure 1). This wonderful project ran for over a decade and raised $83,000 for the Center for Celiac Research. Even more fun, it started as a prank that fooled the news networks.
Figure 1: Alek’s controllable Christmas lights (used with permission from Alek Komarnitsky).
Alek’s Controllable Christmas Lights was a glorious mish-mash of lights and inflatable characters like Homer Simpson, the Incredible Hulk, Santa, SpongeBob SquarePants, the Grinch, and Snoopy that site visitors controlled from their Web browsers. You could turn the lights on and off, inflate and deflate the characters, post live messages, and spy on Alek in his workshop. Alek also ran Controllable Halloween Decorations.
The first incarnation went online in 2002. It was a simulation made with a series of still photos that changed frequently, giving the impression of remote control. There was no Webcam and no remote control; just a fun prank by a funny man. Then the news media got wind of it, and were all over it without bothering to do any fact-checking, and happily reported it as real. (Though it wasn’t the kind of story that called for relentless investigative reporters.) The high point of the prank came when Alek got a ride in an ABC news helicopter over his house, with his wife inside manipulating the lights. Eventually he confessed all, and then made it all real using X10 devices.
Alek retired the project in 2014 and sold all of his gear. It was awesome fun while it lasted. You may enjoy the full story, and the simulation has been resurrected for our amusement.
Cowsay Christmas!
Cowsay supports cowfiles for creating additional cowsay characters. Look at any of the files in /usr/share/cowsay/cows/ to see how easy it is to create your own. Cowsay is written in Perl, so you must escape Perl characters that require escapes, such as @ and . I made a simple cowfile, xmas-tree.cow, to display a little talking ASCII Christmas tree. I rather like Festivus, but the Festivus pole is too plain. Your cowfile must have the .cow extension, and if you put it in the default location of /usr/share/cowsay/cows/ you won’t have to specify the full path to use it. You can be as simple or as elaborate as you like, because that is also the fun of being a grownup. There are many online ASCII generators that will create a nice ASCII image from a photograph.
$ cowsay -f xmas-tree Holiday greetings to
all the good peoples of the world!
 ___________________________________
/ Holiday greetings to all the good
 peoples of the world!             /
 -----------------------------------


             *
            |/
            /o
           /*.'
           /'*'
          /o'*.o
          /.'o'
         /'.*'.*.
         ^^^^^^^^^
            | |
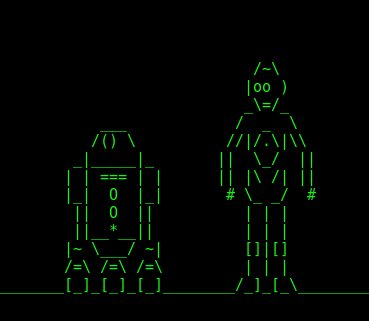
ASCII Star Wars
After all these years this still works; run telnet towel.blinkenlights.nl to see the complete ASCII Star Wars. (Remember, as grownups our holiday traditions can be anything we want, and Figure 2 shows one of mine.)
Figure 2: ASCII Star Wars.
Color ASCII Fire
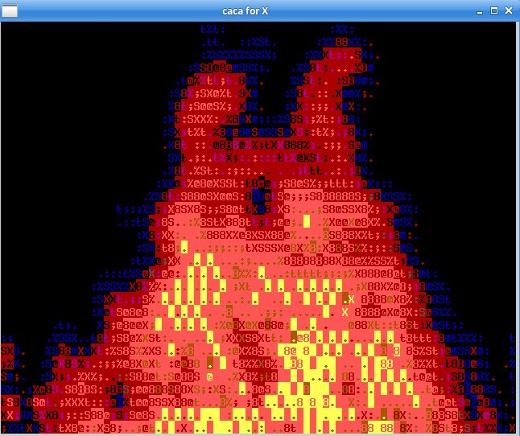
Show of hands: who remembers the Yule Log TV program? Who still watches it? For those who are not familiar with it: Once upon a time, back before the Internet, we watched broadcast TV. This was an amazing invention where TV programs literally flew through the air and then landed in our TV sets. There were three network channels, ABC, NBC, and CBS, and if your reception was decent you also got PBS and local channels. Yes, somehow we made do with less than a dozen TV channels.
Programming ran on a schedule, and unlike today’s 24x7x365 world the channels often went dark after midnight. From Christmas Eve until the day after Christmas some networks broadcast the Yule log, which was a video of a cheery fire in a fireplace. No, really. I am not making this up, and you can find several Yule log videos on YouTube. Command-line fans can run their own cheery Yule fire in their favorite terminals; install caca-utils and run the cacafire command. Behold the result in Figure 3.
Figure 3: Ah, the yule fires of old.
Holiday Star Wars Screensaver
Install xscreensaver and xscreensaver-gl-extra. Open xscreensaver and find the Star Wars screensaver. This is a cool screensaver that plays a text crawl just like the opening credits of the original Star Wars movie, which you can also find on YouTube. The groovy thing about the Star Wars screensaver is you can easily customize it to display your own text. All you do is write whatever you want in a text file. Then go to the Advanced tab and enter the full path to your file on the Text File line in the Text Manipulation section. Then play the preview and you will see your text (Figure 4).
Figure 4: Build your own Star Wars-inspired scrolling screensaver.
Happy Holidays!
Happy holidays and happy New Year everyone, thank you for supporting Linux.com, Linux, and free/open source software. See you next year!