Home Blog Page 653

Containers and Virtual Machines: A Dynamic Duo

It’s easy to think of containers and VMs as a binary choice — deciding whether to use a VM or a container (not both) for your use case. In his keynote at LinuxCon Europe, Brandon Philips, CTO at CoreOS, talked about a case study for using VMs and containers together to take advantage of the strengths of both.

CoreOS runs a service called Quay, Quay.IO for the hosted service, which uses a combination of VMs and containers. It’s used by large organizations like JPL, eBay, Hotels.com, and more, but you can also sign up with your GitHub account to try it out yourself. The goal for Quay is to have a system that people can trust, with audit logs and security scanning to provide confidence that only the people who should have access to each container do have access. There are also options to dig into the container image and send notifications if there are potential vulnerabilities within an image.

With Quay.IO, the SaaS product, it was important for it to handle code from many different people with security in place to make sure that each person only has access to their own code. The entire container market is growing rapidly, so at the same time, it also needed to scale as containers continue to take off to avoid rebuilding everything again in 12 months. 

Philips talks about how Quay uses containers and VMs together by essentially putting the resources isolation inside. This allows you to specify exactly how much CPU bandwidth, memory bandwidth, and network bandwidth is available for the virtual machine. “That’s how we use containers and virtual machines together. We use the isolation mechanisms of VMs and the resources isolation of the container.”

While Quay has been around for a while, they are using a new approach to improve both security and performance. Instead of using EC2, they are using virtual machines, containers, and Kubernetes. It’s similar to the previous approach, but with a single KVM instance running inside of a container replacing a single EC2 instance. This gives users faster builds, and CoreOS makes more efficient use of their capital, allowing them to buy better, bigger, and faster machines for the builds. By moving off of EC2 and onto Packet, using a Kubernetes cluster, and other optimizations, they’ve brought long startup times down to about 15 seconds, an 80% improvement.

Philips has a couple of takeaways:

  • For open source projects, Quay is a free hosted service.
  • You can use it with another open source project, Clair, to scan through these container images finding any known vulnerabilities.
  • Join them at their conference in New York City in December to learn more.

For more details about using containers and VMs together, and how they’ve done this with Quay, watch the keynote video below.

https://www.youtube.com/watch?v=gkisj9pOphg?list=PLbzoR-pLrL6ovByiWK-8ALCkZoCQAK-i_

LinuxCon Europe videos

How to Build an Email Server on Ubuntu Linux

In this fast-changing world of containers and microservices it’s comforting that some things don’t change, such as setting up a Linux email server. It’s still a dance of many steps and knitting together several different servers, and once you put it all together it just sits there, all nice and stable, instead of winking in and out of existence like microservices. In this series, we’ll put together a nice reliable configurable mail server with Postfix, Dovecot, and OpenSSL on Ubuntu Linux.

Postfix is a reliable old standby that is easier to configure and use than Sendmail, the original Unix MTA (does anyone still use Sendmail?). Exim is Debian’s default MTA; it is more lightweight than Postfix and super-configurable, so we’ll look at Exim in a future tutorial.

Dovecot and Courier are two popular and excellent IMAP/POP3 servers. Dovecot is more lightweight and easier to configure.

You must secure your email sessions, so we’ll use OpenSSL. OpenSSL also supplies some nice tools for testing your mail server.

For simplicity, we’ll set up a LAN mail server in this series. You should have LAN name services already enabled and working; see Dnsmasq For Easy LAN Name Services for some pointers. Then later, you can adapt a LAN server to an Internet-accessible server by registering your domain name and configuring your firewall accordingly. These are documented everywhere, so please do your homework and be careful.

Terminology

Let’s take a quick look at some terminology, because it is nice when we know what the heck we’re talking about.

  • MTA: Mail transfer agent, a simple mail transfer protocol (SMTP) server such as Postfix, Exim, and Sendmail. SMTP servers talk to each other
  • MUA: Mail user agent, your local mail client such as Evolution, KMail, Claws Mail, or Thunderbird.
  • POP3: Post-office protocol, the simplest protocol for moving messages from an SMTP server to your mail client. A POP server is simple and lightweight; you can serve thousands of users from a single box.
  • IMAP: Interactive message access protocol. Most businesses use IMAP because messages remain on the server, so users don’t have to worry about losing them. IMAP servers require a lot of memory and storage.
  • TLS: Transport socket layer, an evolution of SSL (secure sockets layer), which provides encrypted transport for SASL-authenticated logins.
  • SASL: Simple authentication and security layer, for authenticating users. SASL does the authenticating, then TLS provides the encrypted transport of the authentication data.
  • StartTLS: Also known as opportunistic TLS. StartTLS upgrades your plain text authentication to encrypted authentication if both servers support SSL/TLS. If one of them doesn’t then it remains in cleartext. StartTLS uses the standard unencrypted ports: 25 (SMTP), 110 (POP3), and 143 (IMAP) instead of the standard encrypted ports: 465 (SMTP), 995 (POP3), and 993 (IMAP).

Yes, We Still Have Sendmail

Most Linuxes still have /usr/sbin/sendmail. This is a holdover from the very olden days when Sendmail was the only MTA. On most distros /usr/sbin/sendmail is symlinked to your installed MTA. However your distro handles it, if it’s there, it’s on purpose.

Install Postfix

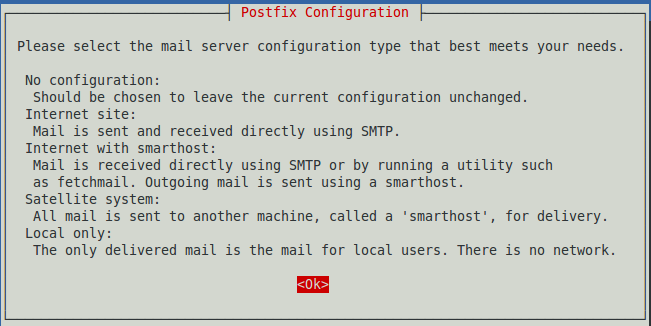
apt-get install postfix takes care of the basic Postfix installation (Figure 1). This opens a wizard that asks what kind of server you want. Select “Internet Site”, even for a LAN server. It will ask for your fully qualified server domain name (e.g., myserver.mydomain.net). On a LAN server, assuming your name services are correctly configured (I keep mentioning this because people keep getting it wrong), you can use just the hostname (e.g., myserver).

Figure 1: Postfix configuration.

Ubuntu will create a configuration file and launch three Postfix daemons: master, qmgr, and pickup. There is no Postfix command or daemon.

$ ps ax
 6494 ? Ss 0:00 /usr/lib/postfix/master
 6497 ? S  0:00 pickup -l -t unix -u -c
 6498 ? S  0:00 qmgr -l -t unix -u 

Use Postfix’s built-in syntax checker to test your configuration files. If it finds no syntax errors, it reports nothing:

$ sudo postfix check
[sudo] password for carla: 

Use netstat to verify that Postfix is listening on port 25:

$ netstat -ant
tcp  0  0 0.0.0.0:25 0.0.0.0:* LISTEN
tcp6 0  0 :::25      :::*      LISTEN

Now let’s fire up trusty old telnet to test:

$ telnet myserver 25
Trying 127.0.1.1...
Connected to myserver.
Escape character is '^]'.
220 myserver ESMTP Postfix (Ubuntu)
EHLO myserver
250-myserver
250-PIPELINING
250-SIZE 10240000
250-VRFY
250-ETRN
250-STARTTLS
250-ENHANCEDSTATUSCODES
250-8BITMIME
250 DSN
^]

telnet> 

Hurrah! We have verified the server name, and that Postfix is listening and responding to requests on port 25, the SMTP port.

Type quit to exit telnet. In the example, the commands that you type to interact with your server are in bold. The output are ESMTP (extended SMTP) 250 status codes.

  • PIPELINING allows multiple commands to flow without having to respond to each one.
  • SIZE tells the maximum message size that the server accepts.
  • VRFY can tell a client if a particular mailbox exists. This is often ignored as it could be a security hole.
  • ETRN is for sites with irregular Internet connectivity. Such a site can use ETRN to request mail delivery from an upstream server, and Postfix can be configured to defer mail delivery to ETRN clients.
  • STARTTLS (see above).
  • ENHANCEDSTATUSCODES, the server supports enhanced status and error codes.
  • 8BITMIME, supports 8-bit MIME, which means the full ASCII character set. Once upon a time the original ASCII was 7 bits.
  • DSN, delivery status notifiction, informs you of delivery errors.

The main Postfix configuration file is /etc/postfix/main.cf. This is created by the installer. See Postfix Configuration Parameters for a complete listing of main.cf parameters. /etc/postfix/postfix-files describes the complete Postfix installation.

Come back next week for installing and testing Dovecot, and sending ourselves some messages.

Read part three of this tutorial series: Building an Email Server on Ubuntu Linux, Part 3

Advance your career in system administration! Check out the Essentials of System Administration course from The Linux Foundation.

Keynote: VM Security and Container Workflows, A Case Study by Brandon Philips, CTO, CoreOS

https://www.youtube.com/watch?v=gkisj9pOphg?list=PLbzoR-pLrL6ovByiWK-8ALCkZoCQAK-i_

There are many great duos: peanut butter & jelly, movies & popcorn, Batman & Robin. Brandon Philips explores a new emerging one: containers and virtual machines. And how this combination will enable new performant multi-tenant systems.
 

Untangling Macros in C

Morse Code made with smoke


As programmers, in our daily office/school life, we are expected to write code following best practice, to comment it wisely, so that when need is to re-read it, well someone can do it. To take a break from all those constraints, we can head to the IOCCC the International Obfuscated C Code Contest.

In this post, we are going to focus on the IOCCC 1986 winner in the Worst abuse of the C preprocessor category. The code was written by James Hague.

Starting from the given source, observing its output, we will explain how it works.

The Code

Here it is in all its obfuscated glory:

#define	DIT	(
#define	DAH	)
#define	__DAH	++
#define DITDAH	*
#define	DAHDIT	for
#define	DIT_DAH	malloc
#define DAH_DIT	gets
#define	_DAHDIT	char
_DAHDIT _DAH_[]="ETIANMSURWDKGOHVFaLaPJBXCYZQb54a3d2f16g7c8a90l?e'b.s;i,d:"
;main			DIT			DAH{_DAHDIT
DITDAH			_DIT,DITDAH		DAH_,DITDAH DIT_,
DITDAH			_DIT_,DITDAH		DIT_DAH DIT
DAH,DITDAH		DAH_DIT DIT		DAH;DAHDIT
DIT _DIT=DIT_DAH	DIT 81			DAH,DIT_=_DIT
__DAH;_DIT==DAH_DIT	DIT _DIT		DAH;__DIT
DIT'n'DAH DAH		DAHDIT DIT		DAH_=_DIT;DITDAH
DAH_;__DIT		DIT			DITDAH
_DIT_?_DAH DIT		DITDAH			DIT_ DAH:'?'DAH,__DIT
DIT' 'DAH,DAH_ __DAH	DAH DAHDIT		DIT
DITDAH			DIT_=2,_DIT_=_DAH_;	DITDAH _DIT_&&DIT
DITDAH _DIT_!=DIT	DITDAH DAH_>='a'?	DITDAH
DAH_&223:DITDAH		DAH_ DAH DAH;		DIT
DITDAH			DIT_ DAH __DAH,_DIT_	__DAH DAH
DITDAH DIT_+=		DIT DITDAH _DIT_>='a'?	DITDAH _DIT_-'a':0
DAH;}_DAH DIT DIT_	DAH{			__DIT DIT
DIT_>3?_DAH		DIT			 DIT_>>1 DAH:''DAH;return
DIT_&1?'-':'.';}__DIT DIT			DIT_ DAH _DAHDIT
DIT_;{DIT void DAH write DIT			1,&DIT_,1 DAH;}

Apart from the particular formatting, what jumps to the eye is the number of “unnecessary” macros and the repetitive use of DIT and DAT variations.

The output

If we compile the code at this point we see many warnings. Among them, two for the implicit declaration of __DIT and _DAH. After that step, we can run the code, and as we provide sequences of ascii characters, it spits out sequences of . and _.

$ ./a.out hello, world

.... . .-.. .-.. --- --..-- .-- --- .-. .-.. -..

It looks like Morse code. And indeed, using an online Morse decoder, it is. It reverses back to HELLO, WORLD

De-Obfuscating

Let’s first try to perform the pre-processor job and replace the macros by their values. After a bit of reformatting, this is what we have:

char _DAH_[]=”ETIANMSURWDKGOHVFaLaPJBXCYZQb54a3d2f16g7c8a90l?e’b.s;i,d:”;
main()
{
char *_DIT, *DAH_, *DIT_, *_DIT_, *malloc (), *gets();
for (_DIT = malloc(81), DIT_=_DIT++; _DIT == gets(_DIT); __DIT(‘n’))
   for (DAH_=_DIT; *DAH_; __DIT(*_DIT_ ? _DAH(*DIT_ ) : ‘?’),__DIT(‘ ‘),DAH_++) 
     for (*DIT_ = 2, _DIT_ = _DAH_; *_DIT_ && (*_DIT_ != (*DAH_ >= ‘a’ ? *DAH_&223 : *DAH_ )); (*DIT_ )++,_DIT_++)
         *DIT_+= (*_DIT_>=’a’ ? *_DIT_ — ‘a’ : 0);
}
_DAH(DIT_)
{ 
__DIT(DIT_> 3 ? _DAH(DIT_>>1) : ‘’);
return DIT_ & 1 ? ‘-’ : ‘.’;
} 
__DIT(DIT_) char DIT_;
{
(void) write (1,&DIT_,1);
}

Slightly better.

We see the three functions we expected: main, _DAH, and __DIT. We also see an external variable __DAH__ , a long string. __DIT looks like the putchar function from the standard library, printing a char at a time. And what about _DAH ?

Dive into _DAH

It is recursive. As long as the argument is a number that takes more than 2 bits to write, it calls the function again, stripping the number from its last bit. The output will be part of the argument printed as — and . masking for 1 and 0 , i.e. the number in binary format, and it will return the second leftmost digit. As an example, if we call _DAH(5) , 5 being 101 in binary, it will call _DAH(2) . That is the base case. it prints (nothing) and return 10 & 1 == 0 so . . Then it will print . and return 101 & 1 == 1 so -. If we want to print that we have to call __DIT(_DAH(5)) which outputs .- which actually corresponds to 3 written in binary. _DAH(n) is a rather obfuscated function, which will not print/return n in binary but n — 2 .

The main function

Again with more explicit variables names.

char code[]=”ETIANMSURWDKGOHVFaLaPJBXCYZQb54a3d2f16g7c8a90l?e’b.s;i,d:”;
main ( )
{
char *line, *letter, *value, *code_copy, *malloc ( ),* gets ( );
    for (line = malloc(81), value= line++; line == gets(line); putchar(‘n’))
     {
     for (letter = line; *letter; putchar(*code_copy ? _DAH(*value) : ‘?’), putchar(‘ ‘), letter++)
         {
         for (*value = 2, code_copy = code; *code_copy && (*code_copy != (*letter >= ‘a’ ? *letter & 2
23: *letter)); (*value)++, code_copy++)
             {
              *value += (*code_copy >=’a’ ? *code_copy — ‘a’: 0);
             }
         }
     }
}

The outer loop: Each time the user enters a new line, it creates a buffer, and reads a line from the standard input to the buffer. gets does not check for buffer overflow, so 81 means nothing in the code itself, and I have not found what it means for Morse users. The function either returns the buffer it takes as an argument or NULL in this case, the program will return. This loop also assigns an address to value which it will use in the inner loop. This loop will print a new line after completion of the two inner loops.

The middle loop: it will loop through each letter in the string obtained above. As it moves from one letter to another, it will either print it using _DAH seen above or print a ? and add a space. As we looked at _DAH above, we used integers as arguments. It works fine as letters, ASCII characters like *value to be more precise, and are small integers in C.

The inner loop: it sets the value of *value to 2, and look at the value of the letter at this point. ((*letter >= 'a') ? *letter & 223 : *letter) means if the letter is lower case, use its upper case version. The octal 233 or 10010011 serves as a mask to change the one bit that is different for a lowercase letter than an uppercase. Of course 223 is not the most obvious one 137 would more easily come to mind. Knowing this, we can realize this inner loop will iterate as long as the *letter variable does not have a match in the code string. As it iterates, it will increase *value by 1 and move on to the next letter in code . Interestingly, if at one point in this process, the letter in code is lowercase, the loop will increase *value by some special number.

Going from a letter to its Morse code: globally, the inner loop starts with a *value = 2 and increase it by 1 each time the iteration moves on to the next letter in code until the letter in code is the letter in my line. It will then print *value using _DAH . Let’s see some examples:

  •  *letter = 'E' then *value = 2 and since E is the first letter in code it goes back to the middle loop and calls putchar(*code_copy ? _DAH(*value) : '?')` . Value of *code_copy == 'E' here so expression above becomes putchar(_DAH(2)) As seen above _DAH(2) returns/prints the binary value of 0as ‘.’ and ‘-’. The output of this expression will be . This is indeed the Morse code for E.
  •  *letter = 'I' then to start *value = 2 , since I is the third letter in code the inner loop will exit with *value == 4 . putchar(_DAH(4)) will print out .. , the Morse code for I.

We can observe a pattern, as the order chosen for the letters in code is such that the letters have Morse codes that are equal to the binary values of their index in the code string plus 2. Of course, this is not perfect. Remember the inner loop special cases ? If *code == 'a' , the loop will skip that *value or said otherwise, this *value or index does not map any Morse code. If *code == 'b' , the loop will skip that *value and shift by 'b' — 'a' == 1 , which means from the on, the Morse code for the letters in code will map the value of their index in the string plus 3. An so on, next comes a d which will shift that new mapping by 'd' — 'a' == 3 …This is genius and so hard to figure out.

Conclusion

The insane contest that is the IOCCC produces crazy creative code. Behind the formatting, the dubious but nevertheless relevant variable names and over complications lies a genius idea that maps letters with their Morse code inside a single string. I do not know how challenging it was to come up with it in the first place, but it did require some time, doubts and a few ‘ha ha’ moments to unravel the underlying process. I am so glad I did it, and I feel I acquired new skills in reading others’ code in the process.

Post Scriptum

As an annex, here is a ‘de obfuscated’ code, it compiles with one warning due to the use of gets. I tried to stay close to the original, but making it more readable.

#include <stdio.h>
#include <stdlib.h>

int _DAH(int);

char code[]="ETIANMSURWDKGOHVFaLaPJBXCYZQb54a3d2f16g7c8a90l?e'b.s;i,d:";

int main(void)
{
        char *line, *letter, *code_copy;
        char *gets(char *);
        char value, upper_case;

for (line = malloc(81); gets(line) != NULL; putchar('n'))
        {

for (letter = line; *letter; letter++)
                {
                        code_copy = code;
                        upper_case = (*letter >= 'a' ? *letter - 'a' + 'A' : *letter);
                        value = 2;
                        while (*code_copy && (*code_copy != upper_case))
                        {
                                value += (*code_copy >='a' ? *code_copy - 'a': 0);
                                value++;
                                code_copy++;
                        }
                        putchar(*code_copy ? _DAH(value) : '?');
                        putchar(' ');
                }
        }
}

int _DAH(int letter)
{
        putchar(letter > 3 ?_DAH (letter>>1): '');
        return (letter & 1 ? '-' : '.');
}

This article was contributed by a student at Holberton School and should be used for educational purposes only.


The Year in NV Trends for 2016

Is it ever too early for a Year in Review column? Didn’t think so. For this attempt, let’s take a look at the exciting trends in network virtualization (NV), as a mixture of open and proprietary technologies battle to be the cloud networking foundation of the future.

On the competitive front, we took a detailed look at the market in our “Future of Network Virtualization and SDN Controllers Report,” released in September. The market continues to grow, with a dynamic mixture of NV incumbents and startups gaining market traction.

Read more at SDx Central

Syscall Auditing at Scale

If you are are an engineer whose organization uses Linux in production, I have two quick questions for you:

1) How many unique outbound TCP connections have your servers made in the past hour?

2) Which processes and users initiated each of those connections?

If you can answer both of these questions, fantastic! You can skip the rest of this blog post. If you can’t, boy-oh-boy do we have a treat for you! We call it go-audit.

Syscalls are how all software communicates with the Linux kernel. Syscalls are used for things like connecting network sockets, reading files, loading kernel modules, and spawning new processes (and much much much more). 


Read more at Slack Engineering Blog

Mozilla and Tor Release Urgent Update for Firefox 0-day Under Active Attack

Developers with both Mozilla and Tor have published browser updates that patch a critical Firefox vulnerability being actively exploited to deanonymize people using the privacy service.

“The security flaw responsible for this urgent release is already actively exploited on Windows systems,” a Tor official wrote in an advisory published Wednesday afternoon. “Even though there is currently, to the best of our knowledge, no similar exploit for OS X or Linux users available, the underlying bug affects those platforms as well. Thus we strongly recommend that all users apply the update to their Tor Browser immediately.”

Read more at Ars Technica

Canonical Offers Direct Docker Support to Ubuntu Users

Enterprise Ubuntu users running Docker in production now have a new source for Docker support: from Canonical.

Earlier today, Canonical and Docker announced joint support for the commercial edition of Docker Engine on Ubuntu. The pair also will provide updates for Docker on Ubuntu through an application delivery system Canonical originally devised.

Read more at InfoWorld

Build a Hadoop Cluster in AWS in Minutes

Check out this process that will let you get a Hadoop cluster up and running on AWS in two easy steps.

I use Apache Hadoop to process huge data loads. Setting up Hadoop in a cloud provider, such as AWS, involves spinning up a bunch of EC2 instances, configuring nodes to talk to each other, installing software, configuring the master and data nodes’ config files, and starting services.

This was a good use case to automate, considering I wanted to solve these problems.

  • How do I build the cluster in minutes (as opposed to hours and maybe even days for a large number of data nodes)?

Read more at DZone

Federating Your Kubernetes Clusters — The New Road to Hybrid Clouds

Over the past six months, federation of Kubernetes clusters has moved from proof of concept to a release that is worth checking. Federation was first introduced under somewhat of a code name — Ubernetes. And then, in Kubernetes v1.3.0, cluster federation appeared. Now, there is extensive documentation on the topic.

Why is it such a big deal? If you have followed the development of Kubernetes, you probably know that it is an open source rewrite of Borg, the system that Google uses internally to manage their containerized workloads across data centers. If you read the paper, you will notice that a single Kubernetes cluster is the equivalent of a Borg cell. As such, Kubernetes itself is not the complete equivalent of Borg. However, by adding cluster federation, Kubernetes can now distribute workloads across multiple clusters. This opens the door for more real Borg features, like failover across Zones, geographic load-balancing, workload migration, and so on.

Indeed, cluster federation in Kubernetes is a hybrid cloud solution.

How does it work ?

The picture below, taken from the Tectonic blog on Federation shows a high-level architectural view.

federation-api-4x.png

Image courtesy of coreOS.

You see three Kubernetes clusters (i.e., San Francisco, New York, and Berlin). Each of those runs an API server, controller, its own scheduler and etcd-based key value store. This is the standard Kubernetes cluster setup. You can use any of these clusters from your local machine, assuming you have an account set up on them and associated credentials. With the k8s client — kubectl — you can create multiple contexts and switch between them. For example, to list the nodes in each cluster, you would do something like:

```

$ kubectl config use-context sanfrancisco

$ kubectl get nodes

$ kubectl config use-context newyork

$ kubectl get nodes

$ kubectl config use-context berlin

$ kubectl get nodes

```

With federation, Kubernetes adds a separate API server (i.e., the Federation API server), its own etcd-based key value store and a control plane. In effect, this is the same setup for a regular cluster but at a higher level of abstraction. Instead of registering individual nodes with the Federated API server, we will register full clusters.

A cluster is defined as a federated API server resource, in a format consistent with the rest of the Kubernetes API specification. For example:

```

apiVersion: federation/v1beta1

kind: Cluster

metadata:

 name: new-york

spec:

 serverAddressByClientCIDRs:

   - clientCIDR: "0.0.0.0/0"

     serverAddress: "${NEWYORK_SERVER_ADDRESS}"

 secretRef:

   name: new-york

```

Adding a cluster to the federation is a simple creation step on the federated API server:

```

$ kubectl --context=federated-cluster create -f newyork.yaml

```

In the sample below, notice that I use a context federated cluster and that I used the k8s client. Indeed the Federated API server extends on the Kubernetes API and can be talked to using kubectl.

Also note that the federation components can (and actually should) run within a Kubernetes cluster.

Creating Your Own Federation

I will not show you all the steps here, as it would honestly make for a long blog. The official documentation is fine, but the best way to understand the entire setup is the walkthrough from Kelsey Hightower. This walkthrough uses Google GKE and Google Cloud DNS, but it can be adapted relatively easily for your own setup using your own on-premise clusters.

In short, the steps to create a Federation are:

1. Pick the cluster where you will run the federation components, and create a namespace where you will run them.

2. Create a Federation API server service that you can reach (i.e., LoadBalancer, NodePort, Ingress), create a secret containing the credentials for the account you will use on the federation and launch the API server as a deployment.

3. Create a local context for the Federation API server so that you can use kubectl to target it. Generate a kubeconfig file for it, store is as a secret, and launch the control plane. The control plane will be able to authenticate with the API server using the kubeconfig secret created.

4. Once the control plane is running, you are ready to add the Clusters. You will need to create secrets for each cluster’s kubeconfig. Then, with Cluster resource manifest on hand (see above), you can use kubectl to create them on the federation context.

The end result of this is that you should have a working federation. Your clusters should registered and ready. The following command will show them.

```

$ kubectl --context=federated-cluster get clusters

```

Migrating a Workload From One Cluster to Another

As federation matures, we can expect to see most Kubernetes resources available on the Federation API. Currently, only Events, Ingress, Namespaces, Secrets, Services and ReplicaSets are supported. Deployments should not be far off, because ReplicaSets are already in there. Deployments will be great because this will bring us rolling updates and rollbacks across clusters.

Creating a workload in the Federation is exactly the same thing as doing it on a single cluster. Create a resource file for a replica set and create it with kubectl targeting the federated cluster.

```

$ cat nginx.yaml

apiVersion: extensions/v1beta1

kind: ReplicaSet

metadata:

 name: nginx

spec:

 replicas: 4

 template:

   metadata:

     labels:

       app: nginx

   spec:

     containers:

       - name: nginx

         image: nginx:1.10


$ kubectl --context=federated-cluster create -f nginx.yaml

```

The really great concept, though, even at this early stage in federation support, is that you can already give some preference to a cluster in the federation. That way, when the Pods start, they may be scheduled more on one cluster and less on another. This is done via an annotation.

Add the following in the metadata of the replica set above:

```

 annotations:

   federation.kubernetes.io/replica-set-preferences: |

       {

           "rebalance": true,

           "clusters": {

               "new-york": {

                   "minReplicas": 0,

                   "maxReplicas": 10,

                   "weight": 1

               },

               "berlin": {

                   "minReplicas": 0,

                   "maxReplicas": 10,

                   "weight": 1

               }

           }

       }

```

If you scale to 10 replicas, you will see five pods appear on each cluster. Indeed, each one has the same weight in the annotation.

Now try this: edit the annotation and change the weight. For example, put 20 on one of the clusters and 0 in the other.

```

$ kubectl --context=federated-cluster apply -f nginx.yaml

```

You will see all your Pods “move” over to one cluster and disappear from the other. Edit the replicaset again, switch the weight the other way and do another apply. You will see the Pods “move” the other way.

This is not a migration in the sense copying memory between two hypervisors like we can do with VMs, but it is migration in a microservice sense, where we can move the services from region to region.

And this is just the beginning!

Read the previous articles in this series:

Getting Started With Kubernetes Is Easy With Minikube

Rolling Updates and Rollbacks using Kubernetes Deployments

Helm: The Kubernetes Package Manager

Enjoy Kubernetes with Python

Want to learn more about Kubernetes? Check out the new, online, self-paced Kubernetes Fundamentals course from The Linux Foundation. Sign Up Now!

Sebastien Goasguen (@sebgoa) is a long time open source contributor. Member of the Apache Software Foundation, member of the Kubernetes organization, he is also the author of the O’Reilly Docker cookbook. He recently founded skippbox, which offers solutions, services and training for Kubernetes.