Regardless of where you work in the stack, if you work with open source software, there’s likely been a time when you faced burnout and other unhealthy side effects related to your work on open source projects. A few of the talks at OSCON Europe addressed this darker side of working in open source head-on.
Industry leader Martin Fowler provides some ”value” in using ValueObjects, particularly small ones.
When programming, I often find it’s useful to represent things as a compound. A 2D coordinate consists of an x value and y value. An amount of money consists of a number and a currency. A date range consists of start and end dates, which themselves can be compounds of year, month, and day.
As I do this, I run into the question of whether two compound objects are the same. If I have two point objects that both represent the Cartesian coordinates of (2,3), it makes sense to treat them as equal. Objects that are equal due to the value of their properties, in this case their x and y coordinates, are called value objects.
But unless I’m careful when programming, I may not get that behavior in my programs.
If you’ve built a new app in AWS, odds are you’re running it on Linux, with a NoSQL data store and Nginx to serve it to your users.
That’s one of the conclusions drawn by Sumo Logic, a cloud-based analytics service for application data that runs on Amazon Web Services, in its analysis of how its customers are putting together modern, cloud-based apps.
Sumo Logic’s report, entitled “The State of the Modern App in AWS,” uses statistics gathered from the company’s base of 1,200 customers to get an idea of how their apps are created and what they run on.
The company’s formal verification engine, now in general availability, is aimed at “eliminating tedious manual correlation by humans and putting it into smart software,” Erickson says. In other words, Forward wants to automate away the human-error factor that causes network outages or security vulnerabilities.
It’s solving a problem that CEO Erickson and his co-founders — Brandon Heller, Peyman Kazemian, and Nikhil Handigol — encountered as students at Stanford University in a period starting around 2007, when they were doing early research on what became SDN. They were part of the team that was led by professor Nick McKeown and included Martin Casado, now a venture capitalist with Andreessen-Horowitz.
Today’s software is served from the cloud and the world’s data is stored in the cloud. The benefits are clear. Let the cloud platform providers deal with the complexities of managing servers and data centers, let the users enjoy continuous experience across multiple devices and let developers focus on their applications. In this article, I’ll focus on developer tools that migrated to the cloud. Development shops used to run servers in the office or rented servers from private hosting providers. This is not necessary anymore. All functions can now be served on the cloud.
As I described in the previous article, with minikube running or with access to a remote Kubernetes cluster, you can start exploring more advanced deployment scenarios than running a single Pod. One of the strengths of Kubernetes is the ability to define a container-based unit (i.e., Pod) in a declarative resource called a Deployment. This Deployment can be scaled up and down and can also be used to keep track of all the versions being deployed, opening the door for simple rollbacks.
Deployments are a higher abstraction, which create ReplicaSets resources. ReplicaSets watch over the Pods and make sure the correct number of replicas are always running. When you want to update a Pod, you can modify the Deployment manifest. This modification will create a new ReplicaSet, which will be scaled up while the previous ReplicaSet will be scaled down, providing no down-time deployment of your application.
The command line kubectlgives you some hints about what is possible. In particular, in version v1.4.0, you have some clearly labeled Deploy Commandsreturned by the kubectl help. Note that the rolling-update command only applies to ReplicationControllers; hence, we will not use it. This type of update was driven client side, whereas with Deployments resources rolling updates are now all done server side.
```

$ kubectl --help

...

Deploy Commands:

 rollout        Manage a deployment rollout

 rolling-update Perform a rolling update of the given ReplicationController

 scale          Set a new size for a Deployment, ReplicaSet, Replication Controller, or Job

```
Of interest for this blog is the rollout command, which allows you to manage various versions of a deployment.
```

$ kubectl rollout --help

...

Available Commands:

 history     View rollout history

 pause       Mark the provided resource as paused

 resume      Resume a paused resource

 status      Watch rollout status until it's done

 undo        Undo a previous rollout

```
Quick and Dirty Deployment
If you cannot wait to get started, make use of the kubectl run command to generate a Deployment. It is a very handy wrapper. Executing it will generate a Deployment, which will create a ReplicaSet, which will create your Pod. For example to run Ghost:
```

$ kubectl run ghost --image=ghost

$ kubectl get pods,rs,deployments

NAME                               READY     STATUS         RESTARTS   AGE

po/ghost-943298627-ev1zb           1/1       Running        0          33s

NAME                         DESIRED   CURRENT   READY     AGE

rs/ghost-943298627           1         1         0         33s

NAME                   DESIRED   CURRENT   UP-TO-DATE   AVAILABLE   AGE

deploy/ghost           1         1         1            0           33s

```
To quickly expose this deployment, we need to create a service. This can be done with the kubectl exposecommand.
To create a Deployment from a manifest, head over to the Deployment documentation, check the specification, and write your own manifest in yaml or json, then use the kubectl create -f command. Note that Deployments are extensions API, they should become first class citizens in an upcoming release. However,kubectl run is a handy wrapper that gets your started in a flash.
Modifying a Deployment
Before modifying a Deployment, let’s have a look at therollout command and see what the history returns:
We have one revision, representing the creation step. And the cause is empty <none>. To get the change cause to be recorded, we need to start a Deployment with a –record option. Each subsequent action will be recorded in an annotation stored in the Deployment resource. Let’s do it, because it is quite fun.
```

$ kubectl run ghost-recorded --image=ghost:0.9 --record

deployment "ghost-recorded" created

$ kubectl rollout history deployments ghost-recorded

deployments "ghost-recorded"

REVISION    CHANGE-CAUSE

1        kubectl run ghost-recorded --image=ghost:0.9 --record

```
There are now many ways to perform an update. One that I like a lot is just to edit the Deployment with my editor using kubectl editlike so:
It is handy, but the annotation is not very helpful, we don’t know what we changed. So, instead let’s use the set command. Currently, this lets you change only the image of a deployment.
```

$ kubectl set image deployment/ghost-recorded ghost-recorded=ghost:0.11

deployment "ghost-recorded" image updated


$ kubectl rollout history deployments ghost-recorded

deployments "ghost-recorded"

REVISION    CHANGE-CAUSE

1        kubectl run ghost-recorded --image=ghost:0.9 --record

2        kubectl edit deployments ghost-recorded

3        kubectl set image deployment/ghost-recorded ghost-recorded=ghost:0.11

```
Every time we make a change, a new ReplicaSet is created. This new ReplicaSet is scaled up and the previous one scaled down, but not deleted… Let’s check it out:
```

$ kubectl get rs

NAME                        DESIRED   CURRENT   READY     AGE

ghost-recorded-214016590    0         0         0         5m

ghost-recorded-3297419894   0         0         0         3m

ghost-recorded-3372327543   1         1         1         1m

```
If you check the Pods, you will see that your running Pod has the hash of the latest ReplicaSet:
```

$ kubectl get pods

NAME                              READY     STATUS    RESTARTS   AGE

ghost-recorded-3372327543-d0xbk   1/1       Running   0          2m

```
Here you have it, rolling update with Kubernetes Deployments, giving you zero down-time!
Rollbacks
How do you roll back ? Simply set the revision that you want. Kubernetes will scale up the corresponding ReplicaSet, and scaled down the current one, and you will have rolled back. Let’s do it, so you believe me:
```

$ kubectl rollout undo deployments ghost-recorded --to-revision=1

deployment "ghost-recorded" rolled back


$ kubectl rollout history deployments ghost-recorded

deployments "ghost-recorded"

REVISION    CHANGE-CAUSE

2        kubectl edit deployments ghost-recorded

3        kubectl set image deployment/ghost-recorded ghost-recorded=ghost:0.11

4        kubectl run ghost-recorded --image=ghost:0.9 --record

```
Here we rolled back to the first revision. The revision index was incremented, but the ReplicaSets stayed the same. We just scale up the original one.
While doing a rollout or rollback, you can define a specific strategy. This strategy is specified in the Deployment manifest. Currently, it only lets you specify the maximum number of Pods that can be unavailable during an update, as well as the maximum number of Pods that can be created above the declared number of replicas.
You can also pause and resume rollout and rollbacks with kubectl rollout pause/resume
There you have it, I think this has never been that easy to perform rolling updates and the crucial rollbacks. The ReplicaSets are brought to bear to keep a history of deployments and provide a zero downtime update. Also critical in all of this, is that the service exposing the application never gets changed. Indeed the service selects the Pods based on labels, whatever happens in the deployment the service is the same. This Deployment resource can also be used to do more involved update patterns, like canary deployments.
Want to learn more about Kubernetes? Check out the new, online, self-paced Kubernetes Fundamentals course from The Linux Foundation. Sign Up Now!
Sebastien Goasguen (@sebgoa) is a long time open source contributor. Member of the Apache Software Foundation, member of the Kubernetes organization, he is also the author of the O’Reilly Docker cookbook. He recently founded skippbox, which offers solutions, services and training for Kubernetes.
Explore Software Defined Networking Fundamentals today by downloading the free sample.Download Now
Join us in this three-part weekly blog series to get a sneak peek at The Linux Foundation’s Software Defined Networking Fundamentals(LFS265) self-paced, online course.
Virtualization, which includes Software Defined Networking (SDN) and Network Function Virtualization (NFV) is changing the entire networking ecosystem. Virtualization is an innovation wave that cannot be ignored. The value proposition is too compelling for anyone operating a network (Enterprises and Service Providers) to ignore. All participants in this ecosystem must adapt, or they’ll be left behind.
This tutorial series, taken from the second session of the course, will provide the fundamental concepts of an SDN switch. This first part covers a short history of networking and the driving forces of innovation behind SDN. It also introduces the concept of planes and gives an overview of the three planes of networking.
The second part shows the architecture and operations of a traditional switch and how the planes are implemented therein. Then part three illustrates the architectural differences of a software defined switch and introduces the concept of an SDN Controller. It then covers RFC 7426 and how it introduced a number of abstraction layers to simplify the programming of complex networks.
The networks that drive today’s world, and the information technology industry in particular, are built on the concepts introduced by ALOHA and the U.S. Defense Advanced Research Project Agency (DARPA) initiative called ARPANET (Advanced Research Projects Agency Network).
What we now refer to as the “Internet” is the evolution of Arpanet. Created in the early 1960s, Arpanet was a packet-based network, as opposed to the widespread circuit switched Public Switched Telephone Network (PSTN). The resilience, we now assume, was created to ensure survivability of a nuclear attack. If a node (in this macabre case, a city) was removed from the network, the remaining nodes would adapt and route around the missing node.
In the 1980s, the Internet Protocol Suite (TCP/IP) was introduced, and the U.S. National Science Foundation funded numerous supercomputing centers at select universities and then funded connectivity to these sites to other research institutions. It was the advent of the web browser by Tim Berners-Lee of CERN that gave us a simple interface to the Internet and its resources and became the World Wide Web that’s become integrated in our lives.
The techniques and methods used in packet networking, as well as the hardware and the software, evolved over time. However, the actual network building blocks are the same, and we enhance them on top of the existing infrastructure.
With the advent of virtual machines (VMs) and virtualized data centers, the landscape changed in the compute domain. Despite that, the networks have been slower to adapt. Networks are geographically large systems with dozens of purpose-built hardware devices connected with miles of fiber optic cables. For an enterprise the network is critical infrastructure, and for service providers the network is their business. Upgrading these mission-critical systems while they are in use is wrought with challenges. Additionally, these purpose-built hardware devices are not only proprietary vendor-specific implementations, they are also rigid and inflexible. Thus, network operators are at the mercy of each vendor’s upgrade cycle and roadmaps. This is often referred to as “vendor lock-in.” To make it more challenging, services are often tightly coupled to hardware devices. If you want to add a new network service, you need to qualify, test, and then integrate a new hardware device to your installed base. As an illustration of this point, AT&T has noted that their average central office has more than 300 unique hardware devices. This alone is an operational nightmare.
As the web skyrocketed, the number of Internet Service Providers (ISPs) did too, creating a large market for companies that made switches and routers. Based on the technology at the time and subsequent technical and market forces, these hardware-centric systems grew in physical size, performance, power consumption, and price.
To achieve the levels of performance required, vendors were often forced to create custom application-specific integrated circuits (ASICS). These complexities led to numerous vendor-specific (proprietary) implementations and management systems. As a result, the services that ran on the network were tightly coupled to the specific pieces of hardware. If a service provider, or enterprise, wanted to add a new service (e.g., VPNs, residential firewalls, etc.), this became a multi-year effort requiring both new hardware and new expensive integration efforts.
At the same time, aggressive cash-rich and nimble web or cloud companies (e.g., Google, Amazon, et al.) were introducing new services seemingly weekly. They accomplished this using Commercial Off-The-Shelf (COTS) hardware and open source software. In networking, the inflexibility, growing costs and services-hardware lock-in ignited the global innovation engine. Research projects led to the paradigm of a programmable network infrastructure, which we now know under the name of Software Defined Networking (SDN). Some of the research projects which led to SDN were:
ForCES (Forwarding and Control Element Separation)
SDN will transform the network away from specialized hardware with protocols and applications implemented for each switch/router hardware/software combination. Instead, the functionality is implemented at a higher level, using the controllers APIs independent of the underlying hardware. Instead of programming individual devices, we can now program the network.
Intro to Networking Planes
On a whiteboard, networks may be drawn as a cloud or a number of straight lines between nodes. In reality, there are three dimensions, called “planes,” of a network: the Data Plane, the Control Plane, and the Management Plane. It is important to understand these planes and how each of them is treated in a software-defined network.
• Data Plane
The data plane is responsible for handling the data packets and applying actions to them, based on rules that we program into lookup tables. The actions must happen at line speed, therefore we must be fast enough (e.g., 40Gbit/sec per port). Also called the data path or the forwarding plane, the data plane takes packets in one port of a switch and sends them out another port.
Knowing what port to send them out requires input from the control plane. Once configured, packets come and go at “wire speed” (e.g., 10Gbps). So the switch has .0000000001 second (at 10Gbps) to figure out which port to forward the packet to. If it can’t match the packet to a pre-programmed rule, it sends the packet to the control plane.
• Control Plane
The control plane is tasked with calculating and programming actions for the data plane. This is where the forwarding decisions are made and where other functions (e.g., Quality of Service, Virtual Local Area Networks, etc.) are implemented. The control plane is operating at a lower speed than the data plane. It does not operate — or need to operate — at wire speed.
• Management Plane
The management plane is where we can configure and monitor the network device (e.g., switch or router). The network device can be a shell, command-line interface (CLI) or web interface. The management plane usually runs on the same processor as the control plane.
In part 2 of this series, we’ll explain the architecture and operations of a traditional switch and how these planes are implemented in this environment. Part 3 will examine the new components in network architecture.
The “Software Defined Networking Fundamentals” training course from The Linux Foundation is designed to provide system and network administrators and engineers with the skills necessary to maintain an SDN deployment in a virtual networking environment. Download the sample chapter today!
High performance computing (HPC) is increasingly going mainstream as the industries using supercomputers to crunch data is multiplying at a rapid clip.
We caught up with Dan Stanzione, executive director of the Texas Advanced Computer Center (TACC) at the University of Texas, Austin, to talk about the state of HPC, sustainability, consumption models and use cases.
Here are the key points:
Sustainability and DC data centers: One of TACC’s most interesting projects is Hikari, a project funded by the Japanese government using NTT facilities and HPE’s Apollo hardware. The general idea is to eliminate the AC to DC power conversions in the data center to improve sustainability.
This article is sponsored by Accelerite as a Gold-level sponsor of ApacheCon Europe 2016.
Cloud computing is on the rise. Gartner predicts that by the year 2020, “a corporate ‘no-cloud’ policy will be as rare as a ‘no Internet’ policy is today.” That is also the year the U.S. Department of Commerce’s 2016 Cloud Computing report predicts more computing power will be sold and deployed by Infrastructure as a Service (IaaS) and Platform as a Service (PaaS) cloud providers than by enterprise data centers.
Certainly Apache CloudStack, an open source IaaS platform, is in alignment with that expectation. The project and its community are still under the auspices of the Apache Software Foundation but the CloudStack commercial product was recently acquired from Citrix Systems by Accelerite. The company is now the largest contributor and provider of commercial products based on the Apache CloudStack project for private clouds.
Rajesh Ramchandani, general manager of Accelerite’s Cloud Services and Platforms
We talked with Rajesh Ramchandani, general manager of Accelerite’s Cloud Services and Platforms, to get the company’s take on the future of cloud, its own vision for it, and why they think the Apache CloudStack project is a key element in both.
Linux.com: What key trends in cloud technologies do you see for next year, 2017?
Rajesh Ramchandani: Some of the key trends include hyper-converged infrastructure; hybrid clouds and software defined networks (SDN); Docker and container orchestration; real time and predictive analytics; microservices architectures and customized PaaS; serverless code maturity, IoT applications; and, machine learning for data center management.
So far the hybrid cloud adoption has been slow, but we expect hybrid cloud to become a reality with real use cases next year. Software Defined Networks will be the key networks between private and public clouds, and come with enforceable policy management for risk, compliance and security management.
Expect almost all of Fortune 2000 to be using Docker and containers in production. The new workloads will evolve to leverage containers. Container orchestration will become key technology to deploy and manage workloads across hybrid infrastructure. Limitations in storage and networking with containers will continue to be eliminated.
Hyper-converged infrastructure, which are high density and highly virtualized self-managing systems, will be at the center of most enterprise IT. High density private clouds will be supplemented with public clouds to provide a highly scalable on-demand hybrid infrastructure which can virtually scale infinitely.
Microservices will be developed as serverless code. Expect multiple serverless frameworks to appear in the marketplace and bleeding edge enterprises. ISVs will adopt them next year.
Microservices architectures will also be dominant for new applications. Enterprises will most likely build a customized PaaS by integrating CI/CD toolset rather than use an integrated PaaS platform that exists today. Different models of DevOps will evolve as each enterprise adopts processes to suite their own specific needs.
Linux.com: How do you see enterprise adoption of the cloud progressing?
Rajesh: Most enterprises have been using VMware virtualized environments and public clouds — such as AWS, Azure and Google — as an isolated environment for less security-sensitive workloads. We expect to see adoption of new technologies such as Docker and container orchestration and management platforms.
As newer services get deployed, the management of each of them adds complexity and cost and hence we should see enterprises leverage cloud-based control planes and management tools rather than on premise deployed point solutions.
The infrastructure that will be deployed will be mostly hyper converged which will have sophisticated operations intelligence built-in to manage the failovers, event pipelines, self-recovery mechanism and security analytics. Some infrastructure will support predictive analytics for advanced planning and downtime management. The most mature cloud-based control planes will provide most of the functionality either way.
On the development side, most of the enterprises will increasingly develop microservices and cloud-native applications. Some enterprises will implement and benefit from a full open DevOps model but majority of them will have a process to manage security, compliance and risk while implementing DevOps and SecOps.
Linux.com: What is the current state of CloudStack project? Is Accelerite going to continue to invest to grow the community?
Rajesh: We are committed to continue to invest and grow the CloudStack project and the community.
CloudStack is very mature technology and is proven to scale large-scale production clouds around the world. Some cloud providers run tens of thousands of nodes today in production, which is mostly unheard of with other competing platforms.
We are investing in the technology and adding resources to help us evangelize CloudStack, organize CloudStack meetups and other events, and be visible at key events such as ApacheCon.
We have also increased our investments in engineering and support to help customers improve their cloud operations operations and next generation cloud native technologies integrations to aid their growth and enable them to contribute back to the CloudStack community.
Linux.com: Accelerite already owns the commercial CloudStack platform, where else are you investing to help enterprises with cloud adoption?
Rajesh: Accelerite is the largest contributor and provider of commercial products based on the Apache CloudStack project for private clouds. As we talk to our customers, it’s becoming clear that there is a need to enhance CloudPlatform / CloudStack and integrate new technologies such as Kubernetes, Mesos, Docker and other container technologies so they can leverage both new technologies and their investment in their existing platform.
We are working on providing a next-generation cloud platform called Rovius to provide a single pane for provisioning VMs, containers on bare-metal and hybrid clouds. We also recently acquired an IoT platform called Concert, an IoT-PaaS for the fast development of highly scalable and smart applications. Further, we have recently launched a new real-time security product called Sentient, which provides real time insights as well as remediation capabilities into security posture of the endpoints, connected devices and cloud infrastructure.
Modern mobile phones have some very sophisticated methods of finding their location. With OwnTracks, you can distribute that information in any way you see fit. The OwnTracks project recommends that you run your own private server and not use any public server. This way, you are the one choosing where your location information is shared.
Although there are many reasons that you might not want your location tracked, most of those stem from fear of losing control over who can see that information. There are also good reasons you might want to know this information and also good reasons that you might want to share it. When organizing an event like a conference, for example, it’s useful to know where the organizers are so you can quickly resolve issues. Knowing where you are can also open up automation for Internet of Things (IoT) applications. For example, you might want to keep track your own location so that you can set up your house to ensure the stove and air conditioning are off when the house is empty.
If you mount a smartphone onto your DIY robot, you can use the location information to help control it and know where it has wandered off to. Just because you are using a phone to get the location doesn’t mean the phone has to be carried by a person.
The parts of the puzzle
OwnTracks uses an app on your Android or IOS smartphone to obtain location information. That data is then sent to the server you have chosen. Data can be sent as normal web HTTP traffic, or more usefully as MQTT messages. MQTT is a way for programs to communicate information in the form of small messages. A program that knows something that might be interesting — such as the phone app here — offers to publish that data to an MQTT server. Another program can contact the MQTT server and subscribe to specific messages which are then sent to that program as they arrive.
All MQTT traffic can be sent over TLS, tapping into the same protection that HTTPS offers for web traffic. On top of that, your MQTT server can set up access control based on username and password so you can allow read access to some messages and block access to others on a per user basis. Again, you have control over who or what can see and send data.
In MQTT, messages use a namespace similar to that of a filesystem. So, an LG G5 phone running OwnTracks might publish messages on the topic “owntracks/ben/g5”. A client can subscribe to exact topics or use wildcards to subscribe to any message on a whole tree. Using topics helps programs only subscribe on messages that they are interested in and lets programs give some information about what a message might mean.
You might wonder what happens if the phone only moves every now and then. If the phone only sends an MQTT message when it moves, you might think that a program that starts late at night and wants to know where your phone is located would have to wait a long time to get a message. Messages in MQTT can be marked as retained.
OwnTracks marks the location messages to be retained. When you arrive home and OwnTracks sends a message that the phone is home, that same message will be delivered to any new subscribers for the topic as soon as they subscribe. So, a late night “are you home” query will know right away that you are home and have been for a many hours now. Normally, only the most recent retained message for a topic is kept by the MQTT server.
Privacy and security
To retain the privacy of your location data, you should set up your own MQTT server. This is not an extremely difficult process, but is an additional hurdle for those used to installing an app and being up and running right away.
The Mosquitto server is a lightweight MQTT server with support for access control and TLS for secure communications. Mosquitto also has command-line clients mosquitto_sub and mosquitto_pub, which let you publish and subscribe to messages and are both invaluable for testing.
To use TLS and secure communications, clients will need to know your MQTT username, MQTT password, and be aware of the certificate authority that created the MQTT server key. This last part can be done by copying a specific non-secret ca.crt file from the machine you are running your MQTT server on onto your phone and telling the App to use that file when verifying the server. Another option is to use Let’s Encrypt TLS keys.
Mosquitto MQTT server setup
OwnTracks has some wonderful documentation on how to set up a Mosquitto MQTT server. I encountered a few minor hiccups along the way, mostly due to the server trying to bind to a port multiple times (a misconfiguration I added), and my not specifying the ca.crt file when trying to connect.
The following procedure should get you up and running. Note that running mosquitto-setup.sh generates server keys with the full domain name of the local machine. The configuration files still reference a generic server.crt file. I assume this is in case the machine has multiple names, although — if you only have one name — perhaps the script could set up the configuration file to use that key only. As shown below, check in /etc/mosquitto/conf.d for crt and key files with the name of your machine and update the configuration file to reference those files.
The main mosquitto file I used is shown below. Because the second TLS configuration file includes the configuration of which ports to listen on, I have removed all of those from the main configuration file shown below.
The conf.d/mosquitto.conf sets up the TLS keys and tells mosquitto that you want it to listen on port 8883 of all network interfaces. Insecure connections on port 1883 are still allowed but only from the local host.
It is useful to test that messages can be sent through the MQTT server using TLS before moving on to installing the OwnTracks Android app.
The three commands shown below should be run from a different console on the same machine that the MQTT server should run on. Notice that the last parameters on the mosquitto_sub and mosquitto_pub commands are the same. The pub command takes the -t topic to connect to and the -m message to send. The sub is using a topic of #, which means it will subscribe to all topics. If everything works, then you will see traffic on the console that is running mosquitto, and the word ‘world’ will appear on the mosquitto_sub console.
With that all set up, the server can be started with the following command.
# /etc/init.d/mosquitto start
Android app setup
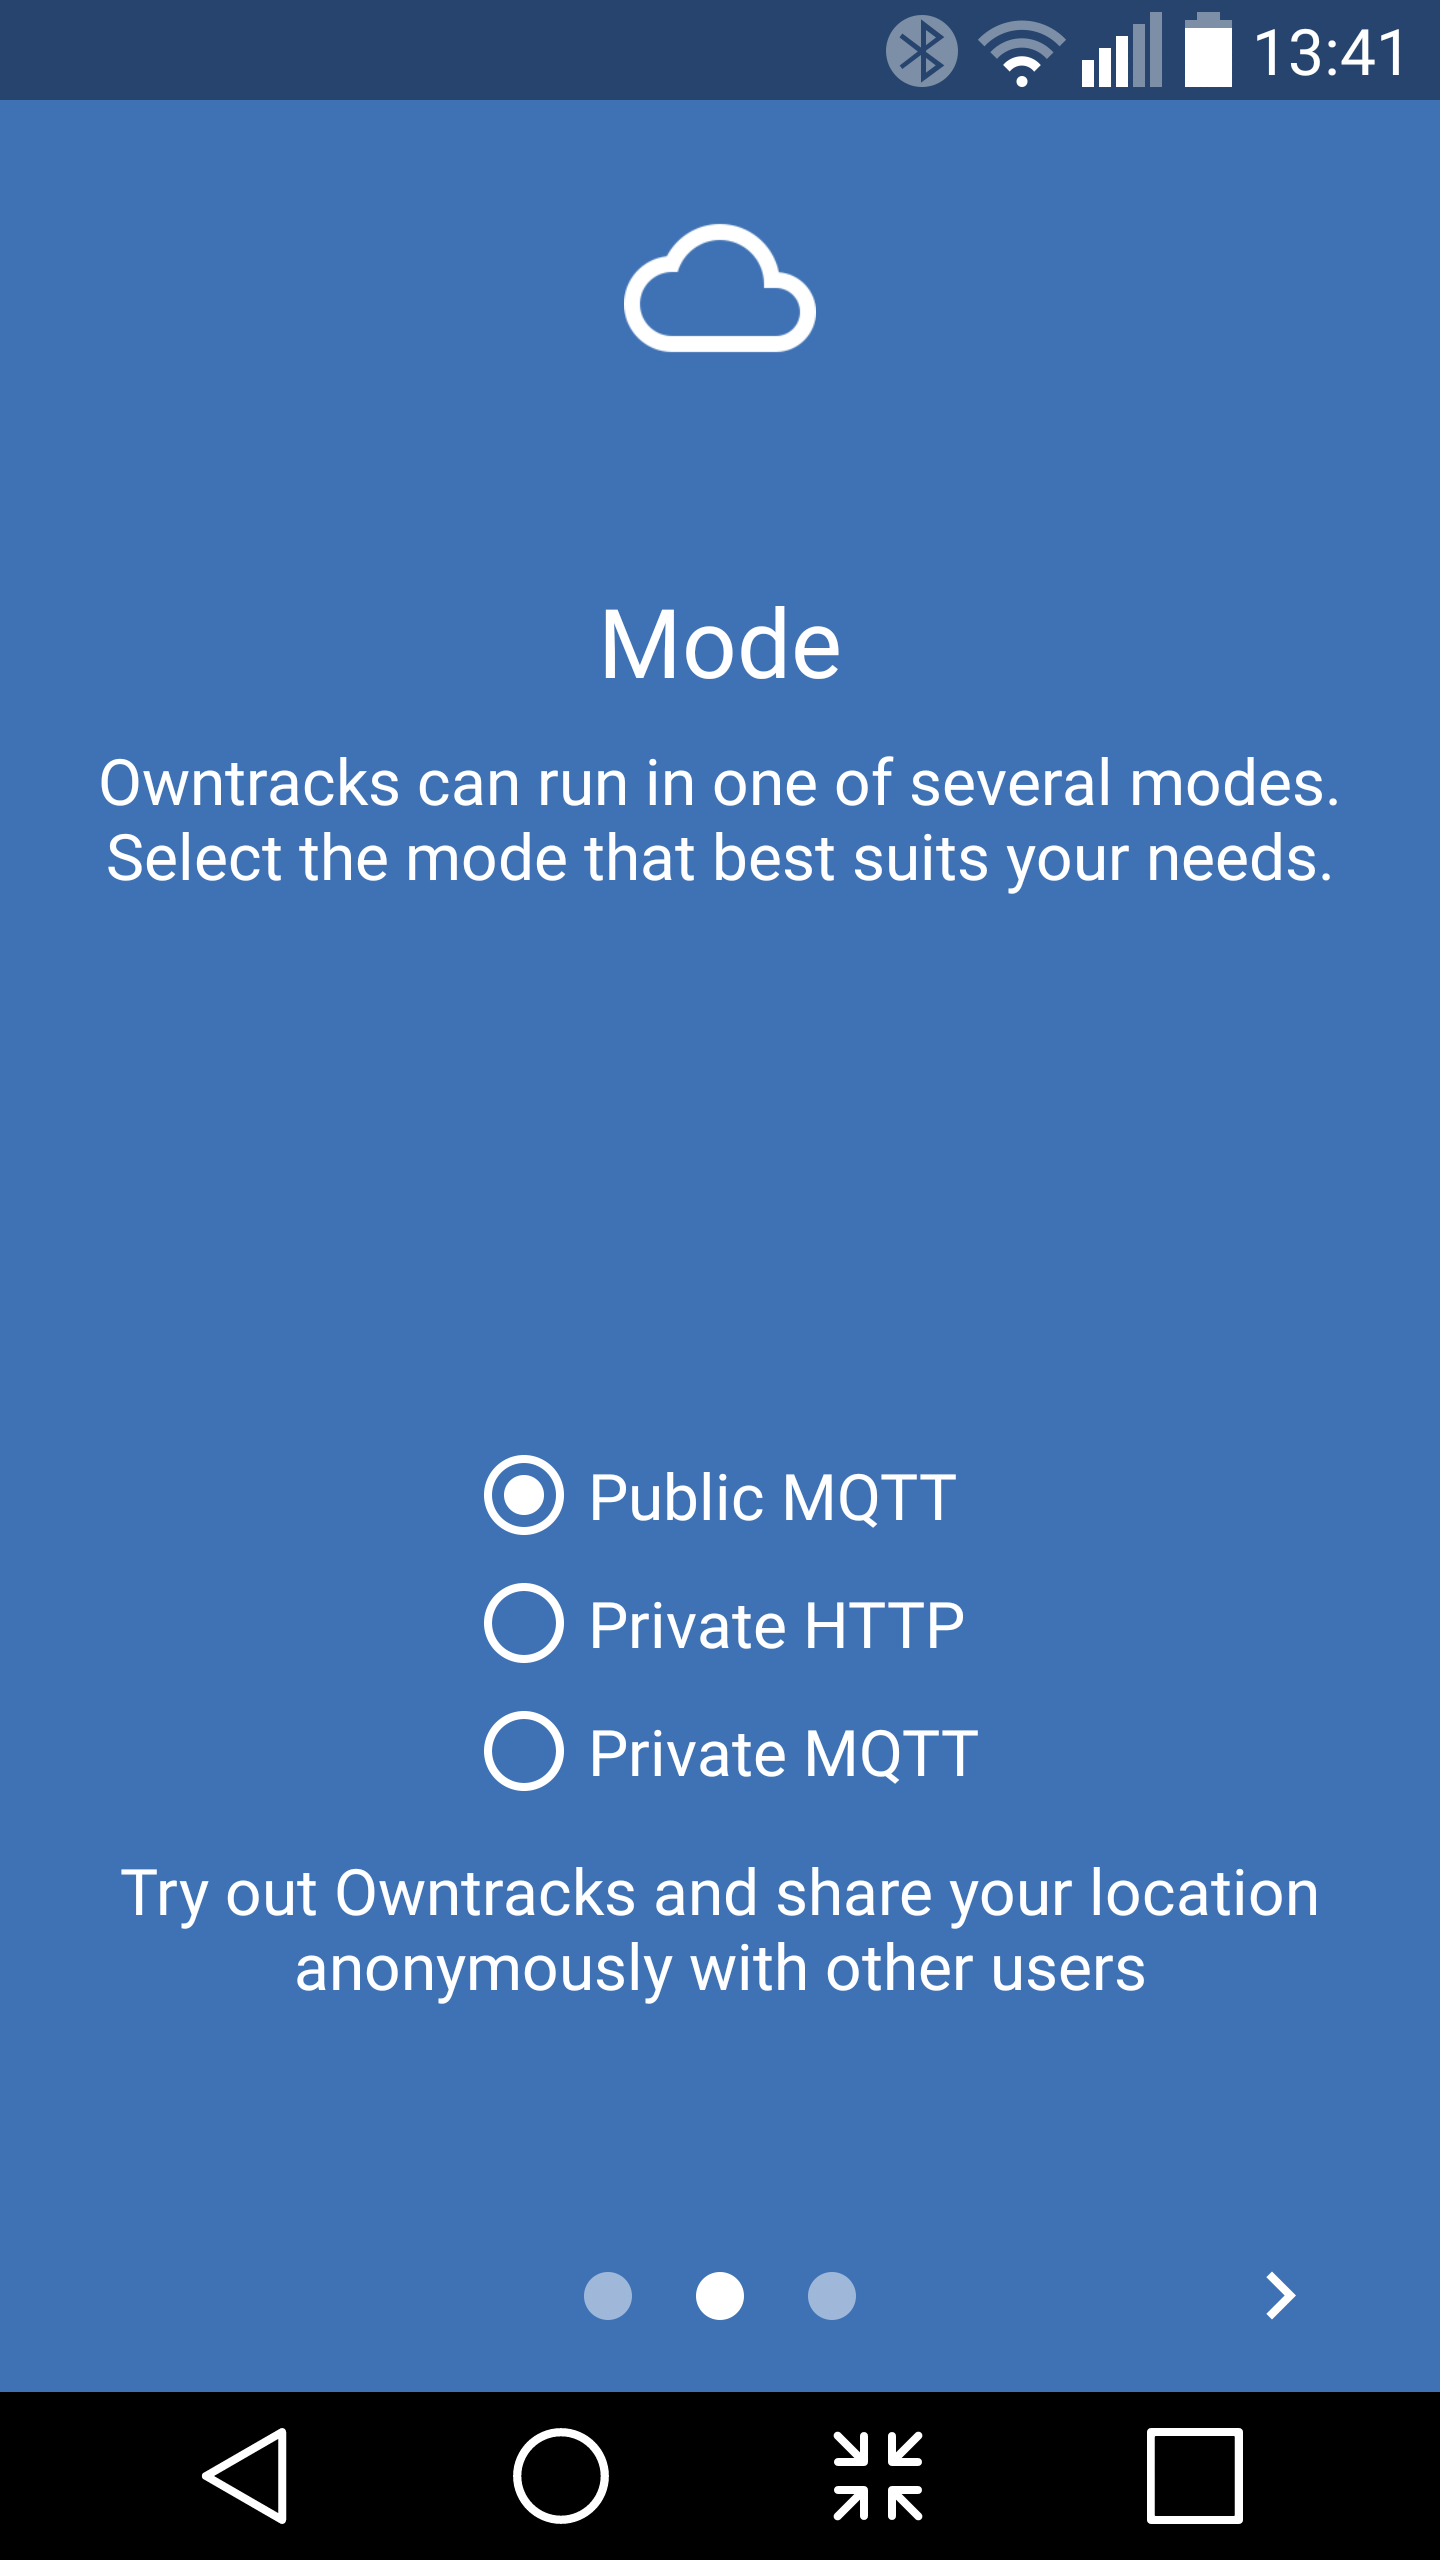
The OwnTracks Android App is available in the Google Play Store. The first time you open the OwnTracks App you will be asked which type of server you intend to send your data to (Figure 1) . This can also be changed later. The Private MQTT option is the recommended setting, letting you retain all your data.
Figure 1: OwnTracks Android app.
Once you get through the small intro screen in the OwnTracks App, swipe from the left of the screen to open the menu and choose Preferences from the bottom of the menu. You will need to set the address, username, password, and ca.crt file in the Connection configuration. The address is set in the Host submenu, the Identification submenu is where you set the username and password. To connect, you will have to also go into the Security submenu and click on the CA certificate line. This will let you select the ca.crt file from your phone. The ca.crt file is not a sensitive file, so you can get it to the phone via any sharing method you like.
Although the ca.crt doesn’t need to be kept private, it is good practice to double-check the checksum of the file to make sure that it wasn’t changed during transmission. Knowing that you have the same ca.crt file that you sent will prevent a man in the middle type of attack. This is an attack where somebody replaces the ca.crt file with their own. They can then pretend to be your server without your knowing it. If you verify that the ca.crt on the phone is identical to the one you have on the server, then it eliminates this attack possibility.
Back at the main screen of the OwnTracks App — under the Preferences menu and the Connection submenu — there is a little tick at the top right of the screen. That will cause OwnTracks to try to connect with the server using the current configuration. Again, for initial testing, it can be useful to start your mosquitto server as below so you can see debug information on the console letting you know if things have connected.
Once you know that the phone can connect with the server, go back to the top page of the OwnTracks app. In the top right of the screen is a little upward pointing arrow. Clicking on that tells the app to try to send a message with your location back to your server. This is handy if you want to force a message to be sent even when your phone is not moving.
The following mosquitto_sub command will subscribe to all messages on the server. If the phone has already sent a message, the command should show you the phone location instantly. Each time you click on the upload arrow on the OwnTracks app, you should see a new message on the console telling you the current location of the phone. If you forget to include the cafile in the mosquitto_sub command line, then you will not be able to see anything, but you may not get an error message either.
Now you have private, secure, location data collection happening from your phone!
Wrap up
In the next article, I’ll look at some of the clients that can be used with OwnTracks. I’ll also take a look at the friend feature on OwnTracks and show how to update the picture and name shown for your friends.
The Internet of Things is quite a popular term these days. If you are looking to smarten up your home, then knowing where you are located can help these “things” respond in the way you would like.
With OwnTracks, you can keep track of your location and trips. You can also bring together groups who securely share their location to help make a task simpler. If you just want to have some fun then a phone and OwnTracks can help you keep track of your robot and help it navigate at the same time.