Home Blog Page 822

Here Come the x86 Hacker Boards

The first x86-based community-backed hacker SBCs not backed by Intel or AMD have reached market, offering higher prices than most ARM SBCs, but with faster processors and competitive power consumption. The Kickstarter-backed newcomers, all of which run Linux or Android, include the now-shipping JaguarBoard, the soon to ship UP board, and the Udoo X86, due in November.

Udoo X86 board
The Udoo X86 is the only one of the trio to match the fully open source claims of the hacker boards offered by the two major x86 chipmakers, but they’re all aimed at the maker market and offer community services. AMD already sells a Gizmo 2 board, and Intel has the Atom-based MinnowBoard Max and Intel Edison for Arduino Kit, as well as its Quark-based Galileo. Yet, none of these open-spec boards are configured with chips as powerful as those driving the three newcomers, especially the 14nm Atom driven UP and Udoo X86.

The arrival of x86 hacker boards has been slowed by the high power consumption of x86 SoCs compared to ARM, as well as higher prices. The first hurdle has largely been overcome, with the UP’s Atom x5-Z8300 running at 2W and the Udoo X86’s Braswell-based Atom x5-E8000 and faster Celeron N3160 SoCs offering 5W and 6W TDPs, respectively.

Pricing, however, is still a challenge. While these $80 to $100 boards are still in the hacker board ballpark, most of the ARM action is now happening at $35 or under, as with the Raspberry Pi 3, and several boards are selling for well under $20.

Still the new entries compete better with higher-end ARM boards, few of which offer quite the same CPU horsepower. And the Udoo X86 in particular provides features that are still rarely seen on the ARM side, including DisplayPort, SATA, and M.2 expansion.  

Intel just tipped a lower-cost Apollo Lake Atom system-on-chip expected to arrive later this year in 2-in-1s, tablets, and budget mini-PCs. Apollo Lake will debut 14nm “Goldmont” cores as well as Gen9 graphics similar to that found on Intel’s 6th-Gen “Skylake” Core CPUs.

Although embedded is not the main focus, price and the power consumption will be lower than with Braswell Atoms. In addition, Apollo Lake is loaded with interfaces like GPIO, I2C, SPI, and PWM, that would be welcome on a hacker SBC.

Here’s a quick look at the new JaguarBoard, UP board, and Udoo X86:

JaguarBoard — Jaguar Electronic HK’s JaguarBoard launched in January, and has already shipped to backers. The 101.9 x 64.5mm SBC is the most affordable of the three newcomers, offered at $65 to Kickstarter backers, and now available for $79.

The JaguarBoard’s lower price reflects the fact that it runs on Intel’s older, 22nm, “Bay Trail” Atom Z3735G, and offers only 1GB of RAM and 16GB flash, The SBC ships with an SD slot, HDMI, 10/100 Ethernet, and three USB 2,0 ports, among other I/O. Total consumption is said to be under 7.5W. There are no claims for open hardware, but there’s a forum and other community resources.

UP board — Asus-backed Aaeon Europe’s UP board will begin shipping to Kickstarter backers in early May. Based on a 14nm “Cherry Trail” Atom x5-Z8300, the UP has a Raspberry Pi-compatible 40-pin connector, and offers a similar, 85.6×56.5mm size and port layout.

The quad-core Atom x5-Z8350 is clocked at 1.44GHz (1.92GHz burst) and provides 4K-ready Intel HD 400 Graphics. You can choose between 1GB ($89) or 2GB ($99) DDR3L-1600 RAM, each with 16GB flash, expandable to 32GB, and there’s a new 4GB version with 32GB of flash that goes for $149. Intel is using the latter configuration for a $250, Ubuntu-driven Intel RealSense Robotic Development Kit, which includes an external RealSense depth-sensing camera.

The UP board ships with DSI and eDP display interfaces, and offers CSI camera and I2S audio ports. Other features include a Gigabit Ethernet port, three USB 3.0 ports, and six onboard USB interfaces. Aaeon just launched its UP Community website, which features a new Yocto Project build, but there’s currently no forum, and no schematics or other open spec resources.

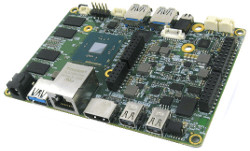
Udoo X86 — Last week, Seco’s Udoo project, known for open-spec SBCs like the i.MX6-based Udoo Quad, surpassed its Kickstarter goal for its $89 and up Udoo X86. With its quad-core, 14nm Braswell-based Atom and Celeron processors, the open-spec Udoo X86 is billed, somewhat justifiably, as “the most powerful maker board ever.” Then again, it won’t ship until November, by which time we can expect several more x86 hacker SBCs to break cover.

Kickstarter funding is available through June 6 for the $89 Udoo X86 Basic (1.04GHz with 2.00GHz burst) with 2GB of RAM and an Atom x5-E8000 SoC. There’s also the $129 Udoo X86 Advanced with 4GB RAM and a faster Celeron N3160 (1.60GHz with 2.24GHz burst). Both options can drive three simultaneous 4K displays.

The 120x85mm Udoo X86 is equipped with 8GB of eMMC, as well as a microSD slot and a SATA connector with optional solid state drives. The SBC features HDMI and dual DisplayPort++ ports, plus S/PDIF and analog audio outputs. Other features include a GbE port, three USB 3.0 ports, an IR interface, and 20 GPIOs. An M.2 Key B slot supports an optional 802.11ac and Bluetooth 4.0 module.

The Udoo X86 is the first hacker SBC to integrate the tiny Intel Curie module, which incorporates a Bluetooth Low Energy radio, and a Quark SE MCU. The Quark enables Arduino 101 IDE compatibility, as well as support for Arduino shields, sensors, and actuators.


OpenStack By the Numbers: Who’s Using Open Source Clouds and For What?

IT vendors and telecos are heaviest users of open source cloud software. 

One thing that’s clear is that interest in OpenStack continues to grow rapidly. The project is made up of 20 million lines of code; more than 585 companies have supported OpenStack in some way, and the OpenStack Foundation counts almost 40,000 people actively engaged in the community.

The April 2016 version of the OpenStack Foundation’s survey (read the full report here) queried 1,603 members from 1,111 organizations who oversee 405 OpenStack clouds.

Read more at NetworkWorld

How to Use Awk to Print Fields and Columns in File

In this part of our Linux Awk command series, we shall have a look at one of the most important features of Awk, which is field editing.

It is good to know that Awk automatically divides input lines provided to it into fields, and a field can be defined as a set of characters that are separated from other fields by an internal field separator.

Read more at Tecmint

How Cloud Computing and the On-Demand Economy Are Remaking IT Careers

New tech and innovative business models are changing the shape of tech employment. That role of the IT professional is changing, thanks to new technology and new business models. Rather than simply employing experts in coding and testing, businesses are keen to tap into the skills of business-focused specialists who can manage projects and deliver value.

It all means technology professionals must think very carefully about career development, says independent consultant and author Ade McCormack. He believes we are about to enter into the ‘gig economy’, where most people contract their expertise on a freelance basis.

Read more at ZDNet

DNA: The Long-term Data Storage Format that Will Never Go Obsolete

Digital archivists have been worried about the ephemeral nature of digital storage for some time now. How can you trust vital documents to any storage technology, which will most likely be obsolete within a decade or two? Now some researchers are investigating the use of nature’s own digital storage mechanism, DNA (deoxyribonucleic acid) for long-term data retention. 

At the Linux Foundation’s Vault storage conference, held last week in Raleigh, North Carolina, European Bioinformatics Institute (EBI)researcher Nick Goldman talked about the feasibility of using DNA as a long-term storage format, a talk timely not only because it was at a storage conference, but also because Monday is DNA Day.

Read more at The New Stack

HTTPS Is Hard

This blog post is the first in a regular tech series from the Yell engineering team looking at challenges they face and problems they solve across Yell’s various digital solutions.

Here, Yell’s Head of Web Engineering, Steve Workman, looks back over Yell.com‘s seven-month transition to HTTPS, (a secure version of the HTTP protocol – which sends data between a browser and a website) to raise awareness of the issues with the move in the industry and to make the adoption process easier for other engineering teams.

Read more at Yell Blog

5 Eclipse Tools for Processing and Visualizing Data

Gone are the days of scientists processing data by hand. Scientific tools are rapidly scaling to meet the increasing demands of their users, both in terms of complexity and sheer volumes of data.

In various domains, highly sophisticated scientific workbenches have been developed to enable scientists and researchers to quickly make sense of their data in a reproducible way.  Here are five great scientific workbenches from members of the Eclipse Science Group. Every one of them is open source and built on Java and Eclipse RCP.

Read more at OpenSource.com

Watch Videos from Embedded Linux Conference & OpenIoT Summit North America 2016


Thank you for your interest in the recorded sessions from Embedded Linux Conference and Open IoT Summit 2016! View more than 150 sessions from the events below.

Keynotes


Embedded Linux Conference


OpenIoT Summit


Drones & Robotics Track


IoTivity Track


AllJoyn Track


BoF


How to allows incremental file sync for many users on Linux

Suppose you as a software developer has set up daily builds of your software for testing purposes. Every day you make a new build, users have to re-download the updated build to evaluate it. In this case you may want to enable differential downloads, so that users can download only difference between two builds, thereby saving on the server’s bandwidth. Users will also be happy as they don’t have to wait to re-download the whole thing. Similar situations are encountered when you want to set up a download archive which allows incremental sync for users.

The post How to allows incremental file sync for many users on Linux appeared first on Xmodulo.

Shared Hosting on your Web Server: Multiple virtual hosts

This article tends to help you to set up multiple websites (or virtual hosts) on single web server running on Linux.

It’s particularly useful if you don’t want to spend money on multiple Virtual Private Servers (VPS), but you’d like to have ability to run and build multiple websites with minimum cost on the same server. In real world scenario, most of those sites would be based on common content management systems such as WordPress, Drupal, Joomla, etc.

The idea lies in the fact that instead of having single root directory for your website (which is /var/www/html/ in our example), you can have multiple folders located in /var/www/ where each folder will contain separate website.

What would you need to have to make it work:

  • web server which already has full LAMP stack on it. As example in this article, we use Ubuntu 14 with MySQL and Apache2 as web server.
  • root access to this web server
  • root access to MySQL database on this server

What we actually would do? When you want to add new website into your server, there are following three steps to consider:

  • pointing your domain into that folder
  • creating root folder for the website and setting up web server to recognize that folder
  • creating database and database user which would manage your WordPress or Drupal installation

Note, it doesn’t matter in what sequence you are following these three steps, as long as they all completed. And once all these steps completed, you are good to go with installation of your CMS as per its documentation.

All actions shown as performed under root account. Remember, it’s best practice to use regular account with sudo rather than root to perform any changes in your system.

Step 1: Point the domain

Point your web traffic of your  domain on to your server as per requirements of  your domain provider. Essentially it means you would need to create A record which resolves into your web server’s IP.

Step 2: Adding virtual host into web server’s configuration.

Let’s assume we want to build  website called cutepuppies.com  and related configuration files and folders in our server will be named accordingly as cutepuppies

Make separate root directory for your new website:

mkdir  /var/www/cutepuppies


Give ownership of the directory to the Apache web user (which is www-data)

chown www-data:www-data -R /var/www/cutepuppies


Also, if you action not under root account, add your username to the web group:

usermod -aG www-data YOUR_USER_NAME

Go to your web server configuration folder  /etc/apache2/sites-available

Make a copy of default configuration file 000-default.conf and name it cutepuppies.conf

cp 000-default.conf cutepuppies.conf


Open your new configuration file and change following parameters as per below:

ServerName cutepuppies.com
Server Alias www.cutepuppies.com
DocumentRoot /var/www/cutepuppies

<Directory /var/www/cutepuppies>
    DirectoryIndex index.php
    AllowOverride All
    Order allow,deny
    Allow from all
</Directory>


Once your configuration file is ready, enable it with this command:

a2ensite cutepuppies.conf


Now to make it work after changes, you need to reload configuration of your web server:

service apache2 reload


Step 3: Create MySQL database and database user

Let’s assume we’ve defined the values for new database as following:

Database name: dbcutepups

Database user: dbuser

DB user’s password: password123


Log into MySQL using your MySQL root credentials:

mysql -u root -p


Provide password when prompted. After successful login, instead of BASH invitation you will see the one looking like this:

mysql>


What we have logged into MySQL for is to create database, database user and make that user work with this database. It’s simply achieved by the following commands:

mysql> CREATE DATABASE dbcutepups;
mysql> CREATE USER dbuser@localhost;
mysql> SET PASSWORD FOR dbuser@localhost= PASSWORD("password123");
mysql> GRANT ALL PRIVILEGES ON dbcutepups.* TO dbuser@localhost IDENTIFIED BY 'password123';
mysql> FLUSH PRIVILEGES;

Then, you can exit from MySQL.

Now you are ready to unpack your CMS into root directory /var/www/cutepuppies/ and to run installation. When installing CMS, you would need to use MySQL credentials that you’ve just created.

Each time you want to add new website into your server, follow described instructions again. If everything is working properly, all your websites located on the server should be accesible. The other thing to worry about after that will be your server’s security and performance what’s beyond of subject of this article.

If you have anything to add or clarify, please feel free to comment and contibute.