eCryptfs is a POSIX-compliant enterprise-class stacked cryptographic filesystem for Linux. You can use it to encrypt partitions and also directories that don’t use a partition of their own, no matter the underlying filesystem, partition type, etc. This tutorial shows how to use eCryptfs to encrypt a directory on Debian Jessie.
Ubuntu MATE Developers Are Preparing Something Special for 16.04 LTS
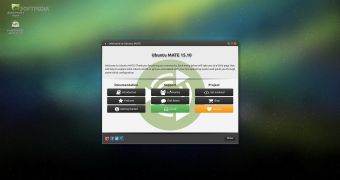
The Ubuntu MATE developers usually post details about donations from the previous month, and regardless of what people might think, it’s actually a very interesting read. The same is true for the month of October.
The Ubuntu MATE devs have started a very nice public trend of publishing everything they are doing with the money they receive from donations. Other projects have similar transparency procedures, but that’s not all. In the case of Ubuntu MATE, we also see that a s… (read more)
Ubuntu Core to Power MagicStick, the Most Powerful PC Stick Ever Made
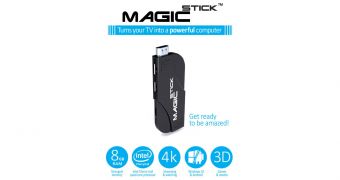
MagicStick is a new PC-on-a-stick device that promises to be the most powerful launched until now, and it’s in the middle of a very successful Indiegogo campaign. To top it all off, MagicStick will also provide the users with the option of loading it with Ubuntu Core.
MagicStick came out of nowhere and took everyone by surprise. It’s presented as the most powerful device of its kind, and if we take a closer look at its specs, we have no reason to think that’s not the case. … (read more)
Hewlett Packard Enterprise Embraces Docker
VIDEO: Hewlett Packard Enterprise VP Omri Gazitt discusses DockerCon EU news and why containers are the path to platform-as-a-service (PaaS).
IT Workers in Major Cities Want More Affordable Housing
In addition, nearly half of tech pros in major tech cities say they deal with too much traffic and congestion on their commute, according to Dice.
How to Customise Your Linux Desktop: Xfce
Here is the first in a series of posts describing some of the most popular Linux desktops, including examples of customizing their appearance and operation.
Read more at ZDNet News
The IoT and the Return of 8-bit Computing
It’s time to brush off those 1980s programming skills, if we’re to have a cheap and flexible Internet of Things.
Read more at ZDNet News
Linux Foundation Scholarship Recipient: Erich Noriega
The Linux Foundation regularly awards scholarships as part of its Linux Training Scholarship Program. In the five years that the Linux Foundation has hosted this program, it has awarded 34 scholarships totaling more than $100,000 in free training. In conjunction with this program, we are featuring recent scholarship recipients in the hope that their stories will inspire others. In this installment of the series, we talk with Erich Noriega, a recipient in the Sys Admin Superstar category.
Apply by June 30 for a 2016 Linux Foundation Training (LiFT) Scholarship. Learn more.
Erich lives in Canada, where he works as a consultant and a Software and Integration Architect. He has worked with Linux in web servers, databases, application servers, and virtualization. Additionally, he worked on an e-government initiative using Linux as the operating system for running load balancers, DNS round robins, databases, and content management applications to deliver very demanding service level agreements in terms of concurrency and availability. For that work, he and his team were recognized by the United Nations in the 2005 Public Service Award.
How did you become interested in Linux and open source?
By exposure and curiosity at the Tec de Monterrey Campus Hidalgo university back in 1993. There, we had some *NIX-like computers, some AIX and one NeXT, so my first exposure must have been with Unix, we had fast Internet access (a DS-0!) at the time, browsing newsgroups using Lynx and then Mosaic. It all began after realizing I could download, compile, and install software to have a page similar to the ones I visited, my own webpage… So, I got an early version of Linux kernel — somewhere in the range of 0.5 to 0.9 kernel version — read a lot, learned a lot, and then after many, many trials succeeded in compiling the operating system, and set up an HTTP server and started to serve the seventh webpage in Mexico.
What Linux Foundation course are you planning to take with your scholarship?
I believe I will pursue the Linux Foundation Engineer Certification through the LFS230 course.
How do you expect to use the knowledge you gain from the course?
I continue to learn new things on a daily basis, I am always eager to understand different perspectives to the same problem, find multiple solutions, and how can they mix and match, or act together in an orchestrated symphony. I am naturally curious, and I ended up in the information technology domain without really thinking about it. I just love to solve problems; sometimes solutions come naturally from previous experiences, but more frequently solutions impose a challenge. To learn and then to solve, those are my expectations from this formal training.
What are your career goals? How do you see a Linux Foundation course helping you achieve those goals?
I am 37, I have been doing this since I was 17. I have been lucky enough to have witnessed and undergo deep transformations in the organizations I have collaborated with in both private and public sectors. I believe it is in my interest to keep learning, keep maturing, and keep sharing the experience gained from practical real life. Fortunately, I am in a domain where I will never stop learning and playing with new things, and I will continue to task myself as an agent of change — not only to influence technology supported and informed decisions but to steer the organization’s internal debate in asking the right questions.
What other hobbies or projects are you involved in? Do you participate in any open source projects at this time?
I am not participating in open source projects as a contributor; however, I use open source software every day. I work as a consultant and a Software and Integration Architect in the Québec city region, and I use different technology stacks all the time (open source and closed), I also have been exploring open source technologies and working on a prototype for embedded Pi hardware, along with some pressure and temperature sensors, to solve some problems on the maple syrup plantation of my partner’s family.
Read more:
Linux Foundation Scholarship Recipient: Eva Tanaskoska, Women in Linux
Linux Foundation Scholarship Recipient: Enrique Sevillano, SysAdmin Superstar
Linux Foundation Scholarship Recipient: Anthony Hooper, Whiz Kid
Linux Foundation Scholarship Recipient: Yashdeep Saini, Developer Do-Gooder
Linux Foundation Scholarship Recipient: Kiran Padwal, Kernel Guru
Red Hat Enterprise Linux 5 and CentOS 5 Receive an Important Kernel Update
The latest Red Hat Bug Fix Advisory (RHAB) informs users of the Red Hat Enterprise Linux Server (RHEL) 5.x and Red Hat Enterprise Linux Desktop 5.x operating system about a new kernel update that fixes multiple vulnerabilities.
According to the kernel bug fix advisory, two security flaws have been discovered and patched in the Linux kernel 2.6.18 packages. The first one is related to the incorre… (read more)
Neverware’s CloudReady Brings a Chromium-Fueled Chromebook OS to Standard Hardware
I have been a Chromebook user for a while now. I find their ease of use, simplicity, and reliability something that is unmatched by most standard laptops or desktops. As someone who spends a vast amount of their PC time writing words, Chrome OS makes perfect sense. The added bonus of Chrome OS being powered by the Linux kernel makes it all the better.
Point in fact… I like the Chrome OS platform so much, I became the proud owner of a Pixel—probably the single most amazing piece of mobile hardware I have ever experienced. But not everyone wants to shell out the cash for such a machine. In fact, some would rather make use of the hardware they already have.
That’s where the likes of Neverware’s CloudReady comes into play. However, this relatively new platform isn’t just a tinker’s toy. Yes, the claim that CloudReady will turn any hardware into a Chromebook is spot on. However, CloudReady isn’t just for individual users. Neverware is putting this platform to good use for educators, individuals, and even enterprises. That Neverware is taking on the educational system is telling. Primary and secondary school systems across the globe are staring down financial burdens that don’t allow them to purchase new hardware or operating systems. By allowing those same institutions to repurpose aging hardware and turn them into efficient, reliable machines, educators are able to squeeze far more out of less.
CloudReady has already found major success in over 100 U.S. school districts with thousands of deployments.
But before you make the connection between your educational district and Neverware, you probably will want to kick the tires first. Or maybe you’re a single user that wants to take an aging piece of hardware and get a bit more use of it. Or… maybe you love the idea of having a Pixel-like machine, but don’t want to shell out the premium for the hardware (and you happen to have an ultrabook lying around, ready to take on the task).
Regardless of why, CloudReady is there to serve. It’s incredibly easy to install and even easier to use. For those individuals who want to run a Chromium-based Chrome OS-like platform on standard hardware (or educators/enterprise users who want to kick the tires and see if it’s the right fit), here’s what you’ll need:
-
Laptop or desktop machine (NOTE: There are over 125 certified models, guaranteed to run CloudReady, listed here*)
-
A USB flash drive of 5 Gb or greater capacity (NOTE: All contents of the USB drive will be erased…so make sure you have all data backed up)
-
The CloudReady free image (download link)
-
A Google account
-
Either a Chromebook running Chrome OS or a machine running Linux.
*I successfully installed CloudReady on a Sony Vaio, which is not listed in the certified hardware. Chances are, CloudReady will run on your machine. The good news is you can fire it up and run it live, so it’s pretty easy to tell if it will work on your configuration.
Copying the image
There are two ways to copy the CloudReady image onto your USB drive:
-
With the Chromebook Recovery Utility
-
Using the Linux dd command.
Since we’re coming at this from a Linux perspective, let’s copy the image to the flash driving using the dd command. Here are the steps:
-
Download the CloudReady image and save it to your ~/Downloads directory
-
Open a terminal window
-
Change into the ~/Downloads directory with the command cd ~/Downloads
-
Unzip the image with the command unzip cloudready-free-XXX.bin.zip (Where XXX is the release number)
-
Plug in your USB device
-
Issue the command sudo fdisk -l to determine the device name of your USB (It will be listed as /dev/sdX where X is the unique identifier)
-
DOUBLE CHECK THE ABOVE, ELSE YOU COULD ERASE THE WRONG DEVICE
-
Once you are certain you have the correct device, issue the command sudo dd if=cloudready.bin of=/dev/sdX bs=4M (Where X is the identifier for your USB drive)
-
Wait for the command to complete
-
Unmount the device when the copy completes.
NOTE: If you are using a Linux distribution that doesn’t require sudo, you will have to su to the root user and then issue the dd command, minus sudo. You now have a bootable USB drive, ready to fire up CloudReady.
Installing CloudReady
When you boot your system with the CloudReady USB flash drive, you will first find yourself staring at a very Google-like network connection tool. Connect to your network and then, when prompted, log into your Google account on the CloudReady desktop. What you need to do, while logged in, is check to make sure everything works (video, sound, bluetooth, etc). Once you’ve discerned if the hardware works, log out and then click the system tray. You should now see an entry labelled Install CloudReady (Figure A, above). Click that and the installation will begin. If you attempt to install CloudReady while logged into your Google account, the install will fail.
The installation should take roughly twenty(ish) minutes (depending upon your hardware). Once it is complete, the machine will automatically shut down. Remove the USB device and boot the machine. You should then be prompted to log into your CloudReady device and enjoy the full-blown Chrome OS experience, thanks to Neverware and Chromium (Figure B).

At this point, everything will behave exactly as you would expect from a Chromebook. You can also take the USB drive with you and always have a CloudReady desktop ready to boot.
So long as you don’t expect Chromebook-like boot times, you will find the CloudReady experience to be a fantastic replica of the official Google Chrome OS. This is, without a doubt, the closest take on Chrome OS, for standard hardware, that you will ever experience. If you want a Chrome OS platform for your aging laptops and desktops, CloudReady is what you want. And any educational institution looking to keep hardware relevant for as long as possible, this might well be the solution you need.