Linux is a remarkably flexible operating system. One of the easiest means of understanding that is when you see that, given a task, there are always multiple paths to success. This is perfectly illustrated when you find the need to display a remote desktop on a local machine. You could go with RDP, VNC, SSH, or even a third-party option. Generally speaking, your desktop will determine the route you take, but some options are far easier than others. Once you understand how streamlined modern desktops have made this task, your remote administration of Linux desktops and servers (with GUIs) becomes much simplified.
As I mentioned, how you do this will depend upon your distribution. In this article, I’ll cover how this can be done between Ubuntu Desktop 18.04 and Fedora 26 and Fedora 26 to Kubuntu. The big issue you will come across is that some desktops simply don’t work well with this technology. For example, as it stands, Wayland has yet to find its way to supporting VNC. The same thing holds true with the Elementary OS desktop. So I’ll demonstrate connecting to Fedora 26 from Ubuntu 18.04 and then from Fedora 26 to Kubuntu 17.10. I’ll be using the tools remmina, krfb, and the GNOME built-in tools.
From Ubuntu to Fedora
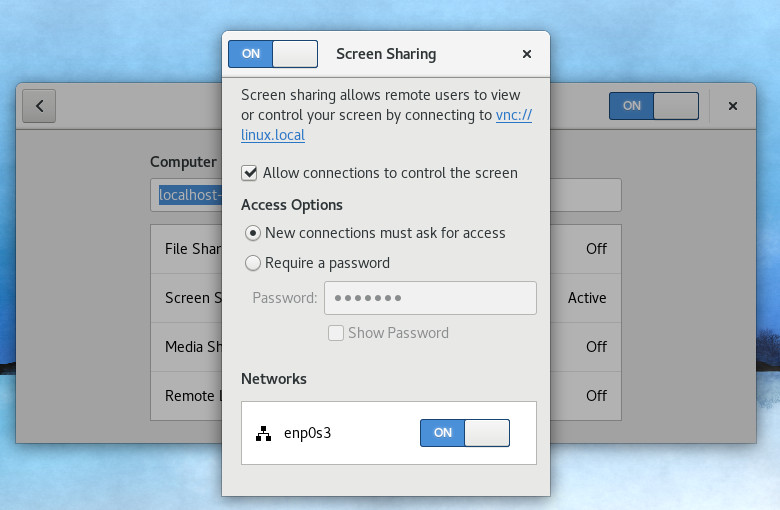
With the latest release of Fedora 26, using the default GNOME desktop, setting up a remote connection is fairly straightforward (because everything is installed by default). The first thing you must do is enable sharing. If you open up the GNOME Dash and type sharing, you’ll see the Sharing option appear, which allows you to open the tool. When the window opens, click the ON/OFF slider to the ON position and then click Screen Sharing. In the resulting window (Figure 1), click the checkbox for Allow connections to control the screen.

You can also enable the access options for New connections must ask for access and requiring a password. I highly recommend, at a bare minimum, that you enable the option for New connections must ask for access. That way, when someone attempts to gain access to your remote desktop, the connection will not be made until it is approved. Once these options have been taken care of, you can close out that window.
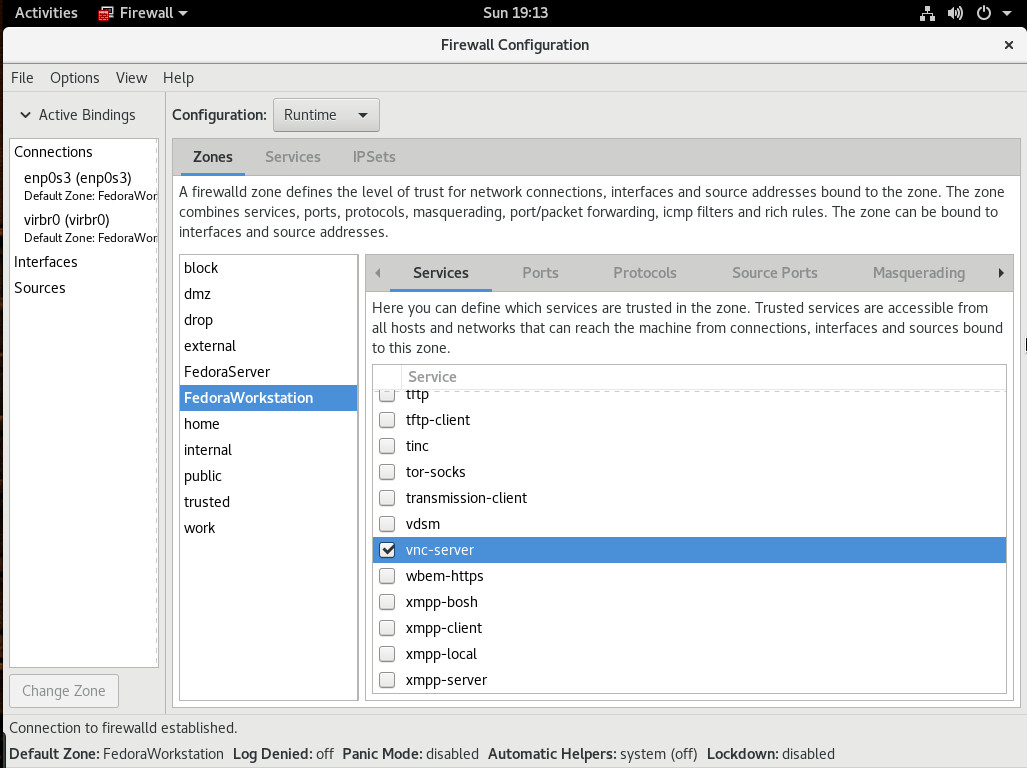
Out of the box, Fedora must have the necessary port opened in the firewall, so this remote connection can work. Go back to the GNOME Dash and type firewall. When the firewall icon appears, click on it, and enter your admin password. In the resulting window, click on Services and scroll down until you see vnc-server (Figure 2).

Click to enable vnc-server and then, when prompted, type your admin password. Access to the VNC port is now enabled.
Head over to the Ubuntu machine. We need to install the remmina application (which is one of the better remote client applications). Because the version in the standard repository contains a few bugs, we’ll install the most recent version with the following steps:
-
Add the necessary repository with the command sudo apt-add-repository ppa:remmina-ppa-team/remmina-next
-
Update the apt sources with the command sudo apt update
-
Install the software with the command sudo apt-get install remmina remmina-plugin-rdp remmina-plugin-gnome libfreerdp-plugins-standard
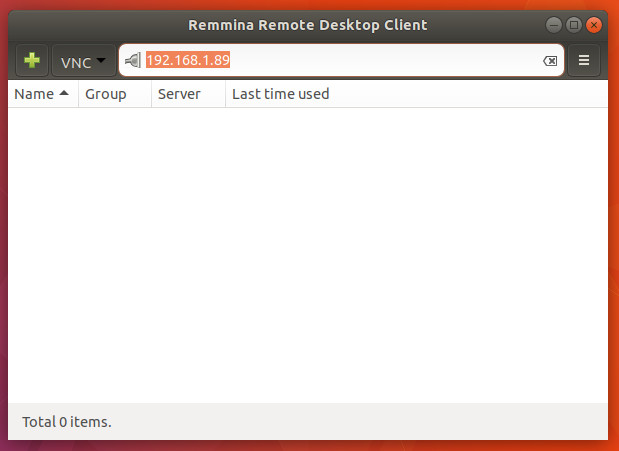
From the desktop menu, type remmina and open the newly installed software. In the address window (Figure 3), select VNC from the drop-down, enter the IP address of the Fedora machine, and hit Enter on the keyboard.

Once you hit Enter on the keyboard, the Fedora desktop notification will pop up. Hover over that notification and click Accept (Figure 4). The connection will be made and whoever is on the Ubuntu machine can control your Fedora desktop.

From Fedora to Kubuntu
Now we’re going to connect from Fedora to Kubuntu. Because we’re going to use the same client (remmina), we need to install it on Fedora. To do this, open up a terminal window and issue the command sudo dnf install remmina.
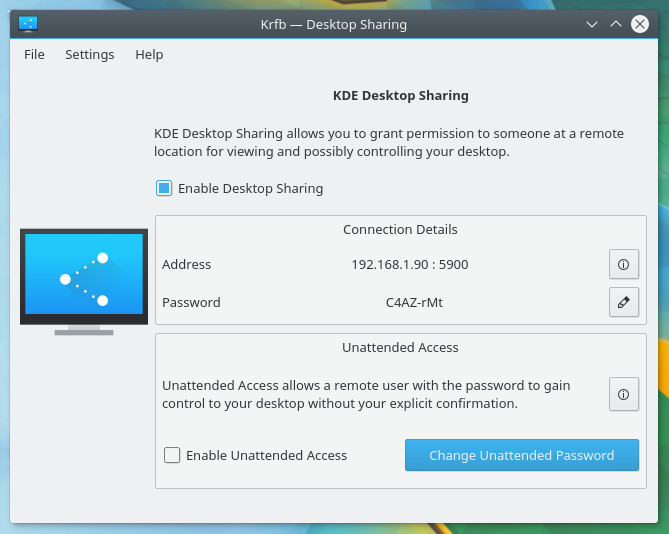
With that installed, we now have to add the necessary piece of software on the Kubuntu desktop. The application in question is krfb and can be installed with the command sudo apt install krfb. Once that is installed, you can open the KDE menu and type krfb. Click on the resulting entry and then, in the new window, click the checkbox associated with Enable Desktop Sharing (Figure 5).

The krfb tool also gives you the necessary IP address as well as the password to use in order to gain access from the client. If you don’t like the given password, it can be changed by clicking the associated edit button.
At this point, your KDE desktop is ready to share. Head over to Fedora, open the GNOME Dash, type remmina and click the icon to open the software. Select VNC from the drop-down, type the IP address of the Kubuntu machine, and hit enter. You will be prompted for the krfb password. Type that and click OK. Back on the Kubuntu desktop, you’ll be asked to accept the connection. Once accepted, the Kubuntu desktop will appear on the Fedora. You’re ready to work.
Simple remote desktop connection
And that’s all there is to it. Yes, there are plenty of other ways to enable these types of connections (and some desktops don’t make the process nearly as easy). Fortunately, modern desktop distributions do include everything necessary to make remote connections incredibly simple. If your particular desktop of choice doesn’t include the tools to make this easy, you’re looking at installing one of the many VNC servers available for Linux (such as vino, TigerVNC, or tightvnc). Going the standard VNC server route might not be as user-friendly as the methods I’ve explained here, but, once set up, it is equally reliable.
Learn more about Linux through the free “Introduction to Linux” course from The Linux Foundation and edX.


