
In our previous Android coding tutorials (part 1, part 2), you set up your dev environment, built a basic app, and then improved it by adding a menu and a second Activity. In this tutorial we’re going to look at a very handy part of the Android API: ListView, ListActivity, and the associated methods which give you an easy way to show the user a list and then act when they click a list item.
Creating a ListView
A very common pattern in an Android activity is showing a list of items for the user to select from. The Android API provides the ListView and ListActivity classes to help out with this. Carrying on with the Countdown app from previous tutorials, we’ll list a few sample countdown times for the user to select from to set the timer.
If all you want is a List, ListActivity will set your View up for you automatically; no need to write any XML at all. So onCreate()can be very simple:
public class CountdownActivity extends ListActivity {
  public void onCreate(Bundle savedInstanceState) {
	super.onCreate(savedInstanceState);

    Integer[] values = new Integer[] { 5, 10, 15, 20, 25, 30, 45, 60 };
    ArrayAdapter adapter =
        new ArrayAdapter(this, android.R.layout.simple_list_item_1,
                                  values);
    setListAdapter(adapter);
  }
}
CountdownActivity now extends ListActivity. ListActivity does a lot of the preparation work for you, so to show a list, you just need to create an array of values to show, hook it up to an ArrayAdapter, and set the ArrayAdapter as the ListActivity’s ListAdapter. The ArrayAdapter has three parameters:
- The current context (
this); - The layout resource defining how each array element should be displayed;
- The array itself (
values).
For the layout resource, we’re use a standard Android resource, android.R.layout.simple_list_item_1. But you could create your own, or use another of the standard layout items (of which more later). You can also take a look at the XML of the standard resources.
The problem with this layout is that it only shows a list. We want to be able to see the countdown and the start button as well. This means setting up our own XML layout, rather than relying on ListActivity to generate its own layout. Add this to your XML, below the TextView and the Button:
<ListView
          android:id="@android:id/list"
          android:layout_width="wrap_content"
          android:layout_height="wrap_content"
          android:layout_below="@+id/startbutton" />
It’s important that the ListView should have the ID @android:id/list. This is what enables the ListActivity to do its magic without you explicitly setting up the List.
Now go back to CountdownActivity.onCreate(), and put your previous display and button setup code back in, after the ListView setup:
public void onCreate(Bundle savedInstanceState) {
  super.onCreate(savedInstanceState);

  Integer[] values .... etc ...
  [ ... ]
  setListAdapter(adapter);
  setContentView(R.layout.activity_main);
  countdownDisplay = (TextView) findViewById(R.id.time_display_box);
  Button startButton = (Button) findViewById(R.id.startbutton);
  [ .... etc .... ]
}
Again, it’s important that you set up the ListView first, before setContentView(), or it won’t work properly. Recompile and run, and you’ll see the list appear below the text and button. What you won’t see, though, is anything happening when you click the list elements. The next section will tackle that problem.
One final note: you can also set up an empty element in the layout, which will display if and only if the ListView is empty. Add this to your XML:
<TextView
       android:id="@android:id/empty"
       android:layout_width="wrap_content"
       android:layout_height="wrap_content"
       android:layout_centerHorizontal="true"
       android:layout_below="@+id/startbutton"
       android:text="@string/empty_list" />
(You’ll need to set up the string value in res/values/strings.xml, too). Now replace the array declaration line in CountdownActivity.onCreate()with this one:
Integer[] values = new Integer[] { };
Compile and run, and you’ll see the empty text displayed, and no list. Put the array declaration back how it was, compile and run again, and the list shows, but no text. In our app this isn’t particularly useful, but if you were populating the array from elsewhere in your code, it’s a neat trick to have available.
Clicking on List elements
Now we have the List set up, we need to make it do something when you click on a list element. Specifically, it should set the countdown seconds to the new value, and change the display. Happily, Android has a straightforward API for this, too:
ListView list = getListView();
list.setOnItemClickListener(new OnItemClickListener() {
  public void onItemClick(AdapterView<?> parent, View view, int position,
                          long id ) {
    countdownSeconds = (Integer) getListAdapter().getItem(position);
   	countdownDisplay.setText(Long.toString(countdownSeconds));
  }
});
This is all pretty self-explanatory! We grab the ListView, set its OnItemClickListener, and create an onItemClick() method for the Listener. As you can see here, onItemClick()has access to the position in the List of the item you clicked on. So we can grab the ListAdapter, get the item from that position, and then cast the value to an Integer. Save and run, and you have a list of values to set your timer.
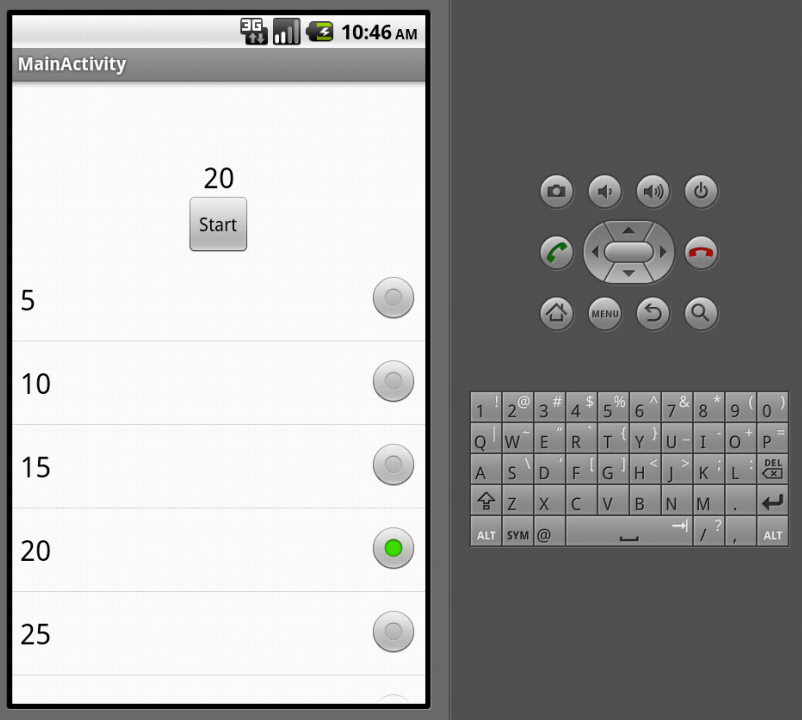
Changing the List’s appearance
Earlier, we mentioned the other standard layouts available. If you switch simple_list_item_1 to simple_list_item_single_choice, and rerun your code, you’ll see that you get a selection indicator next to your list items. However, when you click it, the countdown value changes, but the selection indicator doesn’t do anything. To make this work, you need to change your ListView, too. Add this attribute in your XML:
<ListView ....
          android:choiceMode="singleChoice"
... >
Run it again, and the selection indicator does its job. If you were using a ListActivity without an XML file, you could do this with a line of code in your app:
getListView().setChoiceMode(ListView.CHOICE_MODE_SINGLE);
Conclusion
There are lots of situations in apps where you might want to show the user a list. ListView and ListActivity make that very easy, and as shown just above, there are plenty of ways to improve the UI experience. You could also look at providing a context menu (in these tutorials we’ve only used the options menu so far) when the user long-clicks on a list item. Or you could look at some form of back-end data storage, and allow the user to add and edit their own list items, so they have a list of countdown times that they regularly use. As ever, keep playing with the code and see where it takes you!
For more Android programming training resources, please visit the Linux training website.


