
In this final part of our three-part series, we reach the conclusion everyone has been waiting for. The ultimate goal of using LDAP (in many cases) is enabling desktop authentication. With this setup, admins are better able to manage and control user accounts and logins. After all, Active Directory admins shouldn’t have all the fun, right?
WIth OpenLDAP, you can manage your users on a centralized directory server and connect the authentication of every Linux desktop on your network to that server. And since you already have OpenLDAP and the LDAP Authentication Manager setup and running, the hard work is out of the way. At this point, there is just a few quick steps to enabling those Linux desktops to authentication with that server.
I’m going to walk you through this process, using the Ubuntu Desktop 18.04 to demonstrate. If your desktop distribution is different, you’ll only have to modify the installation steps, as the configurations should be similar.
What You’ll Need
Obviously you’ll need the OpenLDAP server up and running. You’ll also need user accounts created on the LDAP directory tree, and a user account on the client machines with sudo privileges. With those pieces out of the way, let’s get those desktops authenticating.
Installation
The first thing we must do is install the necessary client software. This will be done on all the desktop machines that require authentication with the LDAP server. Open a terminal window on one of the desktop machines and issue the following command:
sudo apt-get install libnss-ldap libpam-ldap ldap-utils nscd -y
During the installation, you will be asked to enter the LDAP server URI (Figure 1).
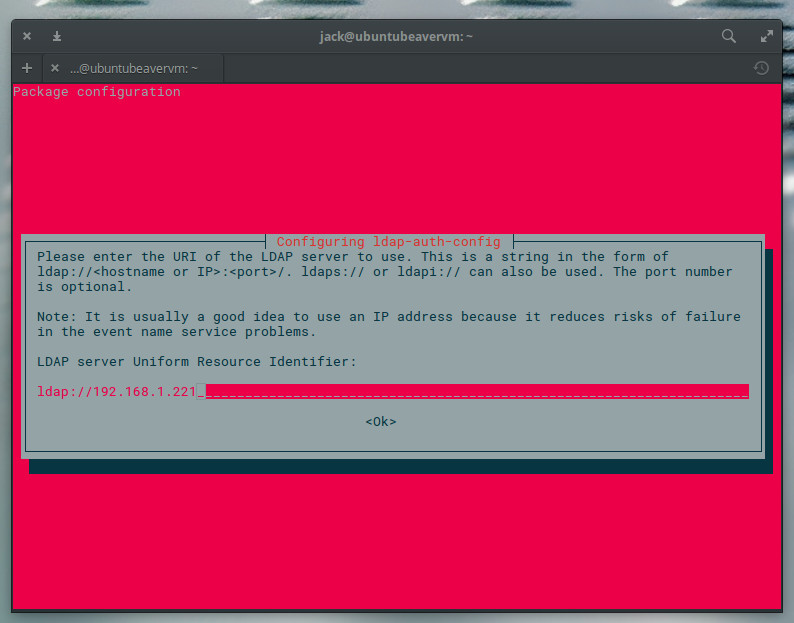
The LDAP URI is the address of the OpenLDAP server, in the form ldap://SERVER_IP (Where SERVER_IP is the IP address of the OpenLDAP server). Type that address, tab to OK, and press Enter on your keyboard.
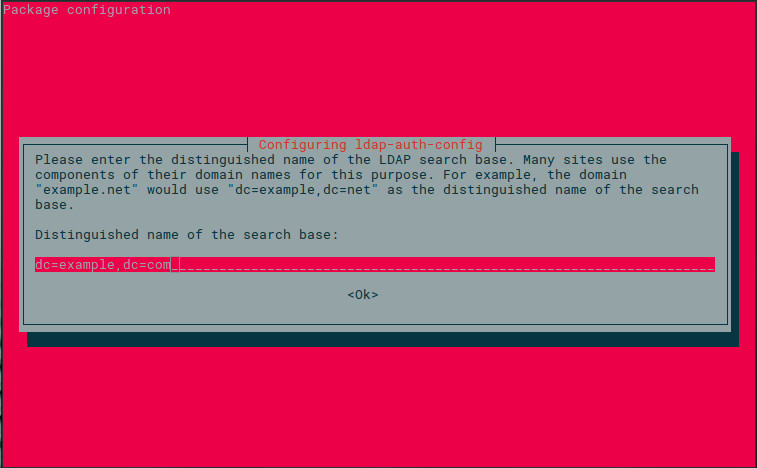
In the next window (Figure 2), you are required to enter the Distinguished Name of the OpenLDAP server. This will be in the form dc=example,dc=com.
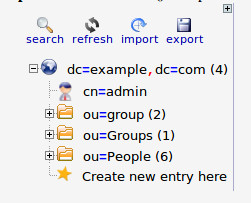
If you’re unsure of what your OpenLDAP DN is, log into the LDAP Account Manager, click Tree View, and you’ll see the DN listed in the left pane (Figure 3).
The next few configuration windows, will require the following information:
-
Specify LDAP version (select 3)
-
Make local root Database admin (select Yes)
-
Does the LDAP database require login (select No)
-
Specify LDAP admin account suffice (this will be in the form cn=admin,dc=example,dc=com)
-
Specify password for LDAP admin account (this will be the password for the LDAP admin user)
Once you’ve answered the above questions, the installation of the necessary bits is complete.
Configuring the LDAP Client
Now it’s time to configure the client to authenticate against the OpenLDAP server. This is not nearly as hard as you might think.
First, we must configure nsswitch. Open the configuration file with the command:
sudo nano /etc/nsswitch.conf
In that file, add ldap at the end of the following line:
passwd: compat systemd

group: compat systemd

shadow: files
passwd: compat systemd ldap
group: compat systemd ldap
shadow: files ldap
gshadow files
The entire section should now look like:
passwd: compat systemd ldap

group: compat systemd ldap

shadow: files ldap

gshadow files
Now we need to configure PAM for LDAP authentication. Issue the command:
sudo nano /etc/pam.d/common-password
Remove use_authtok from the following line:
password [success=1 user_unknown=ignore default=die] pam_ldap.so use_authtok try_first_pass
Save and close that file.
There’s one more PAM configuration to take care of. Issue the command:
sudo nano /etc/pam.d/common-session
At the end of that file, add the following:
session optional pam_mkhomedir.so skel=/etc/skel umask=077
The above line will create the default home directory (upon first login), on the Linux desktop, for any LDAP user that doesn’t have a local account on the machine. Save and close that file.
Logging In
Reboot the client machine. When the login is presented, attempt to log in with a user on your OpenLDAP server. The user account should authenticate and present you with a desktop. You are good to go.
Make sure to configure every single Linux desktop on your network in the same fashion, so they too can authenticate against the OpenLDAP directory tree. By doing this, any user in the tree will be able to log into any configured Linux desktop machine on your network.
You now have an OpenLDAP server running, with the LDAP Account Manager installed for easy account management, and your Linux clients authenticating against that LDAP server.
And that, my friends, is all there is to it.
We’re done.
Keep using Linux.
It’s been an honor.


