Following on from last month’s tutorial on the basics of layout, and in particular LinearLayout, in this tutorial we’ll look at RelativeLayout, and at how you can reuse layouts easily with theinclude directive. Getting a firm grip on how Android layout works is a big help towards making your beginner app into something that looks good and has great UI. Check out last month’s tutorial for the basics of XML and resource management if there’s anything here you don’t recognize. We’ll reuse the basic code structure from that tutorial. (See Android App Development for Beginners: Layout and UI Options, Part One.)
RelativeLayout
With LinearLayout, you can only display your various elements stacked next to each other or one above the other (although you can nest LinearLayouts to do both of these in the same layout). RelativeLayout is much more flexible, allowing you to specify the position of each child element relative to its parent or to another named element. One of the big advantages to using RelativeLayout over nested LinearLayouts is that nested view groups have a performance impact. If you can translate your nested LinearLayout into a single RelativeLayout, it’s almost always a good idea to do so.
First up, let’s replace our nested LinearLayout from the last tutorial with a single RelativeLayout. What we want is a TextView, an EditText below it, and two buttons below that. Using the same Activity as for the last tutorial, create a file activity_relativelayout.xml:
<?xml version="1.0" encoding="utf-8"?>
<RelativeLayout
    xmlns:android="http://schemas.android.com/apk/res/android"
    xmlns:tools="http://schemas.android.com/tools"
    android:layout_width="match_parent"
    android:layout_height="match_parent" >

    <TextView
        android:id="@+id/helloTextView"
        android:layout_width="fill_parent"
        android:layout_height="wrap_content"
        android:layout_alignParentTop="true"
        android:text="@string/hello" />

    <EditText
       android:id="@+id/nameEditText"
        android:layout_width="fill_parent"
        android:layout_height="wrap_content"
        android:layout_below="@id/helloTextView"
        android:hint="@string/name" />

    <Button
        android:layout_width="150dp"
        android:layout_height="wrap_content"
        android:layout_below="@id/nameEditText"
        android:layout_alignParentLeft="true"
        android:text="@string/setName" />
    <Button
        android:layout_width="150dp"
        android:layout_height="wrap_content"
        android:layout_below="@id/nameEditText"
        android:layout_alignParentRight="true"
        android:text="@string/clearName" />
</RelativeLayout>
You’ll also need to change the layout reference in LayoutTestActivity to our new layout file:
public class LayoutTestActivity extends Activity {
  protected void onCreate(Bundle savedInstanceState) {
    super.onCreate(savedInstanceState);
    setContentView(R.layout.activity_relativelayout);
  }
}
Run this, and you should see a layout like the image below.
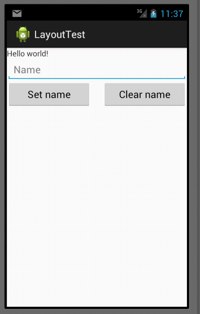
All the elements have height “wrap content”, so they’re just as tall as their content. The buttons have a specific width (which you can play around with it to find out what looks good).
The important new layout attributes are layout_alignParentTop, layout_alignParentRight, layout_alignParentLeft, and layout_below. The names make it fairly clear what they do: these are the layout attributes that allow you to describe the alignment of elements relative to other elements. The ‘parent’ element here is the RelativeLayout itself; all other elements in this layout are its children. The layout_below (or layout_above, etc) attribute allows you to specify a layout relative to another named child element. There are a stack of more options available, too — check out the the RelativeLayout.LayoutParams API to see them all.
Centring and distributing elements
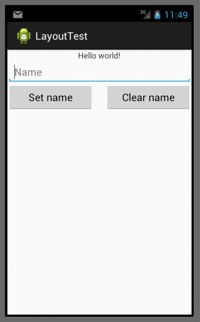
You’ll notice that the TextView above isn’t centered. To center it, you have two options. The first is to make the element fill the parent, then center the text within the element:
<TextView
        android:layout_width="fill_parent"
        android:gravity="center" />
The second is to make the element a specific size (here, wrapping its content), then center the whole element within its parent:
<TextView
        android:layout_width="wrap_content"
        android:layout_centerHorizontal="true" />
You may need to combine these if you want an element to have a specific width that is wider than its content, but also want to center the element within its parent.
You can’t use the weight property (which we used in the last tutorial) in a RelativeLayout. This means that you can’t spread your elements across the whole parent container by allocating them a weight. Instead, if you want to spread your elements out, you’ll need to specify a width/height in dp. If using weight is important for your layout, you’ll need to use a LinearLayout.
Aligning edges
Here’s another way of laying out the elements to produce the same effect:
<TextView
  android:id="@+id/helloTextView"
  android:layout_width="wrap_content"
  android:layout_height="wrap_content"
  android:layout_centerHorizontal="true"
  android:layout_alignParentStart="true"
  android:text="@string/hello" />

<EditText
  android:id="@+id/nameEditText"
  android:layout_width="fill_parent"
  android:layout_height="wrap_content"
  android:layout_below="@id/helloTextView"
  android:hint="@string/name" />

<Button
  android:id="@+id/setNameButton"
  android:layout_width="150dp"
  android:layout_height="wrap_content"
  android:layout_below="@id/nameEditText"
  android:layout_toEndOf="@id/nameEditText"
  android:text="@string/setName" />
<Button
  android:layout_width="150dp"
  android:layout_height="wrap_content"
  android:layout_below="@id/nameEditText"
  android:layout_toRightOf="@id/setNameButton"
  android:text="@string/clearName" />
Attributes that look like layout_toEndOf align the start edge of that element to the end edge of the referenced element. (layout_toStartOf aligns the element’s end edge to the start edge of the referenced element). Check the API docs for specific details of which edge aligns to which. This layout will look much like the previous layout, but the buttons are slightly to the left of center. This is because the second button is arranged to the right of the first button, rather than aligned with the parent’s right edge as it was before. You can play around with adding padding or a margin to see how that affects the position, too.
If you remove the layout_below line from the two buttons, you’ll get them overlaid on the previous element. This is because the edges will be aligned, but without moving them down underneath the reference element.
Try out the various layout options to get a feel for how they work with one another. The full list of parameters is available at the RelativeLayout.LayoutParams API reference page.
Reusing layouts
Finally, a quick note that you can reuse layouts by using the include tag. Let’s say we want to reuse the RelativeLayout above. It must look exactly as you want to use it wherever you’re about to include it. Now let’s set up a LinearLayout (include_layout_test.xml) to drop it into:
<?xml version="1.0" encoding="utf-8"?>
<LinearLayout xmlns:android="http://schemas.android.com/apk/res/android"
    android:layout_width="match_parent"
    android:layout_height="match_parent"
    android:orientation="vertical" >

    <TextView
        android:id="@+id/helloTextView"
        android:layout_width="fill_parent"
        android:layout_height="wrap_content"
        android:gravity="center"
        android:layout_alignParentStart="true"
        android:text="@string/includetest" />

    <include layout="@layout/activity_relativelayout" />
</LinearLayout>
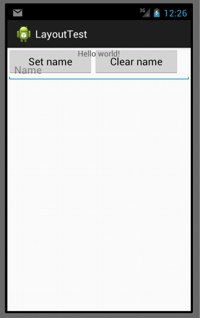
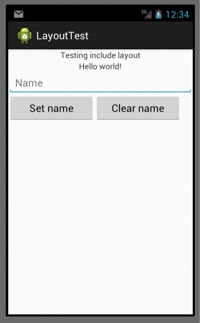
As you can see in the screenshot, this does exactly what you want it to, including the RelativeLayout underneath the TextView.
Being able to reuse XML layouts like this has obvious advantages in terms of making a consistent (and maintainably consistent) look and feel across your app. Set up your repeatedly used text bar or button group in its own XML file, and include it wherever you want it to appear.
For more Android app development tutorials in this series see:
Android App Development for Beginners: Layout and UI Options, Part One
Android App Development: Handling Extra Camera Capabilities
Android App Development: How to Capture Video

 Here at OStatic, we’ve covered open source software aimed at humanitarian causes before, including tools from called InSTEDD (Innovative Support to Emergencies, Diseases and Disasters). Now, a very interesting new startup called Humanitarian Toolbox has appeared, and is focused on open source tools for humanitarian causes. Team mebers from NetHope, CrisisCommons and GeeksWithoutBounds have announced, in partnership with Microsoft and DotNetRocks the launch of the new company.