Home Blog Page 2815

First commit in kernel

My first little patch in linux approved since 2.6.37 🙂

diff --git a/Documentation/video4linux/gspca.txt b/Documentation/video4linux/gspca.txt
index 3a2f407..6a562ee 100644
--- a/Documentation/video4linux/gspca.txt
+++ b/Documentation/video4linux/gspca.txt
@@ -309,6 +309,7 @@ sonixj 0c45:610c PC Camera (SN9C128)
sonixj 0c45:610e PC Camera (SN9C128)
sonixj 0c45:6128 Microdia/Sonix SNP325
sonixj 0c45:612a Avant Camera
+sonixj 0c45:612b Speed-Link REFLECT2
sonixj 0c45:612c Typhoon Rasy Cam 1.3MPix
sonixj 0c45:6130 Sonix Pccam
sonixj 0c45:6138 Sn9c120 Mo4000
diff --git a/drivers/media/video/gspca/sonixj.c b/drivers/media/video/gspca/sonixj.c
index 89e488c..025f9ba 100644
--- a/drivers/media/video/gspca/sonixj.c
+++ b/drivers/media/video/gspca/sonixj.c
@@ -3031,6 +3031,7 @@ static const __devinitdata struct usb_device_id device_table[] = {
{USB_DEVICE(0x0c45, 0x6128), BS(SN9C120, OM6802)}, /*sn9c325?*/
/*bw600.inf:*/
{USB_DEVICE(0x0c45, 0x612a), BS(SN9C120, OV7648)}, /*sn9c325?*/
+ {USB_DEVICE(0x0c45, 0x612b), BS(SN9C110, ADCM1700)},
{USB_DEVICE(0x0c45, 0x612c), BS(SN9C110, MO4000)},
{USB_DEVICE(0x0c45, 0x612e), BS(SN9C110, OV7630)},
  /* {USB_DEVICE(0x0c45, 0x612f), BS(SN9C110, ICM105C)}, */


Simplify LDAP with Fedora’s 389 Directory Server

If you’ve ever had to deal with LDAP, you know it is not an easy beast to master. In fact, the command line tools for LDAP alone would keep many users from even attempting to learn how to take advantage of this powerful tool. If you look, you’ll find several tools that make the job of managing LDAP data easier. One of the best is the 389 Directory Server for Fedora and Red Hat Enterprise Linux. 389 is extremely powerful and offers a simple to use GUI for all aspects of user, group, and server management.

Don’t be fooled, just because 389 Directory Server has been created as an enterprise-level tool, doesn’t mean that anyone with a smaller organization (or lesser needs) need not apply. 389 Directory Server can aid anyone in the management of their LDAP data — no matter the size. In this tutorial, you’ll learn how to master your LDAP data in a few simple steps using the 389 Directory Server.

Installation

The 389 Directory Server requires Java be installed. For many, the installation of Java on Linux is a deal-breaker… but not this time. A single command will install the 389 Directory Server and all of its dependencies. Follow these steps and you will have 389 DS on your machine ready to go:

  1. Open up a terminal window.

  2. su to the root user (type su at the command line and enter your root user password).

  3. Issue the command yum install fedora-ds.

  4. Accept all dependencies.

  5. Sit back and watch the magic happen.

Believe it or not, that is all you need to do to get 389 Directory Server installed. And now that the installation is done, it’s time to configure the server.

Configuration

The configuration of 389 Directory Server isn’t terribly difficult. You do need to have some information on hand however. The information you will need is:

  • Fully qualified domain name of server.

  • Administration ID.

  • Administration domain.

  • Server port.

  • Directory server identifier.

  • Valid DN for your directory suffix.

Once you have that information you are ready to go. Note that, even if you are planning on having your LDAP server only visible to your internal LAN, you will still want to have a fully qualified domain name for your server. If this means you need to change the hostname of your LDAP server, then do so before you run the configuration script for 389 DS.

For my example I set all my machines to work with the name wallen.local. So I have on my internal LAN: ubuntu.wallen.local, fedora.wallen.local, mac.wallen.local, and variations on that same theme. My LDAP server is at fedora.wallen.local. Naturally, in order for each machine to see the LDAP server, I will need to map all machines to that server in their /etc/hosts file (or whatever version of a hosts file they use).

With all of your information in hand, go back to your terminal window and issue the command (as root)setup-ds-admin.pl and walk through the various set up screens. Once you are finished with the setup, you can then open up the 389 Directory Server GUI with the command 389-console.

Logging in and administering your data

When you issue the command to start the GUI you will be greeted by a login screen. You will have set your admin ID, password, admin URL, and port in the configuration process. Enter that information and click OK to enter the console.

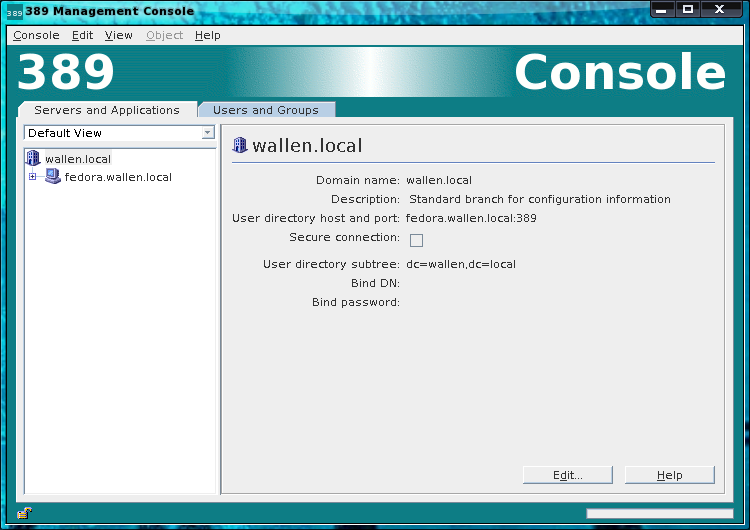
389 Directory Server main screenThe first screen you will see (shown in Figure 1) gives you a quick summary of your server in the right pane and a navigation tree in the left pane. If you expand that tree you will see the Server Group. If you expand that you will see the Administration Server and the Directory Server. Click on any of those to get a summary. If you double click on either the Administration Server or Directory Server you then open up a new window which allows you to administer that particular server. To really begin managing your LDAP data you want to double click on the Directory server to open up the Directory Server administration tool (see Figure 2).

Directory Server managerNOTE: In this window you will want to click on the Directory tab to do the next bit of work.

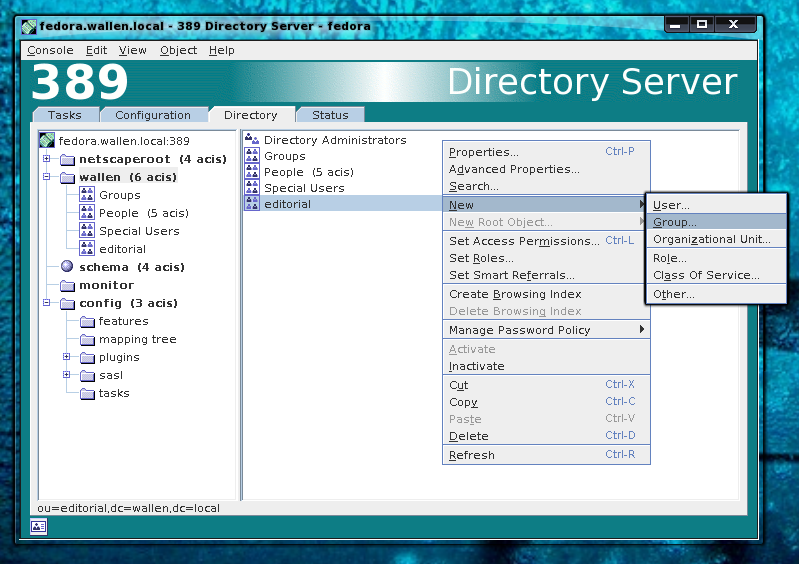
In the Directory tab, If you right-click on any white space in this new window you will find a menu that allows you to create new objects.

You will probably want to create a new Organizational Unit first. To do this first select the Directory of Administrators (in my example it would be wallen), right-click any blank space, and click New > Organizational Unit. In the resulting window you will need to give the group a name and an optional description, phone, fax, alias, and address . Once you have done that click OK and the Organizational Unit will be created.

Now, let’s add a new Group to that Organizational Unit we just created. To do this right-click the new OU we just created and click New > Group. Now just give the Group a name, an optional description, and then click OK.

If you click on the Directory of administers (again, in my example wallen) in the left pane, you will see your new Organizational Unit in the right pane. If you then click on the new OU you created in the left pane you will see the new Group you created in the right pane. Now let’s add a user to our new group.

The process of adding a new user is nearly the same as adding a new group. Click on your new Organizational Unit in the left pane and then right-click the Group you want to add the user into. Click New > User and then fill out all of the information for this new user. Once you have filled out all of the necessary information, click OK and the user will be added.

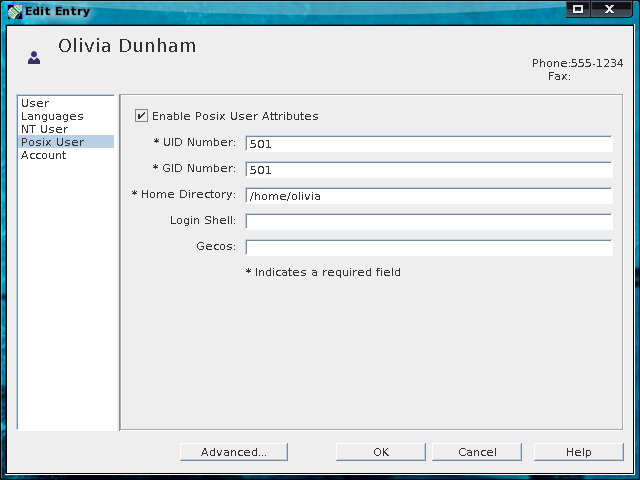
POSIX AttributesYou can continue on to create as many Organizational Units, Groups, and Users as you want. You can also edit any of the information associated with any of those objects. Let’s say you want to add POSIX attributes to a user so they can authenticate from a Linux machine. Even this is simple using 389 Directory Server. To do this navigate to that user so the user is displayed in the right pane. Right-click the user and select Properties. In this new window (see Figure 3) click on the POSIX User section, click the Enable check box, fill out the necessary information, and click OK when you are done. That user now has their POSIX attributes set.

How simple is that? Far more simple than using the command line for LDAP. Not convinced? Let me show you. Let’s say we want to add that same user, Olivia Dunham, using the ldapadd command. First we would create an ldiff file (say user.ldif) for the user with contents that looked similar to:

dn: cn=Olivia Dunham,ou=people,dc=wallen,dc=local
cn: Olivia Dunham
objectClass: person
sn: Dunham

Note: The above is just very basic information. Now, to actually add that user the command:

ldapadd -x -D cn=admin,dc=wallen,dc=local -W -f user.ldif

would have to be run as root. Imagine having to do this for an entire company worth of data! And then having to make changes using the ldapmodify command would consume even more of your time and efforts.

Final thoughts

The 389 Directory Server makes the job of managing your LDAP data a task just about anyone can do. Of course we have only scratched the surface of what this powerhouse of a tool can do. But now you should at least have it running and you should be able to easily manage your LDAP data. LDAP has been an elusive tool for many people for a long time. No longer is this the case with tools like the 389 Directory Server.

openSUSE Wekly News, Issue 140 is out!

We are pleased to announce our new Issue 140 of openSUSE Weekly News.

This Week:


  • openSUSE News: SUSE Studio Contest – you have until the end of this month!
  • Rares Aioanei: openSUSE kernel news – 11.09.2010
  • Sankuru: Using ffmeg to batch convert cd audio files to mp3
  • OMG!SUSE! team: Geeko Gist – September
  • Network World/Joe Brockmeier: Linux desktop market share: Small no matter how you measure

Like ever we have now finshed just the english Version under: http://en.opensuse.org/Weekly_news. From now on starts the translating Process. You can see the actual results under: http://en.opensuse.org/Weekly_news#Translations. If any Translation is ready the Translation Team moves the Language up to “Available”.


No we hope you enjoy the reading 🙂


Comments, News and Wishes can send to
This e-mail address is being protected from spambots. You need JavaScript enabled to view it
.


Locating a Linux User Group


In my location we are fortunate to have the Tidewater Linux User Group, this group is in place to discuss all subjects relating to Unix systems, Linux systems and Free and Open Source Software. This is the first LUG I have joined and it has become a great resource to help me to learn more and inspire others. Most LUGs have a mailing-list, wiki websites for documentation and physical meetings every month, all of which are great resources which can be expanded by the more knowledgeable users.

If you are interesting in joining or checking out a Linux User Group you can find information at the following websites.


If you are already a member of a LUG, I highly recommend for you to see if your LUG is on the listed sites and add it if it is missing from the directories.

And if I missed any other good LUG directories please feel free to post them in the comments and I will add them to the list.

Weekend Project: Open Source Alternatives to Adobe Flash on Linux


Linux users have never been well-served by Flash. The official browser plugin offered by Adobe has tended to lag behind releases for other platforms. Flash is available only for 32-bit Intel-compatible processor architectures, and it has long been a source of browser slowdowns, freezes, and crashes. And to all that the fact that it is a proprietary, binary-only blob, and you can see why many Linux desktop users want to free themselves from it. You can, with a little bit of time and preparation, this weekend.

You may wonder why you need Flash support at all. If you are an adult without kids, you may generally encounter Flash only in its use as a cross-platform video delivery mechanism, and in many ways this is the easiest usage of Flash to dispense with. There are video extraction tools and extensions to pull video right out of Flash wrappers at the click of a button, allowing you to forget it ever existed. If you do have kids, however, you likely see Flash games and interactive content all the time (perhaps even too often for your liking…), and for you, simply ignoring Flash is not a real option.

Finally, if you spend the bulk of your online time at tech-heavy Web sites (as many Linux users do), you probably see modern HTML, CSS, and JavaScript. But the further you stray from the bleeding edge of technology, the more likely you are to find a site built with Flash interactivity and navigation, from the dark days before DHTML and DOM scripting. Or to put it another way, although your LUG and your favorite distro probably do not use Flash on their sites, your local farmer’s market or Wild West reenactor troupe, sadly, might.

Unfortunately, many of the same things that make the official Flash plugin crash-prone also make the plugin difficult to replace — namely that the Flash specification is incredibly complex, with numerous APIs that change between releases of the official Flash platform. It covers both raster and vector graphics, wraps several different audio and video formats, handles animation, interactivity, and several different generations of Adobe’s scripting language ActionScript. As a result, to get solid support for all of these varying types of content, you will need to work with several different open source components.

The overall plan is to completely remove the Adobe Flash plugin first, then to install two open source Flash implementations that handle different versions of Flash content such that they gracefully fail-over to each other as needed, and finally to configure Flash-less browsing for some specific sites that offer more modern content-delivery options.

Remove Adobe’s Flash plugin

All major Linux web browsers support the same plugin format, the Netscape Plugin Application Programming Interface (NPAPI). This includes Firefox, Mozilla Seamonkey, Opera, Konqueror, Epiphany, Google Chrome, and Chromium. A plugin like Adobe Flash is a shared binary object tucked away in some directory where the browser knows to look for it. Adobe Flash’s is named libflashplayer.so.

To uninstall it, first open up your browser’s plugin preferences. For brevity’s sake, we will use Firefox in the examples, but the process is the same for other browsers; only the location of the tools is likely to be different. On Firefox, you need the Tools -> Add-ons menu item, in the Plugins tab. Disable the Flash plugin, then close the browser. The tricky part comes next. Depending on how you installed the plugin initially, removing the libflashplayer.so file could require different steps.

If you installed it via your distribution’s package management system, you should start by uninstalling the package the same way. If you installed it through the downloadable installer program provided by Adobe, though, you will need to remove it by hand. It is usually installed in $HOME/.mozilla/plugins, and you can simply delete the file from the command line.

But the above steps do not always work. Open up the URI about:plugins in your browser, and scroll down through the list to see if “Shockwave Flash” is still listed anywhere. If it is, then Firefox may have found libflashplayer.so in some other location, such as the system-wide /usr/lib/mozilla/plugins/. By default, about:plugins only reports the file name of the plugin, not the full directory path. You can change this by opening the URI about:config and looking at the plugin.expose_full_path preference. Set it to “true” by double clicking on the Value column, then return to about:plugins and find the full path to libflashplayer.so. Delete without mercy.

Install Gnash in stand-alone mode

With Adobe Flash gone, it is time to install the open source alternates. It will ultimately require two: Gnash and Lightspark. The two projects cover different versions of the Flash specification; Gnash is the more mature project, and supports Flash content up to version 8. Version 9 of Flash debuted sporting a rewritten version of ActionScript based on an entirely different virtual machine model; Lightspark implements this newer framework.

Take a look at your distribution’s package management software for Gnash packages. If you are in luck, there will at least two — one that specifically provides the browser plugin, and one that provides the “stand-alone” player. Install the stand-alone version, including any support packages it recommends, but do not install the browser plugin.

If a package is not available, you can fetch the latest version of Gnash from the project’s Web site. The newest release as of today is version 0.8.8. Compiling it can be painful, but only in the sense that it has a long list of dependencies due to the wide variety of media content the Flash format encompasses. You can trim down the list of dependencies by specifying a subset of the configuration options (such as GTK+ only, rather than GTK+, Qt, and framebuffer GUIs). Consult the Gnash reference manual for a complete list of the configuration options.

Install Lightspark in plugin mode

Next, install the second Flash-replacement, Lightspark. Again, start by checking for a Lightspark package in your distribution’s package management system. In this case, however, pay close attention to the version number. For Lightspark-and-Gnash co-habitability, you will need at least version 0.4.2.

If your distribution provides only an older release, you will need to compile and install Lightspark yourself. Visit the project’s site and download the latest release — as of right now, this is version 0.4.4.1. Installation instructions are provided on the project’s documentation pages, which also include generally-up-to-date links to third-party binary packages that might be available for your distribution.

However you install it, check that your browser can actually find and recognize the Lightspark plugin. Open Tools -> Add-ons and check that it is installed and enabled, and visit about:plugins, and look again for Lightspark in the list. You can get troubleshooting help at the Lightspark Web site if something goes awry.

Finally, if you are running Firefox 3.6.4 or later, you can switch on Firefox’s “out-of-process plugin” mode, which runs each plugin in a separate process to prevent plugin crashes from crashing the browser. Visit about:config, then right-click and select New -> Boolean. Enter dom.ipc.plugins.enabled.liblightsparkplugin.so as the preference name, and set it to “true.”

Installing Lightspark as the plugin and Gnash as the standalone works because Lightspark has the ability to query Flash content for version information. If the content uses newer Flash features that Lightspark supports, it will render the content as normal. If the content is older, however, it will call the Gnash library (which was installed as part of the stand-alone package) to handle the rendering instead.

Avoid Flash whenever you have an option

The last step in replacing Flash is to configure non-Flash content delivery wherever it is supported. This is a site-specific process, so you can safely skip it if you do not plan to visit any of the supported sites regularly. It centers around the use of Flash as a video content wrapper; many high-volume video sharing services are offering non-Flash alternatives that use HTML’s <video> element to place content directly in the page, rather than embedding a Flash player. In many cases, Lightspark and Gnash will handle the Flash video just fine, but as long as you have a choice, it can’t hurt to request HTML5 video instead — in fact, in most cases it moves forward the cause of free and open video codecs.

Chrome, Opera, and the latest development builds of Firefox all support the new WebM codec released earlier this year by Google. At the moment, YouTube is the only major video-sharing site serving up WebM-encoded HTML5 content, although rumors persist that it is coming soon to others (such as Vimeo). You must opt-in to YouTube’s HTML5 delivery system by visiting http://www.youtube.com/html5.

Several other sites offer HTML5 video content in the free Theora format, including Dailymotion and Blip.tv. Dailymotion’s content is accessible by visiting a different start-page URL, http://openvideo.dailymotion.com/, and Blip.tv’s by visiting http://www.blip.tv/html5 and selecting the “On” preference. The Free Software Foundation maintains a list of Ogg-supporting sites at its PlayOgg campaign, sorted by national origin. Theora creators Xiph.orgalso maintain such a list, including a section specifically devoted to video sharing (as opposed to Ogg Vorbis audio) services.

There are other sites, such as the aforementioned Vimeo, that offer HTML5 video in the non-free and patent-encumbered H.264 format. Although it is not a truly free solution, setting up your browser to play H.264 video on these sites does help to liberate you from the Adobe Flash plugin.

Flashing out

Currently, these video-sharing services are the only places where Flash is optional, which is nice, but not comprehensive. Lightspark and Gnash cover a considerable amount of the total Flash specification, but always bear in mind that they are unofficial re-implementations. Even though both do regular testing, out in the wild wild Web, you might find content that does not work correctly.

The best thing you can do is file a bug report about it. You should try and discern whether it is Lightspark or Gnash rendering the Flash content, though, to file a report in the right place. This is easiest with the out-of-process-plugin option. Open top or another process viewer to see whether Gnash is fired up when you visit the site. The Lightspark site has instructions for getting a backtrace in the event of crash. In any event, note the expected behavior and what the plugin actually does, then file your bug. Afterwards, remember to set aside a few minutes to help the farmers and reenactors re-tool their sites with CSS and JavaScript.

Is Apple Now Blocking Contributions To GCC?

Yesterday on the mailing list for GCC is was brought up if Apple’s Objective-C 2.0 patches for the GNU Compiler Collection could be merged back into the upstream GCC code-base as maintained by the Free Software Foundation. Even though Apple’s modified GCC sources still reflect the FSF as the copyright holder and are licensed under the GNU GPLv2+, it doesn’t look like Apple wants their compiler work going back upstream any longer…

Read more at Phoronix

Mainframe servers to survive x86 competition

A Gartner analyst reckons that mainframes are likely to face increasing pressure from x86-based servers in the next five to 10 years.

Read more at ZDNet News

Android Notifier sends notifications to your desktop

If you’ve ever used Android for any period of time, you know that the notification system can be both a blessing and a curse — it’s one of the most powerful, useful, and flexible approaches out there, but if you don’t keep up, your menu bar can stack up into a mess of cryptic numbered icons. So we were really hoping Android Notifier could help us with that — it pipes notifications to your OS X desktop over WiFi or Bluetooth. (Linux support is coming soon, and the project is looking for a Windows volunteer.) While it works as described — we had it up and running with Growl on our iMac in just a few moments — it’s also unfortunately a little limited: only phone, SMS, MMS, and voicemail notifications are sent, and clearing them on the computer doesn’t clear them on the phone, which sort of misses the point.
 
Read more at Engadget Mobile

Debian GNU/kFreeBSD Becomes More Interesting

Since last year we have been talking about Debian GNU/kFreeBSD, one of the official ports for Debian 6.0 “Squeeze” that will bring a 32-bit and 64-bit FreeBSD kernel as an option to using the Linux kernel. Debain GNU/kFreeBSD still has the Debian user-land complete with its massive package repository and apt-get support, but the FreeBSD kernel is running underneath instead of Linux. Debian GNU/kFreeBSD has matured a lot over the past year and most recently it has switched to using the FreeBSD 8.1 kernel by default and also now supports ZFS file-systems…

Read more at Phoronix

New Linux Benchmarks Of SilverStone’s HDDBOOST

Back in April we reviewed the SilverStone HDDBOOST, which was an innovative product from this manufacturer known for their computer cases that allows you to pair a solid-state drive and a hard drive in an attempt to experience the best of both worlds when it comes to storage performance. The purpose of the HDDBOOST is to increase the disk performance by enabling SSD speeds on the host hard drive while reducing write times to the SSD. From our Linux tests in that article we had a hard time getting this small device to provide any measurable performance gains, but in fact it caused some performance losses. In June, we then had results from SilverStone when they tested it under Ubuntu Linux with the Phoronix Test Suite. Since then we have been trying out a new HDDBOOST unit and it now seems to be working right.


Read more at Phoronix