Created just three years ago and admitted to the Cloud Native Computing Foundation (CNCF) as an incubating project a year later, DNS server CoreDNS has come a long way. Last month, CoreDNS was named the default DNS for Kubernetes and now the CNCF has announced that the project will join the ranks of Kubernetes, Prometheus, and Envoy as a CNCF graduate — the first of 2019. CoreDNS will graduate just a year shy of its anniversary of becoming an incubating project with CNCF.
The CNCF incubates projects according to a three tier progression of maturity, starting first at the sandbox, then moving on to incubation, and finally graduation. The criteria for graduation include a number of qualifications, such as “committers from at least two organizations,” which signals that a project will not fail if a single individual or company pulls out, but also several more meant to help ensure the future success of the project.
A CNCF statement details the project’s further qualifications, which include not only the basic requirements such as the adoption of the CNCF Code of Conduct, but also various other signals of maturity.
Canonical released Ubuntu Core 18, based on Ubuntu 18.04 LTS, bringing 10-year support to the embedded Linux platform. Other enhancements include a reduced attack surface and easier porting of Ubuntu apps.
Canonical’s stripped-down, container-like Ubuntu Core version of Ubuntu for embedded IoT has reached version 18. The most significant benefit is that the distro is based on Ubuntu 18.04 LTS (Bionic Beaver), which was released in early 2018. The release’s long-term support (LTS) status means Canonical promises to support it for 10 years, improving the chance of warding off malware attacks throughout the product lifespan.
Ubuntu Core, which runs on a variety of devices including Lime SDR boards such as the LimeNET Micro board, is already notable for being one of the more secure embedded Linux distros around. Its “snap” apps are containerized, and it offers transactional updates, among other security features.
In addition to the LTS status, the new release should be even more secure because the already minimalist distro has the smallest footprint yet, fitting into 260MB, according to the ZDNet story that alerted us to the release.
The US Department of Homeland Security (DHS) has published today an “emergency directive” that contains guidance in regards to a recent report detailing a wave of DNS hijacking incidents perpetrated out of Iran.
The emergency directive [1, 2] orders government agencies to audit DNS records for unauthorized edits, change passwords, and enable multi-factor authentication for all accounts through which DNS records can be managed.
The DHS documents also urges government IT personnel to monitor Certificate Transparency (CT) logs for newly-issued TLS certificates that have been issued for government domains, but which have not been requested by government workers (a sign that a malicious actor has hijacked a government domain’s DNS records, and is now requesting TLS certificates in its).
When you need to run Linux in an especially secure environment, SELinux is the answer. But it takes some know-how to get the hypersecure Linux version up and running.
Twenty years ago, when it became apparent how important Linux would become, the U.S. National Security Agency created a mandatory access control (MAC) architecture for Linux. As in other realms, security is always important, but sometimes it’s especially important. From its creation and extending to today, Security-Enhanced Linux (SELinux) has blocked tampering threats and prevented attempts to bypass application security.
I hasten to stress that you should not adopt SELinux just because the extra-robust security functionality exists. Yes, I know how much security matters to your business, but SELinux isn’t for everyone. Running SELinux takes extra time, requires far more hands-on involvement than other Linux distributions, and demands deep knowledge about Linux architecture.
In fact, if you set it up haphazardly, you are asking for trouble.
Network management tools have come a long way from the early command-line products with arcane, text-based configuration files that kept everyone except the resident (typically Linux) guru in the dark. Today’s management tools, replete with desktop or web-based GUIs, easy installs and configuration wizards, are far more accessible. With each iteration vendors find ways to make these tools more powerful and easier to use.
For this review, we evaluated newer versions of three established open-source network management products – OpenNMS, Zenoss Core and NetXMS – as well as a relative newcomer, Sensu Core. All four products are free and open source.
Here’s what we found:
OpenNMS provides a range of management options, from simple to complex, and it’s available for both Windows and Linux environments. Customizable dashboard options are a plus, but configuration can be tricky.
Zenoss Core stands out for its flexible reporting and wide range of preconfigured plugins, however it’s only available for two versions of Linux.
Blockchains have to be trusted in order for them to succeed, and public blockchains can cause problems you may not think about, according to Bruce Schneier, a fellow and lecturer at the Harvard Kennedy School, in his keynote address at December’s Hyperledger Global Forum on “Security, Trust and Blockchain.”
Schneier began his talk by citing a quote from Bitcoin’s anonymous developer, Satoshi Nakamoto, who said “We have proposed a system for electronic transaction without relying on trust.”
“That’s just not true,’’ Schneier said. “Bitcoin is not a system that doesn’t rely on trust.” It eliminates certain trust intermediaries, but you have to somehow trust Bitcoin, he noted. Generally speaking, the Bitcoin system changes the nature of trust.
Schneier called himself a big fan of “systems thinking,” which is what the issue boils down to, he said. This is something that is in too short supply in the tech world right now,’’ he maintained, and “we need a lot more of it.”
Trust relationships
Schneier’s talk focused on the data structures and protocols that make up a public blockchain. He called private blockchains “100 percent uninteresting,” explaining that they’re easy to create and secure, they don’t need any special properties, and they’ve been around for years.
Public blockchains are what’s new, he noted. They have three elements that make them work:
The ledger, which is the record of what happened and in what order
The consensus algorithm, which ensures all copies of the ledger are the same
The token, which is the currency
All the pieces fit together as a single system, and whether they can achieve anything gets back to the issue of trust, he said.
Learn how to get network information using the ss command in this tutorial from the archives.
Linux includes a fairly massive array of tools available to meet almost every need. From development to security to productivity to administration…if you have to get it done, Linux is there to serve. One of the many tools that admins frequently turned to was netstat. However, the netstat command has been deprecated in favor of the faster, more human-readable ss command.
Thess command is a tool used to dump socket statistics and displays information in similar fashion (although simpler and faster) to netstat. The ss command can also display even more TCP and state information than most other tools. Because ss is the new netstat, we’re going to take a look at how to make use of this tool so that you can more easily gain information about your Linux machine and what’s going on with network connections.
The ss command-line utility can display stats for the likes of PACKET, TCP, UDP, DCCP, RAW, and Unix domain sockets. The replacement for netstat is easier to use (compare the man pages to get an immediate idea of how much easier ss is). With ss, you get very detailed information about how your Linux machine is communicating with other machines, networks, and services; details about network connections, networking protocol statistics, and Linux socket connections. With this information in hand, you can much more easily troubleshoot various networking issues.
Let’s get up to speed with ss, so you can consider it a new tool in your administrator kit.
Basic usage
The ss command works like any command on the Linux platform: Issue the command executable and follow it with any combination of the available options. If you glance at the ss man page (issue the command man ss), you will notice there aren’t nearly the options found for the netstat command; however, that doesn’t equate to a lack of functionality. In fact, ss is quite powerful.
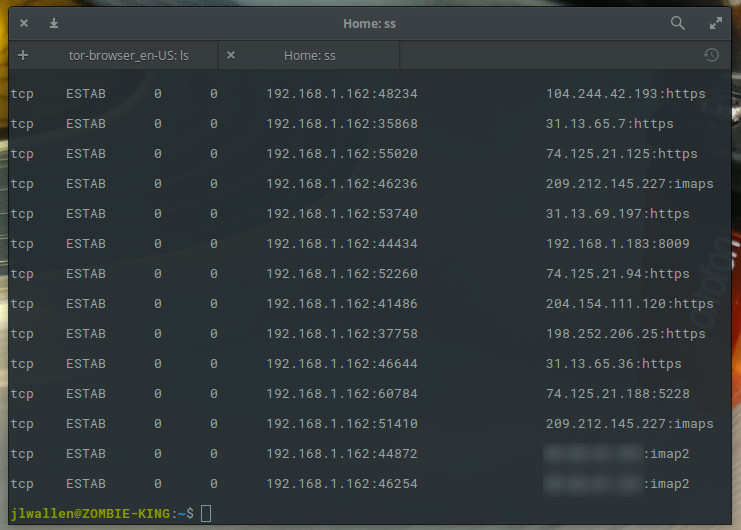
If you issue the ss command without any arguments or options, it will return a complete list of TCP sockets with established connections (Figure 1).
Figure 1: A complete listing of all established TCP connections.
Because the ss command (without options) will display a significant amount of information (all tcp, udp, and unix socket connection details), you could also send that command output to a file for later viewing like so:
ss > ss_output
Of course, a very basic command isn’t all that useful for every situation. What if we only want to view current listening sockets? Simple, tack on the -l option like so:
ss -l
The above command will only output a list of current listening sockets.
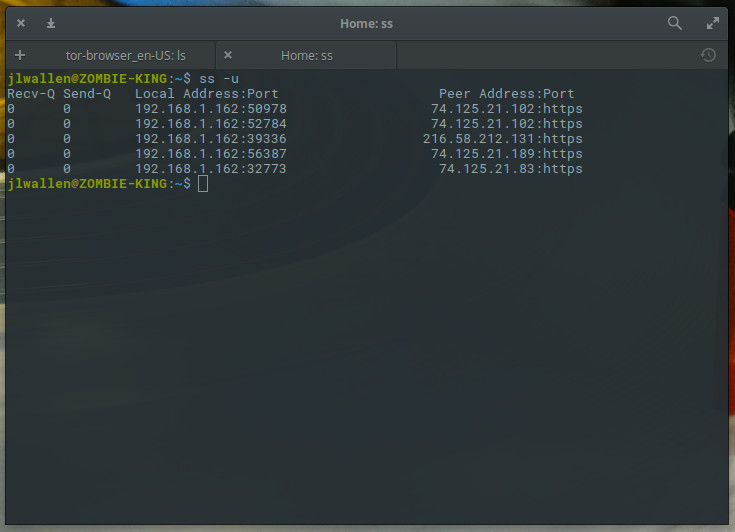
To make it a bit more specific, think of it this way: ss can be used to view TCP connections by using the -t option, UDP connections by using the -u option, or UNIX connections by using the -x option; so ss -t, ss -u, or ss -x. Running any of those commands will list out plenty of information for you to comb through (Figure 2).
Figure 2: Running ss -u on Elementary OS offers a quick display of UDP connections.
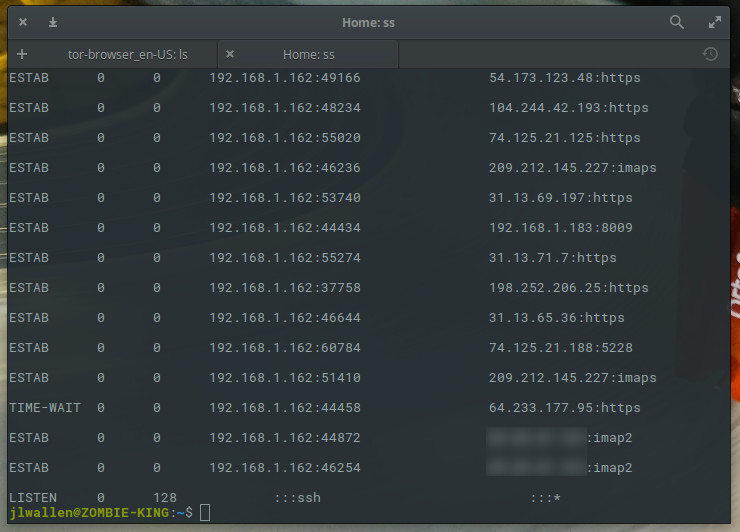
By default, using either the -t, the -u, or the -x options alone will only list out those connections that are established (or connected). If we want to pick up connections that are listening, we have to add the -a option like:
ss -t -a
The output of the above command will include all TCP sockets (Figure 3).
Figure 3: Notice the last socket is ssh listening on the device.
In the above example, you can see that UDP connections (in varying states) are being made from the IP address of my machine, from various ports, to various IP addresses, through various ports. Unlike the netstat version of this command, ss doesn’t display PID and command name responsible for these connections. Even so, you still have plenty of information to begin troubleshooting. Should any of those ports or URLs be suspect, you now know what IP address/Port is making the connection. With this, you now have the information that can help you in the early stages of troubleshooting an issue.
Filtering ss with TCP States
One very handy option available to the ss command is the ability to filter using TCP states (the the “life stages” of a connection). With states, you can more easily filter your ss command results. The ss tool can be used in conjunction with all standard TCP states:
established
syn-sent
syn-recv
fin-wait-1
fin-wait-2
time-wait
closed
close-wait
last-ack
listening
closing
Other available state identifiers ss recognizes are:
all (all of the above states)
connected (all the states with the exception of listen and closed)
synchronized (all of the connected states with the exception of syn-sent)
bucket (states which are maintained as minisockets, for example time-wait and
syn-recv)
big (Opposite to bucket state)
The syntax for working with states is simple.
For tcp ipv4:ss -4 state FILTERFor tcp ipv6:ss -6 state FILTER
Where FILTER is the name of the state you want to use.
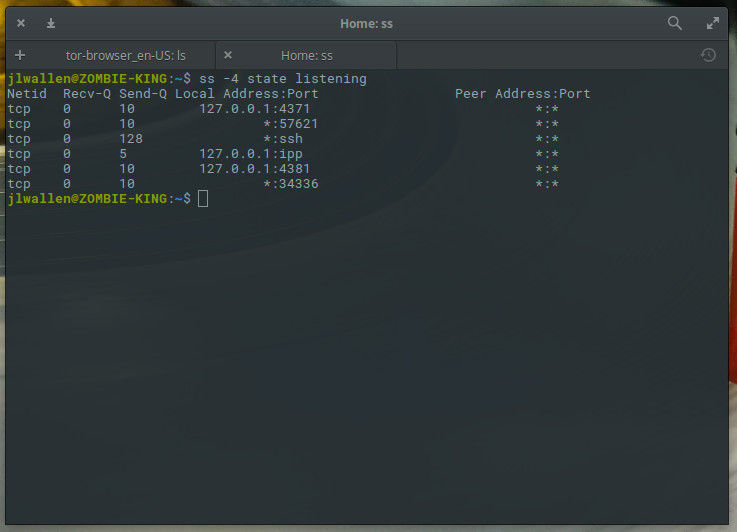
Say you want to view all listening IPv4 sockets on your machine. For this, the command would be:
ss -4 state listening
The results of that command would look similar to Figure 4.
Figure 4: Using ss with a listening state filter.
Show connected sockets from specific address
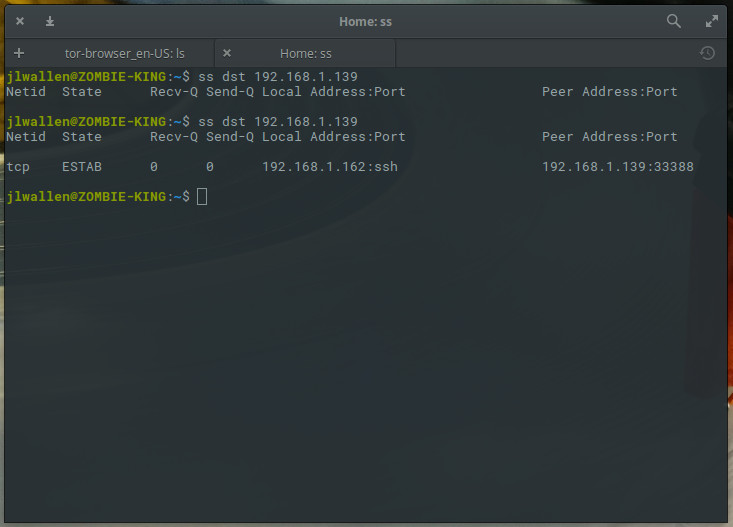
One handy task you can assign to ss is to have it report connections made by another IP address. Say you want to find out if/how a machine at IP address 192.168.1.139 has connected to your server. For this, you could issue the command:
ss dst 192.168.1.139
The resulting information (Figure 5) will inform you the Netid, the state, the local IP:port, and the remote IP:port of the socket.
Figure 5: A remote machine has established an ssh connection to our local machine.
Make it work for you
The ss command can do quite a bit to help you troubleshoot issues with your Linux server or your network. It would behoove you to take the time to read through the ss man page (issue the command man ss). But, at this point, you should at least have a fundamental understanding of how to make use of this must-know command.
Learn more about Linux through the free “Introduction to Linux” course from The Linux Foundation and edX.
Building applications that run on your own servers and networks used to mean some very firm demarcations between what was considered a developer task and what was left up to the network team. The move to cloud platforms and cloud abstractions (even on your own hardware) has changed where those divisions fall — just as network operations teams have been adopting new ways of working, in part to keep up with new demands from developers used to being able to control the environment of their application without having to wait for access to resources, whether that’s VMs, storage or connectivity.
In the cloud, you don’t touch a physical network switch because clouds like Amazon Web Services, Microsoft Azure and the Google Cloud Platform don’t let developers anywhere near that level of the hardware. But developers set up all the networking for their applications, managing IP ranges and creating virtual networks and performing networking tasks that they want to automate and operationalize.
“More and more, cloud native developers are having to grapple with networks in a way they hadn’t before,” explains Nigel Kersten, vice president of ecosystem engineering at Puppet.
I talk a lot about containerd. I write blog posts about it, speak at conferences about it, give introductory presentations internally at IBM about it and tweet (maybe too much) about it. Due to my role at IBM, I’ve helped IBM’s public cloud Kubernetes service, IKS, start a migration to use containerd as the CRI runtime in recent releases and similarly helped IBM Cloud Private (our on-premises cloud offering) offer containerd as a tech preview in the past two releases. Given that backdrop of activity and the communities I participate in, I obviously hear a lot of chatter about replacing Docker with {fill in the blank}. Given my containerd resume, you might assume that I always think replacing Docker is the right step for anyone working with container runtimes.
Replace Docker!? or “Choose The Right Tool For The Job”
Maybe due to historic frustrations and/or differences of opinion across the container runtime space, some have failed to see that picking the right tool for the job is just as valuable in this context as it is in any other. There have definitely been “party lines” drawn in some circles based on vendor-affiliation, or some basing decisions off the latest arguments on HackerNews. But, let’s ignore that (which, I’ll admit, is good advice generally!) and look at what we are talking about when we compare the Docker toolset to any of rkt,cri-o,containerd, or any other runtime alternative.
An open-spec, Allwinner H6 based “Orange Pi 3” SBC has gone on sale for $30 to $40, with the latter giving you 2GB of RAM and 8GB eMMC. Other highlights: GbE, HDMI 2.0, 4x USB 3.0, WiFi-ac, and mini-PCIe.
The long-awaited Orange Pi 3 — the highest end of three Allwinner H6 based Orange Pi SBCs — has arrived for about the price of a Raspberry Pi 3. The most powerfully equipped H6-based SBC to date will attempt to take on Rockchip RK3399 based boards, including Shenzhen Xunlong’s own Orange Pi RK3999.