Open source tools continue to serve as the underlying cornerstone of cloud native DevOps patterns and practices — while they also continue to change and evolve.
Cloud native’s origins, of course, trace back to when Amazon and then Microsoft began to offer so-called cloud platforms, allowing organizations to take advantage of massive resources on networks of servers in their data centers worldwide. Heavy hitters Google and Alibaba followed their lead, laying the groundwork for when, more recently, Netflix and Pivotal began to describe so-called cloud native architectures.
Netflix has been very transparent about its reliance on its large suite of open source stacks built for its momentous video sharing service, thanks largely to what the Cloud Native Computing Foundation [CNCF] has made available and Kubernetes and microservices architectures built on cloud native architectures. Additionally, about a decade after it was first introduced as a concept, DevOps has helped to set in motion the team culture fostering the development pipelines and workflows for the industry shift to cloud native deployments. …
DevOps’ deployments on cloud native tools and libraries obviously hinge on what DevOps teams think work best for their workflows. But in today’s new stack context, this era of open source and collaboration has created an explosion of possibilities.
If your organization has a point-of-sale system running on technology that is older than you care to admit in public, well, you’re not alone.
Baby Boomers are retiring and taking with them the skills to run legacy technologies upon which organizations still (amazingly) rely – from AS/400 wrangling to COBOL development. That leaves many CIOs in a tight spot, trying to fill roles that not only require specialized knowledge no longer being taught but that most IT professionals agree also have limited long-term prospects. “Specific skill sets associated with mainframes, DB2 and Oracle, for example, are complex and require years of training, and can be challenging to find in young talent,” says Graig Paglieri, president of Randstad Technologies.
Let’s examine three categories of legacy tech skills that CIOs may still need for the foreseeable future, according to IT leaders and recruiters:
Linux-based operating systems are still a very small part of the desktop market, but that hasn’t stopped VPN services from providing client applications. The best we’ve found are from ExpressVPN, NordVPNand VPN Unlimited.
Eight of the VPN services we’ve reviewed have either command-line-interface (CLI) or graphical-user-interface (GUI) client software for major Linux distributions such as Ubuntu, Mint and Red Hat.
The CLIs were just as easy to use as the GUIs, but we’ve still divided them into separate categories because Linux newbies may prefer windows and buttons over typed commands. Our top recommendation blends the two types of interfaces to get the best of both worlds.
There are so many reasons why you might need to record your Linux desktop. The two most important are for training and for support. If you are training users, a video recording of the desktop can go a long way to help them understand what you are trying to impart. Conversely, if you’re having trouble with one aspect of your Linux desktop, recording a video of the shenanigans could mean the difference between solving the problem and not. But what tools are available for the task? Fortunately, for every Linux user (regardless of desktop), there are options available. I want to highlight five of my favorite screen recorders for the Linux desktop. Among these five, you are certain to find one that perfectly meets your needs. I will only be focusing on those screen recorders that save as video. What video format you prefer may or may not dictate which tool you select.
And, without further ado, let’s get on with the list.
Simple Screen Recorder
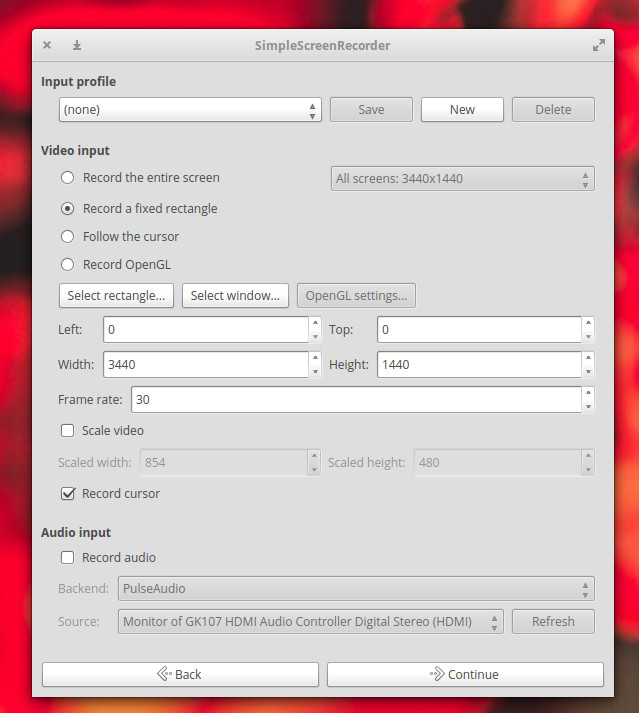
I’m starting out with my go-to screen recorder. I use Simple Screen Recorder on a daily basis, and it never lets me down. This particular take on the screen recorder is available for nearly every flavor of Linux and is, as the name implies, very simple to use. With Simple Screen Recorder you can select a single window, a portion of the screen, or the entire screen to record. One of the best features of Simple Screen Recorder is the ability to save profiles (Figure 1), which allows you to configure the input for a recording (including scaling, frame rate, width, height, left edge and top edge spacing, and more). By saving profiles, you can easily use a specific profile to meet a unique need, without having to go through the customization every time. This is handy for those who do a lot of screen recording, with different input variables for specific jobs.
Allows for the selection of video containers and codecs
Adds timestamp to file name (optional)
Includes hotkey recording and sound notifications
Works well on slower machines
And much more
Simple Screen Recorder is one of the most reliable screen recording tools I have found for the Linux desktop. Simple Screen Recorder can be installed from the standard repositories on many desktops, or via easy to follow instructions on the application download page.
Gtk-recordmydesktop
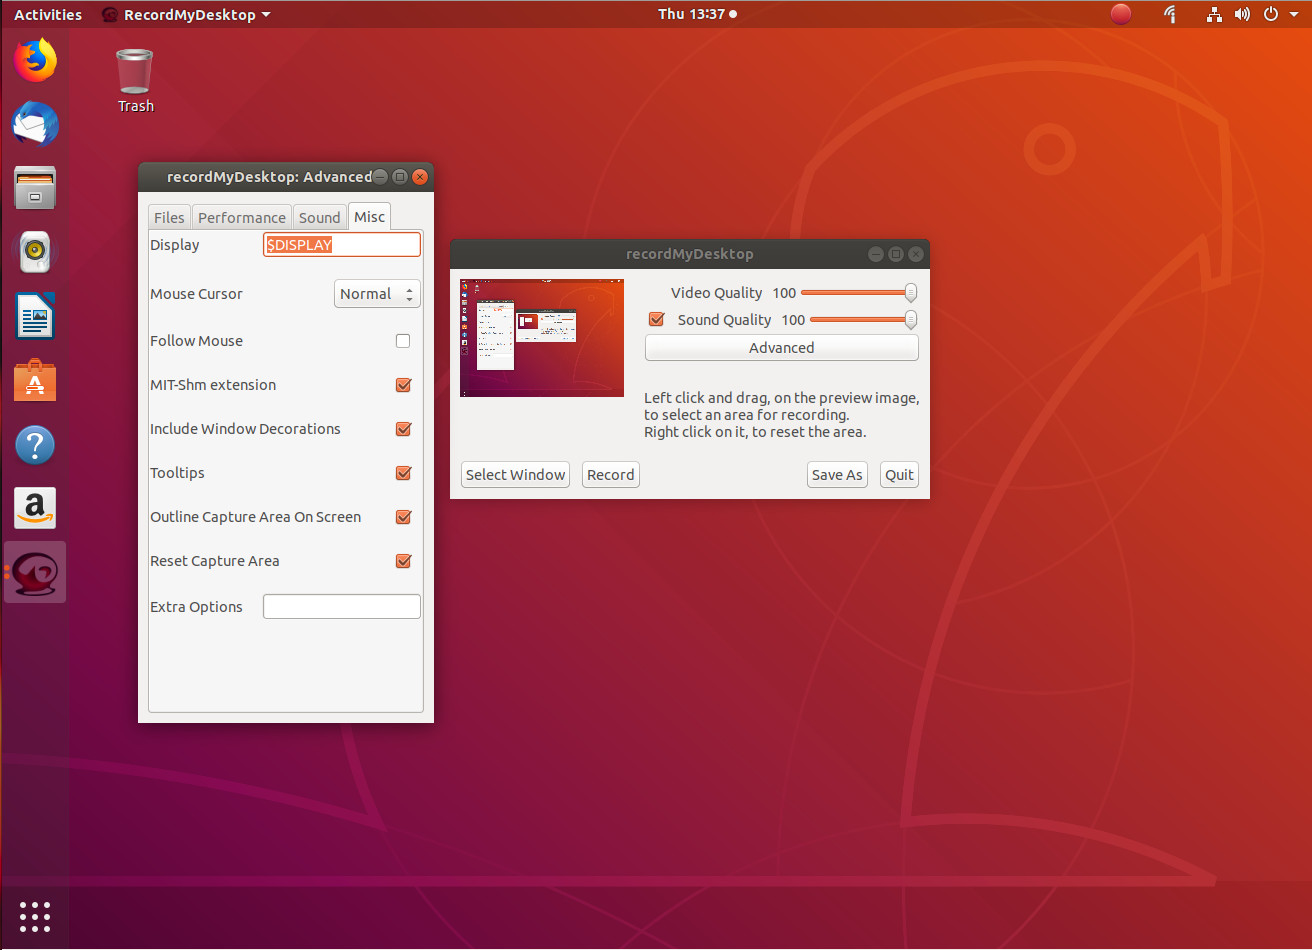
The next entry, gtk-recordmydesktop, doesn’t give you nearly the options found in Simple Screen Recorder, but it does offer a command line component (for those who prefer not working with a GUI). The simplicity that comes along with this tool also means you are limited to a specific video output format (.ogv). That doesn’t mean gtk-recordmydesktop isn’t without appeal. In fact, there are a few features that make this option in the genre fairly appealing. First and foremost, it’s very simple to use. Second, the record window automatically gets out of your way while you record (as opposed to Simple Screen Recorder, where you need to minimize the recording window when recording full screen). Another feature found in gtk-recordmydesktop is the ability to have the recording follow the mouse (Figure 2).
Figure 2: Some of the options for gtk-recordmydesktop.
Unfortunately, the follow the mouse feature doesn’t always work as expected, so chances are you’ll be using the tool without this interesting option. In fact, if you opt to go the gtk-recordmydesktop route, you should understand the GUI frontend isn’t nearly as reliable as is the command line version of the tool. From the command line, you could record a specific position of the screen like so:
To find out more about the command line options, issue the command man recordmydesktop and read through the manual page.
Kazam
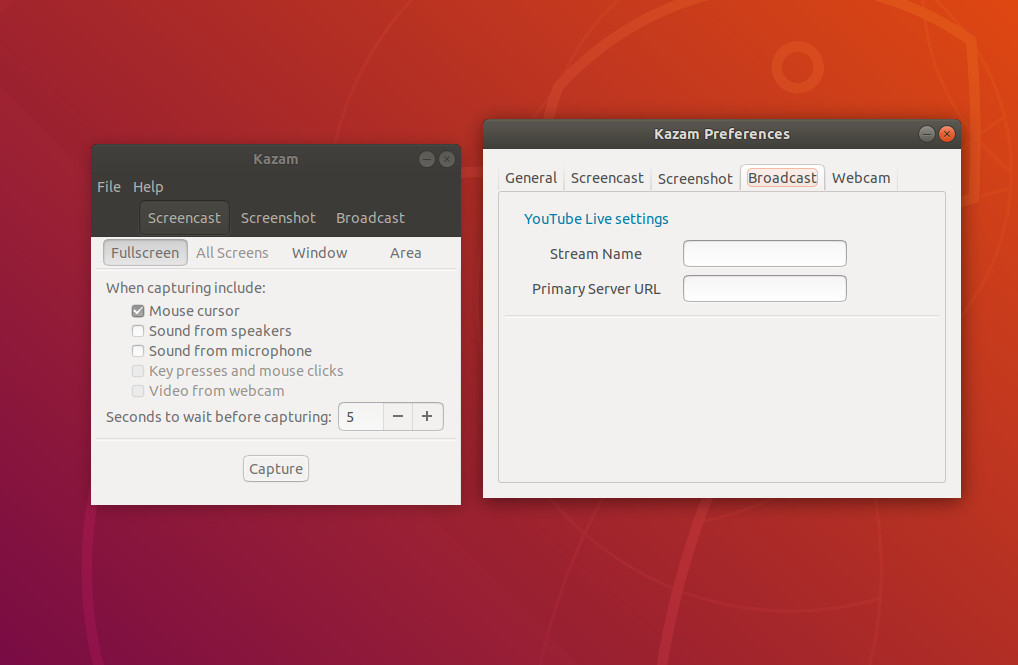
If you’re looking for a bit more than just a recorded screencast, you might want to give Kazam a go. Not only can you record a standard screen video (with the usual—albeit limited amount of—bells and whistles), you can also take screenshots and even broadcast video to YouTube Live (Figure 3).
Figure 3: Setting up YouTube Live broadcasting in Kazam.
Kazam falls in line with gtk-recordmydesktop, when it comes to features. In other words, it’s slightly limited in what it can do. However, that doesn’t mean you shouldn’t give Kazam a go. In fact, Kazam might be one of the best screen recorders out there for new Linux users, as this app is pretty much point and click all the way. But if you’re looking for serious bells and whistles, look away.
The version of Kazam, with broadcast goodness, can be found in the following repository:
ppa:sylvain-pineau/kazam
For Ubuntu (and Ubuntu-based distributions), install with the following commands:
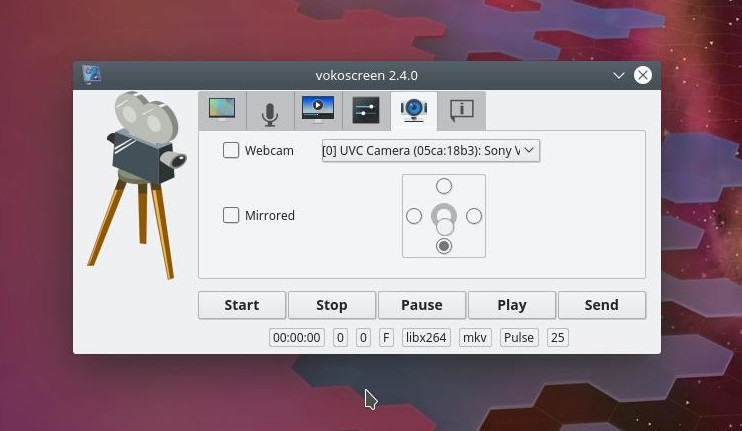
The Vokoscreen recording app is for new-ish users who need more options. Not only can you configure the output format and the video/audio codecs, you can also configure it to work with a webcam (Figure 4).
Figure 4: Configuring a web cam for a Vokoscreen screen recording.
As with most every screen recording tool, Vokoscreen allows you to specify what on your screen to record. You can record the full screen (even selecting which display on multi-display setups), window, or area. Vokoscreen also allows you to select a magnification level (200×200, 400×200, or 600×200). The magnification level makes for a great tool to highlight a specific section of the screen (the magnification window follows your mouse).
Like all the other tools, Vokoscreen can be installed from the standard repositories or cloned from its GitHub repository.
OBS Studio
For many, OBS Studio will be considered the mack daddy of all screen recording tools. Why? Because OBS Studio is as much a broadcasting tool as it is a desktop recording tool. With OBS Studio, you can broadcast to YouTube, Smashcast, Mixer.com, DailyMotion, Facebook Live, Restream.io, LiveEdu.tv, Twitter, and more. In fact, OBS Studio should seriously be considered the de facto standard for live broadcasting the Linux desktop.
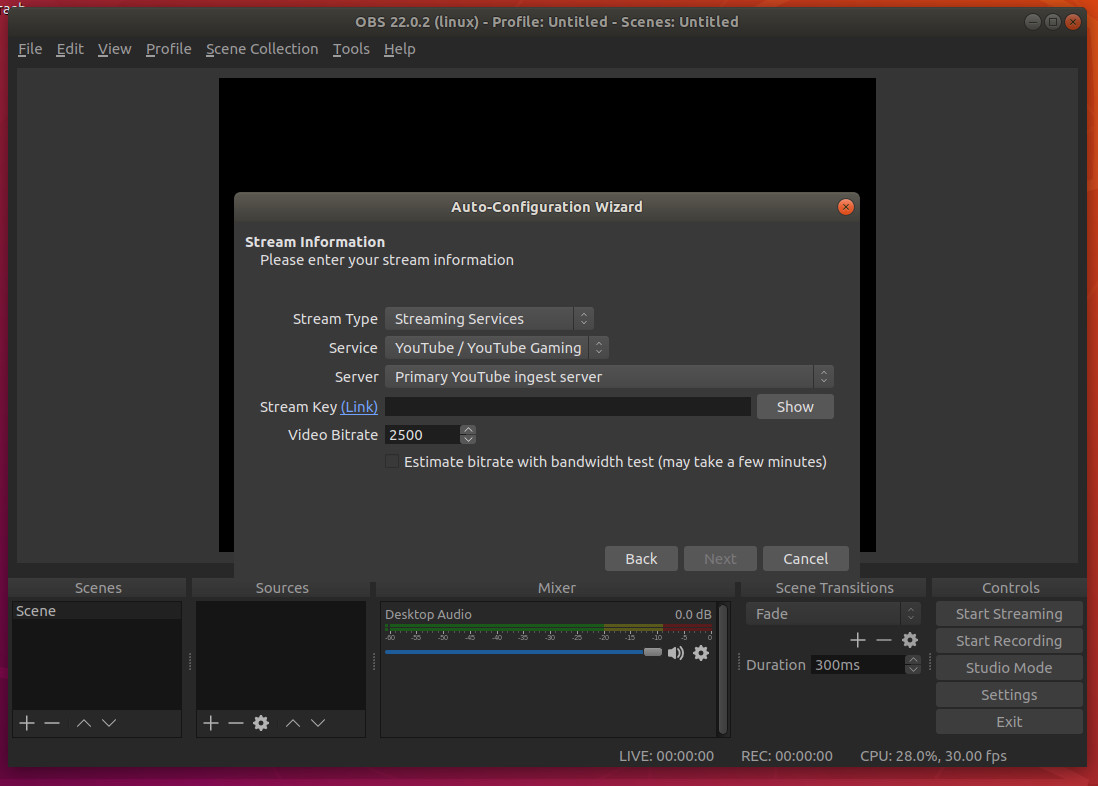
Upon installation (the software is only officially supported for Ubuntu Linux 14.04 and newer), you will be asked to walk through an auto-configuration wizard, where you setup your streaming service (Figure 5). This is, of course, optional; however, if you’re using OBS Studio, chances are this is exactly why, so you won’t want to skip out on configuring your default stream.
Figure 5: Configuring your streaming service for OBS Studio.
I will warn you: OBS Studio isn’t exactly for the faint of heart. Plan on spending a good amount of time getting the streaming service up and running and getting up to speed with the tool. But for anyone needing such a solution for the Linux desktop, OBS Studio is what you want. Oh … it can also record your desktop screencast and save it locally.
There’s More Where That Came From
This is a short list of screen recording solutions for Linux. Although there are plenty more where this came from, you should be able to fill all your desktop recording needs with one of these five apps.
Learn more about Linux through the free “Introduction to Linux” course from The Linux Foundation and edX.
The modern container revolution started with Docker and its eponymous Docker Engine. Docker Engine is the runtime and tooling that enables container applications, defined by a dockerfile, to run on top of a host operating system in an isolated “container” section.
“We are here because of docker engine,” Maink Taneja, Sr Product Manager at Docker said in a session at the Dockercon Europe conference.
The Docker Engine in 2018 isn’t the same technology it was when Docker first started. Rather, it has evolved significantly in recent years and is now based on the containerd container runtime at the core.
So what actually is the modern Docker Engine architecture?
The lack of standardized metrics, datasets, methodologies and tools for extracting insights from Open Source projects is real.
Open Source Metrics That Actually Matter
Let’s take a look at the first part of the problem: the metrics. OSS Project stakeholders simply don’t have the data to make informed decisions, identify trends and forecast issues before they arise. Providing standardized and language agnostic data to all stakeholders is essential for the success of the Open Source industry as a whole. Everyone can query the API of large code repositories such as GitHub and GitLab and find interesting metrics but this approach has limitations. The data points you can pull are not always available, complete or structured properly. There are also some public datasets such as GH Archive but these datasets are not optimized for exhaustive querying of commits, issues, PRs, reviews, comments, across a large set of distributed git repositories.
Retrieving source code from a mono-repository is an easier task, but code retrieval at scale is a pain point for researchers, Open Source maintainers or managers who want to track individual or team contributions.
This tutorial series from our archives explains how to build a fully automated holiday display with Raspberry Pi.
Christmas has been one of my favorite festivals, and this year it’s special because I’m planning a massive project to decorate my house using open source projects. There will be WiFi-controlled lights and a music show, there will be a talking moose singing Christmas carols (powered by Raspberry Pi, Arduino, and some servo motors), there will be a magical musical Christmas tree, and much more.
I built a music-light show for Halloween, but I improved it and added more features as I worked on the Christmas project. In this series, I’ll provide comprehensive instructions to build a fully automated Christmas music/light show that turns on automatically at a given time or that you can plug and play.
Caveat: This project involves working with 110v A/C, so take on this project only if you have experience with high voltage and understand the necessary safety precautions.
I spent weeks finding just the right parts below to create my setup. You can use your own creativity when selecting that parts that you need.
We need to install an operating system on our Pi, and we will be using Raspbian. First, let’s prepare the Micro SD card for Raspbian. Plug in the card into your PC and open the Terminal; we are going to format the Micro SD card as FAT32.
Run the lsblkcommand to list the block devices so you can get the block devices name of the micro sd card:
lsblk
In my case, it was mmcblk0. Once you have the block device name, run the parted command as sudo:
sudo parted /dev/mmcblk0
Once you are inside the parted utility, you will notice parted in the command line. Now create the partition table:
mklabel msdos
Then, create one partition:
mkpart primary fat32 1Mib 100%
And exit the parted utility:
quit
Again run the lsblk command to find the name of the partition that you just created:
lsblk
In my case, the partition on the ‘mmcblk0’ block devices was ‘mmcblk0p1’. We are going to format this partition with Fat32 file system:
sudo mkfs.vfat /dev/mmcblk0p1
Our Micro SD card is ready. Let’s download the zip file of the official image of NOOBS from this page. Then unzip the content of the downloaded folder into the root of the Micro SD card. First, change directory to Micro SD card:
cd path_of_microsd_cardunzip path_of_noobs_zip_file.zip
Open the Micro SD card in a file manage to make sure that all files are in the root folder of the card.
Prepare your Pi
Connect an HDMI monitor, keyboard and mouse to the Pi. Plug in the Micro SD card and then connect the 5V power supply. NOOBS will boot up and you will see this screen:
Select Raspbian from the list and click on the install button. The system will reboot after successful installation. Once you boot into Raspbian, open the wireless settings from the top bar and connect to your wireless.
We will be using our Raspberry Pi in headless mode so that we can manage the Christmas music show remotely from a PC, laptop, or mobile device. Before enabling SSH, however, we need to know the IP address of our Pi so that we can log into it remotely. Open the Terminal app and run the following command:
ifconfig
Note down the IP address listed under ‘wlan0’.
Once you have the IP address, open the configuration file of Raspbian by running the following command in the Terminal:
sudo raspi-config
Go to Advanced > SSH and select ‘Yes’ to enable SSH server.
(Note: use the arrow and enter keys to navigate and select; the mouse won’t work here)
We will also change audio settings to get the audio output through the 3.5mm audio jack instead of HDMI. In Advanced Options, go to Audio and select the second option ‘Force 3.5mm (‘headphone’) jack’, then select ‘Ok’.
Select ‘Finish’ in the main window and then reboot the system.
sudo reboot
You can now unplug the HDMI monitor as we will do the rest of the installation and configuration over ssh. Open terminal app on your PC or laptop and then ssh into the Pi:
ssh pi@IP_ADDRESS_OF_PI
In my case it was:
ssh pi@10.0.0.33
Then enter the password for the Pi: ‘raspberry’.
This is the default password for pi, if you want to change it you can do so from the ‘raspi-config’ file.
Now it’s time to update your system:
sudo apt-get updatesudo apt-get dist-upgrade
It’s always a good idea to reboot your system if there are any kernel updates:
sudo reboot
In the next article, I’ll show how to set up the light show portion of our project, and in part 3, we’ll wrap it all up with some sound.
For 5 more fun projects for the Raspberry Pi 3, including a holiday light display and Minecraft Server, download the free E-book today!
802.11ax will dominate the Wi-Fi-infrastructure landscape. Here’s why–and what you need to do to get ready for 802.11ax.
With the steady advances in wireless LAN (WLAN) technologies during the past two decades–remember, the first 802.11 standard of 1997 specified just 1 and 2 Mbps throughput–it’s perhaps getting tiresome that we’re still having to deal with yet another new physical-layer standard. This time around it’s the soon-to-be-official 802.11ax, now called Wi-Fi 6 by the Wi-Fi Alliance. After all, we’re seeing per-station throughput on the order of 1 Gbps with Wave 2 of 802.11ac (now a.k.a. Wi-Fi 5) and appropriate clients. So it’s fair to ask if we really need more–so much so that another rip-and-replace of access-point (AP) infrastructure should in fact be in the plans. Answering that question is precisely our mission here.
As open source software releases and customer adoption continue to increase, many companies underestimate what’s involved with going open source. It’s not only a matter of volunteering for the encouraged, but optional, upstream contributions to FOSS projects, but also complying with the legal requirements of open source licenses. Software increasingly includes a diverse assortment of open source code with a variety of licenses, as well as a mix of proprietary code. Sorting it all out to can be a major hassle, but the alternative is potential legal action and damaged relations with the open source community.
The Linux Foundation has just launched an Automated Compliance Tooling (ACT) project to help companies comply with open source licensing requirements. The new group consolidates its existing FOSSology and Software Package Data Exchange (SPDX) projects and adds two new projects: Endocode’s QMSTR for integrating open source compliance toolchain within build systems and VMware’s Tern, an inspection tool for identifying open source components within containers.
Announced at this week’s Open Compliance Summit in Yokohama, Japan, the ACT umbrella organization aims to “consolidate investment in, and increase interoperability and usability of, open source compliance tooling,” says the project.
“There are numerous open source compliance tooling projects but the majority are unfunded and have limited scope to build out robust usability or advanced features,” stated Kate Stewart, Senior Director of Strategic Programs at The Linux Foundation. “We have also heard from many organizations that the tools that do exist do not meet their current needs. Forming a neutral body under The Linux Foundation to work on these issues will allow us to increase funding and support for the compliance tooling development community.”
The four ACT projects, with links to their websites, include:
FOSSology— This early project for improving open source compliance was adopted by the Linux Foundation in 2015. The FOSSology project maintains and updates a FOSSology open source license compliance software system and toolkit. The software lets users quickly run license and copyright scans from the command line and generate an SPDX file — a format used to share data about software licenses and copyrights. FOSSology includes a database and web UI for easing compliance workflow, as well as license, copyright, and export scanning tools. Users include Arm, HP, HP Enterprise, Siemens, Toshiba, Wind River, and others.
SPDX— The Software Package Data Exchange project maintains the SPDX file format for communicating software Bill of Material (BoM) information including components, licenses, copyrights, and security references. The SPDX project was spun off from FOSSology as a Linux Foundation project in 2011 and is now reunited under ACT. In 2015, SPDX 2.0 added improved tracking of complex open source license dependencies. In 2016, SPDX 2.1 standardized the inclusion of additional data in generated files and added a syntax for accurate tagging of source files with license list identifiers. The latest 2.1.15 release offers support for deprecated license exceptions. The SPDX spec will “remain separate from, yet complementary to, ACT, while the SPDX tools that meet the spec and help users and producers of SPDX documents will become part of ACT,” says the project.
QMSTR— Also known as Quartermaster, QMSTR was developed by Endocode and is now hosted by ACT. QMSTR creates an open source toolchain that integrates into build systems to implement best practices for license compliance management. QMSTR identifies software products, sources, and dependencies, and can be used to verify outcomes, review problems and produce compliance reports. “By integrating into DevOps CI/CD cycles, license compliance can become a quality metric for software development,” says ACT.
Tern — This VMware hosted project for ensuring compliance in container technology is now part of the ACT family. Tern is an inspection tool for discovering the metadata of packages installed in container images. Tern “provides a deeper understanding of a container’s bill of materials so better decisions can be made about container based infrastructure, integration and deployment strategies,” says ACT.
The ACT project aligns with two related Linux Foundation projects: OpenChain, which just welcomed Google, Facebook, and Uber as platinum members, and the Open Compliance Program. In 2016, the OpenChain project released OpenChain 1.0 with a focus on tracking open source compliance along supply chains. The project also offers other services including OpenChain Curriculum for teaching best practices.
The Open Source Compliance group hosts the Open Compliance Summit. It also offers best practices information, legal guidance, and training courses for developers. The group helps companies understand their license requirements and “how to build efficient, frictionless and often automated processes to support compliance,” says the project.
ACT has yet to launch a separate website but has listed anact@linuxfoundation.org email address for more information.
2018 has been an amazing year for Cloud Foundry, with Alibaba joining as a Gold member, and Pivotal going public with its IPO, among some of the highlights. I recently talked withAbby Kearns, Executive Director of Cloud Foundry Foundation, to reflect on these milestones and more.
Kearns has been part of the Cloud Foundry ecosystem for the past five years and, under her leadership, Cloud Foundry has grown and evolved and found its way into half of the Fortune 500 companies, with those numbers increasing daily.
All of the major public cloud vendors want to be part of the ecosystem. “This year, we saw Alibaba join as a Gold member, and Cloud Foundry is now natively available on Alibaba Cloud,” said Kearns.
In 2017, Cloud Foundry embraced Kubernetes, the hottest open source project, and created CFCR (Cloud Foundry Container Runtime). “Kubernetes is a great technology that brings tons of capabilities to containers, which are the fundamental building blocks for a lot of portability for cloud native apps,” Kearns said.