The Linux Foundation has released the second edition of Open Source Compliance in the Enterprise by Ibrahim Haddad, which offers organizations a practical guide to using open source code and participating in open source communities while complying with both the spirit and the letter of open source licensing.
This fully updated ebook — with new contributions from Shane Coughlan and Kate Stewart — provides detailed information on issues related to the licensing, development, and reuse of open source software. The new edition also includes all new chapters on OpenChain, which focuses on increasing open source compliance in the supply chain, and SPDX, which is a set of standard formats for communicating the components, licenses, and copyrights of software packages.
“Open source compliance is the process by which users, integrators, and developers of open source observe copyright notices and satisfy license obligations for their open source software components,” Haddad states in the book.
This 200+ page book encompasses the entire process of open source compliance, including an introduction on how to establish an open source management program, a description of relevant roles and responsibilities, an overview of common compliance tools and processes, and all new material to help navigate mergers and acquisitions. It offers proven best practices as well as practical checklists to help those responsible for compliance activities create their own processes and policies.
Essential topics covered in this updated ebook include:
A recently updated user survey from monitoring software provider Datadog confirms an increase in Kubernetes adoption. We believe this is the result of three factors: 1) more organizations using containers in production; 2) Kubernetes has emerged as the leading orchestration platform; 3) organizations are choosing to adopt Kubernetes earlier in cloud native voyage. There is also some evidence that Kubernetes adoption is more likely among organizations with more containers being deployed. This article highlights findings from several studies released in conjunction with KubeCon + CloudNativeCon North America, a Kubernetes user conference being held this week in Seattle.
Cloud Foundry’s most recent survey of IT decision makers shows container production usage jumping from 22 percent in early 2016 to 38 percent in late 2018, with these deployments increasingly being described as “broad.” The Cloud Foundry report also found an increase in the number of containers being deployed — in 2016, only 37 percent of container organizations had more than 100 containers deployed, but for today that figure rises to 47 percent.
What is etcd? No, it’s not what happens when a cat tries to type a three-letter acronyms. Etcd (pronounced et-see-dee) was created by the CoreOS team in 2013. It’s an open-source, distributed, consistent key-value database for shared configuration, service discovery, and scheduler coordination. It’s built on the Raft consensus algorithm for replicated logs.
Open source software isn’t just transforming technology infrastructure around the world, it is also creating profound opportunities for people with relevant skills. From Linux to OpenStack to Kubernetes, employers have called out significant skills gaps that make it hard for them to find people fluent with cutting-edge tools and platforms. The Linux Foundation not only offers self-paced training options for widely known tools and platforms, such as Linux and Git, but also offers options specifically targeting the rapidly growing cloud computing ecosystem. The latest offering in this area isMonitoring Systems and Services with Prometheus (LFS241).
Prometheus is an open source monitoring system and time series database that is especially well suited for monitoring dynamic cloud environments. It contains a powerful query language and data model in addition to integrated alerting and service discovery support. The new course is specifically designed for software engineers and systems administrators wanting to learn how to use Prometheus to gain better insights into their systems and services.
Why is monitoring so crucial for today’s cloud stacks and environments? Because the metrics these monitoring tools provide allow administrators to see and anticipate potential problems, keep performance tuned, and more. Monitoring tools like Prometheus can also generate automated alerts, helping administrators respond to issues in real time.
The Site Reliability Engineering book covering Google’s key site reliability tools notes: “The idea of treating time-series data as a data source for generating alerts is now accessible to everyone through open source tools like Prometheus.”
As is true for most monitoring tools, Prometheus provides detailed and rich dashboard views of system and platform performance. Prometheus is also 100 percent open source and community-driven. All components are available under the Apache 2 License on GitHub.
Announced in November, this training course includes 20 to 25 hours of course material covering many of the tool’s major features, best practices, and use cases. Students will be able to monitor their systems and services effectively with Prometheus upon completion on this course. This course covers the following topics:
Prometheus architecture
Setting up and using Prometheus
Monitoring core system components and services
Basic and advanced querying
Creating dashboards
Instrumenting services and writing third-party integrations
Alerting
Using Prometheus with Kubernetes
Advanced operational aspects
Hands-on training makes a big difference, and this course contains 55 labs that can be completed locally on a VM or in the cloud. What do you need in terms of prerequisites? Participants should have basic experience with Linux/Unix system administration and common shell commands, as well as some development experience in Go and/or Python and working with Kubernetes.
“Adoption of the Prometheus monitoring system is growing rapidly, leading to demand for more talent qualified to work with this technology, which is why we decided now is the time to develop this course,” said Clyde Seepersad, General Manager, Training & Certification, The Linux Foundation. “With content developed by Cloud Native Computing Foundation (CNCF), which hosts Prometheus, and Julius Volz, one of the founders of the project, there is no better option than LFS241 for learning the ins and outs of this solution.”
In 2016, Deis (now part of Microsoft) platform architect Matt Butcher was looking for a way to explain Kubernetes to technical and non-technical people alike. Inspired by his daughter’s prolific stuffed animal collection, he came up with the idea of “The Children’s Illustrated Guide to Kubernetes.” Thus Phippy, the yellow giraffe and PHP application, along with her friends, were born.
Today, live from the keynote stage at KubeCon + CloudNativeCon North America, Matt and co-author Karen Chu announced Microsoft’s donation and presented the official sequel to the Children’s Illustrated Guide to Kubernetes in their live reading of “Phippy Goes to the Zoo: A Kubernetes Story” – the tale of Phippy and her niece as they take an educational trip to the Kubernetes Zoo.
As such, it behooves anyone working with containers or the cloud—which is pretty much everyone in enterprise IT—to improve their Kubernetes skills. That’s both to benefit your company and your own career prospects.
Unfortunately, setting up Kubernetes on a cloud is difficult. You can spend more time getting it to work than learning how to use it.
The solution: Minikube. Minikube is an application that brings you up to speed. It helps you set up and run Kubernetes on a computer running Linux, macOS, or (in beta) Windows. You can avoid Kubernetes’ steep deployment learning curve and get straight to trying out the container management tool’s features.
But even Minikube needs an introduction. In this article, I show you the steps involved in using Minikube, using Linux as my operating system.
After taking the world by storm, Tetris was cloned many, many times. I would suspect you could find a Tetris clone for just about any operating system in any language you looked for. Seriously, go look. There are some fun ones out there.
The version I’m bringing you for today’s command-line toy is written in Haskell, and it’s one of the better-done versions I’ve seen, with on-screen preview, score, help, and a clean look.
If you’re willing to run a compiled binary from an untrusted source (I wouldn’t recommend it), you can grab that directly, but for a safer approach, it’s also easy to use a containerized version with dex, or to install from source with stack.
In the previous article, we started building the foundation for building a custom operator that can be applied to real-world use cases. In this part of our tutorial series, we are going to create a generic example-operator that manages our apps of Examplekind. We have already used the operator-sdk to build it out and implement the custom code in a repo here. For the tutorial, we will rebuild what is in this repo.
The example-operator will manage our Examplekind apps with the following behavior:
Create an Examplekind deployment if it doesn’t exist using an Examplekind CR spec (for this example, we will use an nginximage running on port 80).
Ensure that the pod count is the same as specified in the Examplekind CR spec.
Update the Examplekind CR status with:
A label called Group defined in the spec
An enumerated list of the Podnames
Prerequisites
You’ll want to have the following prerequisites installed or set up before running through the tutorial. These are prerequisites to install operator-sdk, as well as a a few extras you’ll need.
1. Make sure you’ve got your Kubernetes cluster running by spinning up minikube. minikube start
2. Create a new folder for your example operator within your Go path.
mkdir -p $GOPATH/src/github.com/linux-blog-demo
cd $GOPATH/src/github.com/linux-blog-demo
3. Initialize a new example-operator project within the folder you created using the operator-sdk.
operator-sdk new example-operator
cd example-operator
What just got created?
By running the operator-sdk new command, we scaffolded out a number of files and directories for our defined project. See the project layout for a complete description; for now, here are some important directories to note:
pkg/apis – contains the APIs for our CR. Right now this is relatively empty; the commands that follow will create our specific API and CR for Examplekind.
pkg/controller – contains the Controller implementations for our Operator, and specifically the custom code for how we reconcile our CR (currently this is somewhat empty as well).
deploy/ – contains generated K8s yaml deployments for our operator and its RBAC objects. The folder will also contain deployments for our CR and CRD, once they are generated in the steps that follow.
Create a Custom Resource and Modify it
4. Create the Custom Resource and it’s API using the operator-sdk.
operator-sdk add api --api-version=example.kenzan.com/v1alpha1 --kind=Examplekind
What just got created?
Under pkg/ais/example/v1alpha, a new generic API was created for Examplekind in the file examplekind_types.go.
Under deploy/crds, two new K8s yamls were generated:
examplekind_crd.yaml – a new CustomResourceDefinition defining our Examplekind object so Kubernetes knows about it.
examplekind_cr.yaml– a general manifest for deploying apps of type Examplekind
A DeepCopy methods library is generated for copying the Examplekind object
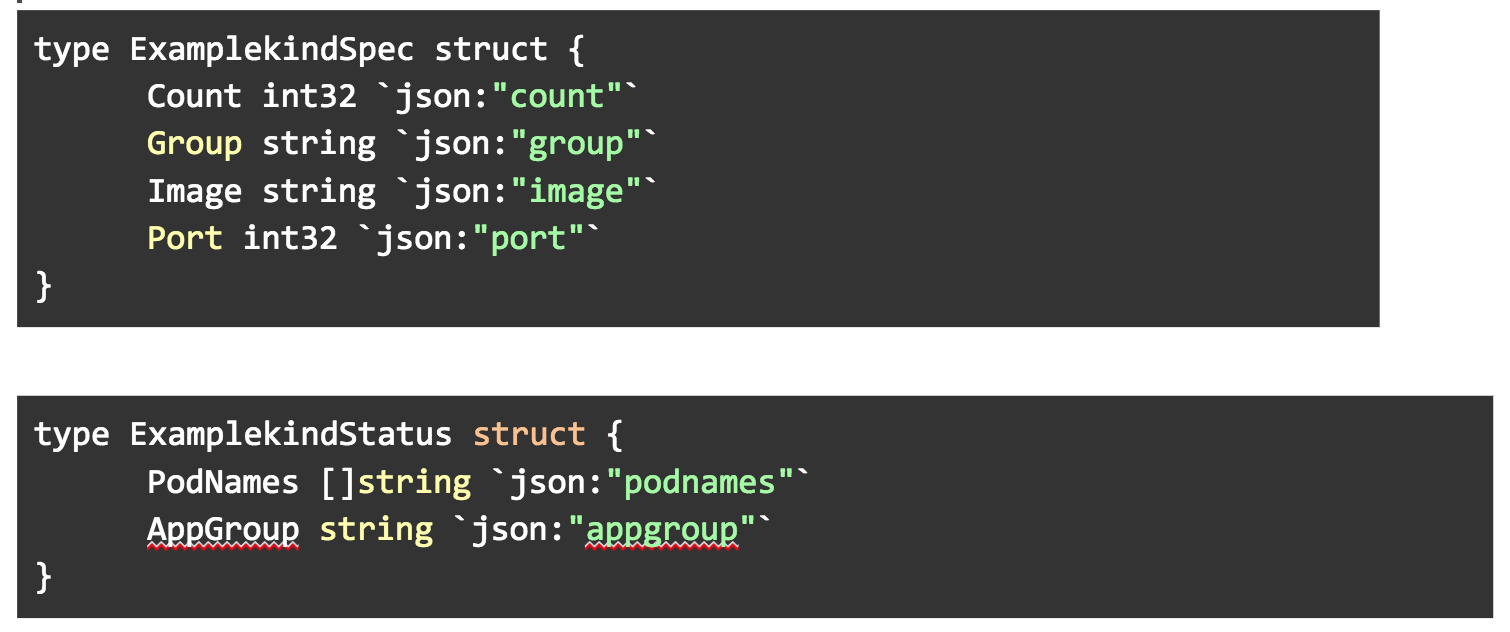
5. We need to modify the API in pkg/apis/example/v1alpha1/examplekind_types.go with some custom fields for our CR. Open this file in a text editor. Add the following custom variables to ExamplekindSpec and ExamplekindStatus structs.
The variables in these structs are used to generate the data structures in the yaml spec for the Custom Resource, as well as variables we can later display in getting the status of the Custom Resource.
6. After modifying the examplekind_types.go, regenerate the code.
operator-sdk generate k8s
What just got created?
You always want to run the operator-sdk generate command after modifying the API in the _types.go file. This will regenerate the DeepCopy methods.
Create a New Controller and Write Custom Code for it
What just got created? Among other code, a pkg/controller/examplekind/examplekind_controller.go file was generated. This is the primary code running our controller; it contains a Reconcile loop where custom code can be implemented to reconcile the Custom Resource against its spec.
8. Replace the examplekind_controller.go file with the one in our completed repo. The new file contains the custom code that we’ve added to the generated skeleton.
Wait, what was in the custom code we just added?
If you want to know what is happening in the code we just added, read on. If not, you can skip to the next section to continue the tutorial.
To break down what we are doing in our examplekind_controller.go, lets first go back to what we are trying to accomplish:
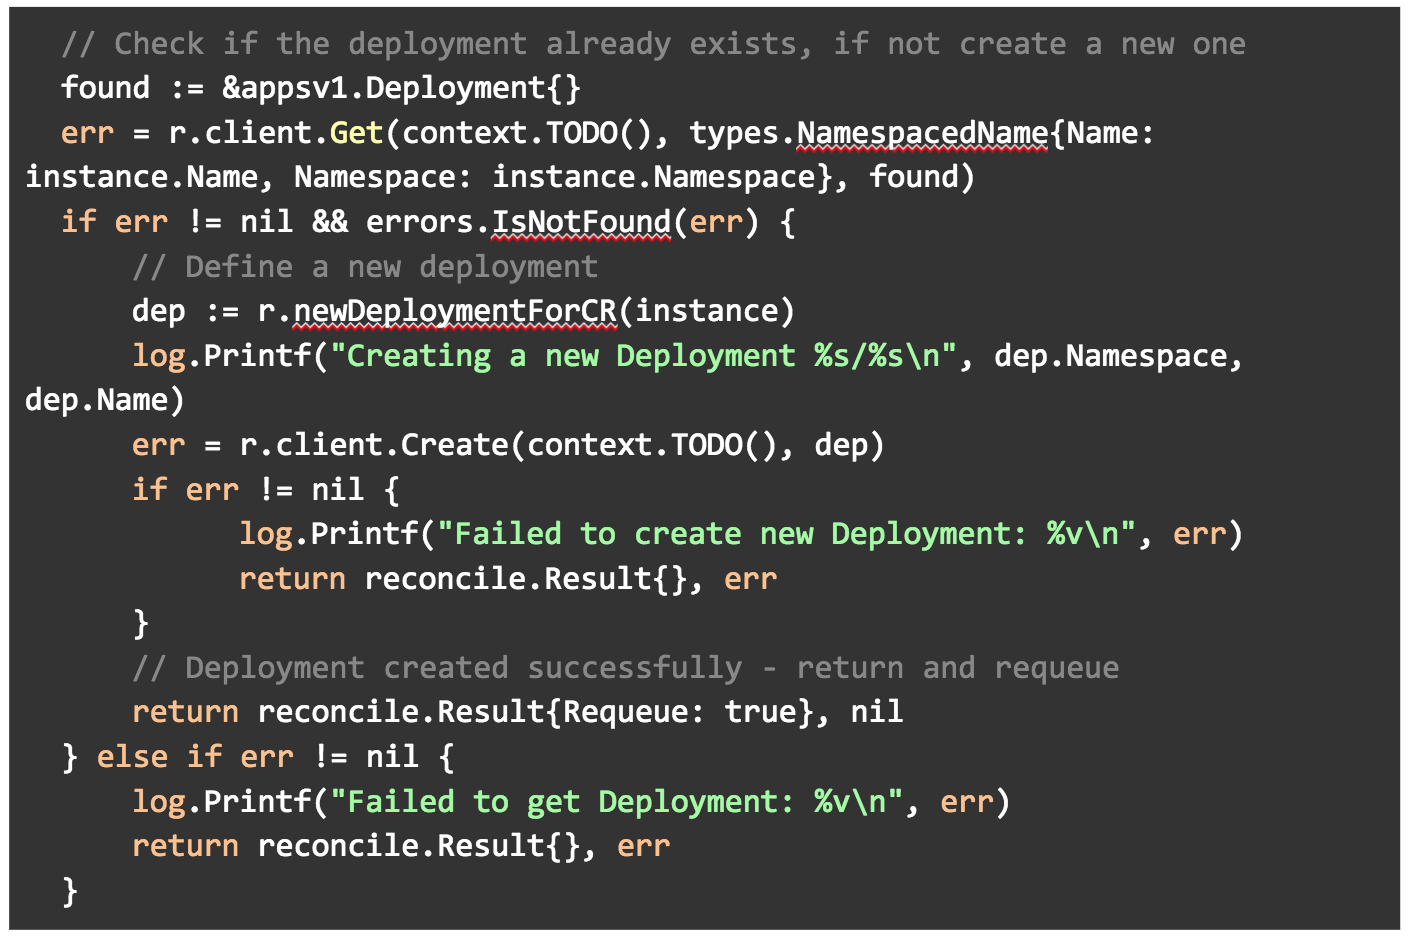
Create an Examplekind deployment if it doesn’t exist
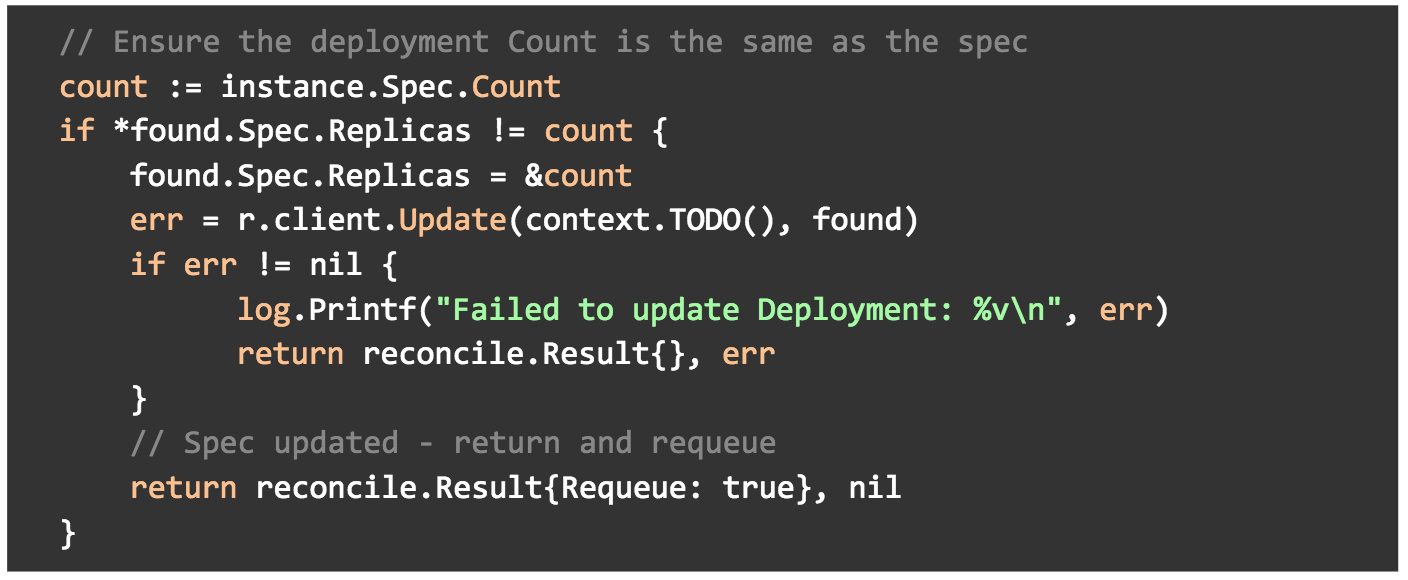
Make sure our count matches what we defined in our manifest
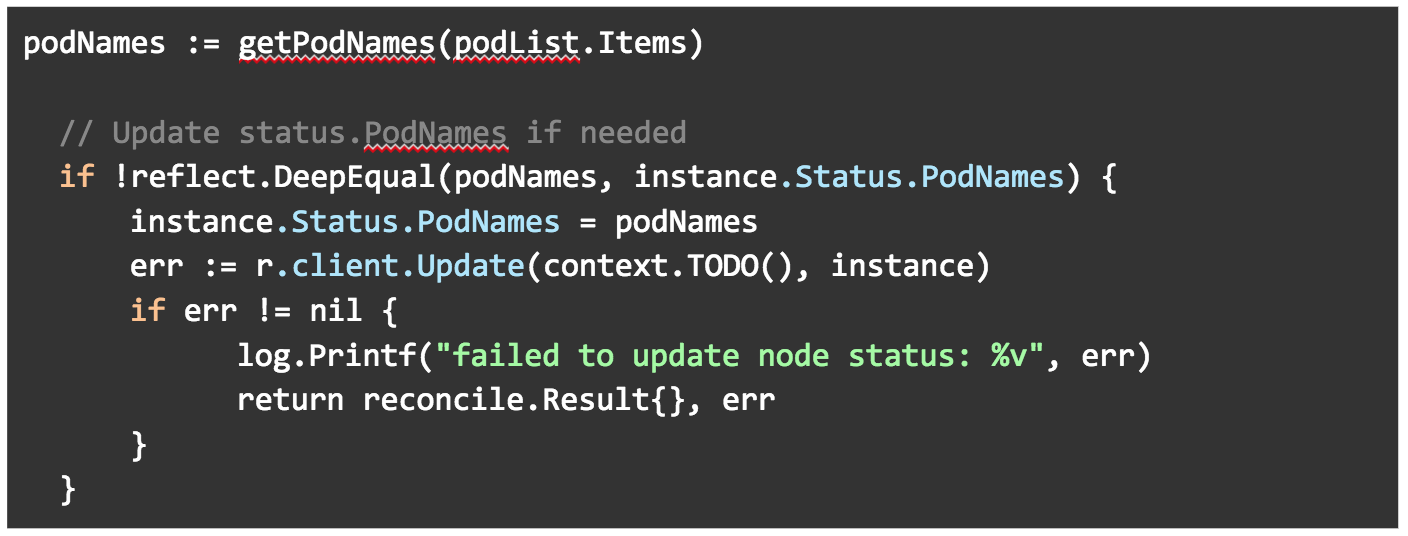
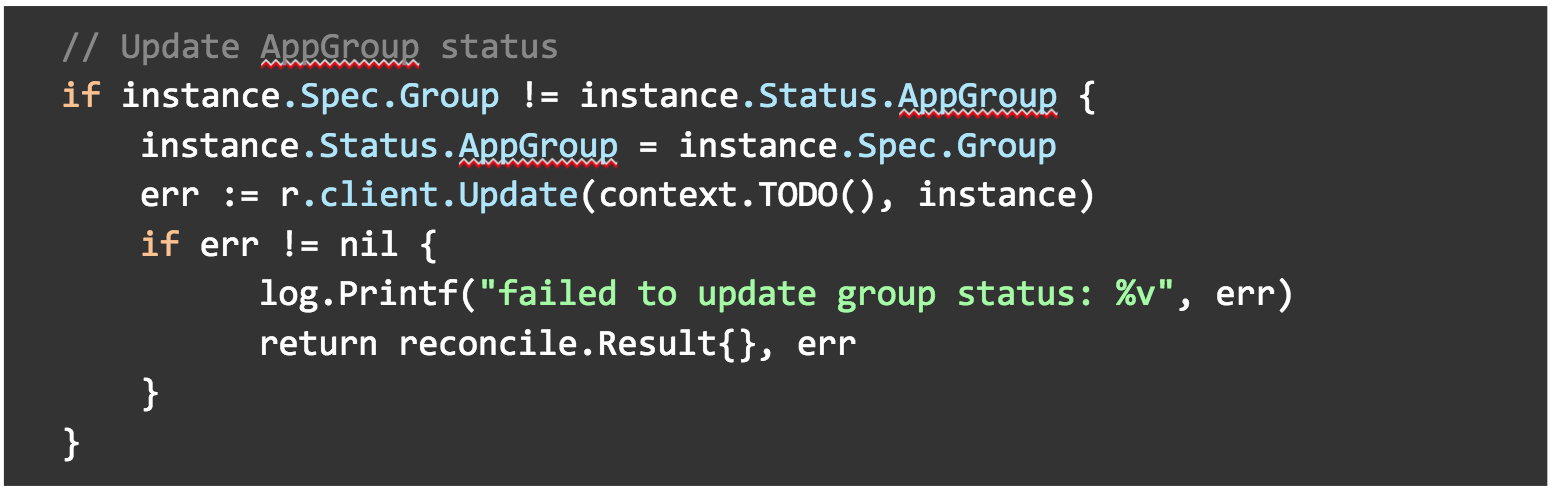
Update the status with our group and podnames.
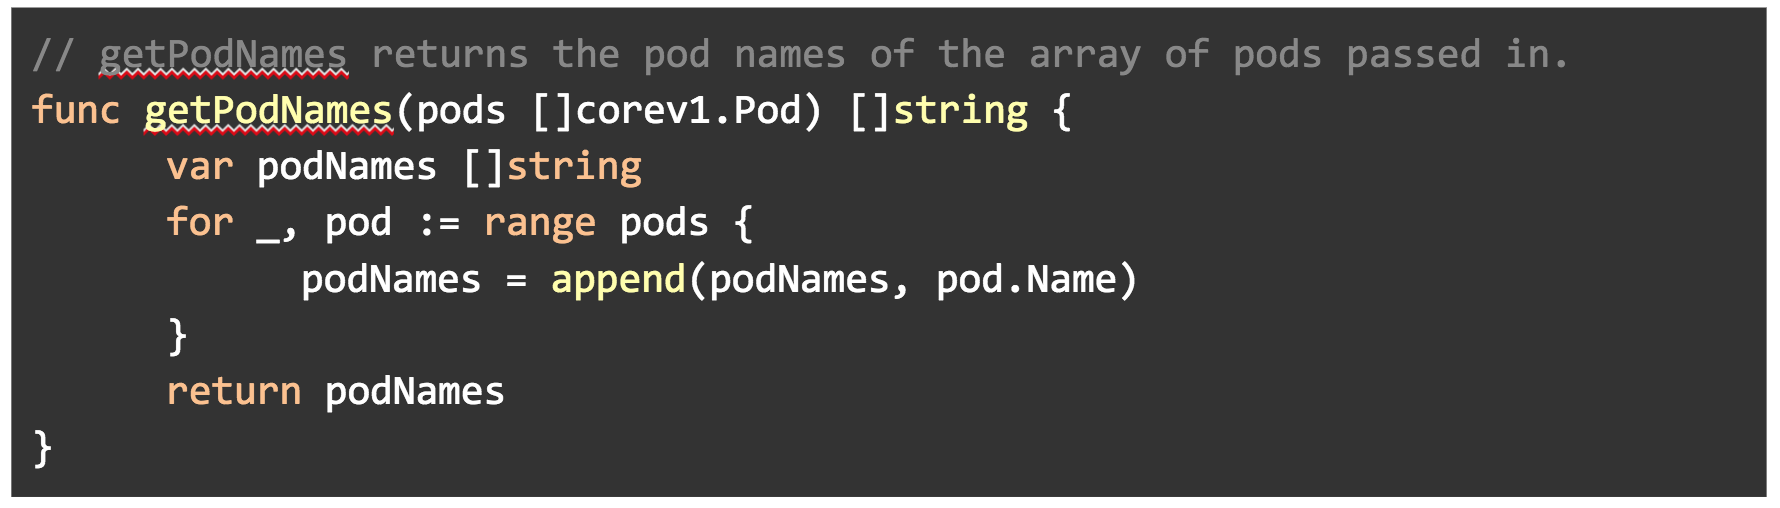
To achieve these things, we’ve created three methods: one to get pod names, one to create labels for us, and last to create a deployment.
In getPodNames(), we are using the core/v1 API to get the names of pods and appending them to a slice.
In labelsForExampleKind(), we are creating a label to be used later in our deployment. The operator name will be passed into this as a name value.
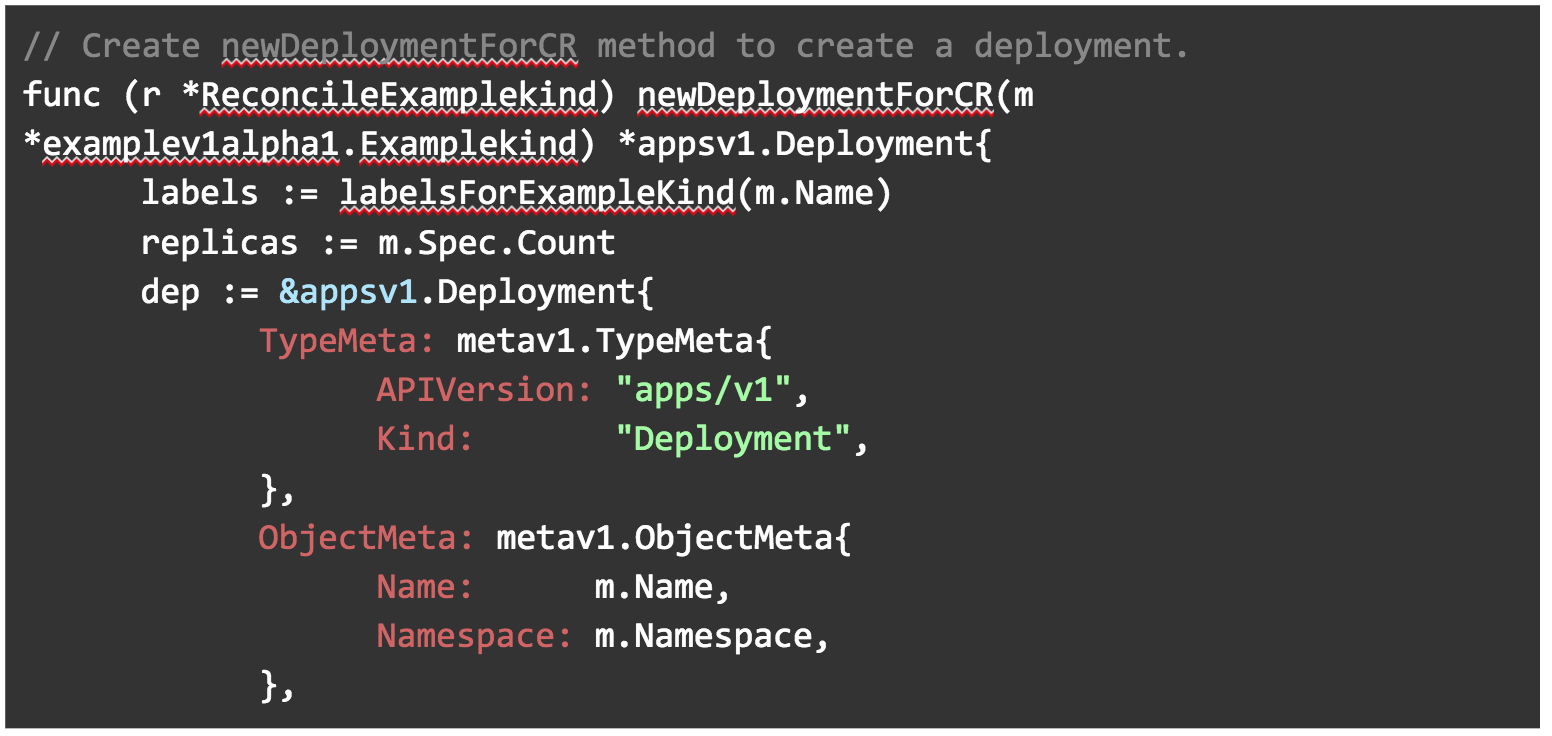
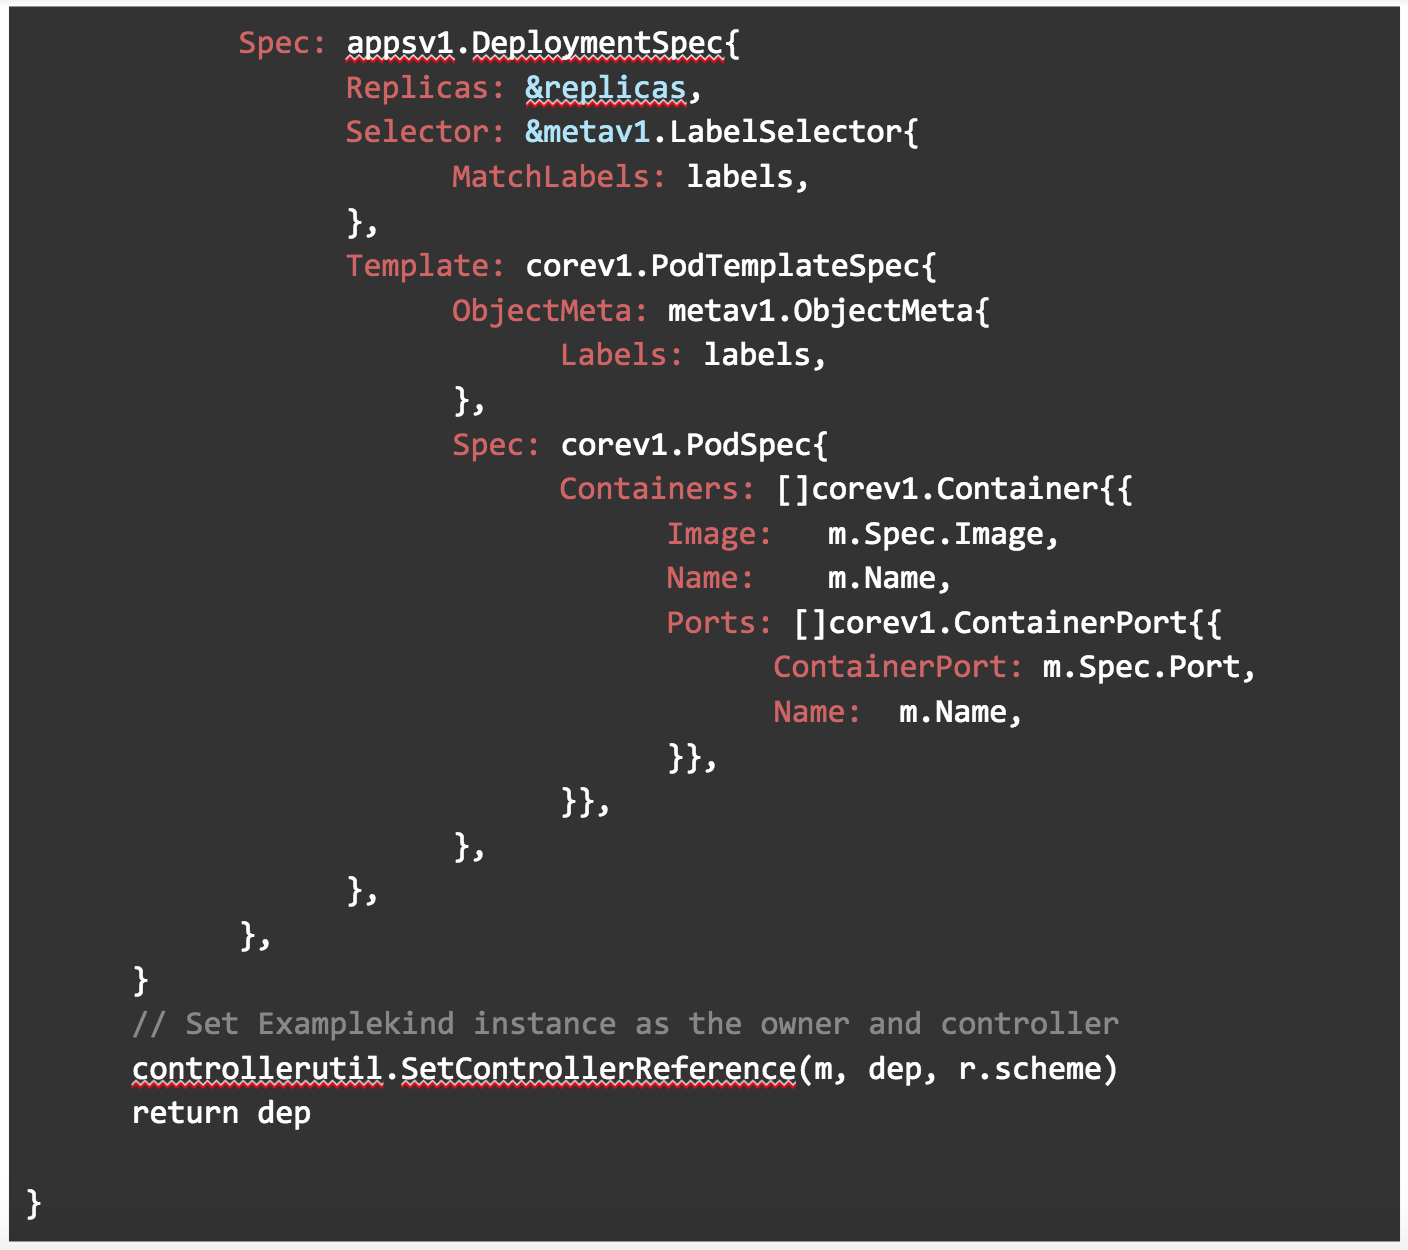
In newDeploymentForCR(), we are creating a deployment using the apps/v1 API. The label method is used here to pass in a label. It uses whatever image we specify in our manifest as you can see below in Image: m.Spec.Image. Replicas for this deployment will also use thecount field we specified in our manifest.
Then in our main Reconcile() method, we check to see if our deployment exists. If it does not, we create a new one using the newDeploymentForCR()method. If for whatever reason it cannot create a deployment, print an error to the logs.
In the same Reconcile() method, we are also making sure that the deployment replica field is set to our countfield in the spec of our manifest.
And we are getting a list of our pods that matches the label we created.
We are then passing the pod list into the getPodNames() method. We are making sure that the podNames field in our ExamplekindStatus ( in examplekind_types.go) is set to the podNames list.
Finally, we are making sure the AppGroup in our ExamplekindStatus (in examplekind_types.go) is set to the Group field in our Examplekind spec (also in examplekind_types.go).
Deploy your Operator and Custom Resource
We could run the example-operator as Go code locally outside the cluster, but here we are going to run it inside the cluster as its own Deployment, alongside the Examplekind apps it will watch and reconcile.
9. Kubernetes needs to know about your Examplekind Custom Resource Definition before creating instances, so go ahead and apply it to the cluster.
10. Check to see that the custom resource definition is deployed.
kubectl get crd
11. We will need to build the example-operator as an image and push it to a repository. For simplicity, we’ll create a public repository on your account on dockerhub.com.
14. Open up the deploy/operator.yamlfile that was generated during the build. This is a manifest that will run your example-operator as a Deployment in Kubernetes. We need to change the image so it is the same as the one we just pushed.
a. Find image: REPLACE_IMAGE
b.Replace with image: [Dockerhub username]/example-operator:v0.0.1
15. Set up Role-based Authentication for the example-operator by applying the RBAC manifests that were previously generated.
kubectl create -f deploy/service_account.yaml
kubectl create -f deploy/role.yaml
kubectl create -f deploy/role_binding.yaml
16. Deploy the example-operator.
kubectl create -f deploy/operator.yaml
17. Check to see that the example-operator is up and running.
kubectl get deploy
18. Now we’ll deploy several instances of the Examplekind app for our operator to watch. Open up the deploy/crds/example_v1alpha1_examplekind_cr.yamldeployment manifest. Update fields so they appear as below, with name, count, group, image and port. Notice we are adding fields that we defined in the spec struct of our pkg/apis/example/v1alpha1/examplekind_types.go.
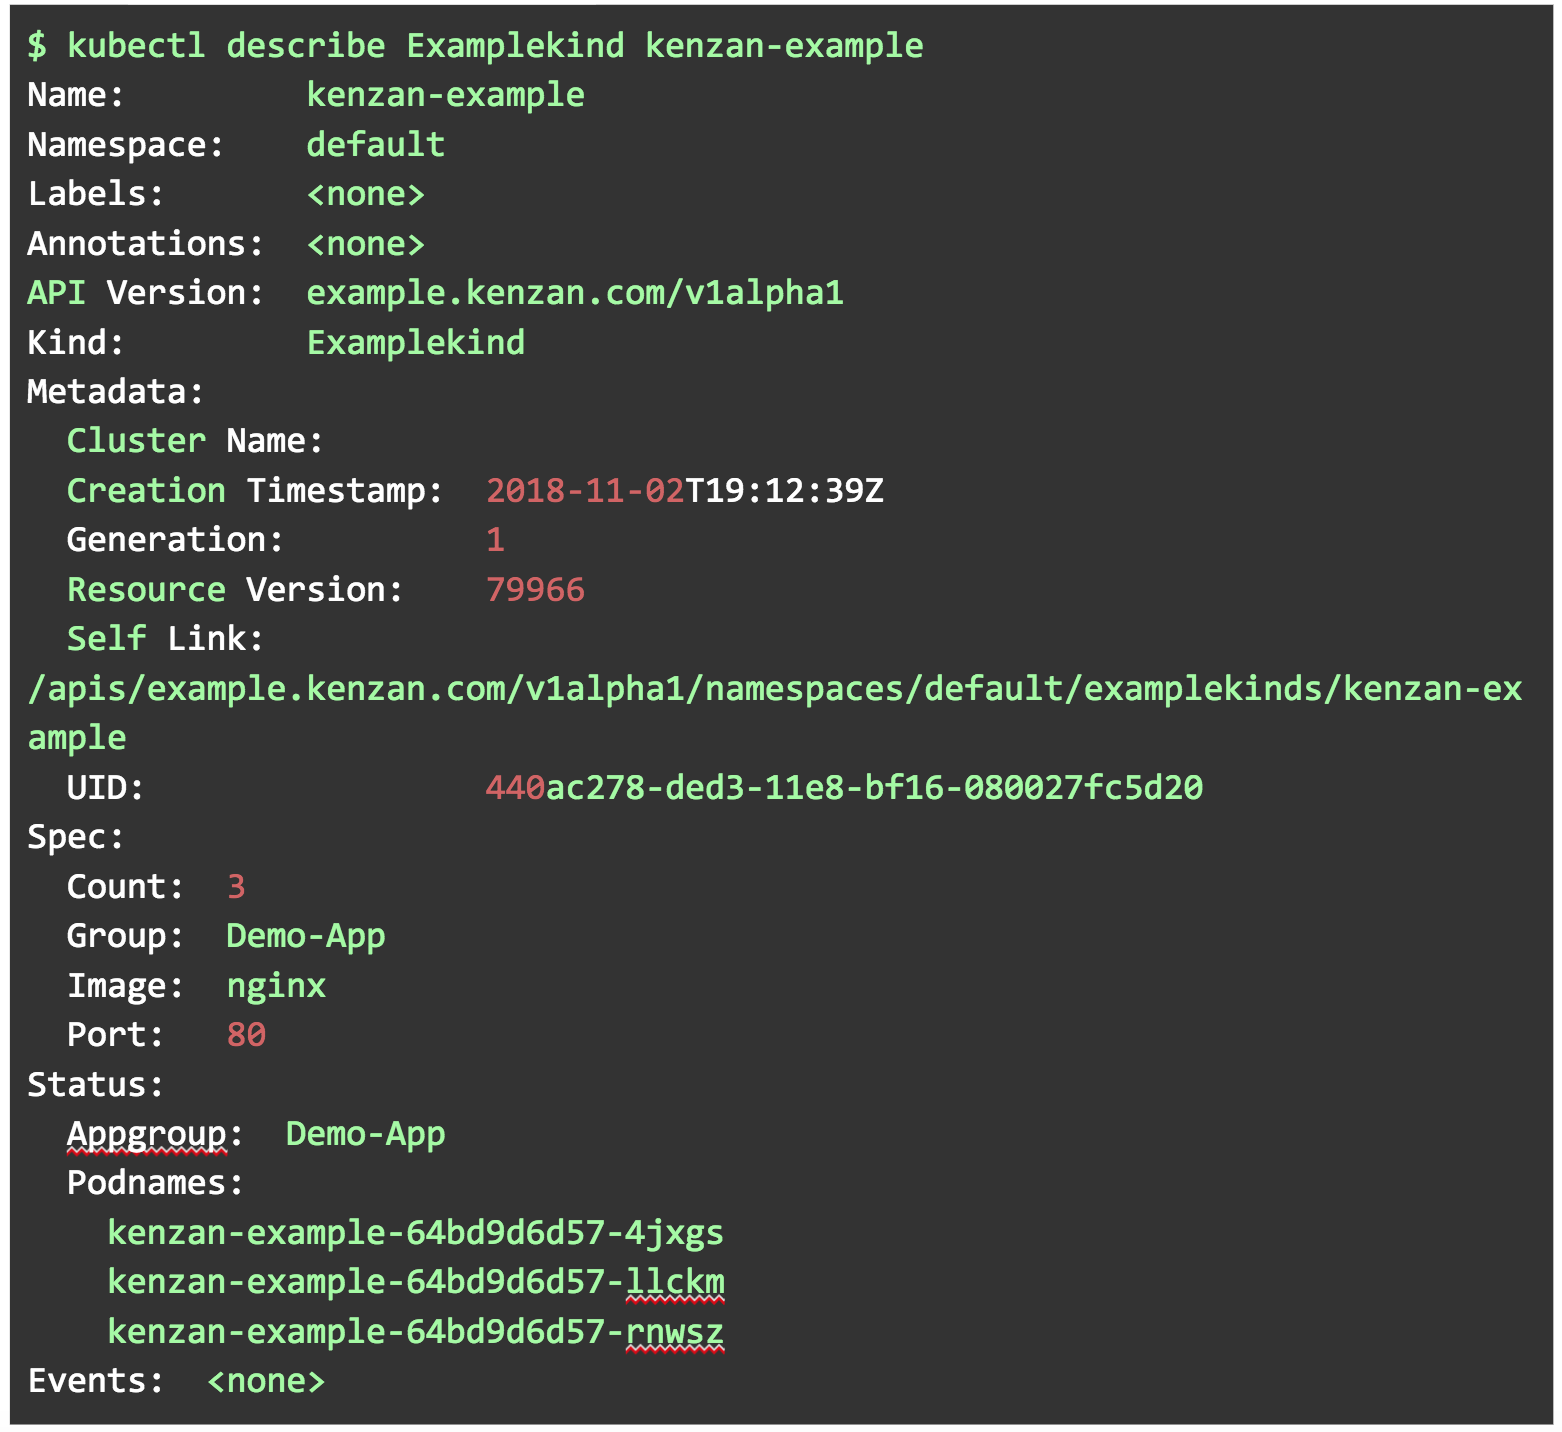
23. Based on the operator reconciling against the spec, you should now have one instance of kenzan-example.
kubectl describe Examplekind kenzan-example
Well done. You’ve successfully created an example-operator, and become familiar with all the pieces and parts needed in the process. You may even have a few ideas in your head about which stateful applications you could potentially automate the management of for your organization, getting away from manual intervention. Take a look at the following links to build on your Operator knowledge:
The artificial intelligence (AI), deep learning (DL) and machine learning (ML) space is changing rapidly, with new projects and companies launching, existing ones growing, expanding and consolidating. More companies are also releasing their internal AI, ML, DL efforts under open source licenses to leverage the power of collaborative development, benefit from the innovation multiplier effect of open source, and provide faster, more agile development and accelerated time to market.
To make sense of it all and keep up to date on an ongoing basis, the LF Deep Learning Foundation has created an interactive Deep Learning Landscape, based on the Cloud Native Landscape pioneered by CNCF. This landscape is intended as a map to explore open source AI, ML, DL projects. It also showcases the member companies of the LF Deep Learning Foundation who contribute contribute heavily to open source AI, ML and DL and bring in their own projects to be housed at the Foundation.
Open source tools continue to serve as the underlying cornerstone of cloud native DevOps patterns and practices — while they also continue to change and evolve.
Cloud native’s origins, of course, trace back to when Amazon and then Microsoft began to offer so-called cloud platforms, allowing organizations to take advantage of massive resources on networks of servers in their data centers worldwide. Heavy hitters Google and Alibaba followed their lead, laying the groundwork for when, more recently, Netflix and Pivotal began to describe so-called cloud native architectures.
Netflix has been very transparent about its reliance on its large suite of open source stacks built for its momentous video sharing service, thanks largely to what the Cloud Native Computing Foundation [CNCF] has made available and Kubernetes and microservices architectures built on cloud native architectures. Additionally, about a decade after it was first introduced as a concept, DevOps has helped to set in motion the team culture fostering the development pipelines and workflows for the industry shift to cloud native deployments. …
DevOps’ deployments on cloud native tools and libraries obviously hinge on what DevOps teams think work best for their workflows. But in today’s new stack context, this era of open source and collaboration has created an explosion of possibilities.