A trip to KubeCon + CloudNativeCon reveals a community hard at work building an open, agile and scalable cloud platform to fuel the boom in ubiquitous services….
To understand the importance of Kubernetes we need to return to containers briefly. Containers, by design, use less resources than virtual machines (VMs) as they share an OS and run ‘closer to the metal’. For developers, the technology has enabled them to package, ship and run their applications in isolated containers that run virtually anywhere. When continuous integration/continuous delivery software (e.g. Jenkins) and practices are added into the mix, this enables companies to benefit from nimble and responsive automation and it significantly speeds up development. For example, any changes that developers make to the source code will automatically trigger the creation, testing and deployment of a new container to staging and then into production.
The idea of a container allowing one process only to run inside it has also led on to microservices. This is where applications are broken down into their processes and placed inside a container, which makes a lot of sense in the enterprise world where greater efficiencies are constantly being sought.
However, this explosion of containerised apps has created the need for a way to manage or ‘orchestrate’ thousands of containers.
In this video from the 2018 Swiss HPC Conference, Saverio Proto from SWITCH presents: Kubernetes as a Service Built on OpenStack.
“At SWITCH we are looking to provide a container platform as a Service solution. We are working on Kubernetes leveraging the Openstack cloud provider integration. In this talk we show how to re-use the existing keystone credentials to access the K8s cluster, how to obtain PVCs using the Cinder storage class and many other nice integration details.”
jm-shell is a free open source, small, highly informative and customized Bash shell, that gives you a great wealth of information about your shell activity as well as certain useful system information such as system load average, battery status of laptops/computers and much more.
Importantly, unlike Bash which only stores unique commands in a history file, for searching previously run commands – jm-shell records each and every shell activity in a log file.
In addition, if your current directory is a code repository for any version control systems such as Git, Subversion, or Mercurial, it will provide information about your repositories (such as active branch).
Jm-shell Features
Has a status line (divider) to separate commands.
Displays the number of items in current directory.
Shows current location in the filesystem.
It maintains a shell log file – full history of your shell activity.
Displays current system load average if higher than, in red if critical (higher than 2).
Shows the time last command finished.
It prints an error code of last command, if any.
Displays total time of last command if higher than 4 seconds.
This week in our news roundup, Microsoft demonstrates its “open source love” with a Linux-friendly update to the Windows Notepad feature, KubeCon size tripled this year & attendees learned about the direction of Kubernetes & container orchestration & more! Read on!
1) “Microsoft has updated Notepad to be able to handle end of line characters used in Unix, Linux, and macOS environments.”
4) “Consider that the attendance at KubeCon in Copenhagen last week numbered 4300 registered participants, triple the attendance in Berlin just last year.”
5) Red Hat Summit 2018 gathered open source+tech world thought leaders such as Red Hat CEO Jim Whitehurst, JewelBots CTO Sara Chipps, and Jennifer Cloer, Executive Producer of a new episodic documentary about the experiences of women in tech.
FreeBSD is an open source operating system that descended from the famous Berkeley Software Distribution. The first version of FreeBSD was released in 1993 and is still going strong. Around 2007, Lucas Holt wanted to create a fork of FreeBSD that made use of the GnuStep implementation of the OpenStep (now Cocoa) Objective-C frameworks, widget toolkit, and application development tools. To that end, he began development of the MidnightBSD desktop distribution.
MidnightBSD (named after Lucas’s cat, Midnight) is still in active (albeit slow) development. The latest stable release (0.8.6) has been available since August, 2017. Although the BSD distributions aren’t what you might call user-friendly, getting up to speed on their installation is a great way to familiarize yourself with how to deal with an ncurses installation and with finalizing an install via the command line.
In the end, you’ll wind up with desktop distribution of a very reliable fork of FreeBSD. It’ll take a bit of work, but if you’re a Linux user looking to stretch your skills… this is a good place to start.
I want to walk you through the process of installing MidnightBSD, how to add a graphical desktop environment, and then how to install applications.
Installation
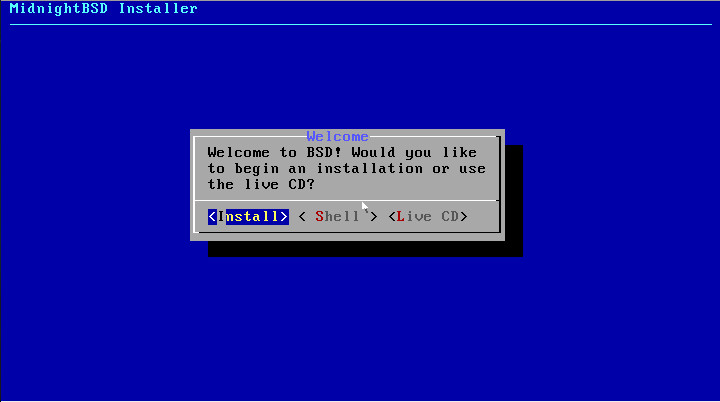
As I mentioned, this is an ncurses installation process, so there is no point-and-click to be found. Instead, you’ll be using your keyboard Tab and arrow keys. Once you’ve downloaded the latest release, burn it to a CD/DVD or USB drive and boot your machine (or create a virtual machine in VirtualBox). The installer will open and give you three options (Figure 1). Select Install (using your keyboard arrow keys) and hit Enter.
Figure 1: Launching the MidnightBSD installer.
At this point, there are quite a lot of screens to go through. Many of those screens are self-explanatory:
Set non-default key mapping (yes/no)
Set hostname
Add optional system components (documentation, games, 32-bit compatibility, system source code)
Partitioning hard drive
Administrator password
Configure networking interface
Select region (for timezone)
Enable services (such as secure shell)
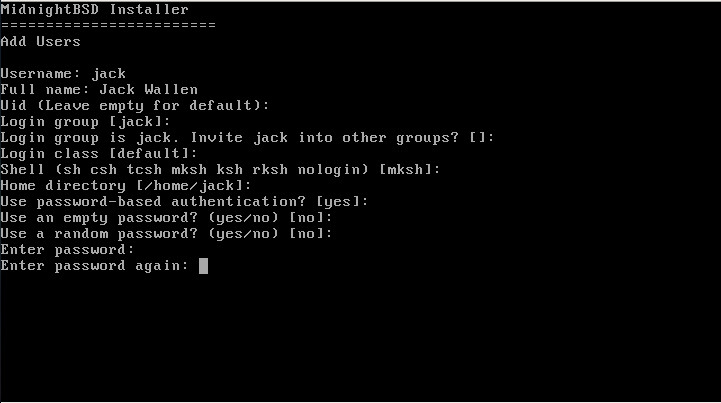
Add users (Figure 2)
Figure 2: Adding a user to the system.
After you’ve added the user(s) to the system, you will then be dropped to a window (Figure 3), where you can take care of anything you might have missed or you want to re-configure. If you don’t need to make any changes, select Exit, and your configurations will be applied.
Figure 3: Applying your configurations.
In the next window, when prompted, select No, and the system will reboot. Once MidnightBSD reboots, you’re ready for the next phase of the installation.
Post install
When your newly installed MidnightBSD boots, you’ll find yourself at a command prompt. At this point, there is no graphical interface to be found. To install applications, MidnightBSD relies on the mport tool. Let’s say you want to install the Xfce desktop environment. To do this, log into MidnightBSD and issue the following commands:
sudo mport indexsudo mport install xorg
You now have the Xorg window server installed, which will allow you to install the desktop environment. Installing Xfce is handled with the command:
sudo mport install xfce
Xfce is now installed. However, we must enable it to run with the command startx. To do this, let’s first install the nano editor. Issue the command:
sudo mport install nano
With nano installed, issue the command:
nano ~/.xinitrc
That file need only contain a single line:
exec startxfce4
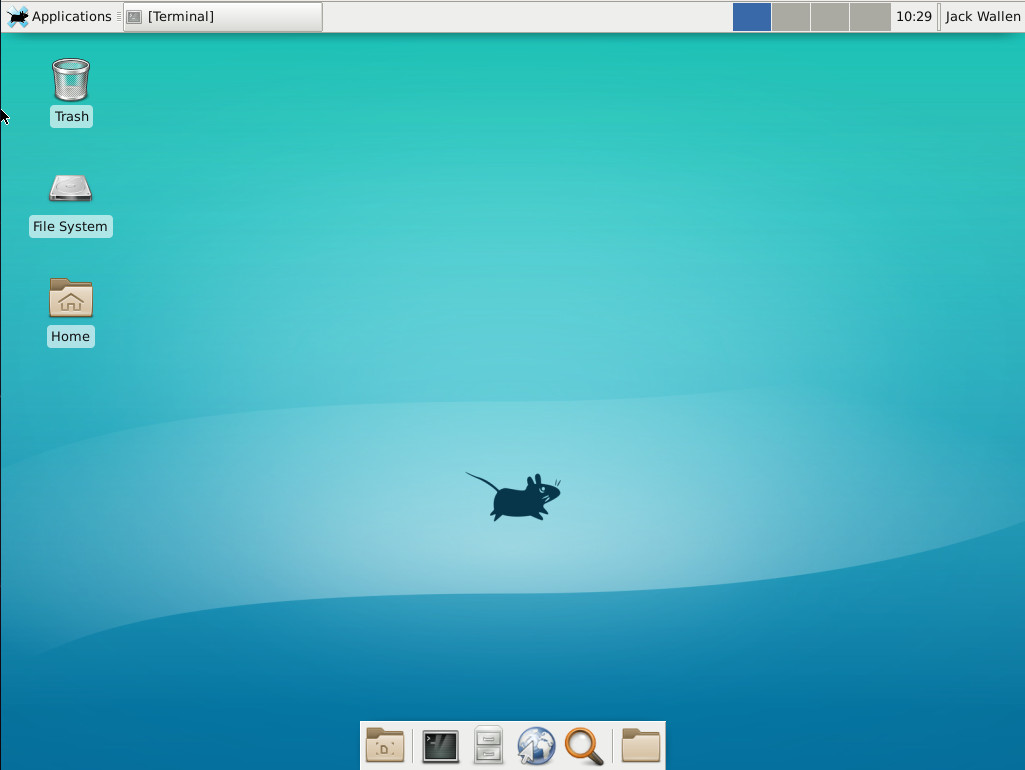
Save and close that file. If you now issue the command startx, the Xfce desktop environment will start. You should start to feel a bit more at home (Figure 4).
Figure 4: The Xfce desktop interface is ready to serve.
Since you don’t want to always have to issue the command startx, you’ll want to enable the login daemon. However, it’s not installed. To install this subsystem, issue the command:
sudo mport install mlogind
When the installation completes, enable mlogind at boot by adding an entry to the /etc/rc.conffile. At the bottom of the rc.conf file, add the following:
mlogind_enable=”YES”
Save and close that file. Now, when you boot (or reboot) the machine, you should be greeted by the graphical login screen. At the time of writing, after logging in, I wound up with a blank screen and the dreaded X cursor. Unfortunately, it seems there’s no fix for this at the moment. So, to gain access to your desktop environment, you must make use of the startx command.
Installing
Out of the box, you won’t find much in the way of applications. If you attempt to install applications (using mport), you’ll quickly find yourself frustrated, as very few applications can be found. To get around this, we need to check out the list of available mport software, using the svnlite command. Go back to the terminal window and issue the command:
svnlite co http://svn.midnightbsd.org/svn/mports/trunk mports
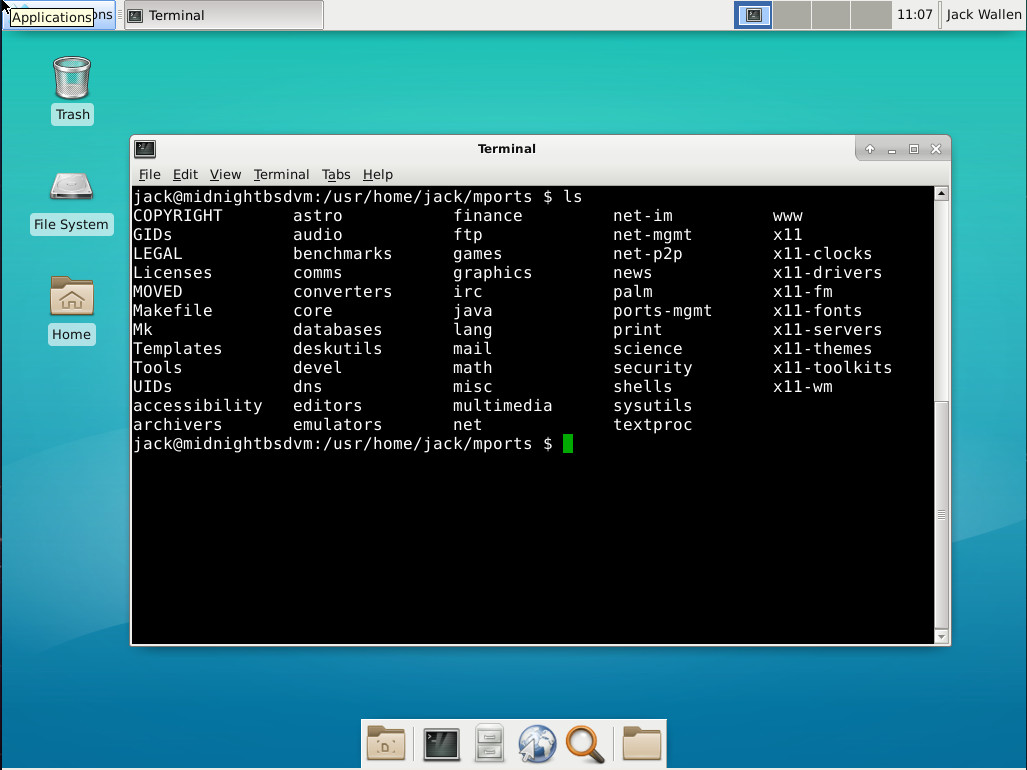
Once you do that, you should see a new directory named ~/mports. Change into that directory (with the command cd ~/.mports. Issue the ls command and you should see a number of categories (Figure 5).
Figure 5: The categories of applications now available for mport.
Say you want to install Firefox? If you look in the www directory, you’ll see a listing for linux-firefox. Issue the command:
sudo mport install linux-firefox
You should now see an entry for Firefox in the Xfce desktop menu. Go through all of the categories and install all of the software you need, using the mport command.
A sad caveat
One sad little caveat is that the only version of an office suite to be found for mport (via svnlite) is OpenOffice 3. That’s quite out of date. And although Abiword is found in the ~/mports/editors directory, it seems it’s not available for installation. Even after installing OpenOffice 3, it errors out with an Exec format error. In other words, you won’t be doing much in the way of office productivity with MidnightBSD. But, hey, if you have an old Palm Pilot lying around, you can always install pilot-link. In other words, the available software doesn’t make for an incredibly useful desktop distribution… at least not for the average user. However, if you want to develop on MidnightBSD, you’ll find plenty of available tools, ready to install (check out the ~/mports/devel directory). You could even install Drupal with the command:
sudo mport install drupal7
Of course, after that you’ll need to create a database (MySQL is already installed), install Apache (sudo mport install apache24) and configure the necessary Apache directives.
Clearly, what is installed and what can be installed is a bit of a hodgepodge of applications, systems, and servers. But with enough work, you could wind up with a distribution that could serve a specific purpose.
Enjoy the *BSD Goodness
And that is how you can get MidnightBSD up and running into a somewhat useful desktop distribution. It’s not as quick and easy as many other Linux distributions, but if you want a distribution that’ll make you think, this could be exactly what you’re looking for. Although much of the competition has quite a bit more available software titles ready for installation, MidnightBSD is certainly an interesting challenge that every Linux enthusiast or admin should try.
Learn more about Linux through the free “Introduction to Linux” course from The Linux Foundation and edX.
Ubuntu 18.04 LTS “Bionic Beaver” arrives with a default Gnome desktop and a new minimalist install option for desktop users.
Canonical’s Ubuntu distribution for Linux has earned a reputation for being user-friendly, with editions aimed at desktop, server, cloud, and IoT users. This changelog tracks updates to Ubuntu across its release cycle, including its LTS (long term support) releases.
Canonical produces new Ubuntu releases every six months and supports them with free security updates and bug fixes for at least nine months. New LTS releases arrive every two years and are supported for five years.
Machine learning today resembles the dawn of aviation. In 1903, dramatic flights by the Wright brothers ushered in the Pioneer Age of aviation, and within a decade, there was widespread belief that powered flight would revolutionize transportation and society more generally. Machine learning (ML) today is also rapidly advancing. We have recently witnessed remarkable breakthroughs on important problems including image recognition, speech translation, and natural language processing, and major technology companies are investing billions of dollars to transform themselves into ML-centric organizations. There is a growing conviction that ML holds the key to some of society’s most pressing problems….
Simply put, we needed to invent aeronautical engineering before we could transform the aviation industry. Similarly, we need to invent a new kind of engineering to build ML applications. Data-driven software development is radically different from conventional software development, as it targets complex applications domains (e.g., vision, speech, language) and focuses on learned behaviors instead of rule-based operations (e.g., training deep neural networks on massive data sets versus hand-coded if-then-else statements). Currently, very few organizations have the expertise to do this kind of engineering, and we are just scratching the surface of the potential for ML-powered technology. We describe three key challenges of this new development paradigm below.
Think about this situation, you have a Ubuntu server and with your home videos or movies, books and other important files that are worth having a backup. You don’t have enough space on your laptop and also on your server the available space is almost gone. You go to a shop and buy a new HDD to make more space on your server but, when you connect it and you run lsbk you see two different discs on your system and you can’t have for examples home videos1 and home videos2 because you want to get them organized properly.
Today I will show you how to create an LVM partition and let you know some advantages and disadvantages of LVM over normal partitions.
LVM – Logical Volume Management
Logical volume management provides a higher-level view of the disk storage on a computer system than the traditional view of disks and partitions. This gives the system administrator much more flexibility in allocating storage to applications and users.
In other words, we can say that LVM allows multiple disks to show as one and help to maintain your information.
Open source-based testing acceleration is a new use case in Gartner’s Critical Capabilities for Software Test Automation, which is Gartner’s recognition that QA teams are increasingly using open source tools and frameworks. It has become evident that no industry is immune to market disruption, including the software development and testing space. In the past two decades, the software testing industry has been flooded with open source frameworks, including a few at the top such as Selenium and Appium that has popularized its adoption. In addition, organizations incorporating agile development and continuous delivery to enhance their DevOps practices are driving the acceleration of open source tools within large organizations.
There are clear differences between open source and commercial tools. Not every company, industry, and QA team is the same and how each defines, executes, and maintains tests vary. Aside from a tool’s functionality meeting your software needs, the question comes down to a few key business differentiators:
Free Sells: Demands for frequent release cycles, managing infinite combinations of devices, and creating standardization has put pressure on delivery times.
After following the first four blogs in this series previewing the Cloud Foundry for Developers training course, you should have a Cloud Foundry instance to use, have the cf CLI installed, and know how to connect to your instance and run commands. Now it’s time to push an app to your Cloud Foundry instance. You can catch up on the previous articles here:
Writing an app is beyond the scope of this series, but you can refer to the Developer Guide for detailed help. Apps must have unique names, so don’t name it my-app, demo-app, test-app, sample-app, or any other commonly used name for testing.
Pushing Apps
Use the cf push command to deploy your app to your Cloud Foundry instance. If your app requires other services, such as a database, log management, or messaging, the services must be already provisioned, and may need to be bound to your app. See the Deploy an Application to learn more.
A lot of things happen when you push your app:
Cloud Foundry uploads and stores your app files
Reads and stores app metadata
Creates a droplet, the CF unit of execution
Assigns the droplet to a Diego cell
Starts the app
Writing your app is the hard part. Pushing it is easy. Change to the directory it is in and run cf push. You will see a lot of output as it is deployed. When it is finished, you can run cf apps to list all the apps in your space.
$ cf apps
name               state   instances memory disk urls
mine-fine-ruby-app started 1/1       64M    512M mine-fine-ruby-app.cfapps.io
Run cf app [appname] to see some details of your running app.
$ cf app mine-fine-ruby-app
requested state: started
instances: 1/1
usage: 64M x 1 instances
urls: mine-fine-ruby-app.cfapps.io
last uploaded: Mon Apr 9 8:49:11 UTC 2018
stack: cflinuxfs2
buildpack: ruby_buildpack

     state     since        cpu    memory         disk
#0   running   2018-04-09   0.0%   25.7M of 64M   102.4M of 512M
What is your app doing? Tail its logfile, or dump the log instead of tailing. Ctrl+c stops tailing.