Virtualized GPU access is becoming common in the containerized and virtualized application space. Let’s have a look at why and how.
By Robert Foss, Senior Software Engineer at Collabora.
For the past few years a clear trend of containerization of applications and services has emerged. Having processes containerized is beneficial in a number of ways. It both improves portability and strengthens security, and if done properly the performance penalty can be low.
In order to further improve security containers are commonly run in virtualized environments. This provides some new challenges in terms of supporting the accelerated graphics usecase.
OpenGL ES implementation
Currently Collabora and Google are implementing OpenGL ES 2.0 support. OpenGL ES 2.0 is the lowest common denominator for many mobile platforms and as such is a requirement for Virgil3D to be viable on the those platforms.
That is is the motivation for making Virgil3D work on OpenGL ES hosts.
How does this work?
This stack is commonly referred to as Virgil3D, since all of the parts originated from a project with that name.
There are a few parts to this implementation.
QEMU, virglrenderer and virtio-gpu. They way it works is by letting the guest applications speak unmodified OpenGL to the Mesa. But instead of Mesa handing commands over to the hardware it is channeled through virtio-gpu on the guest to QEMU on the host.
QEMU then receives the raw graphics stack state (Gallium state) and interprets it using virglrenderer from the raw state into an OpenGL form, which can be executed as entirely normal OpenGL on the host machine.
The host OpenGL stack does not even have to be Mesa, and could for example be the proprietary nvidia stack.
There is no such thing as Kubernetes LTS (and that’s fantastic).
TL;DR – Unabated 1.xx major “minor” releases of “vanilla” upstream Kubernetes every three months could continue forever. You have to keep up, while also paying close attention to Kubernetes API object versioning. This relentless pace is the key ingredient in Kubernetes’ domination of the distributed infrastructure world.
What is the Kubernetes Release Cycle?
One of the questions we encounter when talking to those looking to leverage Kubernetes, especially for DIY deployments, is simply “How do you stay up-to-date?”
If you run microservices in containers, they are forced to communicate with each other – and with the outside world. We explain how to network pods and nodes in Kubernetes.
Kubernetes supports different ways of making containers and microservices contact each other, from connections with the hardware in the data center to the configuration of load balancers. To ensure communication, the Kubernetes [1] network model does not use Network Address Translation (NAT). All containers receive an IP address for communication with nodes and with each other, without the use of NAT.
Therefore, you cannot simply set up two Docker hosts with Kubernetes: The network is a distinct layer that you need to configure for Kubernetes. Several solutions currently undergoing rapid development, like Kubernetes itself, are candidates for this job. In addition to bandwidth and latency, integration with existing solutions and security also play a central role. Kubernetes pulls out all stops with the protocols and solutions implemented in Linux.
The recently revealed Meltdown and Spectre bugs are not just extraordinary issues of security, but also performance. The patches that workaround Meltdown introduce the largest kernel performance regressions I’ve ever seen. Many thanks to the engineers working hard to develop workarounds to these processor bugs.
In this post I’ll look at the Linux kernel page table isolation (KPTI) patches that workaround Meltdown: what overheads to expect, and ways to tune them. Much of my testing was on Linux 4.14.11 and 4.14.12 a month ago, before we deployed in production. Some older kernels have the KAISER patches for Meltdown, and so far the performance overheads look similar. These results aren’t final, since more changes are still being developed, such as for Spectre.
Note that there are potentially four layers of overhead for Meltdown/Spectre, this is just one. They are:
This powerful operating system’s efficient performance, intuitive interface, and exceptional collection of apps make it a top choice for all users.
MX-17 changes the base to Debian 9 (Stretch) and provides upgraded artwork, fresh MX tools, and better live operation courtesy of antiX. Users get persistence (a whopping 20GB) and remaster along with a full suite of updated MX-apps including mx-tweak, mx-conky, and NVidia.
Here’s why MX-17 is a worthy distro, and what you stand to gain from this midweight Linux operating system and its antiX components.
Arch Anywhere was a distribution aimed at bringing Arch Linux to the masses. Due to a trademark infringement, Arch Anywhere has been completely rebranded to Anarchy Linux. And I’m here to say, if you’re looking for a distribution that will enable you to enjoy Arch Linux, a little Anarchy will go a very long way. This distribution is seriously impressive in what it sets out to do and what it achieves. In fact, anyone who previously feared Arch Linux can set those fears aside… because Anarchy Linux makes Arch Linux easy.
Let’s face it; Arch Linux isn’t for the faint of heart. The installation alone will turn off many a new user (and even some seasoned users). That’s where distributions like Anarchy make for an easy bridge to Arch. With a live ISO that can be tested and then installed, Arch becomes as user-friendly as any other distribution.
Anarchy Linux goes a little bit further than that, however. Let’s fire it up and see what it does.
The installation
The installation of Anarchy Linux isn’t terribly challenging, but it’s also not quite as simple as for, say, Ubuntu, Linux Mint, or Elementary OS. Although you can run the installer from within the default graphical desktop environment (Xfce4), it’s still much in the same vein as Arch Linux. In other words, you’re going to have to do a bit of work—all within a text-based installer.
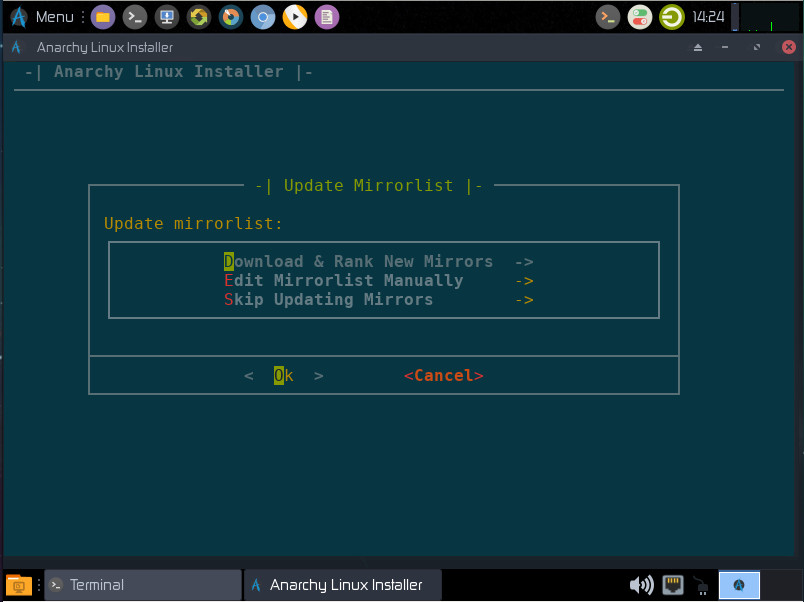
To start, the very first step of the installer (Figure 1) requires you to update the mirror list, which will likely trip up new users.
Figure 1: Updating the mirror list is a necessity for the Anarchy Linux installation.
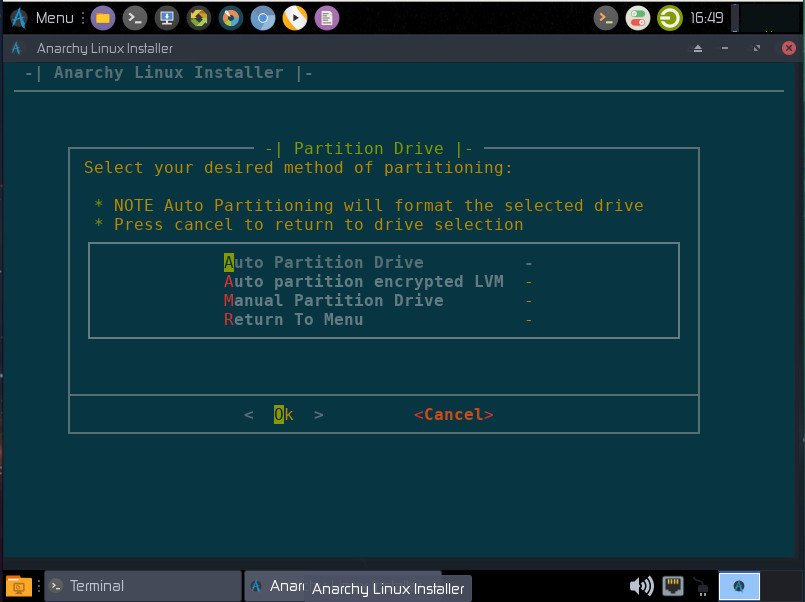
From the options, select Download & Rank New Mirrors. Tab down to OK and hit Enter on your keyboard. You can then select the nearest mirror (to your location) and be done with it. The next few installation screens are simple (keyboard layout, language, timezone, etc.). The next screen should surprise many an Arch fan. Anarchy Linux includes an auto partition tool. Select Auto Partition Drive (Figure 2), tab down to Ok, and hit Enter on your keyboard.
Figure 2: Anarchy makes partitioning easy.
You will then have to select the drive to be used (if you only have one drive this is only a matter of hitting Enter). Once you’ve selected the drive, choose the filesystem type to be used (ext2/3/4, btrfs, jfs, reiserfs, xfs), tab down to OK, and hit Enter. Next you must choose whether you want to create SWAP space. If you select Yes, you’ll then have to define how much SWAP to use. The next window will stop many new users in their tracks. It asks if you want to use GPT (GUID Partition Table). This is different than the traditional MBR (Master Boot Record) partitioning. GPT is a newer standard and works better with UEFI. If you’ll be working with UEFI, go with GPT, otherwise, stick with the old standby, MBR. Finally select to write the changes to the disk, and your installation can continue.
The next screen that could give new users pause, requires the selection of the desired installation. There are five options:
Anarchy-Desktop
Anarchy-Desktop-LTS
Anarchy-Server
Anarchy-Server-LTS
Anarchy-Advanced
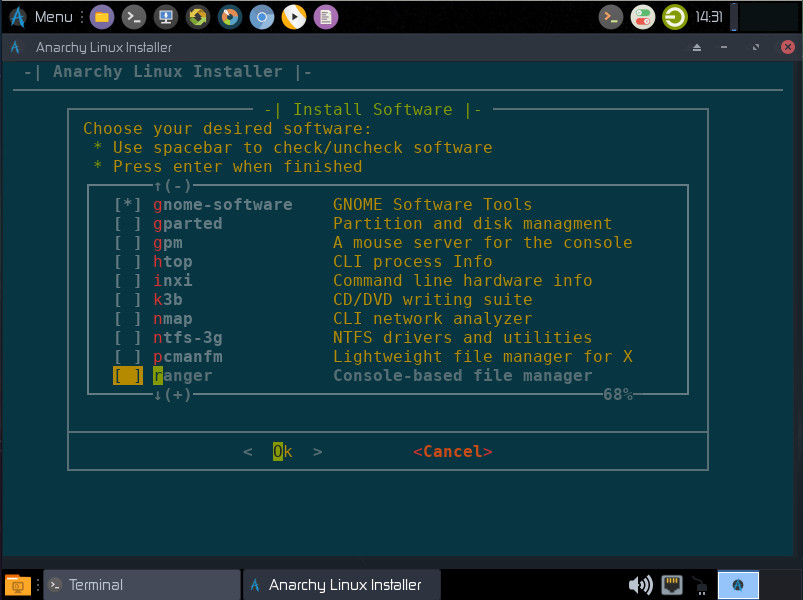
If you want long term support, select Anarchy-Desktop-LTS, otherwise click Anarchy-Desktop (the default), and tab down to Ok. Click Enter on your keyboard. After you select the type of installation, you will get to select your desktop. You can select from five options: Budgie, Cinnamon, GNOME, Openbox, and Xfce4. Once you’ve selected your desktop, give the machine a hostname, set the root password, create a user, and enable sudo for the new user (if applicable). The next section that will raise the eyebrows of new users is the software selection window (Figure 3). You must go through the various sections and select which software packages to install. Don’t worry, if you miss something, you can always installed it later.
Figure 3: Selecting the software you want on your system.
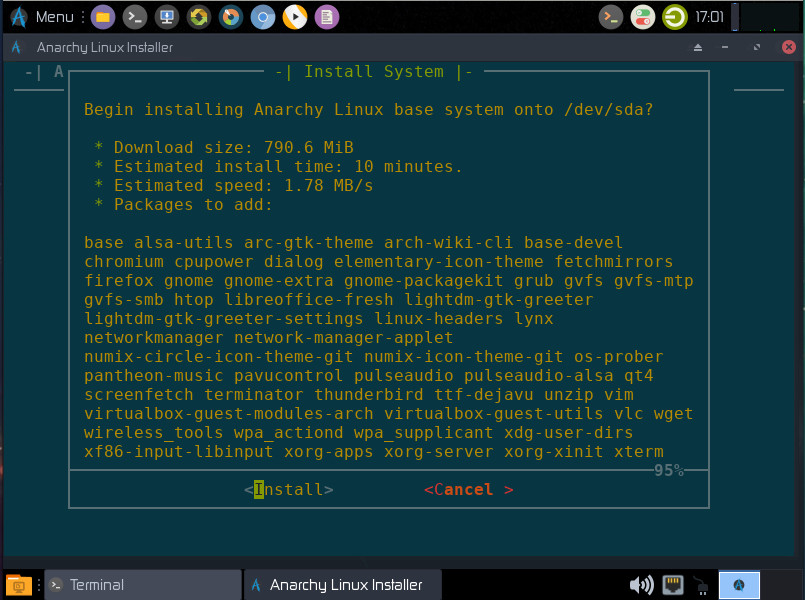
Once you’ve made your software selections, tab to Install (Figure 4), and hit Enter on your keyboard.
Figure 4: Everything is ready to install.
Once the installation completes, reboot and enjoy Anarchy.
Post install
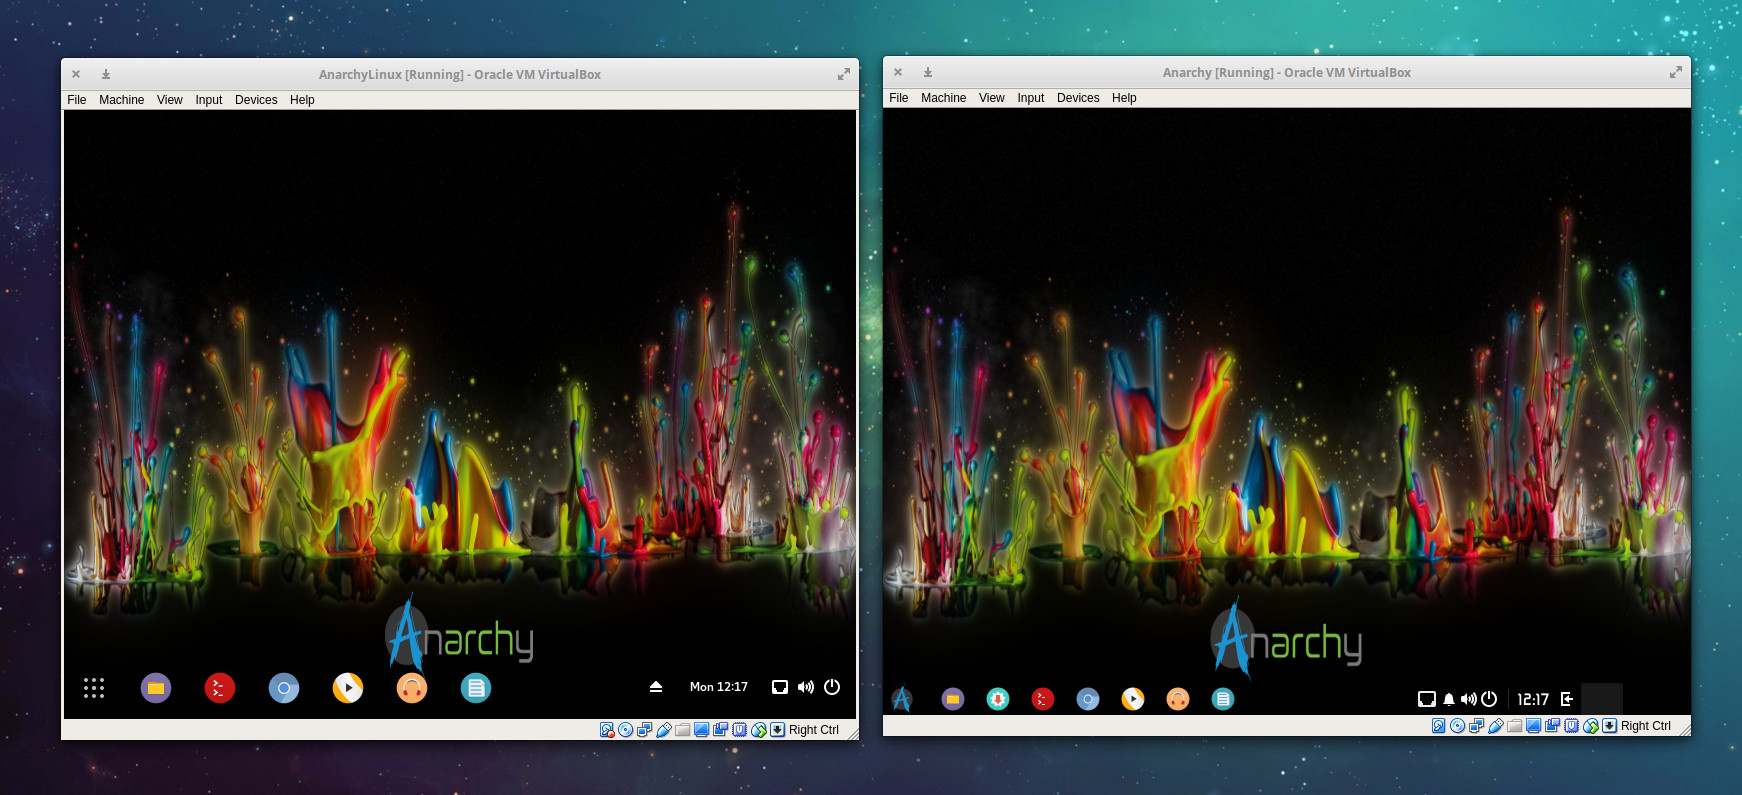
I installed two versions of Anarchy—one with Budgie and one with GNOME. Both performed quite well, however you might be surprised to see that the version of GNOME installed is decked out with a dock. In fact, comparing the desktops side-by-side and they do a good job of resembling one another (Figure 5).
Figure 5: GNOME is on the right, Budgie is on the left.
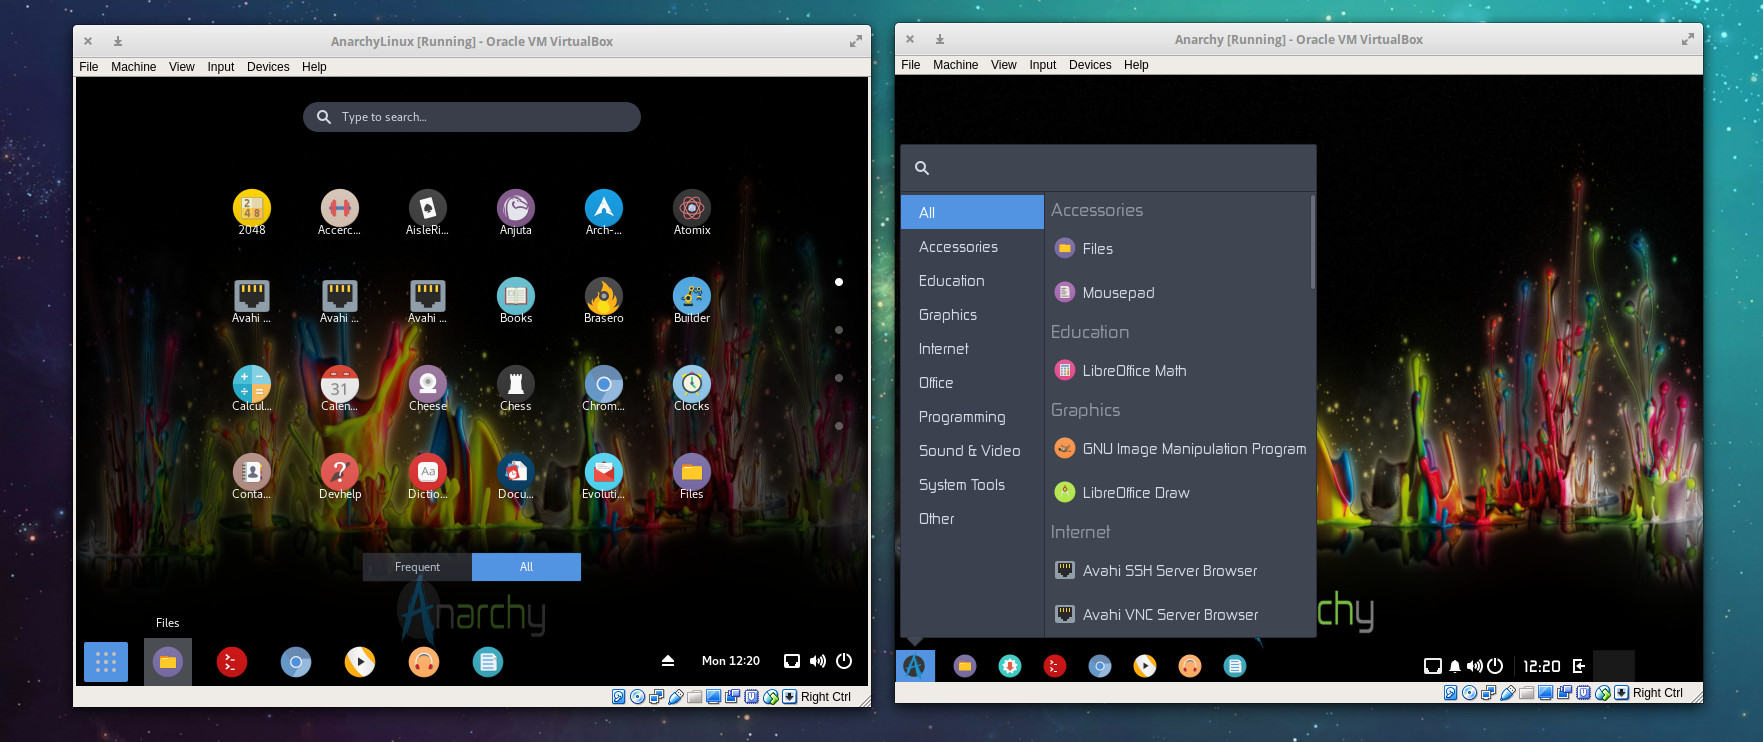
My guess is that you’ll find all desktop options for Anarchy configured in such a way to offer a similar look and feel. Of course, the second you click on the bottom left “buttons”, you’ll see those similarities immediately disappear (Figure 6).
Figure 6: The GNOME Dash and the Budgie menu are nothing alike.
Regardless of which desktop you select, you’ll find everything you need to install new applications. Open up your desktop menu of choice and select Packages to search for and install whatever is necessary for you to get your work done.
Why use Arch Linux without the “Arch”?
This is a valid question. The answer is simple, but revealing. Some users may opt for a distribution like Arch Linux because they want the feeling of “elitism” that comes with using, say, Gentoo, without having to go through that much hassle. With regards to complexity, Arch rests below Gentoo, which means it’s accessible to more users. However, along with that complexity in the platform, comes a certain level of dependability that may not be found in others. So if you’re looking for a Linux distribution with high stability, that’s not quite as challenging as Gentoo or Arch to install, Anarchy might be exactly what you want. In the end, you’ll wind up with an outstanding desktop platform that’s easy to work with (and maintain), based on a very highly regarded distribution of Linux.
That’s why you might opt for Arch Linux without the Arch.
Anarchy Linux is one of the finest “user-friendly” takes on Arch Linux I’ve ever had the privilege of using. Without a doubt, if you’re looking for a friendlier version of a rather challenging desktop operating system, you cannot go wrong with Anarchy.
Learn more about Linux through the free “Introduction to Linux” course from The Linux Foundation and edX.
This week in Linux and open source news, The Linux Foundaiton & edX partnership have helped one million students learn open source for free and on their own schedules. Read the rest of this week’s top open source headlines below!
1) “The Linux Foundation has been able to reach so many students because of its partnership with edX (the non-profit online learning platform from Harvard University and Massachusetts Institute of Technology.)”
2) Linux Foundation NFV project announces verified program to help operators establish entry criteria for their proof of concepts (POCs) and request for proposals (RFPs).
We focus so often on technical anti-patterns, neglecting similar problems inside our social structures. Spoiler alert: the solutions to many difficulties that seem technical can be found by examining our interactions with others. Let’s talk about five things you’ll want to know when working with those pesky creatures known as humans.
1. Tech is Not a Panacea
According to noted thought leader Jane Austen, it is a truth universally acknowledged that a techie in possession of any production code whatsoever must be in want of a container platform.
Or is it? Let’s deconstruct the unspoken assumptions. Don’t get me wrong—containers are delightful! But let’s be real: we’re unlikely to solve the vast majority of problems in a given organization via the judicious application of kernel features. If you have contention between your ops team and your dev team(s)—and maybe they’re all facing off with some ill-considered DevOps silo inexplicably stuck between them—then cgroups and namespaces won’t have a prayer of solving that.
Last year, GitHub brought 24 million people from almost 200 countries together to code better and build bigger. From frameworks to data visualizations across more than 25 million repositories, you were busy in 2017—and the activity is picking up even more this year. With 2018 well underway, we’re using contributor, visitor, and star activity to identify some trends in open source projects for the year ahead.
Some of the projects that experienced the largest growth in activity were focused on cross-platform or web development.
Without a doubt, if you only want to manage a few VMs, you are significantly better off with a typical virtualization manager than with a tool designed to support the operation of a public cloud platform. Although classic VM managers are wallflowers compared with the popular cloud solutions, they still exist and are very successful. Red Hat Enterprise Virtualization (RHEV) enjoys a popularity similar to SUSE Linux Enterprise Server (SLES) 12, to which you can add extensions for high availability (HA) and which supports alternative storage solutions.
Another solution has been around for years: Proxmox Virtual Environment (VE) by Vienna-based Proxmox Server Solutions GmbH. Recently, Proxmox VE reached version 5.0. In this article, I look at what Proxmox can do, what applications it serves, and what you might pay for support.
KVM and LXC
Proxmox VE sees itself as a genuine virtualization manager and not as a cloud in disguise. At the heart of the product, Proxmox combines two virtualization technologies from which you can choose: KVM, which is now the virtualization standard for Linux, and LXC, for the operation of lightweight containers. Proxmox also gives you the choice of paravirtualizing the whole computer or relying on containers in which to run individual applications (Figure 1).