Docker can build an image by reading the build instructions from a file that’s generally referred to as Dockerfile. So, first, check your connectivity with the “dockerhost” and then create a folder called nginx. In that folder, we have created a file called dockerfile and in the dockerfile, we have used different instructions, like FROM, RUN, EXPOSE, and CMD.
To build an image, we’ll need to use the docker build command. With the -t option, we can specify the image name, and with a “.” at the end, we are requesting Docker to look at the current folder to find the dockerfile, and then build the image.
On the Docker Hub, we also see the repositories — for example, for nginx, redis, andbusybox. For a given repository, you can have different tags, which will define the individual image. On the repository page, we can also see a respective Dockerfile, from which an image is created — for example, you can see the Dockerfile of the nginx image.
If you don’t have an account on Docker Hub, I recommend creating one at this time. After logging in, you can see all the repositories we’ve created. Note that the repository name is prefixed with our username.
To push an image to Docker Hub, make sure that the image name is prefixed with the username used to log into the Docker Hub account. With the docker image push command, we can push the image to the Docker Registry, which would, by default, go to the Docker Hub.
DockerHub has a functionality called Docker automated builds, that can trigger a build on DockerHub as soon as you commit a code on your GitHub repository. On GitHub, we have a repository called docker-automated-build, in which we have a Dockerfile, using which the image will be created. In the real-world example, we would have our application code with Dockerfile.
To create the automated build, we need to first log into our DockerHub account, and then, link our GitHub account with DockerHub. Once the GitHub account is linked, we click on “Create” and then on “Create Automated Build.”
Next, we provide a short description and then click on “Create.” Then, we select the GitHub repository that we want to link with this DockerHub automated build procedure. Now, we can go to our GitHub repository and change something there. As soon as we commit the change, a Docker build process would start on our DockerHub account.
Our image build is currently in queue, which will be scheduled eventually, and our image would be created. After that, anybody would be able to download the image.
This online course is presented almost entirely on video, and the material is prepared and presented by Neependra Khare (@neependra), Founder and Principal Consultant at CloudYuga, Docker Captain, and author of the Docker Cookbook.
We often talk about being on call as being a bad thing. For example, the night before I wrote this my phone woke me up in the middle of the night because something went wrong on a computer. That’s no fun! I was grumpy.
In this post, though, we’re going to talk about what you can learn from being on call and how it can make you a better software engineer!. And to learn from being on call you don’t necessarily need to get woken up in the middle of the night. By “being on call”, here, I mean “being responsible for your code when it breaks”. It could mean waking up to issues that happened overnight and needing to fix them during your workday!
The Internet Archive is a nonprofit digital library based in San Francisco. It provides free public access to collections of digitized materials, including websites, books, documents, papers, newspapers, music, video and software.
This article describes how we made the full-text organic search faster — without scaling horizontally — allowing our users to search in just a few seconds across our collection of 35 million documents containing books, magazine, newspapers, scientific papers, patents and much more.
In the last few years, we’ve been seeing some significant changes in the suggestions that security experts are making for password security. While previous guidance increasingly pushed complexity in terms of password length, the mix of characters used, controls over password reuse, and forced periodic changes, specialists have been questioning whether making passwords complex wasn’t actually working against security concerns rather than promoting them.
Security specialists have also argued that forcing complexity down users’ throats has led to them writing passwords down or forgetting them and having to get them reset. They argued that replacing a password character with a digit or an uppercase character might make a password look complicated, but does not actually make it any less vulnerable to compromise. In fact, when users are forced to include a variety of characters in their passwords, they generally do so in very predictable ways. Instead of “password”, they might use “Passw0rd” or even “P4ssw0rd!”, but the variations don’t make the passwords significantly less guessable. People are just not very good at generating anything that’s truly random.
Do you have an Intel Skylake and Kaby Lake processor under your computer’s hood? Have you experienced unexplained application and system hiccups, data corruption, or data loss? It could be because your chipset has hyper-threading enabled and the chips are malfunctioning.
Henrique de Moraes Holschuh, a Debian Linux developer, revealed the Intel chip problem on the Debian developer list. Officially, Intel hasn’t acknowledged the problem, but engineers at Dell and Intel have told me that the problem, and its fix, exists.
I had intended to turn this list in to some kind of monster article or split it in to several. I suck at getting around to writing things so rather than let this fester unpublished I’m going to publish it as is.
This experience comes from 2 and a bit years evaluating and using docker for actual work. Some of it is probably rubbish. The largest deployment of nodes I’ve managed is 50 so not uber scale. Some things will be different beyond that scale but I’m pretty sure most of it applies below that.
Type “devops” into any job search site today and the overwhelming majority of results will be for some variation of “DevOps Engineer”. The skills required will centre on tools like Puppet/Chef/Ansible, AWS/Azure, scripting in Python/Perl/Bash/PowerShell etc. Essentially, they’ve taken a deployment automation engineer role, crossed out “deployment automation” and written “DevOps” in its place.
There’s nothing wrong with hiring deployment automation (or, if you must, DevOps) engineers if you don’t have enough people with the right skills to deliver the deployment automation part of your DevOps strategy. The real problem is when hiring DevOps engineers is your DevOps strategy.
Deployment automation is an ancient art compared to DevOps. How ancient? Here’s an abbreviated history (feel free to skip to the tl;dr if you’re not a history buff):
In our previous article, we had a good overview of SDN as a technology, why it’s needed, and how IT industry is adopting it. Now, let’s get a layer deeper, and understand SDN’s architecture and the role of the Openflow protocol in the implementation of the technology.
SDN broadly consists of three layers:
Application layer
Control layer
Infrastructure layer
Let us try and understand these layers in bottom-to-up approach.
Infrastructure layer is composed of various networking equipment which forms underlying network to forward network traffic. It could be a set of network switches and routers in the data centre. This layer would be the physical one over which network virtualization would be laid down through the control layer (where SDN controllers would sit and manage underlying physical network).
This week in open source, blockchain technology, like that of Hyperledger, is being adopted by the insurance market, Cloud Foundry continues its steady incline of adoption, and more!
1) Blockchain tech like Hyperledger “is making inroads into the insurance sector.”
The Linux platform can do quite a lot of things; it can be just about anything need it to be and function in nearly any form. One of the many areas in which Linux excels is that of storage. With the help of a few constituent pieces, you can have a powerful NAS or cloud storage solution up and running.
But, what if you don’t want to take the time to piece these together for yourself? Or, what if you’d rather have a user-friendly, web-based GUI to make this process a bit easier. For that, there are a few distributions available to meet your needs. Once such platform is Rockstor. Rockstor is a Network Attached Storage (NAS) and cloud solution that can serve either your personal or small business needs with ease.
Rockstor got its start in 2014 and has quickly become a solid tool in the storage space. I was able to quickly get Rockstor up and running (after overcoming only one minor hurdle) and had SMB shares and users/groups created with just a few quick clicks. And, with the inclusion of add-ons (called Rockons), you can extend the feature set of your Rockstor to include new apps, servers, and services.
Let me walk you through that process (as well as how I solved one tiny hiccup), so you can decide if Rockstor is the solution for you.
A word on requirements
I managed to easily get Rockstor running as a VirtualBox VM. Whether you’re installing as a VM or on dedicated hardware, the minimal installation requirements are:
64-bit Intel or AMD processor
2GB RAM or more (recommended)
8GB hard disk space for the OS
One or more additional hard drives for data (recommended)
Ethernet interface (with Internet access – for updates)
Media drive or USB port (for installation on dedicated hardware)
Installation
Based on the Anaconda Installer, the installation of Rockstor is incredibly simple. In fact, once you start the installation process, the only thing you have to do is configure a root user password; there is no package selection, no set up of systems or servers. Once the installation completes, reboot, and you’re ready to go.
When the reboot completes, you will discover the biggest (and really only) caveat to Rockstor—the handling of the IP address. After logging into the Rockstor terminal window (the only GUI is the web interface), you will find it does not give you any indication what IP address to use. And, since you weren’t able to configure the networking interface during installation, what do you do?
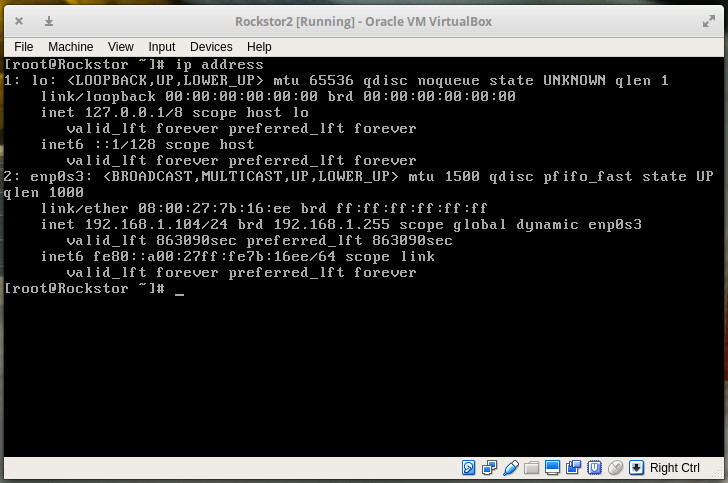
The first thing would be to issue the command ip address. This will report to you the DHCP-assigned IP address of your server (Figure 1).
Figure 1: The IP address to access the Rockstor web interface.
Point your browser to the IP address (using secure HTTPS, so https://SERVER_IP) listed. NOTE: You will have to okay the exception for the self-signed certificate, used by your Rockstor instance, in your browser.
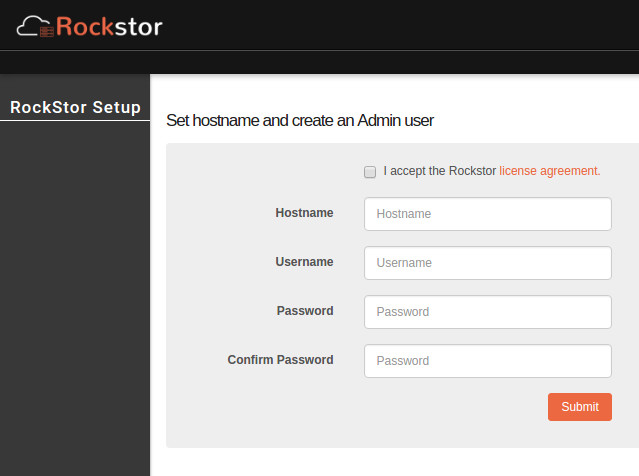
On the first page, you will be required to accept the license as well as create a hostname and admin user for your Rockstor instance (Figure 2). Figure 2: The final installation step.
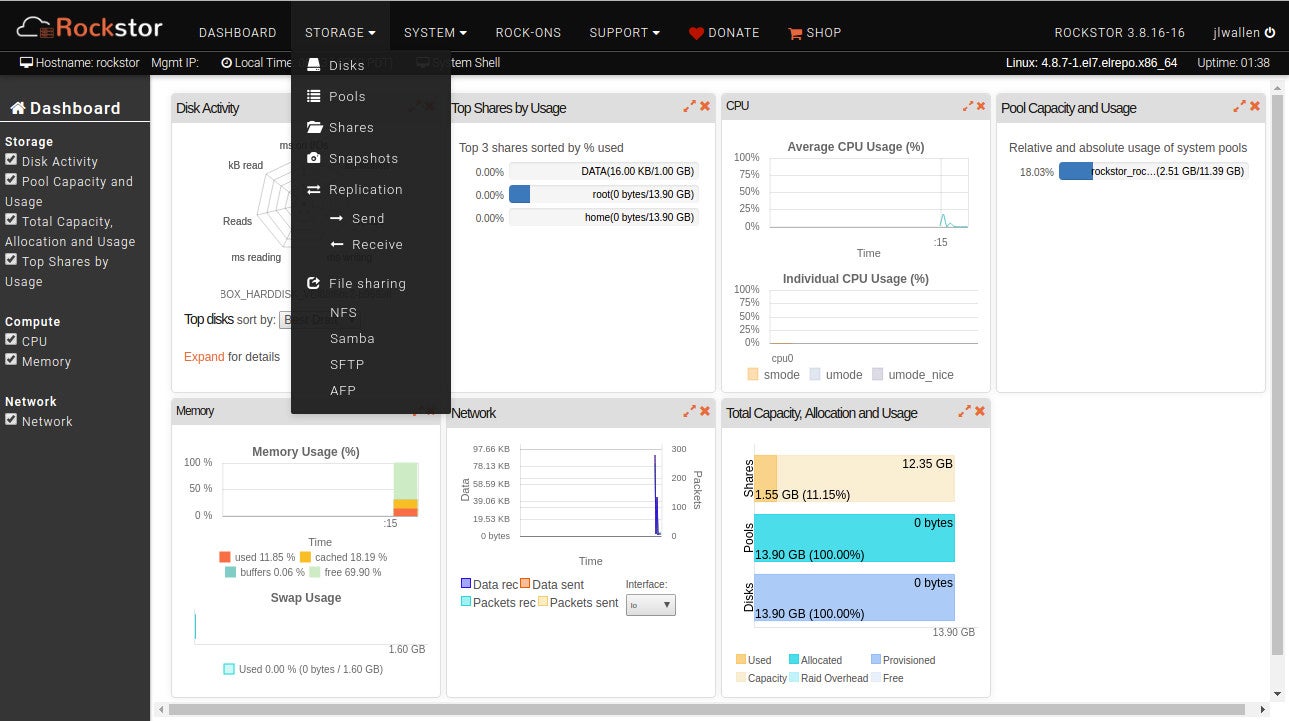
Upon successful creation of the hostname/admin user, you will be greeted by the Rockstor Dashboard (and a popup asking if you want to update to the latest release). Do note that the update popup will take you to a page where you can sign up for either the stable or the testing releases. The Stable updates will cost you $40.00 for a three-year subscription and the Testing updates do not have an associated cost. If you do enable the Testing updates, make sure you read through each offered changelog before okaying the update.
Addressing the IP address caveat
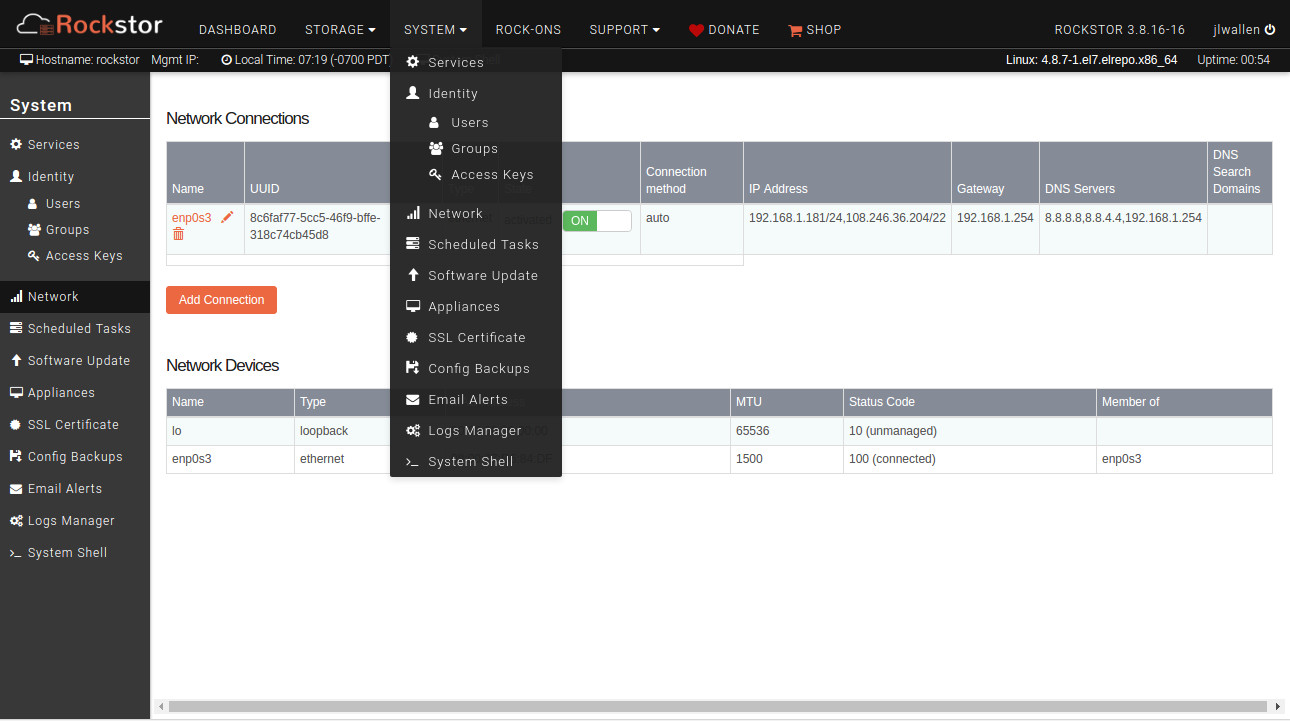
You don’t want to have to work with a DHCP-assigned IP address for your storage server. Once you’ve taken care of the final installation/update bits, you can then configure the network device for a manual (static) address through the Rockstor GUI. One method for setting up a static IP address is through the Rockstor web interface. To do this, log onto Rockstor as your admin user and then click on SYSTEM > Network (Figure 3).
Figure 3: Navigating to the Network configuration from the Rockstor Dashboard.
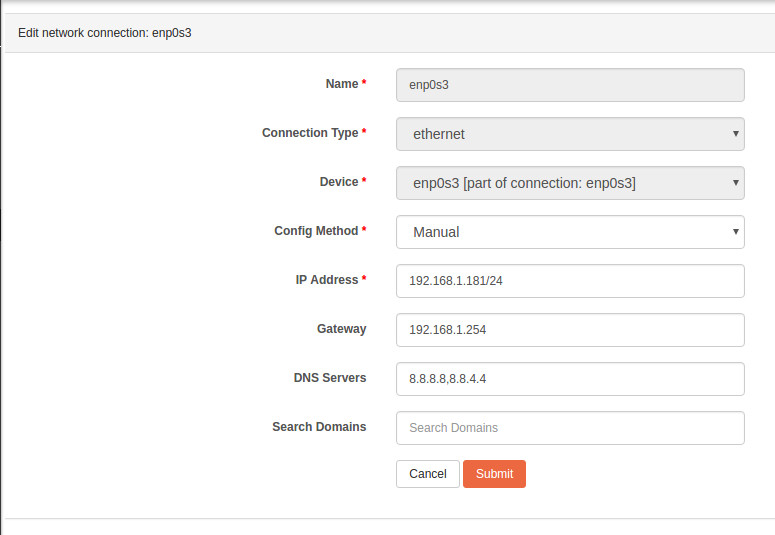
In the resulting window (Figure 4), configure the network interface as a manual connection and fill out the necessary information.
Figure 4: Configuring your networking interface for a static address.
With that taken care of, you’re ready to start setting up your Rockstor storage server.
If the above method fails you (which it did me in one instance), I have found the best solution to be the old-fashioned method…configuring the network manually. For this, you need to log into the Rockstor server as root and then edit the networking file associated with your network adapter. As I was working with VirtualBox, the file was /etc/sysconfig/network-scripts/ifcfg-enp0s3. Open that file for editing and make sure the following options are configured properly:
where all options in bold are specific to your network. There will be other options preconfigured in the file (e.g., NAME and DEVICE), leave them as-is. Once you’ve made these changes, save and close the file, and then issue the command:
systemctl restart network
Now, if you go back to SYSTEM > Network (on your Rockstor Dashboard), you should see the network configuration for your interface is set to Manual, with all of your necessary options.
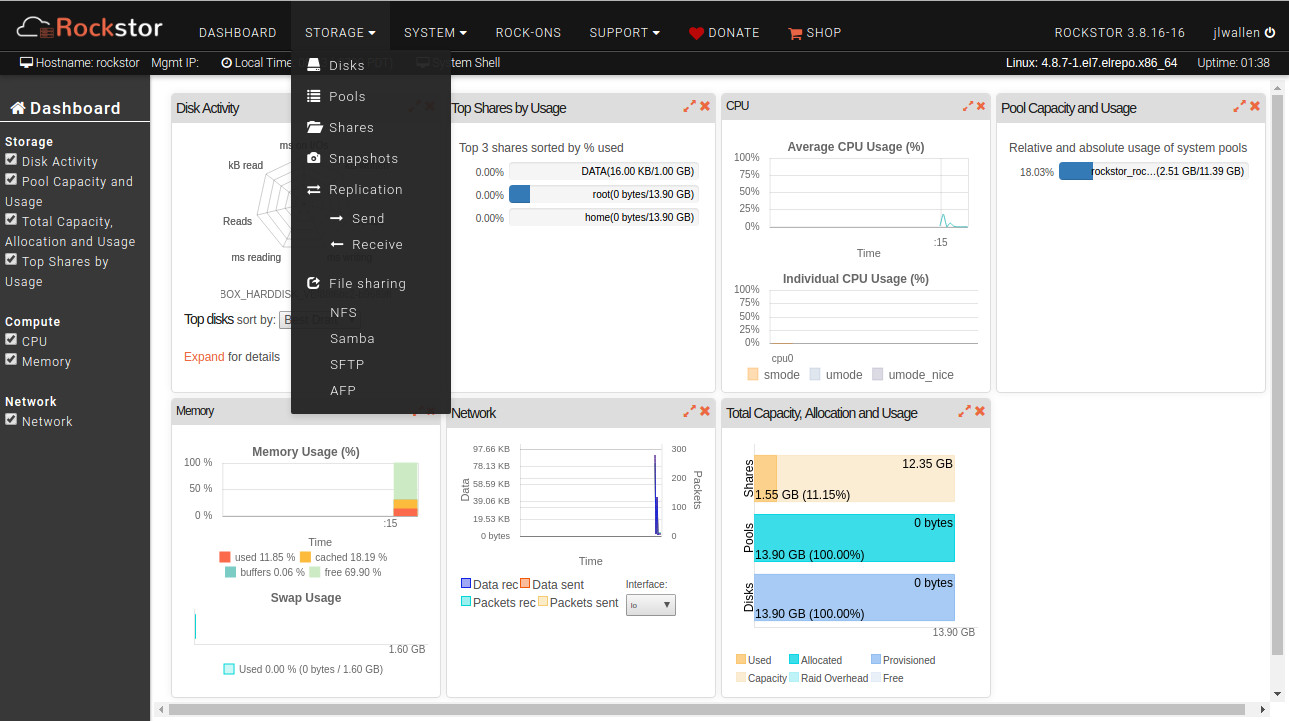
You are now ready to go back to your Rockstor Dashboard, click STORAGE and set up whatever storage type you need (Figure 5). Figure 5: Storage options found in Rockstor.
Quick Samba Share
Before you create your first share, you’ll want to head over to SYSTEM > Groups and SYSTEM > Users and make sure you have the necessary users/groups created, in order to make creating shares easier.
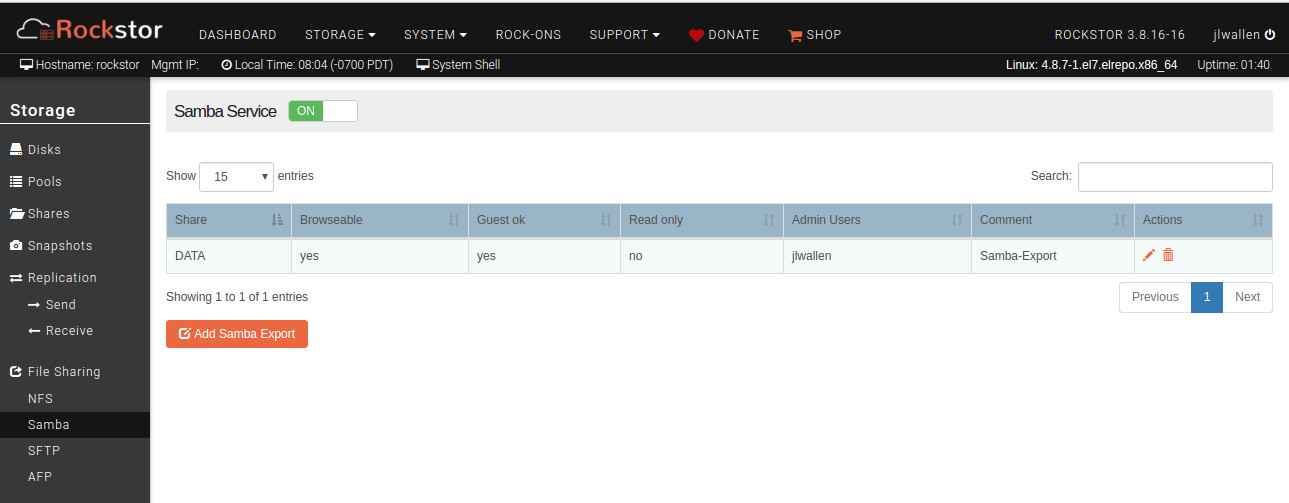
To set up your first Samba Share, click on STORAGE > Samba. In the resulting window (Figure 6), make sure that Samba Service is set to ON.
Figure 6: With the Samba Service ON, you’re ready to go.
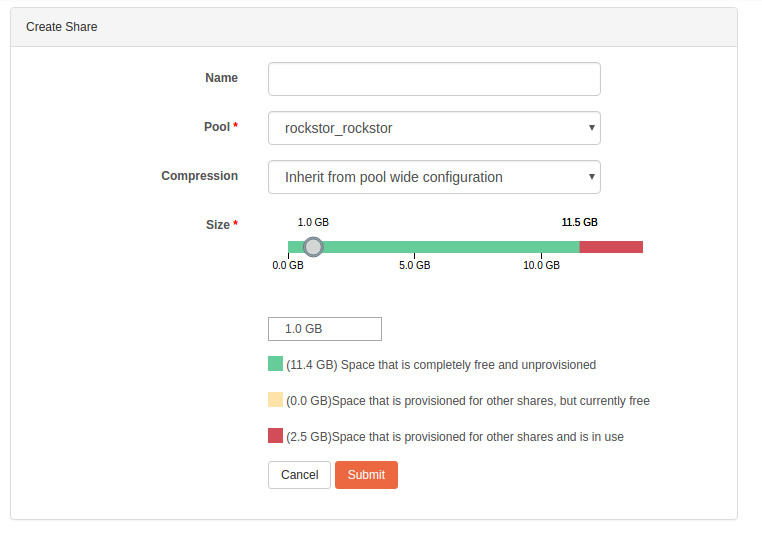
With the Samba Service running, go back to the Dashboard and click STORAGE > Shares. In this new window, click the Create Share button and fill out the necessary information (Figure 7).
Figure 7: Creating a new Samba share.
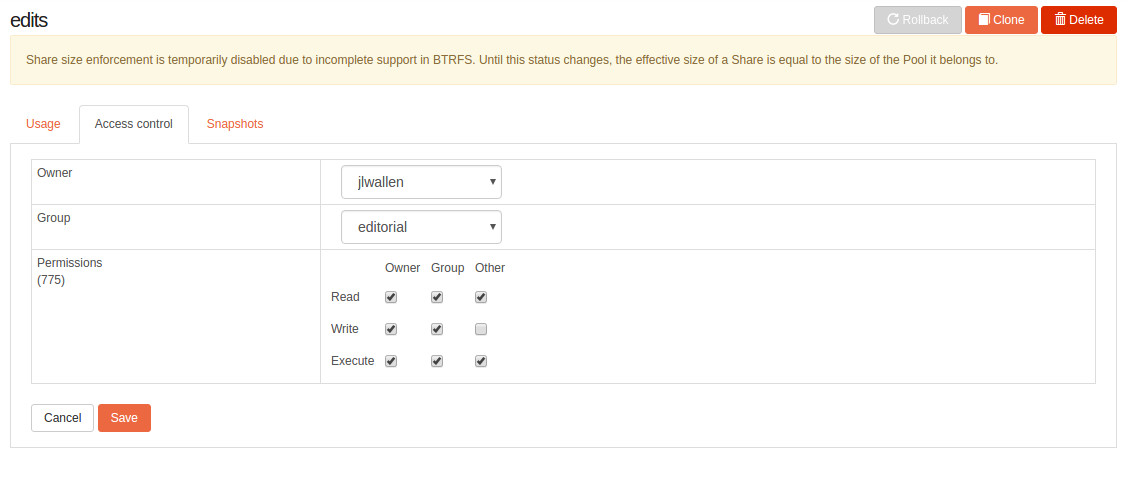
Click Submit and your share has been created. After the share has been saved, click on the new share from the listings and then click on the Access Control tab, where you can change the associated group for the share as well as the share permissions (Figure 8).
Figure 8: Editing the group and permissions for a share.
And that’s it to creating a Samba share with Rockstor.
A solid solution for SOHO and SMB
If you’re looking for a solid storage solution for your home office or small business, you’d certainly be remiss for skipping over the open source Rockstor solution. With one of the best storage GUIs I’ve used, Rockstor makes creating a powerful storage solution an experience nearly anyone can handle.
Learn more about Linux through the free “Introduction to Linux” course from The Linux Foundation and edX.