No one likes to admit it but most of what has passed for IT security in the enterprise has historically been rudimentary at best. Most organizations physically segmented their networks behind a series of firewalls deployed at the edge of the network. The trouble is that once malware gets past the firewall it could move laterally almost anywhere in the data center.
With the rise of network virtualization, a new approach to microsegmenting networks is now possible. The new approach involves using microsegmenting to prevent malware from laterally generating East-West traffic across the data center. Instead of a physical instance of a firewall, there is now a virtual instance of a firewall that is simpler to provision and update.
Over the past two and a half years, I’ve led a project at IBM that deployed a new set of tools to help improve the company’s product development efforts. What is the benefit of providing better tools to employees? A first answer is that it helps increase employee productivity. While this is true and part of the answer, it is much too narrow. The broader answer is that giving employees great tools is an excellent way to concretely affect positive culture change.
In this article I’ll summarize what the team did and what I learned.
Intel has cut funding for an effort it launched two years ago with Rackspace to encourage the use of OpenStack software technology by big business customers that want more flexible and cheaper data center infrastructure.
The two companies announced the joint effort, called the OpenStack Innovation Center, in July 2015. A source close to the effort said initial funding was supposed to last through 2018, but Intel pulled it early.
Intel and Rackspace disclosed the decision internally on Tuesday, the source said.
This week in open source and Linux news, The Linux Foundation/OPNFV’s very own Heather Kirksey is recognized for her leadership as a finalist in Light Reading’s WiC awards, Ubuntu’s uncertainty grows, and more. Read on to say current in developing OSS stories!
1) The Linux Foundation/OPNFV’s Heather Kirksey is a finalist in Light Reading’s Women in Comms Leading Lights awards!
If you’re a DBA, chances are you do most of your database administration via the command line. But when you have a number of databases to work with, running on multiple database servers, a GUI would certainly come in handy. Of course, you could always install phpMyAdmin on each server, but then you’re having to log into a different web interface for each machine. What if you could have a single point of entry for every MySQL database you administer? If that’s something you’re looking for, then you might want to give MySQL Workbench a try.
MySQL Workbench is a unified GUI for database architects, developers, and DBAs, that makes administering multiple databases (from multiple hosts) significantly more efficient. With this tool you can get an at-a-glance for the database server’s status, client connections, and server variables; manage users and privileges; export/import data; run queries; create new schema; inspect objects; create tables; create views; create stored procedures and functions; search table data; and more. MySQL Workbench is a powerhouse tool for developers and administrators. And with MySQL Workbench, you can also migrate Microsoft SQL Server, Microsoft Access, Sybase ASE, PostreSQL, and other RDBMS tables, objects, and data to MySQL with ease.
I want to walk you through the installation of MySQL Workbench as well as the steps necessary on your MySQL servers to enable connection from the new tool. I’ll be demonstrating this on a Ubuntu 16.10 desktop connecting to a Ubuntu 16.04 server. The same results can be had on different Linux distributions, only the steps may require alteration (depending upon your choice of platform).
Installing MySQL Workbench
Before you continue, know that in order to download an installation file for this tool, you do have to register for an Oracle account (both the tool and the account are free). Head over to the official MySQL Workbench download page, select your platform, click Download, and then log into your Oracle account. Once logged in, your download should start. Save the file to~/Downloads.
The installation of MySQL isn’t challenging, but it will fail. Don’t worry, that failure is easy to fix. To start the installation, open up a terminal window and then change into the ~/Downloads directory with the command:
cd ~/Downloads
To run the initial installation, issue the command:
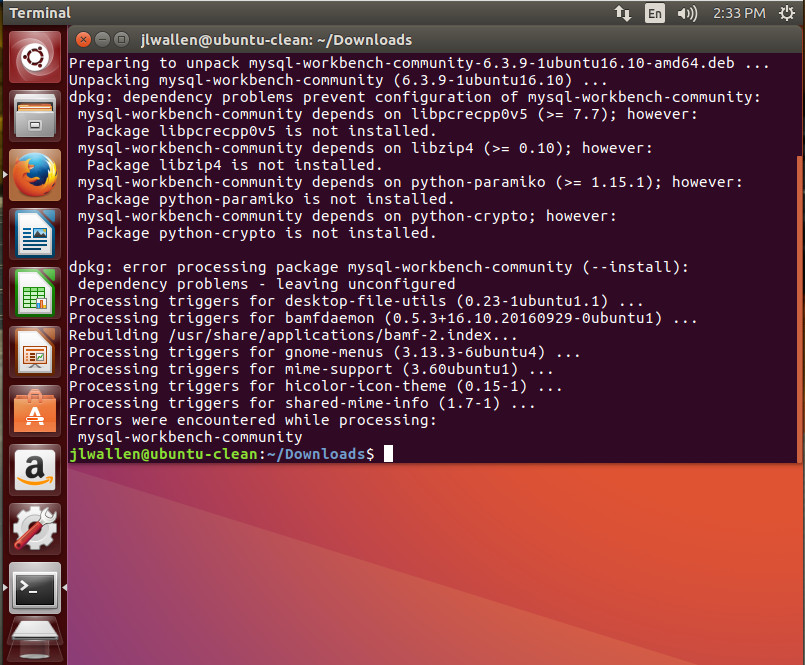
sudo dpkg -i mysql-workbench-community-*.deb
That installation will error out (Figure 1).
Figure 1: The errors reported from the initial installation of MySQL Workbench.
To fix these problems, issue the command:
sudo apt-get install -f
The above command will resolve all of the missing dependencies, which may (or may not exist, depending on your platform) include:
libglibmm-2.4-1v5
libgtk-3-0
libgtkmm-3.0-1v5
libpangomm-1.4-1v5
libpcrecpp0v5
libpng16-16
libsigc++-2.0-0v5
Once apt-get fixes the dependency errors, you are good to run MySQL Workbench from your desktop menu. However, before you use it to connect to your MySQL server, you might have to configure your server for remote connections.
Configuring your MySQL server for remote connections
If you haven’t configured your MySQL servers for remote connection, MySQL Workbench will fail to connect. There are two configurations to be taken care of. The first is to configure your MySQL database to allow connections other than 127.0.0.1. To do this you must log into your MySQL database server and open the /etc/mysql/mysql.conf.d/mysqld.cnffile for editing. With that file open, look for the line:
bind-address 127.0.0.1
Change the above line to:
bind-address 0.0.0.0
Save and close the mysqld.cnf file and restart the MySQL server with the command:
sudo systemctl restart mysql.service
Now that your server is open to remote connections, you need to enable it to allow connections with a specific user from a specific address. This is done from the MySQL command prompt. Issue the command:
mysql -u root -p
NOTE: You can substitute root for whatever user happens to be your MySQL admin account.
When prompted, enter the root password and you’ll find yourself at the MySQL prompt. Here you need to execute a command that will allow your admin user to connect to the server via MySQL Workbench. Let’s say that user is root, the IP address you’ve installed MySQL Workbench on is 192.168.1.139, and you want to allow access to all databases on the server. The command for this would be:
GRANT ALL ON *.* TO 'root'@'192.168.1.139' IDENTIFIED BY ‘PASSWORD' WITH GRANT OPTION;
Where PASSWORDis the actual password for the admin user.
Once you’ve successfully executed the above command, issue the command exit;to leave the MySQL Prompt.
You can now connect MySQL Workbench to that MySQL server.
Connecting MySQL Workbench to your server
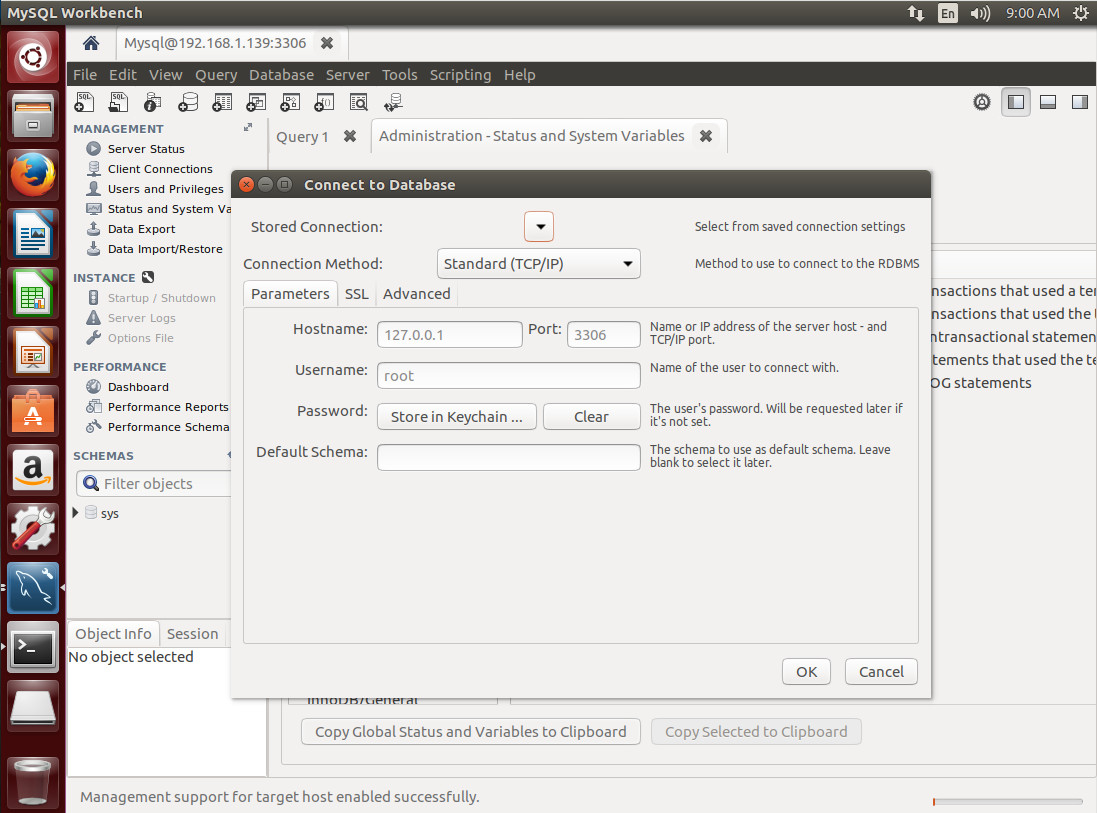
Open up the MySQL Workbench app and then click Database > Connect to database. In the resulting window (Figure 2), fill out the details for your connection.
Figure 2: Connecting to a remote server with MySQL Workbench.
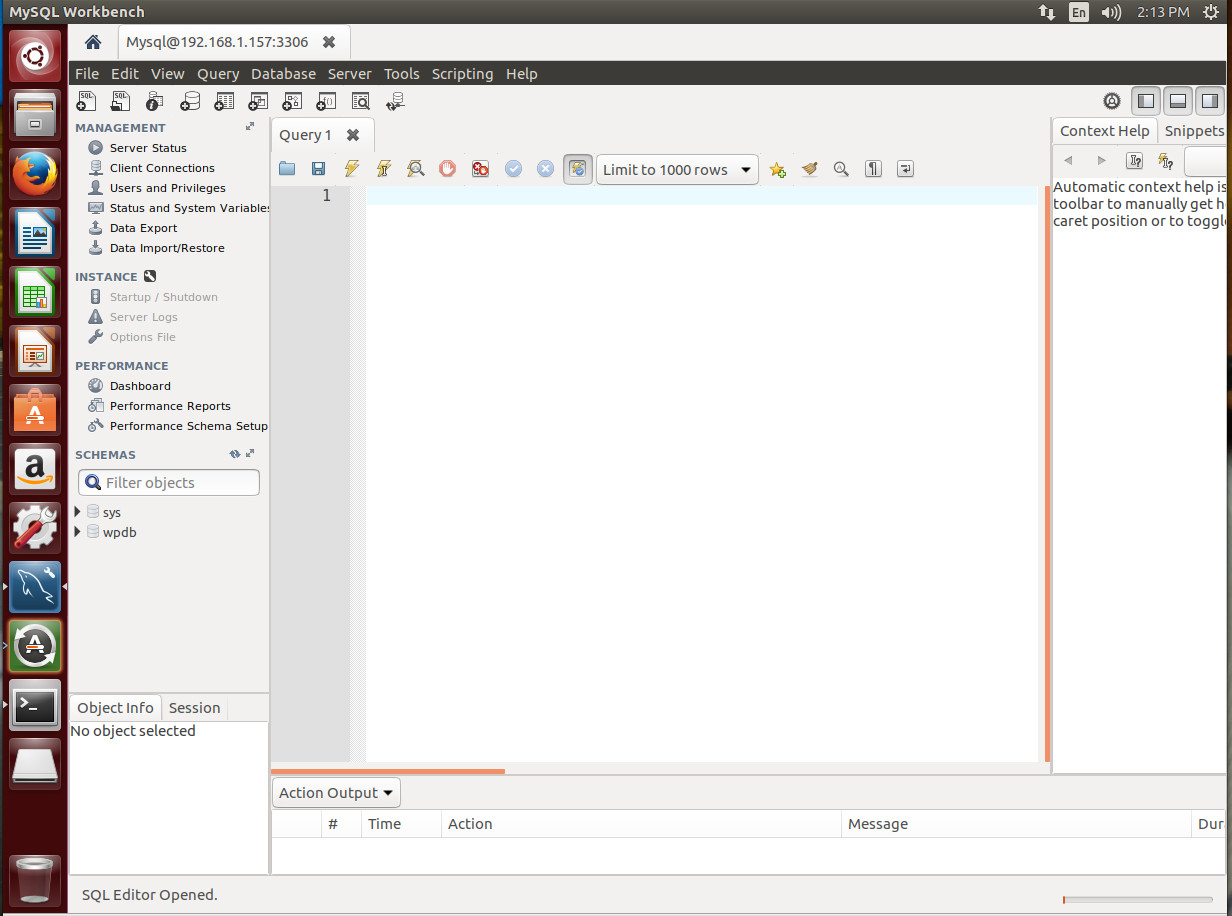
Click OK and you will prompted for the MySQL user password. Once a successful authentication occurs, you will find yourself on the main page for the connection (Figure 3), where you can take care of any number of tasks. Figure 3: The main page for the MySQL Workbench server connection.
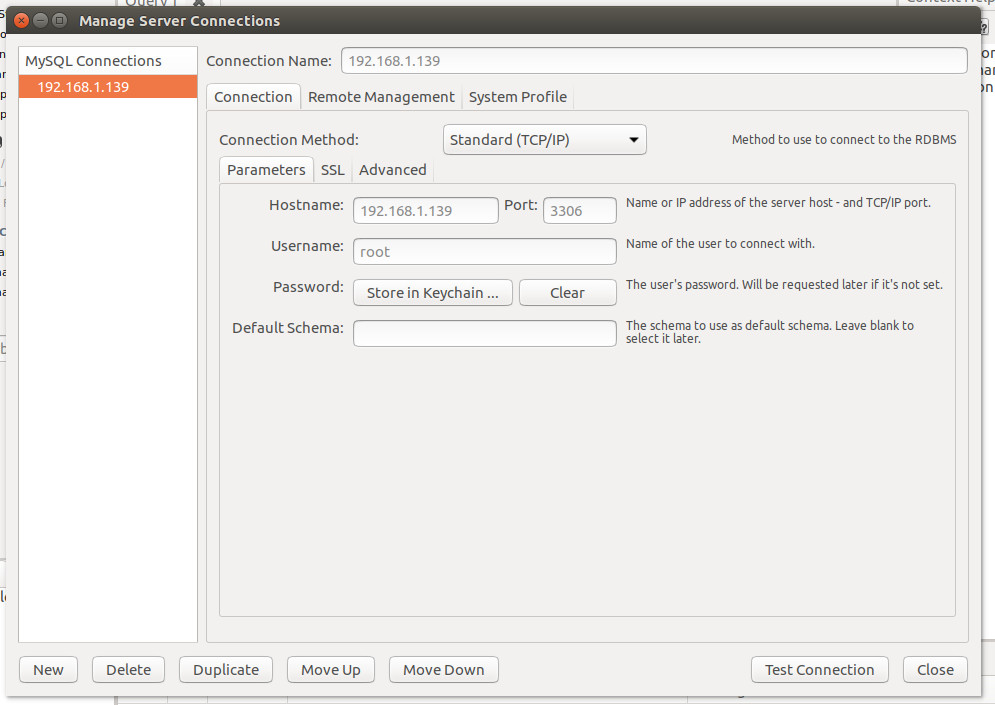
The above method for connection creates a one-time connection. If you know you’ll be connecting to this particular server frequently, you’ll want to instead create the connection through Database > Manage Server Connections. In that resulting window (Figure 4), click New, fill out the necessary details for the connection (making sure to give the connection a name), click Test Connection, enter the remote MySQL admin user password, and click OK. If the connection succeeds, click OK a second time, and click Close.
Figure 4: Creating a new connection that will be saved in the Manage Server Connections window.
Once you close out that window, the connection will be saved. You can then go to that connection by clicking Database > Connect to Database, and select the server you wish to connect to from the Stored Connection drop-down (Figure 5). Figure 5: Connecting to a previously configured server.
At this point, you can start creating, administering, and managing your databases with the help of a very powerful (and user-friendly) GUI.
The MySQL Workbench is just one of a few GUI tools that can help make your MySQL database administration significantly more efficient. Give this tool a try and see if it doesn’t very quickly become your daily driver.
Learn more about Linux through the free “Introduction to Linux” course from The Linux Foundation and edX.
ApacheCon North America is only a few weeks away and will be happening May 16-18, 2017, in Miami. It’s particularly exciting this year because ApacheCon is going to be a little different. For one thing, there is a series of mini-conferences running in and around ApacheCon that you will not want to miss.
We spoke with Mark Thomas, Apache Tomcat committer and Senior Principal Software Engineer at Pivotal, about one of these mini-conferences, TomcatCon, to get a feel for what participants can expect from this event. TomcatCon offers a range of presentations to help users expand their Tomcat knowledge in areas such as networking, security, performance, and deployment, and it provides users and developers with the opportunity to discuss the current Tomcat roadmap and help inform future development. Here’s what Mark said about the conference.
Linux.com: What is TomcatCon? What was the idea behind it?
Mark: The idea was to provide a small conference running alongside ApacheCon that was dedicated to all things Tomcat.
Linux.com: Do you need to have Tomcat experience to attend?
Mark: No, absolutely not. We’re offering talks ranging from the basics for absolute beginners, to topics of interest to experts. We’ve tried to cover the full range of Tomcat users out there. It’s for people who are developing with Tomcat all way to system administrators who are managing hundreds or thousands of Tomcats instances in their organizations.
Linux.com: Speaking of the schedule, what’s on it? Are there any highlights or any interesting things that people should come to?
Mark: We built the talk topics by first asking the Tomcat community what sort of things they wanted to hear about. Some of the topics we were expecting, such as security, which is always a popular topic. We’ve got several sessions on numerous aspects in security.
Networking is another topic that’s very popular. For example, how do you configure Tomcat, when you’ve got more than one? You need load balancing. You’re doing the best proxying, possibly even clustering. Lots of questions around that, lots of interest. So, we’ve got a number of talks in that area too.
We’ve got a little bit on performance and monitoring — something more popular than it’s been in the past — and on the cloud. How do you use Tomcat in the cloud? We’ve got a couple of sessions on that as well.
Linux.com: You’re actually running a few presentations yourself. It looks like quite a busy time at the conference for you. Tell us about what you’re doing there.
Mark:Yes, I am. I’m doing an introductory session in the beginning and the wrap up session at the end. And, I’ve got a couple of technical sessions in the middle. We’ve tried to get a wide spread of Tomcat speakers, including a number of speakers from other Apache products and also from outside Apache. For example, we’ve got somebody from Spring coming to talk to us about using Spring with Tomcat.
Linux.com: What are the specific dates for TomcatCon?
Mark:TomcatCon runs alongside ApacheCon, so it’s three days, exactly the same time. It starts May the 16th and finishes May the 18th.
Linux.com: Are there any additional costs for attending TomcatCon?
Mark:Not at all. If you have a ticket for ApacheCon then that gets you access to TomcatCon and vice versa. So, it’s actually a mini-conference alongside it, but you are free to dip into the two as you wish.
Linux.com: It sounds like it’s quite an interesting new format. I hope that it’s successful. Good luck with TomcatCon, and thanks very much for speaking to me.
Mark: You’re very welcome. Thanks very much, and I will see you there.
Learn first-hand from the largest collection of global Apache communities at ApacheCon 2017 May 16-18 in Miami, Florida. ApacheCon features 120+ sessions including five sub-conferences: Apache: IoT, Apache Traffic Server Control Summit, CloudStack Collaboration Conference, FlexJS Summit and TomcatCon. Secure your spot now! Linux.com readers get $30 off their pass to ApacheCon. Select “attendee” and enter code LINUXRD5. Register now >>
The Fast Data Project (FD.io) is a networking open source project whose scope includes software-based packet processing, fast Input/Output (IO), and universal data plane management across bare metal, hypervisor, and container environments.
A key component of FD.io is the Vector Packet Processing (VPP) software donated by Cisco at the inception of the project. This code is already running in products on the market today.
Teleport, an SSH server that provides support teams with a simpler way to remotely manage server clusters, is an example of Google’s Go language being used to devise safer but still performant replacements for critical infrastructure. Teleport is a replacement for sshd, the stock Linux server for SSH, and it works with existing OpenSSH clients and servers as-is. Instead of using manual key management, a common SSH headache, Teleport uses OpenSSH certificates stored on the cluster to automatically generate session keys.
Creating and running an on-call rotation is the very first step in building truly reliable infrastructure at any scale, but it’s far from the last. As a company grows and scales, the systems that it builds and runs grow in complexity and require more sophisticated on-call practices. While there is no universal approach, there are industry best practices for setting up on-call and incident response at any and every size.
In the sections that follow, we take a close look at how to make on-call work at any scale. We’ll examine how to design, support, and empower on-call and incident response for each size, starting with how tiny garage startups with a handful of engineers can run an on-call rotation and making our way up to best practices for companies the size of Amazon, Facebook, or Google.