pydash is a lightweight web-based monitoring tool for Linux written in Python and Django plus Chart.js. It has been tested and can run on the following mainstream Linux distributions: CentOS, Fedora, Ubuntu, Debian, Arch Linux, Raspbian as well as Pidora.
You can use it to keep an eye on your Linux PC/server resources such as CPUs, RAM, network stats, processes including online users and more. The dashboard is developed entirely using Python libraries provided in the main Python distribution, therefore it has a few dependencies; you don’t need to install many packages or libraries to run it.
In this article, we will show you how to install pydash to monitor Linux server performance.
When I first started working with Linux, some 20 years ago, I sat in wonder at how much I could do. It seemed the roof had been lifted away and the sky was the limit. That held true for nearly every aspect of the platform. In those first years, I was using the likes of FVWM—which, truth be told, wasn’t terribly user-friendly or flexible. But back then, who knew the desktop could be tweaked into a work of art?
And then one day, I connected with a young man named Mark—whom I latched onto, because the guy knew what he was doing. Mark then connected me to AfterStep, which was like a wonderland of magic on the desktop. I had transparent menus and title bars; when I minimized a window, it spun and flipped to the bottom of the screen. I wound up spending countless late-night hours configuring AfterStep… time I felt was very well spent.
One night, during a rather extended search for a rather elusive AfterStep theme, I came across a new window manager: Enlightenment.
I stood (or, rather sat) in awe. This was the first time I’d come across a Linux desktop that might well woo me away from AfterStep. Much later that night, I had a working installation of Enlightenment and the awe continued.
Needless to say, many years later, when I came across Bodhi Linux, I had to give it a try. This was back in 2011 (during its initial release period), so it was just getting off the ground. Even in those early years, Bodhi was something special. It brought the Enlightenment window manager back to relevance and it was glorious.
What is Bodhi Linux?
Bodhi Linux uses a fork of the Enlightenment DDR-17 release, called the Moksha Desktop, (which enables a number of very nice effects that can be enjoyed on low- to high-end hardware) and is based on the current Ubuntu Linux LTS (Long Term Support) release.
Bodhi Linux is a lightweight desktop platform that installs as easily as any operating system and comes with a minimum amount of applications, but it includes its own software center (Bodhi AppCenter) for installing everything you need to be productive.
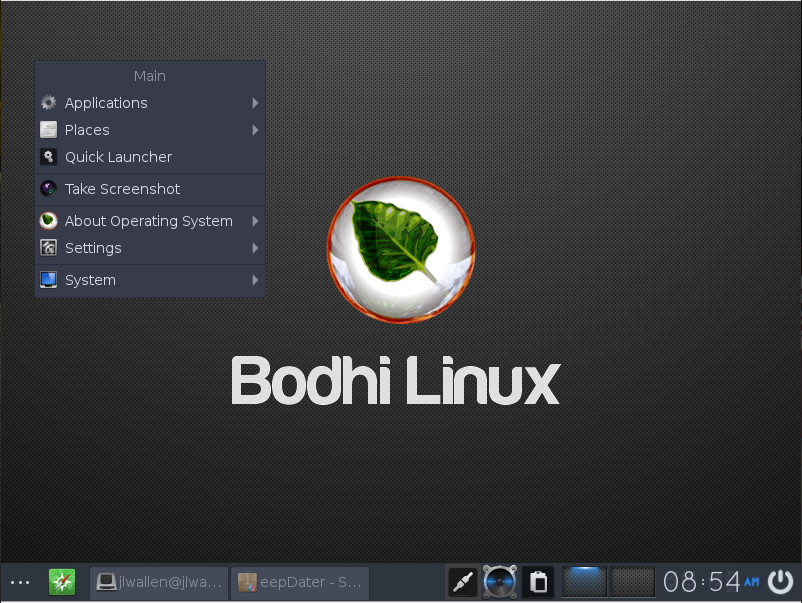
The latest release of Bodhi Linux (4.1.0) was like coming home to an old friend. It had been a while since I’d spun up a release of this particular distribution, but I immediately felt at home. The Moksha Desktop still retains all the things I loved about the Enlightenment desktop:
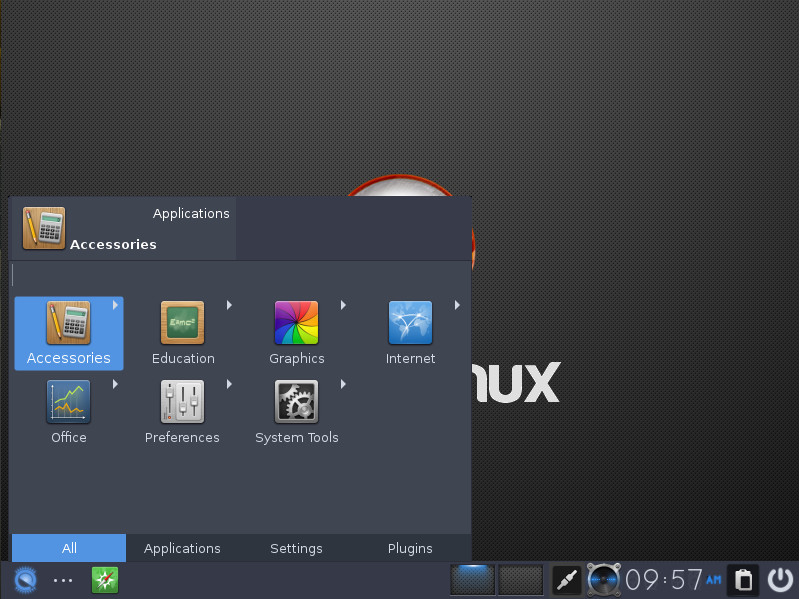
Left-click mouse menu (Figure 1)
Highly configurable
Lightning-fast responsiveness
Perfect balance of minimalism and productiveness
Figure 1: The Bodhi Linux left-click mouse menu.
One thing you should know about using Bodhi—it is not only a tinkerer’s dream come true, it is both a throwback to another era of Linux and a modern take on that same old-school standard. What I mean is this: There is no mistaking the Moksha Desktop has been derived from a look and feel from the past. However, the developers have given it just enough modernity to bring it to the now. If you’re one of those who feels the best days of the Linux desktop are in the rearview mirror, you can relive that past, with modern technology… all thanks to Bodhi Linux.
The Bodhi Linux team have set for themselves a tall order, but they meet and exceed that goal. And even though Bodhi Linux is often lumped in with those distributions that “breathe new life in old hardware,” I think it’s much more than that. Bodhi is like glimpsing Linux’s past, while remaining grounded in the present.
Out of the box
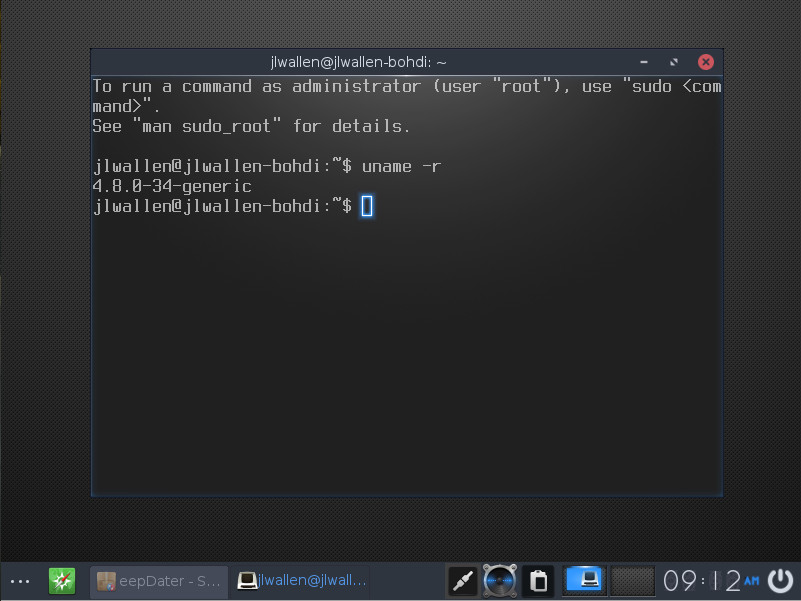
Bodhi ships with the 4.8.0-34 Linux kernel (Figure 2). You can read the changelog for that particular kernel here.
Figure 2: The Bodhi Linux kernel.
Upon installation — the one area that might give the new user pause — is the lack of installed applications. Out of the box, you are faced with a bare minimum of tools. You won’t find anything for productivity and you will see the Midori browser. Every time I see this browser shipped as the default, I cringe a bit. Why? Because of warnings similar to that shown in Figure 3.
Figure 3: Google Drive doesn’t much care for Midori.
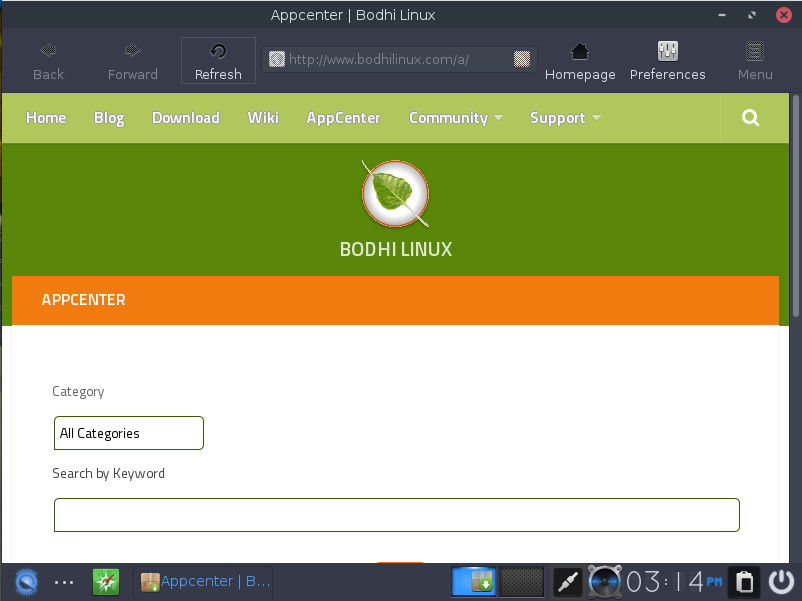
I get it, Midori is a lightweight browser, but when the default browser isn’t fully supported by the likes of Google, there’s a problem (especially to a Google Docs power-user like myself). There is also a solution. Open the main menu (either by way of clicking the three horizontal dots in the bottom left corner of the desktop or left-clicking anywhere on the desktop) and then click Applications > System Tools > Bodhi AppCenter. When the AppCenter opens (Figure 4), you can search for any software you need to be productive.
Figure 4: The Bodhi Linux AppCenter.
The AppCenter works quite well — it’s user-friendly and effective. After a quick install of LibreOffice, I did find that the version installed was out of date. The fault in this doesn’t lie in Bodhi, but in Ubuntu (as that is the most updated version of LibreOffice to be found in the standard repositories). If you’re looking for the newest version of the flagship office suite, your best bet is to download it from the official site and manually install the .deb packages.
One caveat
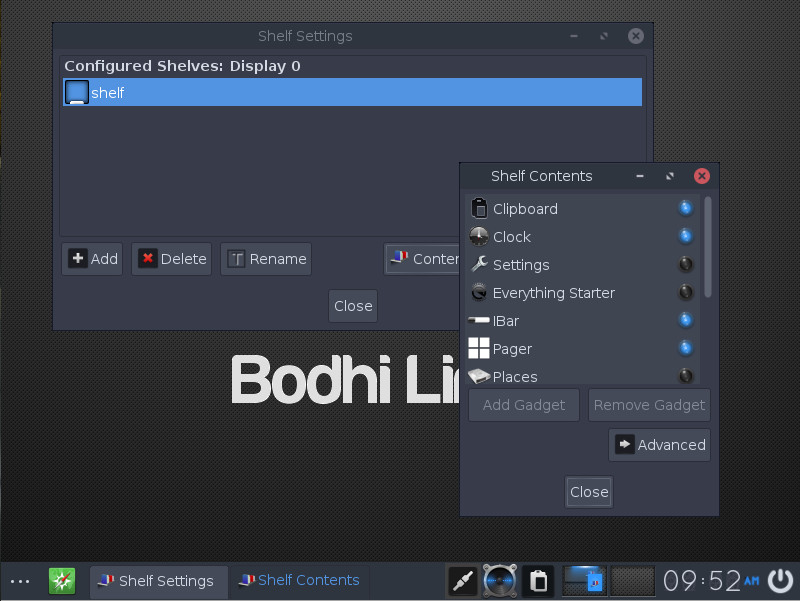
One thing I’ve always warned people about when first giving either Enlightenment or Moksha a go is that the standard desktop terminology doesn’t always apply. For example, panels (or docks) are referred to as Shelves, so when you go to configure the main Shelf, you’ll go to Main Menu > Settings > Shelves. In the Shelves settings window (Figure 5), you can configure the main Shelf or add new Shelves.
Figure 5: Configuring the contents of the main Shelf.
To Shelves, you add Gadgets (as seen in Figure 3), such as the iBar (a bar that allows quick launch icons), Everything Starter (a tabbed-like Main Menu; Figure 6), and much more. Personally, I prefer the Everything Starter to the Bodhi Main Menu, which can be easily taken care of.
Figure 6: The Bodhi Everything Starter is an outstanding replacement for the Main menu.
If you opt to swap out the Main Menu for the Everything Starter, the good news is you can always get to that Main Menu by left-clicking a blank space on the desktop. So, it’s a win-win all around!
Nomenclature notwithstanding, Bodhi is a desktop that can easily meet the needs of those who like to tinker or those who never venture beyond “out of the box.”
Give Bodhi a go
If you never got to experience the Enlightenment desktop, back in the day, I highly recommend you give Bodhi Linux a try. It has just the right combination of “Those were the days” and “Hey, this works really well.” This modern take on the old classic will have your hardware screaming and you configuring the desktop like it was 1999!
Learn more about Linux through the free “Introduction to Linux” course from The Linux Foundation and edX.
Four events, one name: LinuxCon, ContainerCon, CloudOpen and the all-new Community Leadership Conference have combined to form one big event: Open Source Summit North America. The rebranded event, to be held Sept. 11-13 in Los Angeles, will feature a broader range of open source topics, and be more inclusive than ever.
Each of the four conference areas bring a different part of the open source community to the table, providing a holistic overview of the industry for attendees of the new Open Source Summit.
That also means The Linux Foundation is seeking talks on a wide range of subjects from DevOps and Containers, to Security and Networking, to Linux and Kernel Development. Proposals are due May 6 — submit your talk now!
Suggested topics include:
DevOps (Continuous Delivery, Continuous Integration, Lean IT, Moving at Cloud-speed)
Networking (Software Defined Networking, NFV, OpenFlow, Overlays, Networks as Code)
Linux On The Desktop (Porting Proprietary Software, Hardware With Linux Pre-installed, Wine and Emulators, Influencing Closed-Source Companies)
Got a great idea, case study, or technical tutorial you’d like to share? Learn more about the CFP process and submit your speaking proposal before the CFP closes on May 6.
Not interested in speaking but want to attend? Register now to save over $300! Linux.com readers can save an additional $40 off the Attendee All-Access Registration with code LINUXRD5.
This week in open source news, The Linux Foundation’s Open Networking Summit unites software-defined networking and network functions virtualization (SDN/NFV) pros, academics, and enthusiasts for announcements and collaboration, Microsoft has announced the end of CodePlex in favor of GitHub, & more! Keep reading to get caught up on the biggest headlines in open source this week.
1) At the annual Open Networking Summit, SDN & NFV leaders gather. Announcements included the Data Plane Development Kit (DPDK) becoming a Linux Foundation Project and CORD Project working on new OSS service delivery platform.
4) “After six years of pitching the dream of a converged Linux desktop experience that crosses desktop, mobile, server and cloud, Canonical pulls the plug.”
We old coots are forever going on about our favorite keyboard shortcuts, because that is still the fastest way to get stuff done on a computer. Life is too short to faff around the hard way, so let’s try some nice Bash time-saving shortcuts.
The barrier for a lot of people is not having decent typing skills. There are numerous free typing tutors if you need a little help, and if you practice 10 minutes every day you will amaze and delight yourself at your rapid progress. When you can touch-type 40 words per minute without errors, that is a great milestone to reward yourself with a sweet mechanical keyboard, and then you can spend many fun hours hacking your keyboard.
Navigating the Current Line
Ctrl+a or the Home key go to the beginning of the line, and Ctrl+e or the End key go to the end. When you are working with a long command that wraps, remember that it is still just one line.
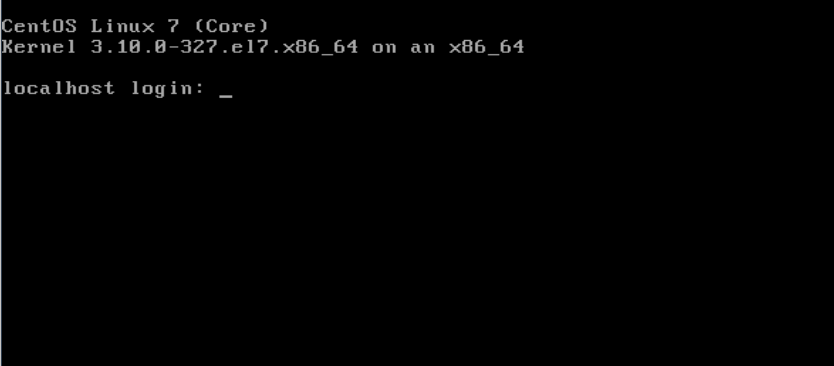
Alt+b moves back one word, and Alt+f moves forward one word. This does not work in many X terminals because the Alt key is mapped to menu commands. Look at your menus; when the first letter is underlined that means Alt+ the underlined letter opens that menu. So, just for fun try it in the console; exit your graphical session by pressing Ctrl+Alt+F1. This should bring you to a console login, so login, type something random or bring up a command from your history, and lo! Alt+b and Alt+f work as they are supposed to.
Figure 1: Linux console.
If Ctrl+Alt+F1 does not bring you to a console login, as various Linuxes map these differently, try Ctrl+Alt+F2, Ctrl+Alt+F3, heck, try all of them up to F8 and see what happens. To get back to your graphical session, try Alt+F7, which is traditional. If that doesn’t work try Alt+F1-F8 until you find your way home.
That was fun, but what if you want to stay in your graphical session and use Alt-key combinations? This is a function of your desktop environment, individual applications, and Linux distribution, so for now my advice is investigate how your particular environment manages this.
Replay Command History
You can use the up and down arrow keys to scroll through your command history, or type the history command. When you find the command you want, type ![number] to run it. For example, !1626:
carla@studio:~$ history
[...]
1626  ls /etc/default/
1627  less /etc/default/smartmontools
1628  apt-cache search smart-notifier

carla@studio:~$ !1626
ls /etc/default/
[...]
Try Ctrl+r to search your history. Start at a blank prompt, press Ctrl+r, then type your search term, for example “vpn” to find your previous openVPN commands. Then keep pressing Ctrl+r to cycle through your results until you find the one you want, and when you find it press the return key to run it.
Cutting and Pasting
Erase the current command with Ctrl+c. If you change your mind a lot, press the Alt+e or End key to go to the end of the line, then Ctrl+u to delete it. Ctrl+y pastes it back. Ctrl+u deletes from the cursor to the beginning of the line.
Another way is to press Ctrl+a or Home, then Ctrl+k, which deletes from the cursor to the end of the line.
You can copy and paste with your mouse by selecting with the cursor, and middle-click paste. This is my favorite way to copy and paste, but sadly it is not universal, and some applications and Web sites disable it.
Ctrl+l or typing the clear command clears the screen. This would be more useful if it remained cleared after running a command. For example, when you’re running searches that return a lot of results and your screen gets all cluttered, you can clear it and get rid of the clutter. But when you run another command your screen un-clears, so you still have to wade through a lot of stuff to see the results of your last command.
Moving Around Directories
This can take some getting used to, especially in deeper directories like /home/carla/Documents/1articles/linuxcom/bash-shortcuts/. First, just where the heck am I?
$ pwd
/home/carla/sketchbook
Well that’s the wrong place. How do I find where I want to go? There are several ways. My favorite, when I know the directory I want, is to use locate:
Then use mouse select/middle-click paste with the cd command:
$ cd /home/carla/Documents/1articles/linuxcom/bash-shortcuts
No, it’s not cheating to use the mouse. It’s fast. You may also use tab completion to quickly type the path. Tab completion is wonderful and I use it all the time as insurance against typos. Start typing, then press the tab key to auto-complete the directory name.
If you need to browse directories, use the asterisk wildcard to browse many directories at one time:
$ ls dirname /*/*
Adjust the number of asterisk and slashes to control how deeply into the filesystem you want to go. Use Shift+PageUp and Shift+PageDown to navigate long command output.
cd - toggles between your current and previous directory.
cd .. takes you up one level, and cd ../../ goes back two levels.
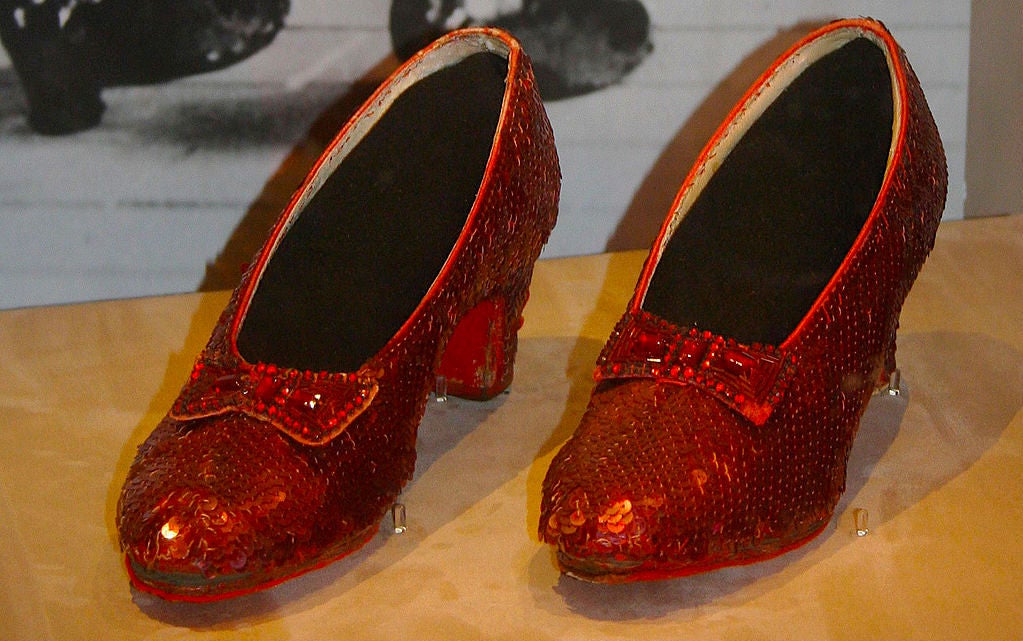
Plain cd is Bash’s ruby slippers, and it returns you to your home directory.
That’s enough for today, and thank you for coming along!
Learn more about Linux through the free “Introduction to Linux” course from The Linux Foundation and edX.
Google is out with its April 2017 Android security update, patching 102 different vulnerabilities in the mobile operating system. Of the vulnerabilities patched by Google this month, only 15 are rated as having critical impact.
Not surprisingly, the mediasever component is once again being patched by Google. The Android mediasever has been patched in every Android security update issued by Google since August 2015. In the new April update, mediaserver accounts for 15 flaws in total, including six rated as critical, five as high and four with only moderate impact.
Following news of Ubuntu abandoning Unity 8 there are now reports of headcount reductions happening at Canonical and Mark Shuttleworth eyeing possible outside investments into the company…
If you ever need to validate certificates or certificate chains before deploying them, Golang provides a near foolproof test method. In this article, I will explain our use case that brought about the need for testing certificate chains, review appropriate web server security settings, and break down the Go code used for testing.
Recently I took on a project at work that has turned into quite the adventure. It’s a small application that seems to cost a lot more money than it should. A third-party constructed this application, which is now maintained in-house. This project lives in Amazon Web Services and makes use of Elastic Load Balancers (ELBs).
Starting from version 4.0, Samba is able to run as an Active Directory (AD) domain controller (DC). In this tutorial, I will show you how to configure Samba 4 as a domain controller with Windows 10, CentOS 7 and CentOS 6 clients.
I will be using 3 Systems, one CentOS 7 server and a Windows 10 client for remote management, a CentOS 7 and CentOS 6 client.
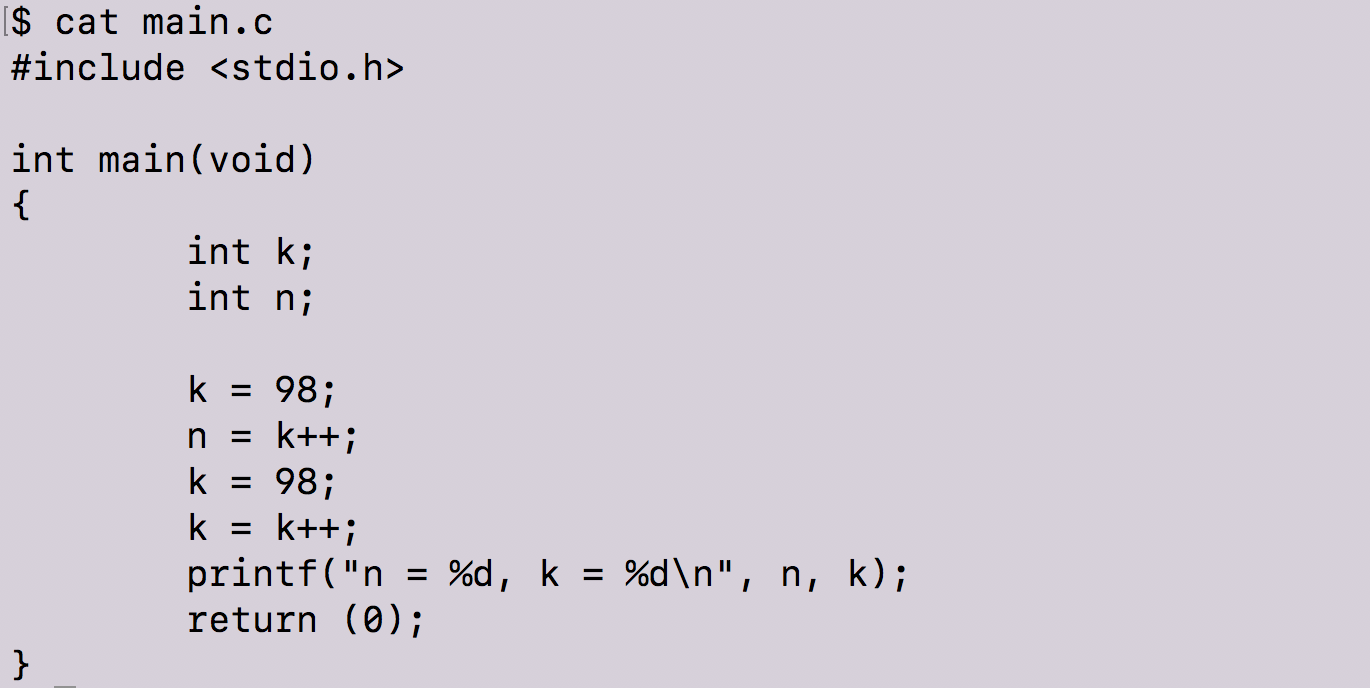
Looking at this code, what would you anticipate the respective values of variables ’n’ and ‘k’ to be?
Despite the confidence expressed in the blogosphere and forums, a number of software engineers would be incorrect….
To understand why ‘k’ increments in this way, we need an abbreviated understanding of how the function’s operations are managed.
For these examples, we are using a 64 bit machine, Ubuntu 14.04 LTS, GCC 4.8.4, and 3.13.0–107-generic GNU/Linux.
As we’ve covered in priorposts, when you compile a program (obviously, comprised of arguments and variables), it goes through a multitude of steps to be executable. The executable arguments and variables need a place to be stored, so that it can be managed and manipulated — resulting in the fulfillment of the function’s requests and directives. This is where the loader comes into play; the loader creates a space of virtual memory addresses where our stack — as well as many other things — will be located. The stack is a data structure that has “last in first out” (LIFO) data storage; the first information entering the stack has a higher memory address, whereas the addition of subsequent information “grows” downward — having a lower memory address.
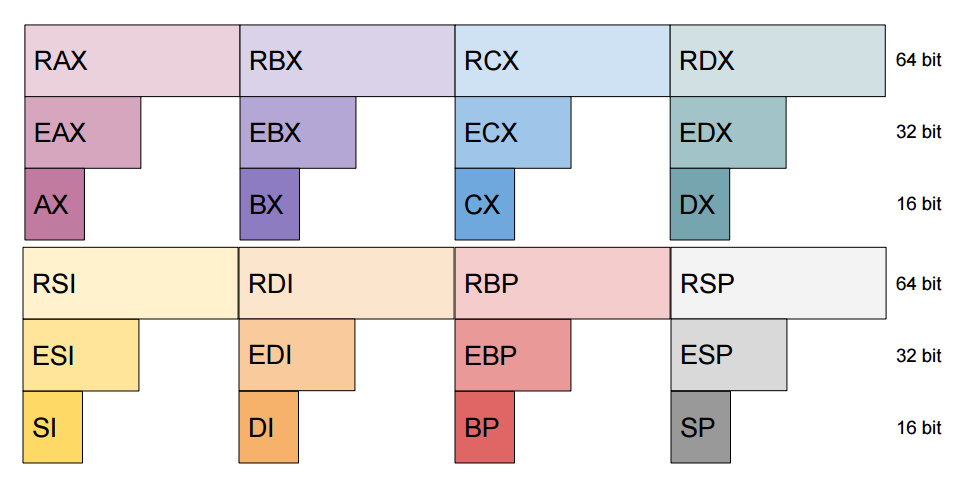
The stack’s data is navigated and controlled by registers. Registers allow for fast processing and internal memory storage without having to access the physical memory. There are eight 16 bit general registers — ax, bp, bx, cx, di, dx, si, and sp (they are case insensitive) — that handle respective tasks. Depending on the operation, program, or processor different register size is required. Extended 32 bit versions can be accessed with the prefix “e”, and the long 64 bit size by prefixing with an “r”.
These are the basics (starting with the two most fundamental); having a reference for their utility will help you understand some object code…
BP, EBP, RBP is the base pointer which points to the address of the bottom of the stack; it’s a fixed reference point for the corresponding function’s parameters and variables within that stack frame.
SP, ESP, RSP on the other hand, is the stack pointer to the address of the top of the stack.
AX, EAX, RAX alongside DX, is responsible for arithmetic operations. It aids with transferring data.
BX, EBX, RBX is a data pointer — only register capable of indirect addressing.
CX, ECX, RCX does loop counting.
DI, EDI, RDI is the pointer to destination in string and memory operations.
DX, EDX, RDX handles input/output as well as arithmetic operations.
SI, ESI, RSI is the pointer to source in string and memory operations.
Moving forward (with all that in mind), what exactly is happening when we initialize k as k++? What exactly is happening in the machine code (or assembly code) that results in this output? Finding the answer to this question inches us closer to the exciting realm of reverse engineering.
In order to fully investigate this, there is a program called objdump we can use within the Linux shell that allows us to “see” inside the machine code. Before jumping into my explanation, let’s review this program:
objdumpis a program for displaying various information about object files. As you will recall from our previous posts, object code is generated during the third stage of compilation, also called assembly. In order to help us parse through the information displayed using objdump we will run it with several options:
-j Display information only for a specified section — today we will only be reviewing two sections: .rodata — this is where read-only data is stored .text this is the program’s actual code (the assembly) — _start and main are both part of this section
-s Displays the full contents of any sections requested. By default all non-empty sections are displayed.
-M Assembly has two versions of syntax — AT&T or Intel. We use -M intel to tell objdump to display output in intel format.
-d Display the assembler mnemonics for the machine instructions from objfile. This option only disassembles those sections which are expected to contain instructions.
-S Display source code intermixed with disassembly, if possible. This is helpful because it will show the lines from our program.
Now that we’ve reviewed objdump — let’s combine that with our investigation into what happens when we specify that k=k++.
The above tells us where the read-only data is stored.
Objdump program ran with flags introduced above
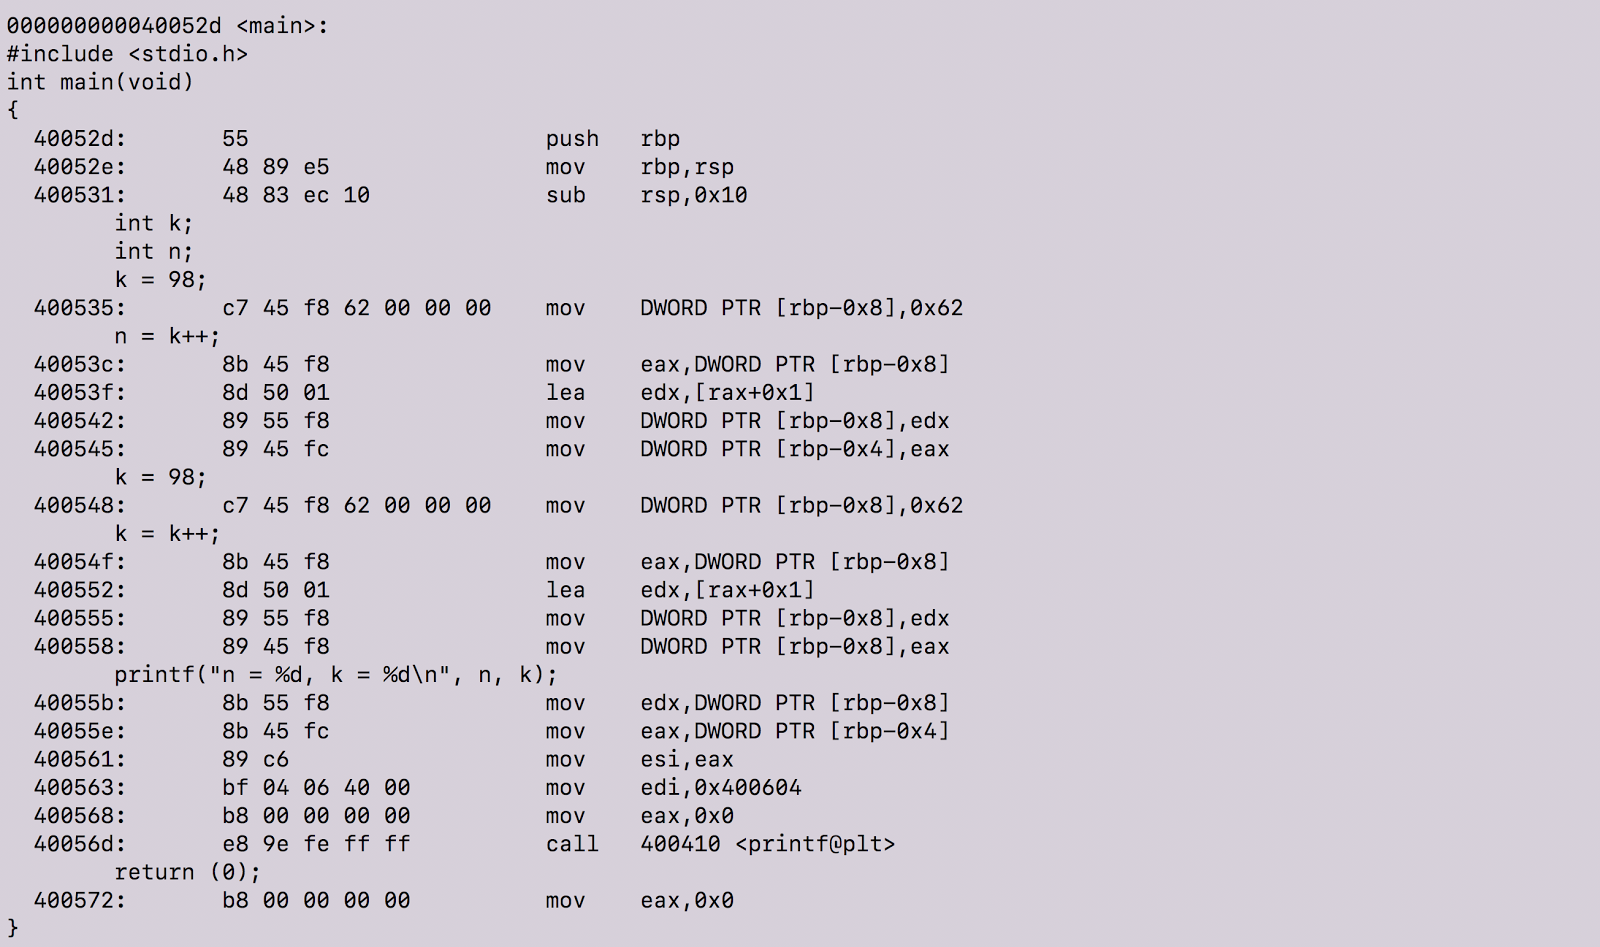
objdump with the above option flags produces our object code with our source code intermixed in the output. In fact, many lines of object code are produced and we are only referencing the section with our source code. To view all of the object code, click here.
There are definitely lots of cool things happening there. Before we proceed, let’s review machine instructions. According to this guide, “machine instructions generally fall into three categories: data movement, arithmetic/logic, and control-flow.” In the above screenshot, the data movement instructions occur in the second to last column.
A short summary of data movement instructions:
mov — Move — this instruction copies data item referred to by its second operand into the location referred to by its first operand. For example: mov eax, ebx— copy the value in ebx into eax
push — push stack — this instruction places its operand onto the top of the hardware supported stack in memory. For example: push eax— push eax on the stack
pop — pop stack — this instruction removes the 4-byte data element from the top of the hardware-support stack into the specified operand. For example: pop edi — pop the top element of the stack into EDI
lea — Load effective address — the instruction places the address specified by its second operand into the register specified by its first operand. Keep in mind, the contents of the memory location are not loaded, but only the effective address is computed and placed into the register. For example: lea eax, [var] — the value [var] is placed in EAX
There are arithmetic, logic and control flow instructions that I will not delve into more — for the purposes of this post, you will need to only know the above as well as one more:
call subroutine call — this control flow instruction pushes the current code location onto the hardware support stack in memory and then performs an unconditional jump to the code location indicated by the label operand. This instruction saves the location to return to when the subroutine completes.
Size directives
BYTE PTR indicates size of 1 byte
WORD PTR indicates size of 2 bytes
DWORD PTR indicates size of 4 bytes
Now that we know what machine instructions are, let’s step in and see what’s happening at a granular level in our program.
The instructions here tell the machine to copy the 32-bit integer representation of 0x62 into the stack at the address rbp-0x8. Remember, since we are compiling our program on a 64-bits machine running Ubuntu 14.04 LTS our integers will be 4 bytes long.
In case you were wondering what in the world 0x62 has to do with k = 98, a simple Google search reveals that 0x62 is the hexadecimal representation of the number 98.
So, at this moment, k = 98 — we know this because the machine instructions above corresponds to the C code k = 98 and the equivalent of k is stored at address rbp-0x8 in our assembly code.
Now, when we initialize our variable n to equal k++ we see the following happen in this order:
The value 98 is taken from rbp-8 (the equivalent of k in our C code) — 98 — and copied to the register eax
eax is a subregister of rax. Since eax contains 98, this line of machine instruction indicates that we are adding 98+1 and storing the result into edx
The value in edx (99) is copied to the location referred to by rbp-0x8. Since rbp-0x8 is the equivalent of k , now k = 99.
The value in eax (98) is copied to the location referenced by rbp-0x4. This means by the end of this line of instruction, n = 98.
As you can see, by the end of the fourth machine instruction, the original value of 98 is called. Similarly, we see the same as above instructions happen in the next two lines of code.
The only part where this is different from the above code is that the value of eax(98) is copied to the location referenced by rbp-0x8.
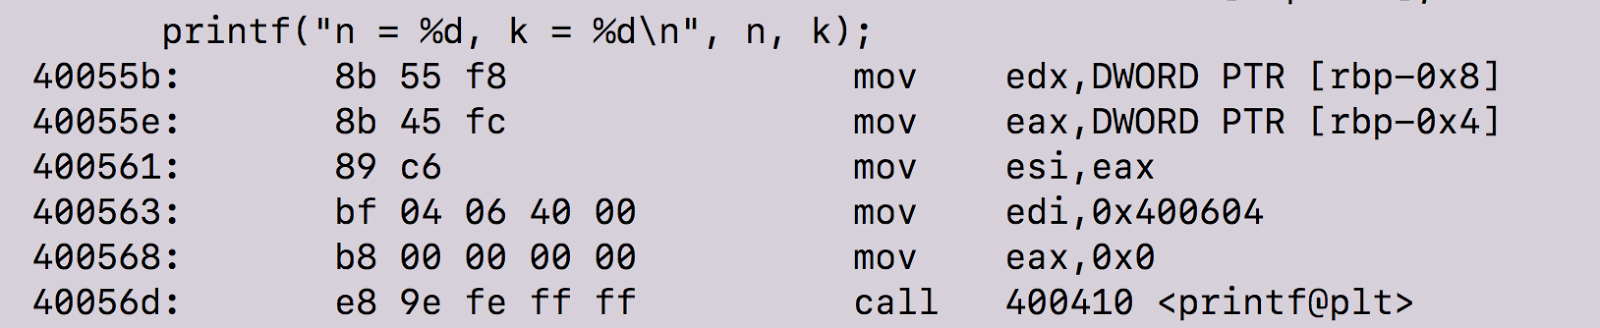
At this point, we know that both rbp-0x8 and rbp-0x4 carry the value of 98. From here the values are stored and then the call instruction tells program to use printf function to print the stored values to standard output.
Lastly, we see that the value of 0x0 is copied into eax — eax will store the return value of the functions. The return value of main will be 0, meaning that the program successfully ran.
So, from this, we can conclude that k = k++ returns k. Why? Well, k++ does in fact increment 98 to 99. The stored value resets the value of k to 98 by the end of the program. In other words, the iteration is only performed on a value stored in temporary location and that location was not called by the program.
Authors
Elaine Yeung is an elementary school dean turned software engineering student at Holberton School.
Naomi Sorrell is an enthusiastic tech newbie at Holberton School that enjoys man pages, fitness, and traveling
Resources
“Assembly Language Tutorial.” Assembly Language Tutorial. N.p., n.d. Web. 11 Mar. 2017.
Bacon, Jason W. “10.7. The Stack Frame.” 10.7. The Stack Frame. N.p., Mar. 2011. Web. 23 Mar. 2017.
Dang, Bruce, Alexandre Gazet, Elias Bachaalany, and SeÌbastien Josse. Practical Reverse Engineering: X86, X64, ARM, Windows Kernel, Reversing Tools, and Obfuscation. Indianapolis, IN: Wiley, 2014. Print.
Koopman, Phillip. “Stack Computers: 9.2 VIRTUAL MEMORY AND MEMORY PROTECTION.” Stack Computers: 9.2 VIRTUAL MEMORY AND MEMORY PROTECTION. N.p., 1989. Web. 11 Mar. 2017.
“Memory Layout of C Programs.” GeeksforGeeks. N.p., 30 Nov. 2016. Web. 11 Mar. 2017.
Milea, Andrea. “Dynamic Memory Allocation and Virtual Memory.” Understanding Virtual Memory and the Free Store (heap) — Cprogramming.com. C Programming, n.d. Web. 11 Mar. 2017.
“Stack (abstract Data Type).” Wikipedia. Wikimedia Foundation, 11 Mar. 2017. Web. 11 Mar. 2017.
Tutorialspoint.com. “Operating System — Virtual Memory.” www.tutorialspoint.com. N.p., n.d. Web. 11 Mar. 2017.
Tutorialspoint.com. “Assembly Registers.” www.tutorialspoint.com. N.p., n.d. Web. 11 Mar. 2017.
“Virtual Memory.” Wikipedia. Wikimedia Foundation, 10 Mar. 2017. Web. 11 Mar. 2017.