Home Blog Page 661

5 Fun Raspberry Pi Projects: Getting Started

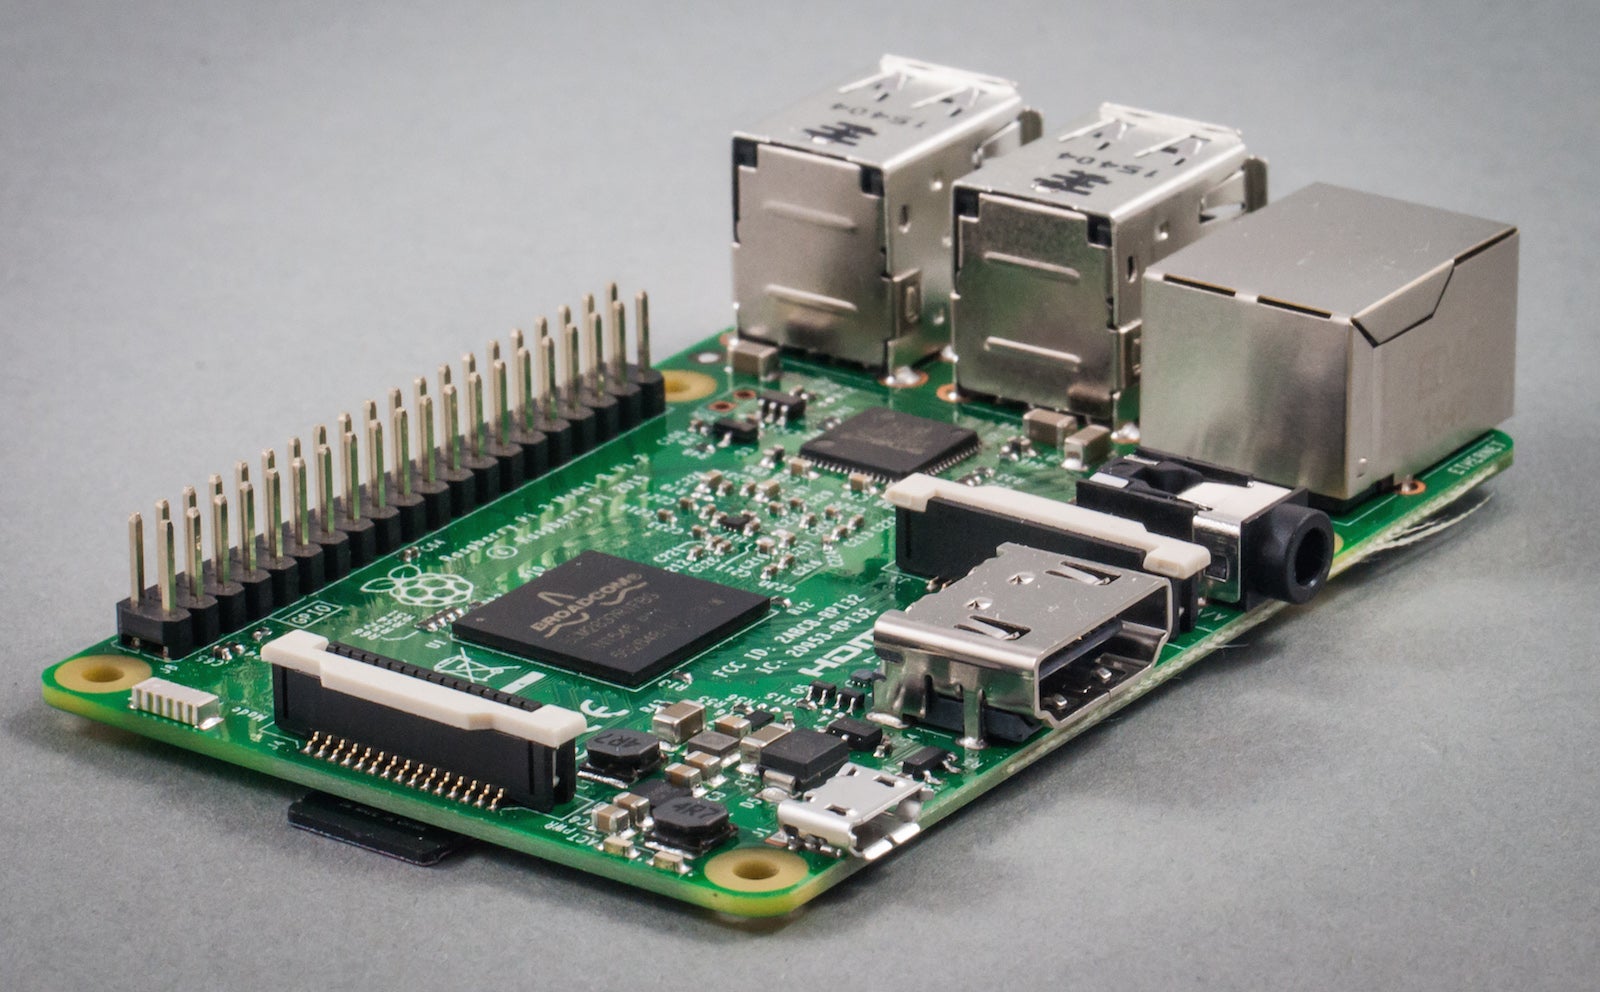
Nearly five years after the first Raspberry Pi boards shipped, the device continues to far surpass its expected popularity, spreading well beyond its originally intended purpose as an educational tool. Though creator Eben Upton originally hoped to sell at most 10,000 boards, more than 10 million are now in the hands of students, teachers, and makers. In addition to three generations of the Raspberry Pi, you can also now have the even smaller Raspberry Pi Zero, as well as several additional products, from the Compute Module to the specially designed cameras, touchscreen, and assorted HATs (Hardware Attached on Top boards).

With so much available and so many possibilities, it can be intimidating to know where to start. Use these tips to learn some basic information about starting your own project. This article assumes you know what a Raspberry Pi is, how to connect things like a keyboard and a display, and how to use a Linux command line, but not much else. (See the official Raspberry Pi help videos for the basics.)
This tutorial is part of the free Linux Foundation Training E-book, 5 Fun Projects for Raspberry Pi 3. Download it now!

Which Pi do I have?

If you’ve had a Raspberry Pi sitting in your desk drawer for so long that you’re not even sure any more what version it is, you’re not alone. Whenever I give a talk on the Raspberry Pi, I ask how many people have one, and generally most of the room confesses to owning one while only a handful have actually used it.

Beyond the amount of RAM, which is the most obvious difference in the earlier boards, or big changes like the additional GPIO in later boards (which is easily apparent), there are some minor distinctions that can be useful to know as you plan your project or troubleshoot problems.

With some visual examination, you can generally figure out which board you have by looks alone, but there’s an easier way using the command line.

Start your Pi, open a terminal, and run the command

cat /proc/cpuinfo | grep 'Revision'

The output should be a four- or six-character string that indicates which board you have:
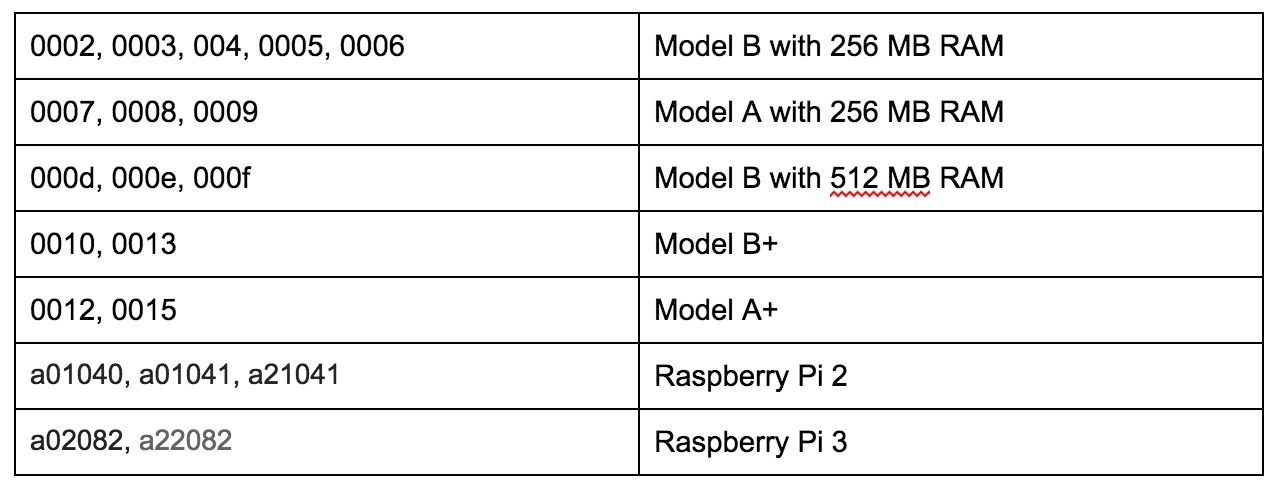
If you see a very long number that starts with “1000,” the part after that is the revision number, and the “1000” indicated that your board has been overvolted.

The following will give you a quick comparison of the major features across the various boards:

0RgbzZ4vA0Mr-qAKPvzH6aytKMJBbPXLQOQm_vSM

If you would like to see even more information about your board from the command line, try the following commands:

  • Hardware: cat /proc/cpuinfo

  • Version: cat /proc/version

  • Memory: cat /proc/memory

  • SD card partitions: cat /proc/cpuinfo

Power it up

You’re probably accustomed to some general truths about the electronics in your house. You plug them into the wall, flip an on/off switch, and they work. The Raspberry Pi is not one of these electronics. Getting a good power supply and cable that provide clean, adequate, consistent power is crucial to your Pi’s performance. And there’s no on/off switch. But that’s ok–you can make one.

How much power is enough?

If you think that insufficient power may be a problem (and if you’re having problems with a Pi, there’s a good chance it’s the power), you can check the actual voltage to see if you’re right.  

On an older Model B, you’re looking for small holes on top of the board marked TP1 and TP2. On a Model B+ or Raspberry Pi 2 or 3, there are spots on the bottom of the board on the side with the SD card slot that are marked PP3 and PP7.

First, plug in all of the peripherals you’ll be using for your project. Use a multimeter set to 20 volts. Touch the red lead to TP1 or PP3 and the black lead to TP2 or PP7. The multimeter should read something close to 5 volts. Anything more than .25 volts variance is a problem, and the closer to 5, the better.

If you find your voltage is low, there are two most likely culprits:

  • Your power cable. The good news about the Raspberry Pi is that if you use an Android phone, you almost certainly already have a multitude of micro USB cables ready to power your Pi. The bad news is that if you picked that cable up from the discount bin, it may give your phone a slow drip that’s enough for a phone recharge, but your Pi won’t be amused by the dribble of electricity you’re offering.

  • Your devices. All those USB peripherals you’re plugging into it–even your lowly keyboard–are hungry for power. You should use a powered USB hub to help out.

Add a reset switch

Now that you know some basics, and you’ve tested your power source, you’re ready for a quick and easy project that will make your Pi feel more like the rest of the electronics you have. You’re going to add a simple reset switch.

Most of the electronics you own come with on/off switches. Because the Pi doesn’t, to restart it, you have to pull the power cable out altogether and reinsert it. The following instructions will let you start or reboot the Pi quickly without having to do so.

You’re looking for two holes on the board next to each other. One has a circular edge and the other a square. On the original Model B, they’re marked “P6” and are found near the HDMI port. On later Raspberry Pis, they’re marked “RUN” and can be found closer to the GPIO pins.

You can purchase strips of breakaway pin headers from anywhere you get other electronics supplies. Solder two of these pins into the P6/RUN holes, and you’ve created a CPU reset switch. All you have to do is touch a piece of metal across both pins.

From here, you can get as creative as you’d like about what to attach to use as the actual button. The simplest solution is to attach a 2-pin switch cable on the pins you attached.

Meet the GPIO

Aside from its low price point, the GPIO options on the Raspberry Pi are one of its most appealing features. They are also the part most likely to intimidate new users. (And if you think stepping on an errant Lego brick hurts, don’t leave your Pi with the GPIO side up on the floor!)

GPIO stands for “general purpose input/output,” which is exactly what these pins do. Nearly all of the awesome projects you’ve seen built with Raspberry Pis take advantage of these pins in some fashion. Their flexibility is their strength!

The earlier boards had 26 GPIO pins, while the Raspberry Pi 2 and 3 have 40. (Technically only 17 of the 26 and 28 of the 40 are GPIO, while the rest are power or ground pins.) They are referred to with pin numbers. The numbers aren’t in any logical order, so you need a diagram to make sure you’re using the right ones. (To add to the confusion, you will sometimes see them referred to by their physical pin numbers, which is the pins counted in order.) If you’re going to be using the GPIO frequently, I recommend Simon Monk’s Raspberry Leaf project, which is a tiny printout of the pins you can lay over them for reference. If you have a 26-pin Pi, you can print one yourself on Monk’s website, or if you have a 40-pin Pi, you can buy them from Adafruit in paper and hard versions.

Now that you know which is which, you’ll need a way to tell the pins what you want them to do, which is going to require a bit of programming. If you’re a beginner, the Pi part of the Raspberry Pi name comes from its original intent as a tool to teach Python, so in a way, you’re using the Pi for its original purpose! (Even if your endpoint is an automated coffeepot or killer robot.)

Of course, teaching you Python is well beyond the scope of this article, but there are plenty of resources waiting. Sparkfun and Adafruit both have starter tutorials for how to use the GPIO, and the Raspberry Pi Foundation’s learning resources include a Python Intro. If you prefer to go more in-depth with a book, there are a few options, including Learning Python with Raspberry Pi and Programming the Raspberry Pi: Getting Started with Python, written by the aforementioned Simon Monk.

Finally, Pinout.xyz can serve throughout your project as a reference tool for each of the pins.

Find a project

The best thing you can do now is start making something. Even if you’ve never written a line of code or touched a soldering iron, the Raspberry Pi is a perfect learning tool for those things and more. But what to build?

If you’re still nervous and want to have something useful that requires writing no code nor touching the GPIO, I recommend setting up Kodi (previously called XBMC). In minutes, you can turn your Pi into a functioning media center.

Once you’ve done that and you’re ready to get braver, think about what interests you. Video games? Home automation? Photography? Whatever it is, chances are good that someone has built something similar and offered their instructions online. Follow them. Make your own changes. Find improvements, or fix problems in the original version. That’s the best way to learn. And once you’ve done so, don’t forget to share what you’ve done with others.  

To get you started on ideas, here are a few of my favorite projects for a variety of interests:

  • The Cupcade is the easiest way to build your own tiny gaming system. There are tons of video game build tutorials out there, but if you’re more interested in starting with a kit, this provides all the pieces you need for a satisfying project. (If you’re more of a builder and would like to go bigger, take a look at the Coffee Table Pi.)

  • Homebrewers who would like to take their brewing to the next level should try BrewPi.

  • If you have access to a 3D printer and would like an amusing but not terribly useful device where all the code’s been written for you, try the Pi Ball.

  • One of the most popular Pi projects is the MagicMirror. It’s customizable to your interests, useful to have in your house, and all of the code is on Github.

  • If you’d like to try robotics, the options are broad. Start with this DIY Hacking tutorial. Adafruit has an introductory robot tutorial as well. From there, the possibilities are up to you.

For 5 more fun projects for the Raspberry Pi 3, including a holiday light display and Minecraft Server, download the free E-book today!

Read the next articles in the series:

How to Build a Minecraft Server with Raspberry Pi 3

Build Your Own Netflix and Pandora With Raspberry Pi 3

Turn Raspberry Pi 3 Into a Powerful Media Player With RasPlex


Planning Microservices: Know the Tradeoffs with Monolithic Design

By now you no doubt understand the advantages of using a microservices architecture, especially in greenfield applications, and in new organizations that need to achieve efficiencies wherever they can. But what about your legacy code and applications? Do you totally rewrite the monolith, or do you chip away at it with new functionalities, added as microservices, over time?

You could pull out some functionality from the monolith, something that isn’t scaling well that you need to rewrite anyway. You might choose to implement it as a standalone service. But then you’ll have a hybrid application that presents delivery challenges. How do you deliver those hybrid apps while they’re in transition to a more flexible architecture based on microservices?

These are just some of the challenges organizations face when planning future products. Fortunately, there are  several strategies you can use when planning a microservices-based system. But the issues can be complicated when existing monolithic systems are in play.

Read the full blog post here. 

Kubernetes Founders Launch Heptio to Help Bring Containers to the Enterprise

For years, the public face of Kubernetes was one of project’s founders: Google group product manager Craig McLuckie. He started the open source container management project together with Joe Beda, Brendan Burns and a few other engineers inside of Google, which has since brought it under the guidance of the newly formed Cloud Native Computing Foundation.

Beda became an entrepreneur in residence at Accel Partners in late 2015. Burns left Google for Microsoft earlier this year and McLuckie quietly left Google to start a new venture a few weeks ago. McLuckie and Beda have now teamed up again to launch Heptio, a new pure-play Kubernetes company.

Read more at TechCrunch

4 Reasons Why SSH Connection Fails

As DevOps or IT professionals, people may ask us why they can’t ssh to servers. It happens from time to time. Isn’t right? Not much fun. Just routine work.

Want to ease the pain and burden? Let’s examine common ssh failures together. Next time forward this link to your colleagues, if useful. People may be able to identify the root cause all by themselves, or be efficient in collecting all necessary information, before turning to us.

Why SSH Connection Failed


Original Article: http://dennyzhang.com/ssh_fail

It’s not something fancy or difficult. Just not everyone posses enough information or experience about this. As DevOpsers, we shouldn’t stand in the way for any process. Let’s empower people with a simple and easy guide.

Here are Common SSH Failures sorted by frequency.

1. Our SSH Public Key Is Not Injected To Servers.

SSH by password is very dangerous. Nowadays almost all serious servers will only accept ssh by key file. Here is the process:

  • We generate a ssh key pair. Even better, protect private key with passphrase.
  • Send our ssh public key to the person who manages the servers.
  • He/She will inject our ssh public key their. Usually it’s ~/.ssh/authorized_keys.
  • Then we should be able to ssh.

Here comes the most frequent ssh failure!

denny@laptop:/# ssh root@www.dennyzhang.com
Permission denied (publickey).

This error message may have 2 possible clauses:

  • The private key doesn’t have the privilege to login.

Either public key is not injected correctly or simply it’s missing.

Tips: If your Ops/DevOps are not available, you can try alternatives. Think who else in the team can ssh. In fact anyone who can ssh, is capable to perform the change.

  • Local ssh public key and private key is not correctly paired.

Before connecting, ssh will check whether our public key and private key is correctly paired. If not, it will reject to use the private key silently. Yes, silently!

You may wonder how could this happen? As humans we don’t, but we may have some automation scripts which create the mess. BTW, if we only have a valid private key without public key, it’s fine.

2. Firewall Prevents Us From Connecting

For security concern, people may enforce a strict firewall policy. It means only certain source IP can ssh.

denny@laptop:/# ssh root@www.dennyzhang.com
ssh: connect to host www.dennyzhang.com port 22: Connection refused

# Confirm with telnet. Usually it shall connect in seconds
denny@laptop:/# telnet www.dennyzhang.com
Trying 104.237.149.124...

You may want to fetch help immediately. Just wait a second.

People may have reconfigured sshd to listen on other port. Are you sure it’s port 22? Even better, double check the server ip or dns name.

I know they might be stupid questions. But people make these mistakes sometimes.

Once it’s confirmed, talk to your DevOps. There is another possible reason for this failure: sshd is not up and running. Very rare I would say. But could be. In that case, DevOps/Ops need to take actions immediately.

3. Host Key Check Fails

When you see below warning for the first time, you may get confused. To be simple, it helps us to avoid the attack of man-in-the-middle.

denny@laptop:/# ssh root@www.dennyzhang.com
@@@@@@@@@@@@@@@@@@@@@@@@@@@@@@@@@@@@@@@@@@@@@@@@@@@@@@@@@@@
@       WARNING: POSSIBLE DNS SPOOFING DETECTED!          @
@@@@@@@@@@@@@@@@@@@@@@@@@@@@@@@@@@@@@@@@@@@@@@@@@@@@@@@@@@@
The ECDSA host key for [www.dennyzhang.com]:22 has changed,
and the key for the corresponding IP address [45.33.87.74]:22
is unknown. This could either mean that
DNS SPOOFING is happening or the IP address for the host
and its host key have changed at the same time.
@@@@@@@@@@@@@@@@@@@@@@@@@@@@@@@@@@@@@@@@@@@@@@@@@@@@@@@@@@@
@    WARNING: REMOTE HOST IDENTIFICATION HAS CHANGED!     @
@@@@@@@@@@@@@@@@@@@@@@@@@@@@@@@@@@@@@@@@@@@@@@@@@@@@@@@@@@@
IT IS POSSIBLE THAT SOMEONE IS DOING SOMETHING NASTY!
Someone could be eavesdropping on you right now (man-in-the-middle attack)!
It is also possible that a host key has just been changed.
The fingerprint for the ECDSA key sent by the remote host is
37:df:b3:af:54:a3:57:05:aa:32:65:fc:a8:e7:f9:3a.
Please contact your system administrator.
Add correct host key in /root/.ssh/known_hosts to get rid of this message.
Offending ECDSA key in /root/.ssh/known_hosts:2
  remove with: ssh-keygen -f "/root/.ssh/known_hosts" -R [www.dennyzhang.com]:22
ECDSA host key for [www.dennyzhang.com]:22 has changed and you have requested strict checking.
Host key verification failed.

Each server can have a fingerprint. If the server is re-provisioned or simply a different server, the fingerprint would be different. Once we have successfully login, our laptop will save the server’s fingerprint locally. Next time we login, it will do a comparison first. If the fingerprint doesn’t match, we will see the warning.

If we’re confident it has been re-provisioned recently, we can ignore this warning. Remove the entry from ~/.ssh/known_hosts. Or you can empty the file. Even turn off ssh host key checking for all hosts.[1] Certainly I would not recommend.

4. Your SSH Key File Mode Issues

As a self-protection, the file access of your ssh key file can’t be widely open. The file mode should be either 0600 or 0400.

denny@laptop:/# ssh -i id_rsa root@www.dennyzhang.com
@@@@@@@@@@@@@@@@@@@@@@@@@@@@@@@@@@@@@@@@@@@@@@@@@@@@@@@@@@@
@         WARNING: UNPROTECTED PRIVATE KEY FILE!          @
@@@@@@@@@@@@@@@@@@@@@@@@@@@@@@@@@@@@@@@@@@@@@@@@@@@@@@@@@@@
Permissions 0644 for 'id_rsa' are too open.
It is required that your private key files are NOT accessible by others.
This private key will be ignored.
bad permissions: ignore key: id_rsa
Permission denied (publickey).

Use -v for verbose output: ssh -v $user@$server_ip.

More Reading:

Footnotes:

Google Unleashes its Machine Learning Group

Google Unleashes its Machine Learning Group Google offers GPUs to support the more complex workloads. 

Google announced its Google Cloud Machine Learning Group to be led by two machine-learning experts: Fei-Fei Li and Jia Li. The group will focus on delivering cloud-based machine learning software to businesses.

The new group evolves from Google’s Cloud Machine Learning alpha application it launched in March. 

In conjunction with announcing the new group, Google also introduced the new Google Cloud Jobs API to help people advance their careers.

Read more at SDx Central

Eclipse Che Cloud IDE Joins Docker Revolution

Eclipse Che 5.0 is making accommodations for Docker containers and Language Server Protocol across multiple IDEs. The newest version of the Eclipse Foundation’s cloud-based IDE and workspace server will be available by the end of the year.

The update offers Docker Compose Workspaces, in which a workspace can run multiple developer machines with support for Docker Compose files and standard Dockerfiles. … Che also has been certified for Docker Store, which features enterprise-ready containers. In addition, Docker is joining the Eclipse Foundation and will work directly with Che.

Read more at InfoWorld

How to Install LXD Container Hypervisor on Ubuntu 16.04 LTS Server

LXD is lxc on steroids with strong security on the mind. LXD is not a rewrite of LXC. Under the hood, LXD uses LXC through liblxc and its Go binding. LXD container “hypervisor” runs unmodified Debian/Ubuntu/CentOS/Arch and other Linux operating systems  (“distros”) VM at incredible speed. In this tutorial, you will learn to set up LXD on a Ubuntu Linux server and create your first VM.

Install LXD

Type the following apt-get command:
$ sudo apt install lxd

OR
$ sudo apt-get install lxd

Read more at Nix Craft

How the Blockchain Will Radically Transform the Economy

Say hello to the decentralized economy — the blockchain is about to change everything. In this lucid explainer of the complex (and confusing) technology, Bettina Warburg describes how the blockchain will eliminate the need for centralized institutions like banks or governments to facilitate trade, evolving age-old models of commerce and finance into something far more interesting: a distributed, transparent, autonomous system for exchanging value.

Watch the video at TED.com

SUSE Advances its Open-Source Storage System

Besides announcing its next version of Ceph-powered SUSE Enterprise Storage, SUSE has bought openATTIC, the open-source Ceph and storage management framework.

SES 4, a software-defined storage system, is powered by Ceph. This is a distributed object store and file system. It, in turn, relies on a resilient and scalable storage model (RADOS) using clusters of commodity hardware. Along with the RADOS block device (RBD), and the RADOS object gateway (RGW), Ceph provides a POSIX file-system interface: CephFS. RBD and RGW have long been in use for production workloads but CephFS has been harder to use in the real world.

Read more at ZDNet

The Linux Foundation Issues Free E-Book on Open Source License Compliance Best Practices

The Linux Foundation today released a free e-book, Open Source Compliance in the Enterprise, that serves as a practical guide for organizations on how best to use open source code and participate in open source communities while complying with the spirit and the letter of open source licensing.

Written by Ibrahim Haddad, Ph.D., vice president of R&D and the head of the open source group at Samsung Research America, the new e-book aims to improve understanding of issues related to the licensing, development, and reuse of open source software. Haddad is responsible for overseeing Samsung’s open source strategy and execution, internal and external collaborative R&D projects, and is a former manager at The Linux Foundation.  ​

The book’s nine chapters take readers through the entire process of open source compliance, including an introduction to the topic, a description of how to establish an open source management program at their organization, and an overview of relevant roles. Examples of best practices and compliance checklists are provided to help those responsible for compliance activities create their own processes and policies.

“We frequently hear from organizations contributing to or simply using open source software about the desire to comply, but uncertainty about how best to do so,” said Mike Dolan, VP of strategic programs at The Linux Foundation. “Although it is sometimes viewed as a challenge, with better education on the topic, compliance can be easier for all involved in open source. This ebook, along with other efforts such as our free Compliance Basics for Developers training course, is one way we are working to help close the knowledge gap and make compliance easier for everyone.”

Companies Benefit from Open Source Compliance

As combining and building upon open source software components has become the de facto way for companies to create new products and services, organizations want to know how best to participate in open source communities and how to do so in a legal and responsible way.  

Under this “multi-source development model” software components can consist of source code originating from any number of different sources and be licensed under different licenses. As a result, the risks that companies previously managed through company-to-company license and agreement negotiations are now managed through robust compliance programs and careful engineering practices.

Open source initiatives and projects provide companies and other organizations with a vehicle to accelerate innovation through collaboration. But there are important responsibilities that come with the benefits of teaming with the open source community: Companies must ensure compliance to the obligations that accompany open source licenses.

“Open source compliance is the process by which users, integrators, and developers of open source observe copyright notices and satisfy license obligations for their open source software components,” according to the book.                                                       

It lists several advantages for companies that achieve open source compliance including:

  • A technical advantage, because compliant software portfolios are easier to service, test, upgrade, and maintain

  • In the event of a compliance challenge, having a compliance program can demonstrate an ongoing pattern of acting in good faith

  • Help in preparing a company for possible acquisition, sale, or new product or service release

  • Verifiable compliance in dealing with OEMs and downstream vendors.    

To learn more about the benefits of open source compliance and how to achieve it, download the free e-book today!