MongoDB is a NoSQL database that offers a high performance, high availability, and automatic scaling enterprise database. Data is stored in a “document” structure in JSON format (in MongoDB called BSON). MongoDB was first introduced in 2009 and is currently developed by the company MongoDB Inc. This tutorial shows the installation and configuration of MongoDB on Ubuntu 16.04.
1) Microsoft’s PowerShell scripting language and command-line shell has been released as open source, meaning that Windows and Azure’s management tools will have a greater reach.
Open source projects are new to networking, but they’ve been cropping up all over the place in the last couple of years. And many of them are gravitating toward the Linux Foundation.
Some of them were originally independent groups. The Open Network Operating System (ONOS) for example, was founded by On.lab. But in October, it became part of the Linux Foundation. The Linux Foundation was already hosting the OpenDaylight Project, which some considered a rival to ONOS. But the two groups seem to be happily coexistingunder the same host.
Recently, though, the pace of networking projects associating with the foundation has picked up. Here is a trend line of Linux Foundation affiliations this year:
Ahmed Alkabary is a recent graduate of the University of Regina in Canada, where he earned degrees in computer science and mathematics as an international student from Egypt. He was one of 14 aspiring IT professionals to receive a 2016 Linux Foundation Training (LiFT) scholarship, announced this week.
LiFT Scholarship winner Ahmed Alkabary
Ahmed began using Linux in the second year of his studies and quickly developed such a passion for it that he began extra studies outside of university to advance his skills. His enthusiasm for Linux even led him to develop a free course on Udemy to teach it to others; nearly 50,000 students have enrolled to date.
Now that he has finished his studies, Ahmed hopes to secure a job as a Linux system administrator. The scholarship will help him achieve his career goals by providing him with the additional training and certification he needs to land a position, he says.
Linux.com: Why do you want to be a Linux sysadmin?
Ahmed Alkabary: For me, I don’t just appreciate the Linux operating system but I also feel like it has become my life. Whenever I’m on a Linux based computer I feel like I’m at home. You can say it is a passion that has taken many years of cultivating to become integrated in my life the way it is today.
In 2011 I was eager to purchase a brand new computer, but to my dismay the shop had only one computer that met my requirements. Although unbeknownst to me the computer had a specific operating system that I was unfamiliar with. The operating system was pre-installed with Linux, specifically openSuse. I was so hesitant to purchase the computer but proceeded anyway. I hoped to change the operating system once I got home, but I was unsure of what came over me to keep Linux. But to this day I feel I have yet to make a decision that would have a greater impact on my life then the day I decided to keep Linux.
Right away I started to notice the efficiency of Linux and how all my needs were met in an instant. I started to teach myself the command line and I became very proficient at it. Then I began to understand why it was developed and how it was created. This sparked a flame inside me to learn more and to research more. I was engulfed in Linux so that it started to become something that I just wanted to do for the rest of my life. This passion that I have for Linux gave me the idea to pursue a career as a Linux sysadmin.
Linux.com: What have you done so far to achieve that goal? How will the LiFT scholarship help?
Ahmed: I took many online Linux courses. I took Introduction to Linux on EdX made by The Linux Foundation. I also took Essentials of Linux System Administration on EdX. I also read many different books on Linux. I am preparing to take my LFCS certification exam next month and after that I would like to learn about the Linux kernel and how to contribute to the kernel project.
The LiFT scholarship will help cover the cost of the LFD420 Linux Kernel Internals and Development course. I want to be a Linux system administrator who has a full understanding of every aspect of Linux. Learning the Linux kernel would guarantee me that. I would also like to be a part of the open source community knowing very well about all the contributions they make to Linux. The kernel community is very supportive and knowledgeable and to become a part of that community would be an honor. In the long run, I even want to be able to write my own operating system!
Linux.com: How did you develop the Linux course on Udemy?
Ahmed: After a few years of using and learning about Linux, I began to notice that there are not so many online courses or resources presented in an approachable manner to newbies. People who want to migrate towards Linux but are afraid to make the move. That’s when it came to my mind to construct a course on Udemy explaining the basics of the Linux command line. I wanted to break the fear that newbies have towards Linux. Most users don’t understand the value and usefulness of the command line interface.
I wanted to explain everything in a simpler manner. I even added animations and graphics so users don’t get discouraged while learning. I decide to make the course completely free because Linux is free to begin with and it would go against my beliefs to charge for something that was free. My aim was never to deter people from Linux but to attract a massive audience all over the world to learn Linux and appreciate its versatility. I also realized that a majority of my students could not afford to pay for an online course.
Linux.com: What have you learned in teaching the course?
Ahmed: Making a course on Udemy and seeing all the messages that I get from the students thanking me for making the course and how I changed their lives motivates me on a daily basis. Whenever I feel like giving up and I get a positive review or a message from a student, It simply makes my day! One thing I learned also is that I am not a bad teacher after all!
Linux.com: You’re a recent graduate, what are you doing now?
Ahmed: Currently I am working as a part-time online instructor at Robertson College in Canada. I teach several computer science courses including introduction to Linux. I basically got this job because of my course on Udemy. Also I am preparing for my LFCS as I mentioned and also working on getting few other certifications (RHCSA , CCNA) to be able to get my dream job as a Linux system administrator. I have gotten numerous interviews for other jobs but I want to keep hunting for my dream to become a Linux sysadmin. I also believe that the LiFT scholarship would enormously help on achieving my dream on becoming a Linux sysadmin.
If you’re not already familiar with the concept of technical debt, it’s worth becoming familiar with it. I say this not only because it is a common industry term, but because it is an important concept.
Coined by Ward Cunningham, the term introduces the idea that taking shortcuts in your software today not only means paying the price eventually — it means paying that price with interest. In other words, introducing that global variable today and saving half a day’s work ahead of shipping means that you’re going to pay for it with more than half a day’s labor down the line.
The Power of the Metaphor
I’ve spent significant time doing IT management consulting in recent years, after spending years and years writing code. And I can tell you that this metaphor for shortcuts in the codebase is a powerful one when it comes to communication between the business and the software development group.
As with any aspect of Linux, there are myriad ways to do a single task. Everything from your desktop GUI, running a web server, checking logs, and backing up your system. Finding how to do a task that best suits your need can sometimes be a drawn-out process. But, when you’re looking for a tool to handle a bare metal backup, your quest might very well begin and end with the dd command. The dd command is actually a reference to the DD statement from IBM’s Job Control Language and means Data Description. The primary purpose of dd is to convert and copy files. With dd you can easily copy a partition or an entire drive.
The feature list includes:
Backup and restore a partition or entire drive
Copy regions of raw device files
Convert data formats
Creating files with fixed sizes
Most importantly, however, the dd command is the oldest disk imaging tool still in use. Why is it still around? Because it’s powerful, reliable, and (most importantly) simple to use.
I will walk you through the process of using dd to create a clone of a drive so that you can then restore that drive from the written image.
Proceed with caution
The first thing you absolutely must know is that reversing the arguments within a dd command can lead to erasing all of your precious data. To that end, you must use caution when working with this tool. Make sure to know the location and names of both your source and your target.
You will also want to run the dd command from within a live Linux distribution. The dd command copies every byte (even unused space), so it’s an intensive process. Working with dd while booted into a production machine could cause data corruption (which is why we run it from a live disk). This means downloading your favorite distribution ISO, burning it to either a DVD or USB drive.
With those warnings in place, let’s get up to speed with dd.
Another very important issue is that the target drive must be either of identical size to the drive being cloned or larger. The dd command will copy both used and unused space from the target. Say, for example, you have Linux installed on a 250GB drive and it is currently only using 100GB of space. The dd command will not discern between the used and unused space, so the image will be of the full drive: 250GB. You can help yourself out with this by creating a compressed image (more on that in a bit).
First steps
The first thing you need to do is boot into your live distribution. It won’t matter which distribution you are using, because almost every flavor of Linux includes the ddcommand. I’ll be demonstrating from a beta release of Elementary OS Loki. Boot into that live distribution and then attach your external drive. The external drive you attach should not have any necessary data (as the dd command will overwrite it). Best to use an empty, formatted drive for this purpose.
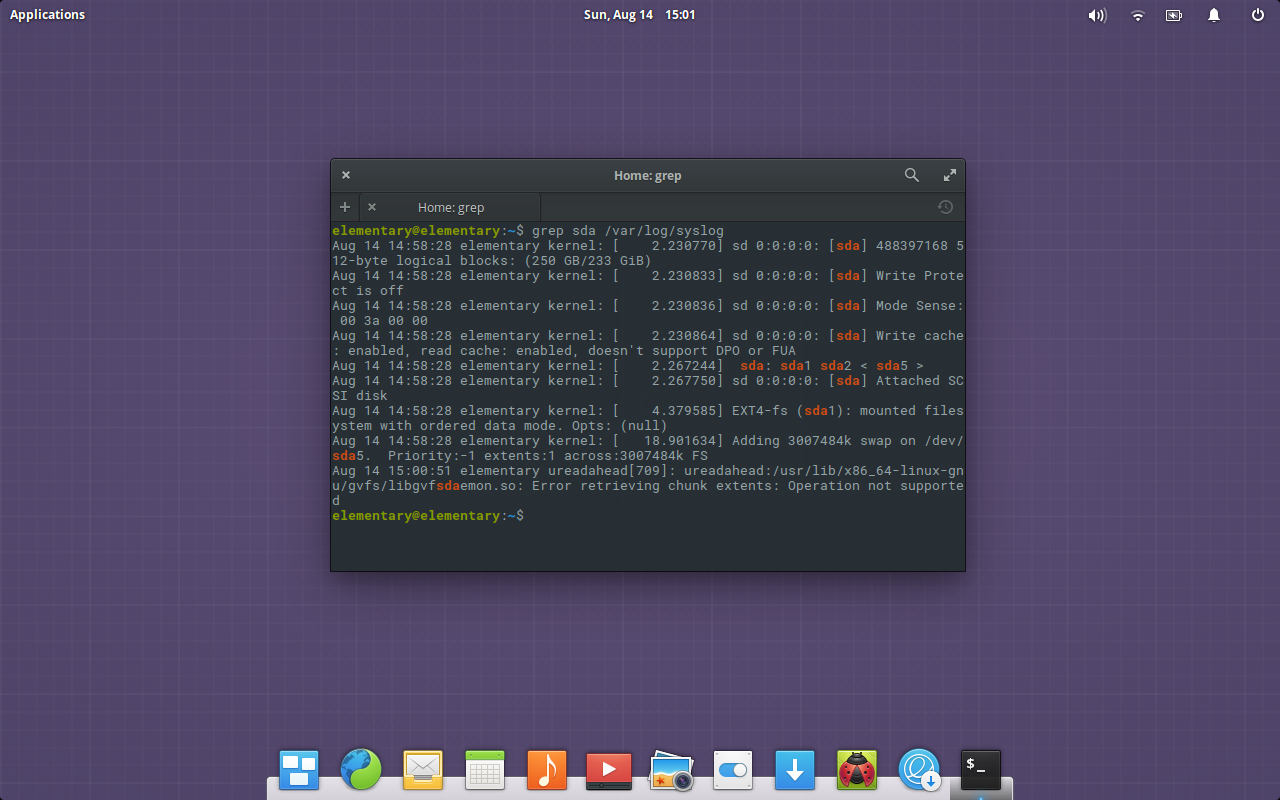
Open up a terminal window (from within the live instance) and check to make sure the drive to be cloned is, in fact, labeled sda. I do this with the command grep sda/var/log/syslog. The output (Figure 1), should indicate that /dev/sda is the location of your source to be copied.
Figure 1: Chances are, the drive you want to copy is sda.
Next, you need to find the location of the attached external drive. To do this, issue the command mount. A good amount of data will fill the window, but you should be able to easily track down the line associated with your target device (the external drive). Most likely, it will be found at /dev/sdb.
Cloning the drive
For the sake of simplicity, let’s assume our source is /dev/sda and our target is is /dev/sdb1. You could copy a single partition from that drive (say, /dev/sda1), but we want to copy the entire drive. To clone sda to sdb1, we’ll issue the command:
bs: Set the block size for copy (the default is 512 bytes but doesn’t work well for larger drives)
noerror: Instructs dd to continue operation, ignoring all read errors
sync: Instruct dd to fill input blocks with zeroes if there were any read errors
Once you issue the command, step away from the computer, as this will take quite some time to accomplish. As the command works, you will see nothing printed on the screen; your prompt will seem to have locked. If you’d prefer to see the status of the command as it works, you can include the status=progress argument like so:
The above addition will keep you informed as to how much has copied, in real time.
You can also opt to clone the disk to an image file. This can make the restoration process a bit easier and create a much smaller file on your target drive. To create an image, we’ll use the dd command like so:
Where /PATH/TO/DRIVE/ is the actual path (on my example, it would be /media/elementary/TOSHIBA/). The above command will create a compressed image of your drive.
My preference is to always clone to an image, as opposed to making a bit-by-bit copy and simply dumping to another drive. One of the benefits of this is the ability to move that image file to wherever you need it. If you are only planning on cloning a target to a source and then using the source as a replacement drive, then you don’t have to bother creating an image file. If, however, you want to backup your drive to an image that can then be used to create multiple copies or need to transport the image (for whatever reason), the latter process will be better suited for the task. Another benefit is that, by creating an image, the empty space will compress very nicely, so the end result will be a much smaller file.
Restoring the copy
I’ll demonstrate how to restore with dd using an image file. As with the copying process, this must be done while booted into a live distribution. I’ll assume the target drive has been installed into the machine, you’ve attached the USB drive (containing the backup image), and you’ve booted into a live distribution.
Once the above dd command completes, you’ll have a file calledbackup_image.img.gz, located on your external drive. To restore that image to a new drive (we’ll restore it to new drive sda, one that is the exact same size as the original), you first must gain su privileges. If you’re running a Ubuntu-based distribution, first issue the command sudo su, type your sudo password, hit Enter, and then run the restore command like so:
Where /PATH/TO/DRIVE is the exact path to your backup_image.img.gz file located on the external device.
NOTE: If you are running a distribution that doesn’t make use of sudo (such as Fedora or openSUSE), you will gain administrator privileges with the command su. Type your administrator password and hit Enter. You can then run the restore command as shown above.
Once again, step away, because this process will take quite some time. When it does finish, you should now have a perfectly bootable drive that is an exact copy of the the original. Reboot, remove the live disk image, and fire up your cloned system.
Congratulations
You now have a working understanding of how to make use of the dd command to clone a drive. There is quite a lot more that dd can do. To get the most out of dd, make sure to read the man page by issuing the command man dd.
More than 70 percent of the 100 federal IT business decision-makers polled in Dell’s State of IT Trends 2016 Study said their agency is using old operating systems to run important mission applications. And a little more than half of respondents said their agency is using software or systems that are no longer vendor-supported, according to the report.
“Running legacy systems that are unsupported creates significant vulnerability in government systems,” Dell Federal Chief Technology Officer Cameron Chehreh told FedScoop. Chehreh cited three things he said are holding agencies back in efforts to modernize: funding, the acquisition model, and understanding where to make low-risk, low-impact changes that enhance the mission.
One interesting finding of the survey, Chehreh noted, was that 24 percent of those polled said “agencies’ lack of knowledge about available solutions” was an obstacle to modernization. And 22 percent cited “conflicting digital transformation strategies” as an obstacle.
Survey finds majority of IT executives rate security higher in public cloud than in their own data centers, but security is still the greatest concern with cloud.
That’s the gist of a recent survey of 210 IT executives conducted by SADA Systems. SADA specializes in cloud migrations, so it’s to be expected they would want to demonstrate that cloud security fears are waning. But this is a trend I’ve seen evolving in recent years, with an awareness that things are getting so complex, and the external and internal security threats are getting so savage, that it’s just too much for a corporate IT shop to attempt to do it on its own.
The survey’s key takeaway was that IT managers are more confident in the security and reliability of public cloud than they used to be, and as a result they are running more data and applications on public cloud infrastructure.
Companies are eager to hire DevOps engineers, and it is not unusual for salaries of $200,000 or more to be offered to DevOps team leaders.
A recent study by Indeed.com ranked DevOps engineers as the hardest hires for tech companies. Lack of talent – as opposed to money or other company resources – is the primary reason major organizations cite as the biggest impediment to implementing DevOps. But where there is a need there is an opportunity, and more people are choosing to steer their careers in the direction of DevOps. Here’s what you need to know to begin your DevOps career.
Statistics show us that well over 80% of web applications and websites are powered by open source web servers. In this article, I look at the most popular open source web servers, and briefly review their history, technology, features, and more. I will also provide some tips so you can easily deploy one of the popular web servers yourself.
According to Wikipedia, a web server is “a computer system that processes requests via HTTP, the basic network protocol used to distribute information on the World Wide Web. The term can refer to the entire system, or specifically to the software that accepts and supervises the HTTP requests.” In this article, we address the software which specifically processes web requests from end users.