Home Blog Page 727

Automatically Deploy Build Images with Travis

This is the third and last tutorial in our series about creating CICD pipelines with Docker containers. Part one focused on how to use Docker Hub to automatically build your application images, and part two used the online Travis-ci platform to automate the process of running those units tests.

Now that our little flask application is tested by Travis, let’s see how we can make sure a docker image is being built and pushed to the hub, instead of using the autobuild feature. Then, we will see how to deploy the latest build image automatically every time some code is added to the project.

I will assume in this tutorial that you already have a remote host set up and that you have access to it through ssh. To create the examples, I have been using a host running on Ubuntu, but it should be very easy to adapt the following to any popular Linux distribution.

Requirements

First, you will need to have the travis command-line client installed on your workstation (make sure the latest version of ruby is installed and run):

sudo gem install travis

Login with your GitHub account by running:

travis login --org

On your remote host, make sure that Docker engine and docker-compose are installed properly. Alternatively, you can also install compose locally; this will be useful if you later add services on which your applications rely (e.g., databases, reverse-proxies, load-balancer, etc.).

Also, make sure that the user you are logging in with is added to the docker group; this can be done on the remote host with:

sudo gpasswd -a ${USER} docker

This requires a logout to be effective.

Building and pushing the image with Travis

In this step, you will be modifying your existing Travis workflow in order push to the image we’ve built and tested onto the hub. To do so, Travis will need to access the hub with your account. Let’s add an encrypted version of your credentials to your .travis.yml file with:

travis  encrypt DOCKER_HUB_EMAIL=<email> --add
travis  encrypt DOCKER_HUB_USERNAME=<username> --add
travis  encrypt DOCKER_HUB_PASSWORD=<password> --add

We can now leverage the tag and push features of the Docker engine by simply adding the following lines to the script part:


- docker tag flask-demo-app:latest $DOCKER_HUB_USERNAME/flask-demo-app:production
- docker push $DOCKER_HUB_USERNAME/flask-demo-app:production

This will create an image tagged “production” and ready to download from your Docker Hub account. Now, let’s move on to the deployment part.

Automatic deployment with Travis

We will use Docker compose to specify how and which image should be deployed on your remote host. Create a docker-compose.yml file at the root of your project containing the following text:


version: '2'
services:
 app:
   image: <your_docker_hub_id>/<your_project_name>:production
   ports: 
     - 80:80

Send this file to your production host with scp:

scp docker-compose.yml ubuntu@host:

Now that you have set up docker-compose on your remote host, let’s see how you can prepare Travis to do the same automatically each time your application is builded and tested successfully.

The general idea is that you will add some build commands in the Travis instructions that will connect to your remote host via ssh and run docker-compose to update your application to its latest available version.

For that purpose, you will create a special ssh key that will be used only by Travis. The user using this key will be allowed to run only one script named deploy.sh, which calls several docker-compose commands in a row.

Create a deploy.sh file with the following content:

docker-compose down
docker-compose pull
docker-compose up -d

Make the file executable and send it to your host with:

chmod +x ./deploy.sh
scp deploy.sh ubuntu@host:

Create the deploy key in your repo code with:

ssh-keygen -f deploy_key

Copy the output of the following command in your clipboard:


echo "command=./deploy.sh",no-port-forwarding,no-agent-forwarding,no-pty $(cat ./deploy_key.pub) 

Connect to your host and paste this output to the .ssh/authorized_keys of your user. You should end up with a command similar to this one:


echo 'command="./deploy.sh",no-port-forwarding,no-agent-forwarding,no-pty ssh-rsa AAAAB3NzaC1yc2EAAAADAQABAAABAQC/OAw[...]kQ728t3jxPPiFX' >> ~/.ssh/authorized_keys

This will make sure the only command allowed for the user connecting with the deploy key is our deployment script.

You can test that everything is in order by running once:


ssh -i deploy_key <your_user>@$<your_remote_host_ip> ./deploy.sh

Now that you have tested your deployment script, let’s see how you can have Travis run it each time the tests are successful.

First, let’s encrypt the deployment key (necessary because you DO NOT want any unencrypted private key in your repository) with:

travis encrypt-file  ./deploy_key --add

Note the use of the –add option that will help you by adding the decryption command in your travis file. Refer to the Travis documentation on encryption to learn more.

Add it to the project with:

git add deploy_key.enc
git commit -m "Adding enrypted deploy key" deploy_key.enc
git push

You should now be able to see your encrypted deploy_key in your projects settings on Travis-ci:

Finally, add the following section to your .travis.yml file, (take care of updating accordingly your remote host ip):


 deploy:
 provider: script
 skip_cleanup: true
 script: chmod 600 deploy_key && ssh -o StrictHostKeyChecking=no -i deploy_key ubuntu@<your_remote_host_ip> ./deploy.sh
 on:
   branch: master

Commit and push your change:

git commit -m "Added deployment instructions" .travis.yml
git push

Head to your Travic-ci dashboard to monitor your build, you should see a build output similar to this one:

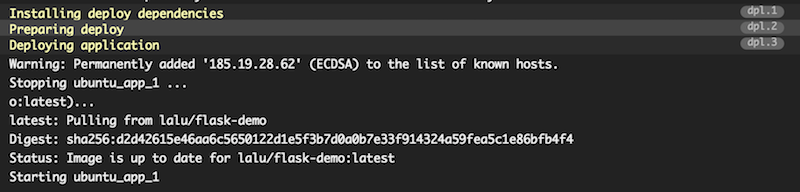
Your build has been deployed to your remote host! You can also verify this by running a docker ps on your host and check for the STATUS column, which should give you the uptime of the app container:


ubuntu@demo-flask:~$ docker ps
CONTAINER ID        IMAGE                    COMMAND             CREATED             STATUS              PORTS                NAMES
ae1797d92bf8        lalu/flask-demo:latest   "/entrypoint.sh"    3 hours ago         Up 10 minutes       0.0.0.0:80->80/tcp   ubuntu_app_1

To sum it up, here is what your final travis.yml file should look like:


sudo: required
language: python
services:
- docker
before_install:
- docker login --email=$DOCKER_HUB_EMAIL --username=$DOCKER_HUB_USERNAME --password=$DOCKER_HUB_PASSWORD
- openssl aes-256-cbc -K $encrypted_ced0c438de4d_key -iv $encrypted_ced0c438de4d_iv
 -in deploy_key.enc -out ./deploy_key -d
- docker build -t flask-demo-app .
- docker run -d --name app flask-demo-app
- docker ps -a
script:
- docker exec app python -m unittest discover
- docker tag flask-demo-app:latest $DOCKER_HUB_USERNAME/flask-demo-app:production
- docker push $DOCKER_HUB_USERNAME/flask-demo-app:production
after_script:
- docker rm -f app
deploy:
 provider: script
 skip_cleanup: true
 script: chmod 600 deploy_key && ssh -o StrictHostKeyChecking=no -i ./deploy_key
   ubuntu@demo-flask.buffenoir.tech './deploy.sh'
 on:
   branch: master
env:
 global:
 - secure: DCNxizK[...]pygQ=
 - secure: cnpkOl9[...]dHKc=
 - secure: wy5+mu0[...]MqvQ=

Et voilà! Each time you will be adding code to your repository that pass your set of tests, it will also be deployed to your production host.

Conclusion

Of course, the example application showcased in this series is very minimalistic. But it should be easy to modify the compose file to add, for example, some databases and proxies. Also, the security could be greatly improved by using private installation of Travis. Last but not least, the workflow should be customized to support different branches and tags according to your environments (dev, staging, production, etc.).

Read previous articles:

Integrating Docker Hub In Your Application Build Process

How to Automate Web Application Testing With Docker and Travis


It’s the Year of Application Layer Security in Public Clouds

The cloud continues to be a significant force in enterprise computing and technology adoption.  Enterprises that have adopted cloud have seen slashes capital expenses, increased agility, centralized information management, and scaled their businesses quickly.

The 2015 RightScale State of the Cloud Survey estimates that 93% of respondents are adopting cloud – 88% are using public cloud, 63% using private cloud, and 58% using both.  

Read more at Cohesive Networks

IoTivity 2.0: What’s in Store?

In May, we reported on an Embedded Linux Conference talk by Open Connectivity Foundation (OCF) Executive Director Mike Richmond on the potential for interoperability between the OCF’s IoTivity IoT framework and the AllSeen Alliance’s AllJoyn spec. We also looked at how the OCF has evolved from the earlier Open Interconnect Consortium (OIC) and acquired the assets of the Universal Plug and Play (UPnP) Forum. Here, we examine another ELC 2016 talk about the specifics of those integrations, as well as other changes planned for the IoTivity 2.0 release due later this year.

The Iotivity 2.0 talk (see full video below) was presented by Vijay Kesavan, a Senior Member of Technical Staff in the Communication and Devices Group at Intel Corp. Kesavan is a seed contributor to the core IoTivity library, and currently serves as the Business Development Task Group chair for OCF.

Speaking shortly after the release of IoTivity 1.1, Kesavan told the ELC audience about plans to support new platforms and IoT ecosystems in v2.0. He also explained how the OCF is exploring usage profiles beyond home automation in domains like automotive and industrial.

Joining the IoTivity Party: iOS, Windows, UPnP, and Arduino 101

IoTivity currently supports Linux, including specific Ubuntu and Android support, as well as Arduino. Version 2.0 will expand that to Windows and iOS. For iOS, the OCF is essentially doing what it did for Android: adding support in the “upper stack built on C++” rather than the lower C-based stack, in order to expose IoTivity to the iOS API, said Kesavan. The Windows integration will be more substantial. “We’re porting IoTivity to Windows so it can build upon Visual Studio 2013,” he said.

New hardware targets will include Intel’s Arduino 101 board. Arduino 101 runs the Arduino IDE on the Intel-developed, open source Zephyr OS, which itself runs on an Intel Curie module based on an Intel Quark SE chip. “Zephyr and IoTivity have the same data model, but the APIs are not yet compatible,” said Kesavan. IoTivity 2.0 will also support Samsung’s Linux-ready Artik embedded modules.

Integrating IoT ecosystems is a more challenging problem. Much of v2.0 is about supporting legacy UPnP devices. “We’re doing a lot of work in protocol translations, exposing UPnP devices using a plugin mechanism,” said Kesavan. “A UPnP device will essentially be discovered and seen as an OCF device.”

In the future, the OCF will translate IoTivity’s REST APIs to UPnP’s SOAP/XML representations, he added. There are also plans to integrate the UPnP AV data model directly to IoTivity to support audio and video.

IoTivity 2.0 will also include “some work” in interoperability with AllJoyn, although in v2.0, this work will not be as comprehensive as the UPnP integration. “There will be an AllJoyn plugin that maps AllJoyn into the OCF model and talks to AllJoyn routers, and maybe talk to some of the thinner devices like lightbulbs,” said Kesavan.

Additionally, IoTivity 2.0 will include the beginnings of interoperability with EEBus, a European IoT spec for energy management in homes and smart buildings. Specific device integration will also be provided for IoT device families like Nest, LIFX, and Hue. Presumably, the Nest support would include some integration with Nest’s Weave IoT protocol, but Kesavan did not go into specifics.

NodeJS and Group Management

The big news for developers in v2.0 is the support for NodeJS at the API level. There will also be better group management features, making it easier to create and manage conceptual groups of IoT devices, and detailing “how you add and remove devices and add security,” said Kesavan.

Other new developer-focused features will include Pub/Sub integration, more cloud extensions, and better tools and documentation. When asked whether IoTivity would expand to different transport protocols beyond its Constrained Application Protocol (CoAP) to support HTTP, Kesavan said there were “no plans for 2.0 but we’re looking into it.”

Finally, IotTvity 2.0 will feature end user improvements including better support for “network onboarding” of tools. “This will make it easier for end users to add a device to a WiFi or BLE network,” said Kesavan.

New Industrial Domains: Supply Chain, Automotive, and More

For future release, the OCF is beginning to look beyond the smart home to new industrial domains with very specific usage requirements. In the shipping business, for example, there are considerable questions about how IoTivity could be modified to support asset tracking and smart logistics in the supply chain. “The industry wants to move beyond bar codes to add smart sensors that continuously monitor shipments,” said Kesavan.

Sensors are being implemented first for high value goods and perishables like vaccines and food that need to maintain consistent temperature and other conditions. “Today, you don’t know about the quality of the goods until you open the box,” said Kesavan. “But if you knew the temperature threshold was being breached closer to the time it happened, you could take action earlier. We’ll see coin-cell driven sensors attached to boxes and pallets to measure things like temperature, shock, and humidity. At each step, that data can be read and aggregated through a gateway to the cloud.”

Industrial supply chains present challenges like scale, density, and quality of service that are less common in the home. “If you have all these boxes all transmitting status over BLE or ZigBee, how do manage interference?” said Kesavan. “We can have gateways coordinate with each other on load balancing, handoffs, and channel allocations.”

The OCF is looking into how to integrate DDS for quality of service, and how to operate on highly constrained devices. “We’ll also need to look at better security at both the device and hierarchical level,” he added.

Other domains under evaluation include medical and automotive. In automotive, the OCF is working with both the Automotive Grade Linux (AGL) and GENIVI standards organizations. “The next step will be creating an automotive profile for IoTivity,” said Kesavan. “We’ll look at how you integrate wearables, and communicate between the car and a home gateway, including scheduling smart charging. We’ll look at how we talk to various automotive buses, as well as other cars or infrastructure using V2V or V2I.”

As the OCF’s industrial workgroups pull together requirements for these and other domains, they need more participants with domain experience. “Please join the OCF,” said Kesavan. “We need your expertise.”

https://www.youtube.com/watch?v=_k7OAXUNl6I

linux-com_ctas_may2016_v2_elc.png?itok=QQNwiljU

The Onion Omega2 Lets You Add Linux to your Hardware Projects

Need a tiny, $5 computer to build a robot that will bring you your slippers, initiate a massage chair session, and pour out your daily dose of bourbon?

The Onion Omega2 can do all that and more.

This tiny board is Arduino-compatible but also runs Linux natively. This means you can plug it in and get a command line or access the system via a desktop-like web interface. It has Wi-Fi built in and can be expanded to support cellular, Bluebooth, and GPS connections.

“Omega2 is a Linux computer designed for hardware projects. It does a few things. First it allows software developers to develop hardware using high-level programming languages and familiar developer tools. …”

Read more at TechCrunch


Google Waves Goodbye to Linux for New IoT OS Fuchsia – Coming Soon to Raspberry Pi

Google has started building a new open-source operating system that doesn’t rely on the Linux kernel.

While Android and Chrome OS have Linux at their heart, Google’s new OS, dubbed Fuchsia, opts for a different kernel to create a lightweight but capable OS, suitable for running all Internet of Things devices, from embedded systems to higher-powered phones and PCs.

Instead of the Linux kernel, Google’s new OS uses Magenta, which itself is based on LittleKernel, a rival to commercial OSes for embedded systems such as FreeRTOS and ThreadX. According to Android Police, Magenta can target smartphones and PCs thanks to user-mode support and a capability-based security model not unlike Android 6.0’s permissions framework.

Read more at ZDNet

New R Extension Gives Data Scientists quick Access to IBM’s Watson

Data scientists have a lot of tools at their disposal, but not all of them are equally accessible. Aiming to put IBM’s Watson AI within closer reach, analytics firm Columbus Collaboratory on Thursday released a new open-source R extension called CognizeR.

R is an open-source language that’s widely used by data scientists for statistical and analytics applications. Previously, data scientists would have had to exit R to tap Watson’s capabilities, coding the calls to Watson’s APIs in another language, such as Java or Python.

Read more at InfoWorld


Agile Programming: The Last Mile for DevOps

As DevOps has come into its own, IT automation companies such as Chef have made automating and managing release pipelines simpler. At ChefConf 2016, Chef announced new tools which include Chef Automate, which pulls together all of Chef’s IT automation tools in one package. How DevOps teams communicate with others in their business has also changed with the rise of tools such as Slack, HipChat, and processes such as ChatOps.

In this episode of The New Stack Makers podcast embedded below, we explore how Chef Automate and ChatOps enable DevOps teams to work more efficiently, the ways in which agile development practices have shaped DevOps, and how the culture of DevOps has evolved as the ways in which businesses use software has changed. Electric Cloud Chief Technology Officer Anders Wallgren and ChatOps software provider VictorOps DevOps evangelist Jason Hand spoke with TNS consulting engineer Lee Calcote and TNS managing editor Joab Jackson at ChefConf 2016 for this podcast.

Read more at The New Stack

How to Manage Binary Blobs with Git

In the previous six articles in this series we learned how to manage version control on text files with Git. But what about binary files? Git has extensions for handling binary blobs such as multimedia files, so today we will learn how to manage binary assets with Git.

One thing everyone seems to agree on is Git is not great for big binary blobs. Keep in mind that a binary blob is different from a large text file; you can use Git on large text files without a problem, but Git can’t do much with an impervious binary file except treat it as one big solid black box and commit it as-is.

Read more at  OpenSource,com

5 Best Linux Gaming Distributions That You Should Give a Try

One of the major reasons why Linux usage has lagged behind in comparison to Windows and Mac OS X operating systems has been it’s minimal support for gaming. Before some of the powerful and exciting desktop environments came to existence on Linux, when all a user would utilize was the command line to control a Linux system, users were restricted to playing text based games which did not offer convenient features comparable to graphical games of today.

However, with the recent progressive development and immense advancement in the Linux desktop, several distributions have come into the limelight, offering users great gaming platforms with reliable GUI applications and features.

[[ This is a content summary only. Visit my website for full links, other content, and more! ]]

Compilation and Installation of PSAD for IPFire firewall

This article is about compilation and installation of PSAD (Port Scan Attack Detector) for IPFire (Linux based firewall). However, a development environment for the IPFire will be setup for the compilation of new plugin (PSAD in this case).

Read full article