Time is money, as goes an old saying, therefore you need to manage it very well. This then calls for proper planning of your daily schedule, future events, appointments and several other daily activities…
You can only achieve this efficiently and flexibly by using a calendar application especially on your Linux desktop. In this article, we shall walk through a brief review of some of the best calendar applications that can help us plan and manage our daily lives.
[[ This is a content summary only. Visit my website for full links, other content, and more! ]]
This is the demo project for Tibbo’s MQTT library. The project demonstrates how easy it is to create sophisticated network-enabled applications in Tibbo BASIC and Tibbo C. The code is extremely simple and easy to understand. Take this app and modify it for your MQTT needs.
To illustrate the use of the MQTT library, we have created two simple Tibbo BASIC applications called “mqtt_publisher” and “mqtt_subscriber”.
In our MQTT demo, the publisher device is monitoring three buttons (Tibbits #38). This is done through the keypad (kp.) object.
The three buttons on the publisher device correspond to the red, yellow, and green LEDs (Tibbits #39) on the subscriber device.
As buttons are pushed and released, the publisher device calls mqtt_publish() with topics “LED/Red”, “LED/Green”, and “LED/Red”. Each topic’s data is either 0 for “button released” or 1 for “button pressed”. The related code is in the on_kp() event handler.
The subscriber device subscribes to all three topics with a single call to mqtt_sub() and the line “LED/#”. This is done once, inside callback_mqtt_connect_ok().
With every notification message received from the server, the subscriber device gets callback_mqtt_notif() invoked. The LEDs are turned on and off inside this functions’s body.
Testing the MQTT demo
The demo was designed to run on our TPS3 boards, but you can easily modify it for other devices.
Open source is the new normal for startups and large enterprises looking to stay competitive in the digital economy. That means that open source is now also a viable long-term career path.
“It is important to start thinking about the career road map, and the pathway that you can take and how Linux and open source in general can help you meet your career goals,” said Clyde Seepersad, general manager of training at The Linux Foundation, in a recent webinar.
Certification is one clear path with real career benefits. Forty-four percent of hiring managers in our recent 2016 Open Source Jobs Report said they’re more likely to hire certified candidates. And 76 percent of open source pros surveyed believe certifications lead to a career boost.
The Linux Foundation Certified System Administrator (LFCS) and Certified Engineer (LFCE) exams are great opportunities for sysadmins to polish and prove their skills. The exams are available online to anyone in the world at any time. They’re also performance based, working within a Linux server terminal and overseen by a proctor. Because the format is not multiple choice, even seasoned pros will need some preparation in order to avoid common mistakes and complete the exam within the time limit.
To help you prepare for the certification exam, and a long and successful sysadmin career, we’ve gathered some tips, below, from Linux Foundation certified sysadmins who have completed the LFCS or LFCE exams.
Chris van Horn, LFCS
1. Practice
“Experience is key. Spin up a VM, take a fresh snapshot of it and go to work applying all the requirements of the exam in practice. When you feel you have satisfied all the exam topics thoroughly, apply that fresh snapshot to revert changes and begin again until it is second nature. Also, feel comfortable with man pages; they are your best friend when Google is not an option.”
“The best preparation is your experience. If you feel that you have enough experience with the topics required by the exam, you can give it a try. Otherwise, you have to work hard to get those skills.
Don’t think that in a short time you can learn everything.”
4. Understand the material, don’t just memorize it
“Forget recipes, it’s not about memorization. Understand what are you doing by reading some books and documentation that give you a deep background of the tasks you’ll perform at the exam and in real life.
“For experienced professionals, I recommend that they prepare the environment for the exam, and follow the instructions. It’s not a difficult exam if you work daily with Linux.
On the other hand, for newcomers, apart from having a look to open/free resources, I just encourage them to set up a Linux environment at home and get their hands dirty!!”
“Make sure you love what you are doing, and do not forget to have fun, to experiment, and then to do it all over again and again, and make sure you learn something new each time.”
The Linux Foundation has released session details for three major conferences coming up this fall: MesosCon Europe, Embedded Linux Conference / OpenIoT Summit Europe, and LinuxCon + ContainerCon Europe.
MesosCon Europe, which will take place August 31-September 1 in Amsterdam, The Netherlands, is an annual conference organized by the Apache Mesos community, bringing together users and developers for two days of sessions about Mesos and related technologies. This year, the MesosCon program will include workshops to get started with Mesos, keynote speakers from industry leaders, and sessions led by adopters and contributors.
LinuxCon + ContainerCon Europe will take place October 4-6 this year in Berlin, Germany. At LinuxCon + ContainerCon Europe, you have the chance to learn from Linux experts, with presentations from leading maintainers, developers, and project leads in the Linux community and from around the world.
With 185+ sessions — ranging from tutorials to technical deep dives — and 1,500 Linux community members to collaborate with, the event offers unparalleled open source content for attendees of all levels. This year, conference festivities also include a special celebration of the 25th anniversary of Linux.
Scheduled speakers and sessions at LinuxCon + ContainerCon Europe will cover today’s important topics in open source development, including containers, networking, security, cloud applications, the Linux kernel, and more.
Embedded Linux Conference and OpenIoT Summit Europe are co-located October 11-13 in Berlin. For the past 10 years, ELC has been the premier vendor-neutral technical conference for developers, architects, and engineers using Linux in embedded products. The OpenIoT Summit offers essential knowledge for system architects and firmware, software, and application developers in the emerging IoT ecosystem.
Pwnie Express has given the keys to software used to secure the Internet of Things (IoT) and Android software to the open-source community.
The Internet of Things (IoT), the emergence of devices ranging from lighting to fridges and embedded systems which are connected to the web, has paved an avenue for cyberattackers to exploit.
The software should help penetration testers identify and locate threats to Internet of Things (IoT) devices.
When I first started on my journey with Linux, back in the late 1990s, there was one inevitability: the terminal. You couldn’t escape it. The command line was a part of your daily interaction with the open source platform and that was that. Today’s Linux is a much different beast. New and seasoned users alike can work with the platform and never touch the command line or terminal.
But, on the off-chance you do want to take advantage of the power that is the command line, it’s good to know there are numerous options available, some of which offer unique takes on the task. Those are the terminals I want to highlight today—the ones that offer more than just the ability to enter a command. If you’re looking for a far more efficient interaction with your terminal and OS, or you’re looking for more flexibility with your terminal, one of these will certainly fit your needs.
Technically speaking, these are actually terminal emulators. What they do is create a windowed terminal environment (so you don’t have to log out of your desktop and work from within a real terminal). With that said, let’s take a look at some really cool (and unique) examples of the Linux terminal window. I’ll be demonstrating these terminals on Elementary OS Freya and Ubuntu 16.04.
Guake
Guake is my terminal window of choice. The primary reason for this is that I use the terminal quite a bit throughout the day and don’t want to have to clutter up an already cluttered dock with yet another tool. Guake makes this easy. With the simple click of a hot key, the Guake terminal will drop down from the top of the window (as an overlay), ready to use (Figure 1).
Figure 1: The Guake Terminal in action.
Installing Guake can be done from standard repositories. Issue the command sudo apt-get install -y guakeand the app and its dependencies will be added to your system. Once installed, you must run the Guake application before you can call the terminal with the hot key. To start up Guake, either find the Guake entry in your desktop menu or issue the command guake. When you run the command, you should get a desktop notification that Guake is running. To call up the terminal overlay, hit the hotkey (by default this is F12) and you’re ready to work.
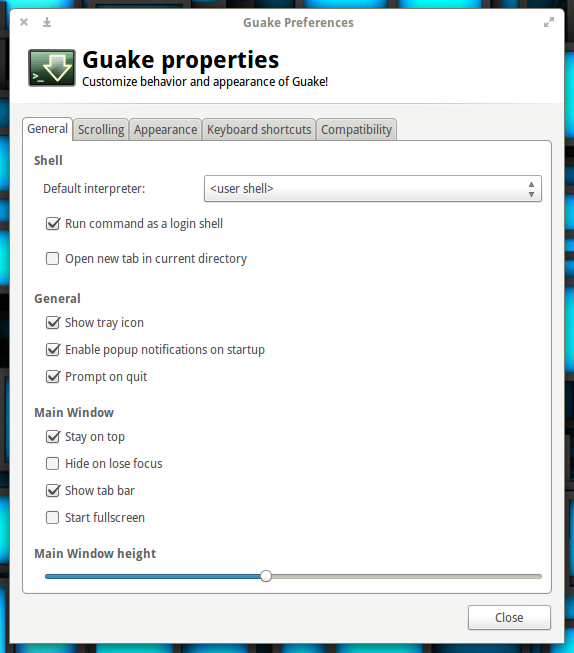
You can configure Guake from with the Guake properties app (it can be found in your desktop menu) or by issuing the command guake-prefs. From within the Guake properties window (Figure 2), you can set a number of options.
Figure 2: The Guake properties window allows you configure the app to your liking.
One thing you will not find is the ability to auto-start Guake at login. Because of this, you will have to make use of your desktop’s startup applications tool to ensure Guake is running at login (otherwise the hotkey will not work). For example: In Elementary OS Freya, I go to System Settings > Applications > Startup and add Guake to the list of apps to start at login.
Once running, to call up my terminal, all I have to do is hit F12.
Terminator
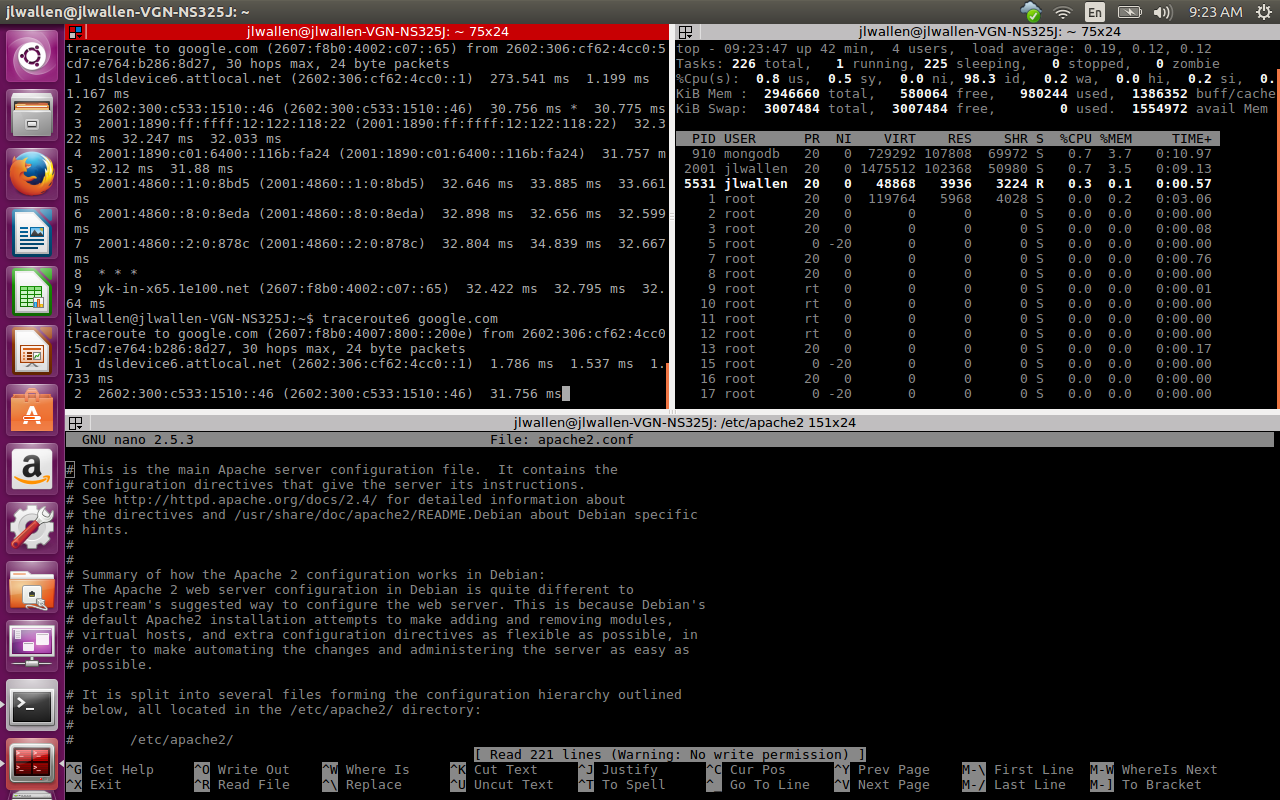
If you’re a system admin, network admin, or a developer, you probably live with multiple terminals open. This can sometimes be a logistical and confusing nightmare. That’s where terminal emulators like Terminator come into play. Terminator allows you to open a terminal window and then split it (horizontally and vertically) into as many terminals as you need. This means, from a single window, you can set up a terminal for each of your tasks (Figure 3).
Figure 3: Terminator running three terminals, each for a different task.
Terminator is also available from the standard repository and can be installed with the command sudo apt-get install -y terminator. Once installed, you can run the app from either your desktop menu or with the commandterminator.
Let’s say you want Terminator displaying the same layout as you see in Figure 3. To do this, follow these steps:
Open Terminator
Right-click in the terminal window and select Split Horizontally
Right-click in the upper terminal and select Split Vertically
You should now have two terminals in the top pane and one in the bottom. But what if you want to give a little more space to that upper right terminal? Easy. Click and drag the vertical bar separating the two until you have the desired size for each terminal.
ROXTerm
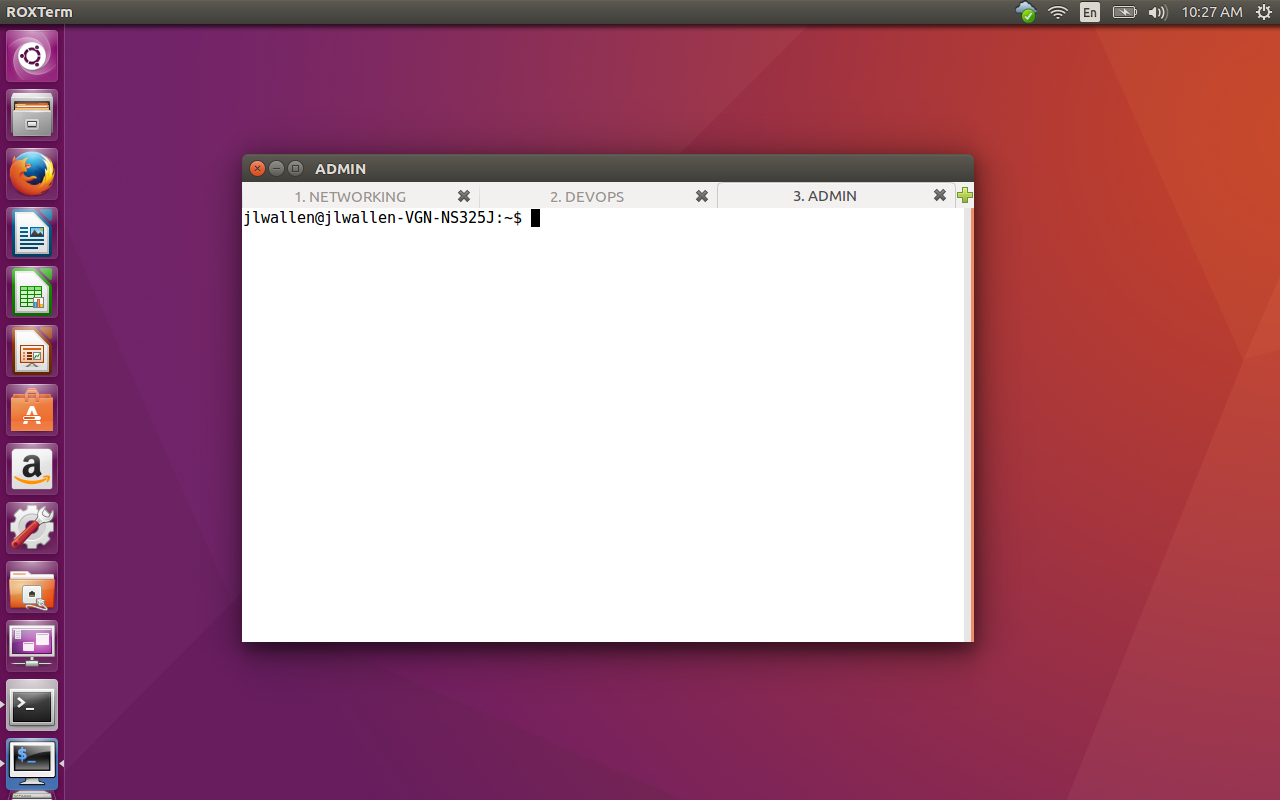
How many times have you been using a terminal that supports tabs, but wound up lost on which tab you had open, which tab you needed, and what work was where? If that describes something you’ve experienced, you might want to give ROXTerm a try. ROXTerm won’t blow you away with bells and whistles; in fact, it really has only three features that set it apart from other terminals. Those features, however, are pretty helpful.
The first feature is the ability to name your tabs. This means you could have tabs for, say, NETWORKING, DEVOPS, and ADMIN (Figure 4).
Figure 4: Named tabs make it really simple to know what you’re working with.
ROXTerm can be installed from the standard repositories. To do so, issue the command sudo apt-get install -y roxterm. Once installed, you can find the app in your desktop menu or issue the commandroxterm.
To rename a tab, do the following:
Open ROXTerm
Click the + button to open as many tabs as needed
Right-click on a tab and select Name Tab
Give the tab a name
Click Apply
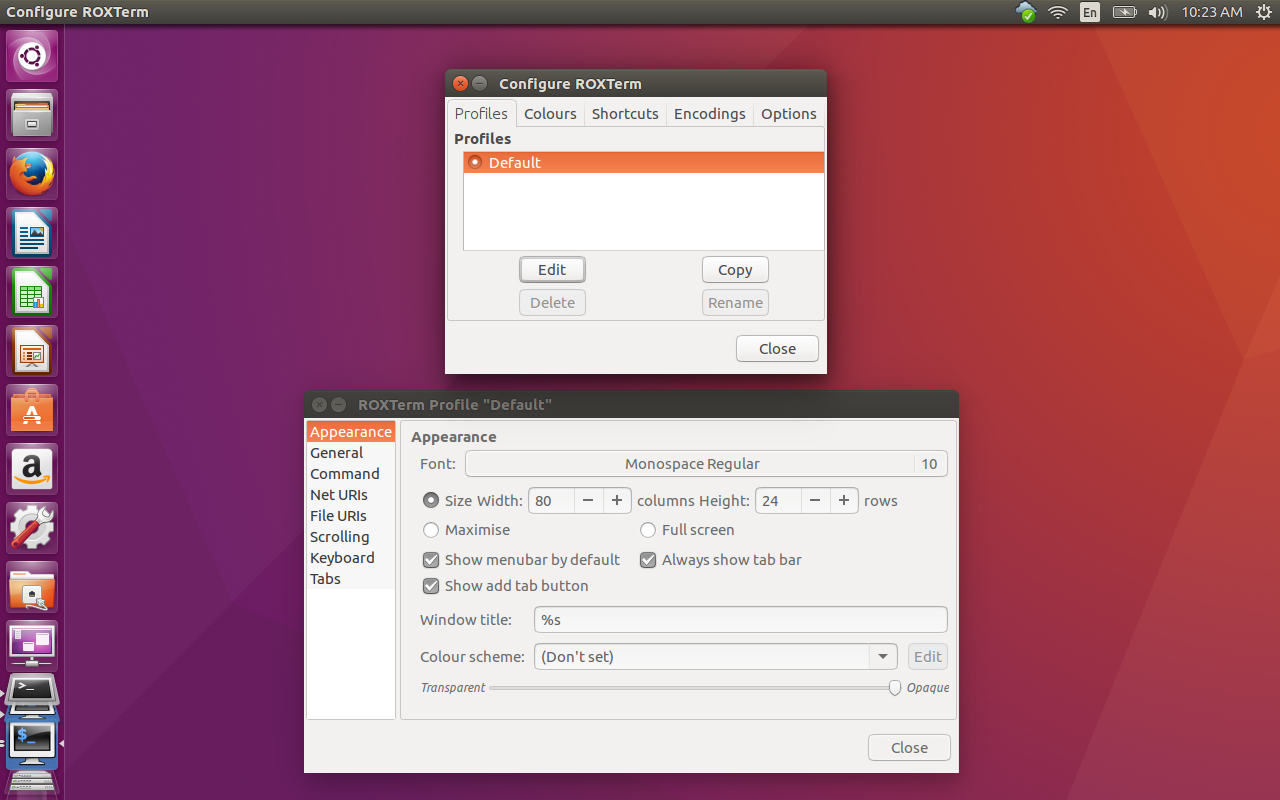
Another incredibly handy feature of ROXTerm is the ability to drag and drop items into the terminal. Don’t get too excited. You cannot drag, say, a configuration file into ROXTerm and have it automatically open it into your favorite editor. What the drag and drop feature does is allow you to drag an item into a terminal and ROXTerm will automatically copy the direct path into the prompt. Say, for instance, you want to edit /etc/apache2/sites-available/000-default.conf. If you drag and drop that file from your file manager into ROXTerm, the direct path will automatically copy to the prompt. All you have to do (for this example) is prepend sudo nano to the prompt and hit Enter. In this case, the nano editor will open to edit the 000-default.conf file. The final feature that sets ROXTerm apart from the standard terminal app is it’s GUI configuration tool (Figure 5) that offers plenty of options.
Figure 5: The ROXTerm configuration tool in action.
To open the ROXTerm configuration tool, issue the commandroxterm-config. With this tool you can edit the default profile, keyboard shortcuts, file URIs, scrolling, command, and more. Although ROXTerm might look, on the surface, like a standard terminal, it’s much, much more.
Take your pick
Many different terminal emulators are available on Linux, each of which offers its own features. You may be someone who can get by with the default tool on your distribution/desktop of choice. If, however, you need more power, more efficiency, and more flexibility, give one of these three a chance and see if it doesn’t wind up your go-to terminal for all your Linux command line needs.
The Solus Project version 1.2, released last month, shows considerable maturity in the homegrown Budgie desktop. Solus 1.2 is the second minor release in the Shannon series, built around a custom Budgie desktop developed in-house and the eopkg package manager forked from PiSi. Solus is a Linux distribution built from scratch.
The Budgie desktop can be set to emulate the look and feel of the GNOME 2 desktop, but it is a different flavor from the GNOME 2-0 retread, MATE. It is tightly integrated with the GNOME stack.
Containers have the power to change infrastructure architecture, making it more secure and more energy efficient. This is because containerized applications can be started, stopped or juggled from machine to machine in seconds — far faster than applications can be moved on VMs or bare metal. That speed opens up the world to intelligent container-aware tools that can control what’s running in a data center in near real time.
Combined with clever tooling, containers could help make data centers less static and more like an organic body: re-assigning resources or repelling threats as and when required.
Future versions of Android will be more resilient to exploits thanks to developers’ efforts to integrate the latest Linux kernel defenses into the operating system.
Android’s security model relies heavily on the Linux kernel that sits at its core. As such, Android developers have always been interested in adding new security features that are intended to prevent potentially malicious code from reaching the kernel, which is the most privileged area of the operating system.
One older example is Security Enhancements for Android (SEAndroid), a set of kernel add-ons and tools that make exploitation of certain vulnerabilities harder by enforcing access controls.