

SUSE Studio is pretty awesome for building custom Linux spins. When you have designed your spin to your liking, you can download what’s known as a “raw image” that you can copy to a USB thumbdrive, and… Hey presto! You’ve got yourself a tailor-made distro on a stick!
There is one serious caveat, however: If you want to add external packages that are not in the otherwise very comprehensive repositories, things can get complicated indeed.
Say you need a customized distro for the kids at your maker club. You want an image they can burn to their own USB thumbdrives so they can use it at home or in the computer lab. Maybe something like this (by the way, if you want to follow along with this tutorial, you may want to download that). You may want to have the Arduino IDE preinstalled. However, the default package for Arduino that comes with openSUSE is quite old, and newer boards are not supported. Of course, you want the most recent version.
Packaging the Arduino IDE for openSUSE is perfectly possible, but it’s a whole new kettle of fish. There must be a shortcut, right? After all, the Arduino IDE requires virtually no installation as such and very little in the way of dependencies. “Installing” Arduino usually consists of downloading the zip file for your architecture, decompressing it in /home/[your user directory]/[somewhere sensible]/ and creating a soft link to the arduino app itself from a bin/ directory on your $PATH. Surely you can do all that by manipulating the disk image that SUSE Studio provides you with.
Well, yes, but there are several steps you have to follow to pull this off.
Raw vs. ISO Images
Before we dig in any deeper, a few words on the differences between raw and ISO images. Although both are a byte per byte copy of block devices, and both can be recorded to read only or read/write media, ISO images do not contain a partition table and are read only, whereas RAW images can contain a complete table and are read/writable.
Raw image files are useful for several reasons. Think of how you “install” Raspberry Pi’s Raspbian, for example: You simply dd the image file to an SD card. Same goes for the default SUSE Studio images mentioned above, and a few other distros. As they are read/writable, copied to a USB thumbdrive or SD card, they become “run ready”, so there’s no need to dump everything into RAM and lose all your changes at power off like with Live CDs/DVDs. With a bootable raw image on a thumbdrive, you can carry around a complete OS in your pocket.
Dealing with Raw Images
So, you download the .raw file, but before making it available to all your friends and colleagues, you want to add in the latest Arduino IDE.
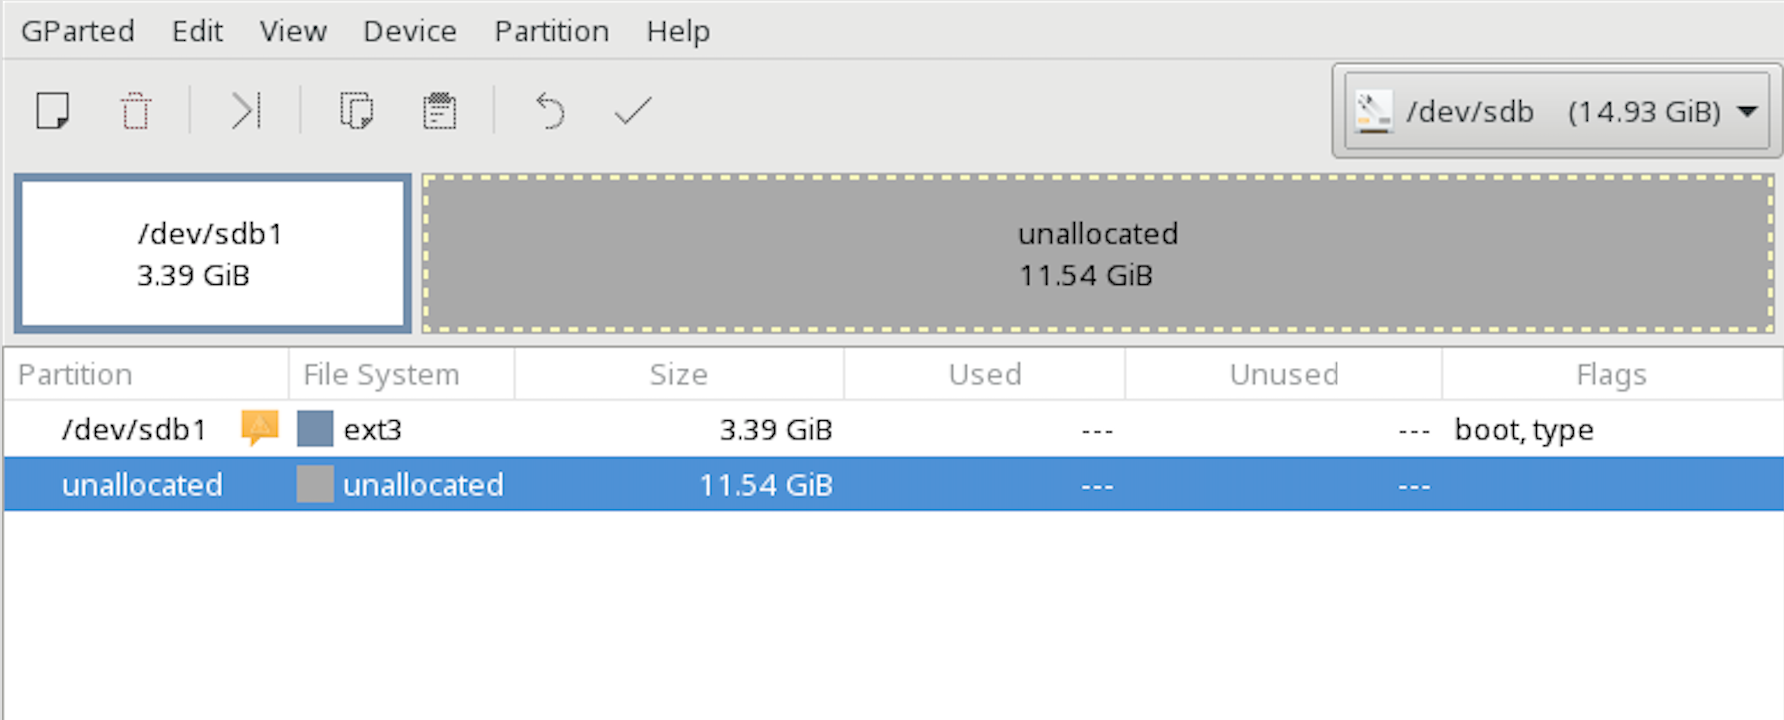
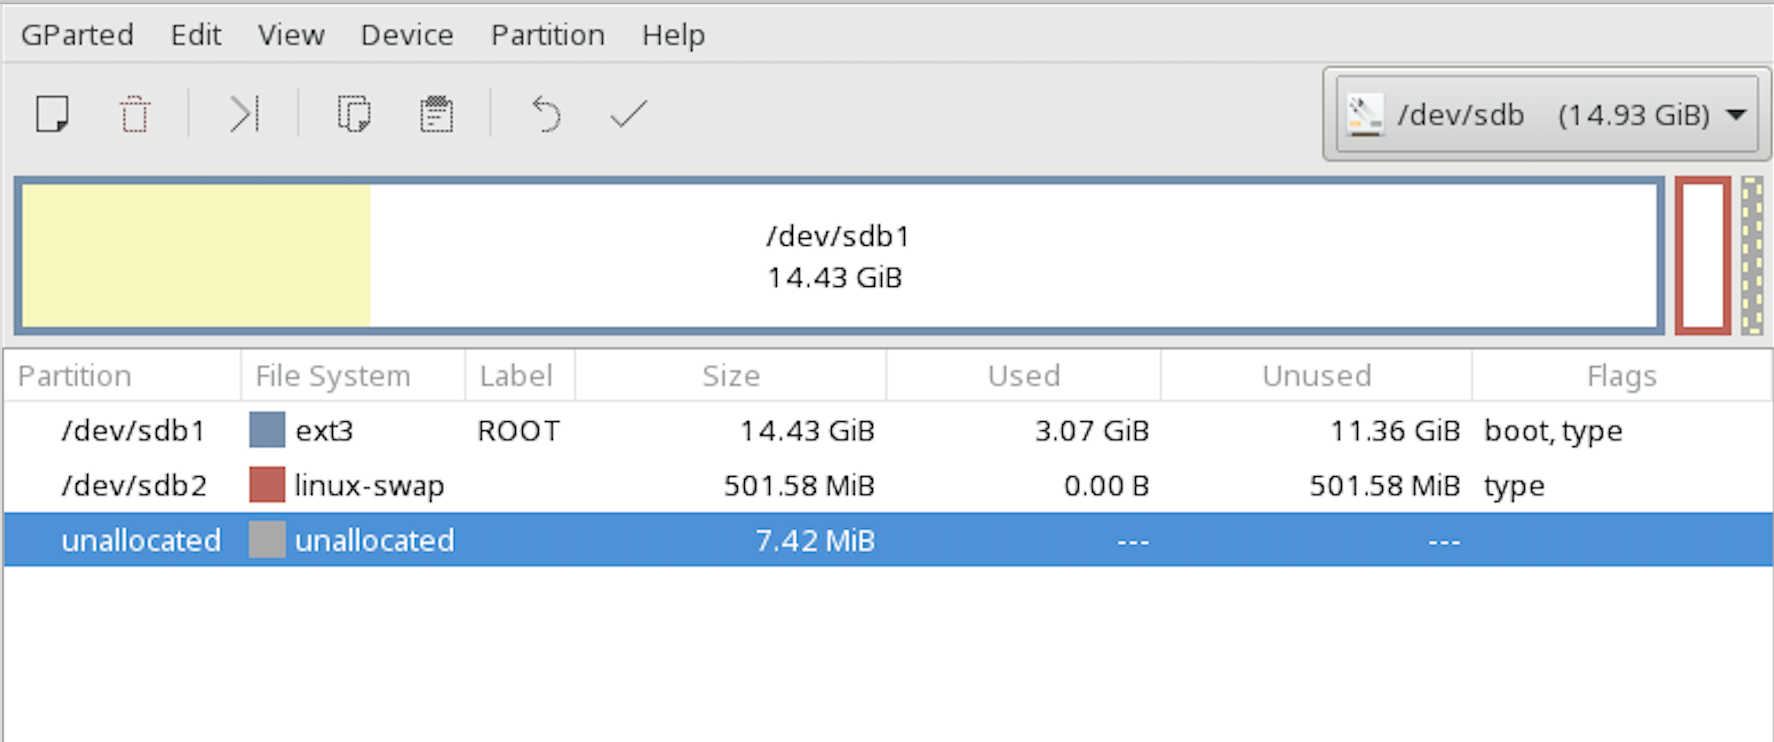
Why do it this way? Why not copy to a USB, boot it, modify whatever, and then copy from the USB back to a raw image? The reason is that first boots are usually different from other boots. There are scripts that poke around the hardware and media and modify stuff depending on what they find. Images generated with SUSE Studio and other similar services contain scripts that automatically grow the partitions so they occupy the whole thumb-drive, for example. If you are making an image available to others, this is a problem. A vanilla raw image that weighs less than 4GB, like the example we’re using in this tutorial, will, if copied to a 16GB pen drive, be enormous when copied back. See Figures 1 and 2.
Plus, doing it the other way around is not elegant.
Poking Around Your Image
You may be familiar with mount‘s -o loop option. In its simplest form, this option allows you to mount and explore an ISO or raw image like this:
$ mkdir image_mount_point
# mount -o loop image.iso image_mount_point
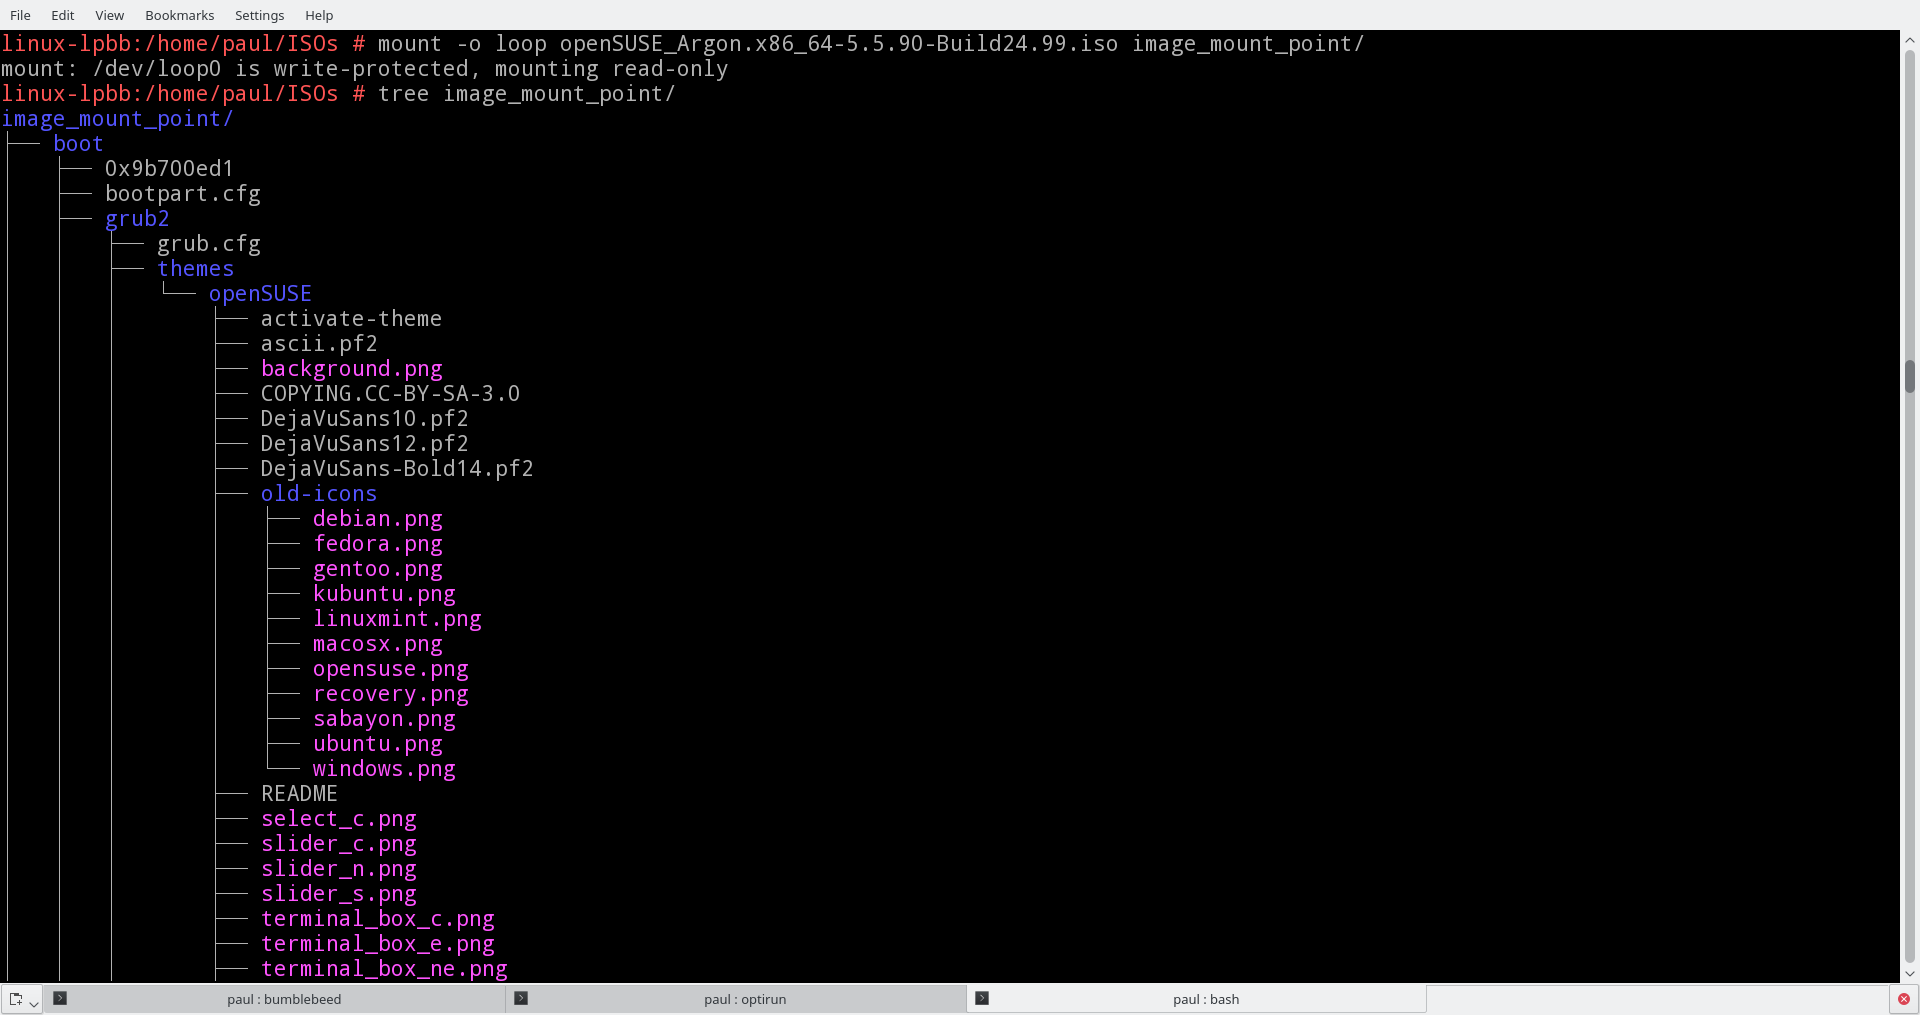
Where image_mount_point is a directory you create specifically to mount the ISO, and image.iso is an ISO image file, say, a live CD image (Figure 3).
Again, notice that you can only explore an ISO image. You can’t actually touch or change anything because the ISO 9660 filesystem — the filesystem used in ISO images — is read only.
Mounting raw images is a little different. As raw images can contain different partitions, you have to figure out which one you want to mount and where it is located on the “virtual” disk. To do this check the map of your image with fdisk -l:
# fdisk -l ArduinoOS_Redux.x86_64-0.0.XX.raw
Disk ArduinoOS_Redux.x86_64-0.0.XX.raw: 3.2 GiB, 3478126592 bytes, 6793216 sectors
Units: sectors of 1 * 512 = 512 bytes
Sector size (logical/physical): 512 bytes / 512 bytes
I/O size (minimum/optimal): 512 bytes / 512 bytes
Disklabel type: dos
Disk identifier: 0x4e37b4f7

Device                      Boot Start     End Sectors  Size Id Type
ArduinoOS_Redux.x86_64-0.0.XX.raw1 *     2048 6793215 6791168  3.2G 83 Linux
This gives you crucial information as to where a mountable partition is located. First, it says that each sector is 512 bytes long (Sector size (logical/physical): 512 bytes / 512 bytes ), then that there’s a mountable partition that starts on sector 2048 (ArduinoOS_Redux.x86_64-0.0.XX.raw1 * 2048 6793215 6791168 3.2G 83 Linux).
If you want to mount the partition, you’ll have pass that information along:
# mount -o loop,offset=1048576 ArduinoOS_Redux.x86_64-0.0.XX.raw /home/[your user]/image_mount_point/
The offset options tells mount where the partition you actually want to mount is. Because 512 (sector size) multiplied by 2048 (sector where partition starts) equals 1048576, that’s what you pass on to offset.
Making Space
With the image mounted, you could start changing stuff right away. However, if you take a closer look at your mounted partition, you may notice you don’t have much empty space:
$ df -h /home/[your user]/image_mount_point/
Filesystem      Size  Used Avail Use% Mounted on
/dev/loop0      3.1G  2.7G  265M  92%
In the (real) example above, there’s only 265MB to spare. That’s not a lot of wiggle room for major changes. I mean, look at what the latest Arduino IDE (1.6.9 at the moment of writing) takes up:
du -ch arduino-1.6.9/
.
.
.
419M    ../Downloads/Arduino/arduino-1.6.9/
419M    total
At 419MB, it’s definitely not going to fit. You are going to have to make the mountable partition bigger. And this is where things get sticky.
Before you continue, unmount the raw image with:
# umount /home/[your user]/image_mount_point/
to expand a partition on a regular drive with parted, given you had empty space on your drive. But, a raw image is not a regular drive; it is more like a potential drive, and its size is static:
# parted ArduinoOS_Redux.x86_64-0.0.XX.raw
GNU Parted 3.2
Using /home/[your user]/ArduinoOS_Redux.x86_64-0.0.XX.raw
Welcome to GNU Parted! Type 'help' to view a list of commands.
(parted) print free
Model:  (file)
Disk /home/[your user]/ArduinoOS_Redux.x86_64-0.0.XX.raw: 3427MB
Sector size (logical/physical): 512B/512B
Partition Table: msdos
Disk Flags:

Number  Start   End     Size    Type     File system  Flags
      32.3kB  1049kB  1016kB           Free Space
1      1049kB  3427MB  3426MB  primary  ext3         boot, type=83
There seems to be about 1MB of free space at the beginning of the disk, and then about 3.3GB in the mountable partition at the end. The empty space at the beginning is not going to help us because, apart from being insufficient, it is not really empty at all. It actually contains the Master Boot Record, a partition table, and so on. If you overwrite that, your USB drive will not be able to boot.
The trick is to tack on the extra space using dd:
# dd if=/dev/zero bs=1M count=512 >> ArduinoOS_Redux.x86_64-0.0.XX.raw
This copies 512MB of null characters on to the end of the file, effectively increasing its space by half a gigabyte:
# parted ArduinoOS_Redux.x86_64-0.0.XX.raw
GNU Parted 3.2
Using /home/[your user]/ArduinoOS_Redux.x86_64-0.0.XX.raw
Welcome to GNU Parted! Type 'help' to view a list of commands.
(parted) print free
Model:  (file)
Disk /home/[your user]/ArduinoOS_Redux.x86_64-0.0.XX.raw: 3964MB
Sector size (logical/physical): 512B/512B
Partition Table: msdos
Disk Flags:

Number  Start   End     Size    Type     File system  Flags
      32.3kB  1049kB  1016kB           Free Space
1      1049kB  3427MB  3426MB  primary  ext3         boot, type=83
      3427MB  3964MB  537MB            Free Space
See the extra 537MB at the bottom of the list? Now you have space that partition 1 can grow into. Don’t exit parted just yet, because you can use it to to take over the adjacent free space you just created:
(parted) resizepart 1 3964MB
(parted) print free
Model: (file)
Disk /home/[your user]/ArduinoOS_Redux.x86_64-0.0.XX.raw: 3964MB
Sector size (logical/physical): 512B/512B
Partition Table: msdos
Disk Flags:

Number  Start   End     Size    Type     File system  Flags
      32.3kB  1049kB  1016kB           Free Space
1      1049kB  3964MB  3963MB  primary  ext3         boot, type=83
parted‘s resizepart instruction takes two parameters: the partition to resize — in this case 1 — and the new end of the partition. As you saw two listings up, the empty space you created ends at the 3964MB mark, so you use that with resizepart.
Notice that, when you’re done, partition 1 is larger by about 500MB and there is no empty space at the end of the device any more.
It may look like everything is as it should be, but, open the image file in any other disk-managing program, and you’ll get contradictory information and errors. This is because the underlying tools parted used to resize and manage partitions works fine with real disks, but not so much with raw images. In fact, if you mounted the mountable partition in ArduinoOS_Redux.x86_64-0.0.XX.raw again, you would still see only 256MB of free space. But, as with nearly everything in Linux, there is a way to sort things out.
Enter kpartx, a tool designed just for the occasion. What kpartx does is take a raw image of a disc and create a “virtual device” in /dev/mapper that can then be manipulated as a real device with real partitions:
# kpartx -a ArduinoOS_Redux.x86_64-0.0.XX.raw
The -a option adds an entry, so if you now look under /dev/mapper:
$ ls /dev/mapper/
control  loop0p1
The raw image appears as device loop 0 and, as it contains only one mountable partition, it has only one entry called loop0p1. If the image contained more mountable partitions, you would see loop0p1, loop0p2, loop0p3, and so on.
Now you have a device you can play with, so let’s first run a check on its virtual partition:
# e2fsck -f -y -v -C 0 /dev/mapper/loop0p1
e2fsck 1.42.13 (17-May-2015)
Pass 1: Checking inodes, blocks, and sizes
Pass 2: Checking directory structure
Pass 3: Checking directory connectivity
Pass 4: Checking reference counts
Pass 5: Checking group summary information

     86010 inodes used (41.10%, out of 209248)
      5413 non-contiguous files (6.3%)
        83 non-contiguous directories (0.1%)
           # of inodes with ind/dind/tind blocks: 5404/51/0
    726741 blocks used (86.89%, out of 836352)
         0 bad blocks
         1 large file

     69360 regular files
      8272 directories
         7 character device files
         4 block device files
         0 fifos
      7797 links
      8358 symbolic links (8166 fast symbolic links)
         0 sockets
------------
     93798 files
Things are looking good. Now you can try resizing the filesystem so it takes up the whole of the partition:
# resize2fs -p /dev/mapper/loop0p1
resize2fs 1.42.13 (17-May-2015)
Resizing the filesystem on /dev/mapper/loop0p1 to 967424 (4k) blocks.
Begin pass 1 (max = 4)
Extending the inode table     XXXXXXXXXXXXXXXXXXXXXXXXXXXXXXXXXXXXXXXX
The filesystem on /dev/mapper/loop0p1 is now 967424 (4k) blocks long.
See that? The resize2fs just expanded your filesystem to take advantage of the available space on its partition.
You can now delete the virtual device from /dev/mapper with
# kpartx -d ArduinoOS_Redux.x86_64-0.0.XX.raw
(The -d option stands for delete, by the way).
If you mount ArduinoOS_Redux.x86_64-0.0.XX.raw and run df again, you can see that you now have the space you need to install the Arduino IDE:
# mount -o loop,offset=1048576 ArduinoOS_Redux.x86_64-0.0.XX.raw  /home/[your user]/image_mount_point/
# df -h /home/[your user]/image_mount_point
Filesystem    Size  Used Avail Use% Mounted on
/dev/loop1    3.6G  2.7G  743M  79% /home/[your user]/image_mount_point
Copying Over
Now you can copy over the uncompressed Arduino directory to the image’s /usr/bin directory, change into the directory, and create a soft link to the arduino executable to make sure it can be run from anywhere:
# cp -Rfv /route/to/download/arduino-1.6.9/ /home/[your user]/image_mount_point/usr/bin
# cd /home/[your user]/image_mount_point/usr/bin
# ln -s arduino-1.6.9/arduino
When you’re done, dismount the image:
# umount /home/[your user]/image_mount_point/
And copy it to your thumbdrive, using:
# dd bs=1M if=ArduinoOS_Redux.x86_64-0.0.XX.raw of=/dev/sdXX
where sdXX is wherever your system maps your USB thumbdrive when you plug it in.
Bear in mind that first boots of SUSE Studio images take a long time. The system goes through a series of chores that can take several minutes, so be patient.
Conclusion
This may seem like a very specific user case, but the techniques described above are good for lots of other situations. You could use them to customize images of Raspberry Pi operating systems, such as Raspbian or NOOBS, or to tweak mirror images of hard disks before installing them elsewhere. The point is, given the default command-line tools provided with GNU/Linux, you can carry out some extraordinarily sophisticated disk image manipulation tasks.
See you next time.