Machine learning apps in containers can’t run GPU-accelerated code, but a new Docker plugin by Nvidia is set to remedy all that.
Nvidia, developer of the CUDA standard for GPU-accelerated programming, is releasing a plugin for the Docker ecosystem that makes GPU-accelerated computing possible in containers. With the plugin, applications running in a Docker container get controlled access to the GPU on the underlying hardware via Docker’s own plug-in system.
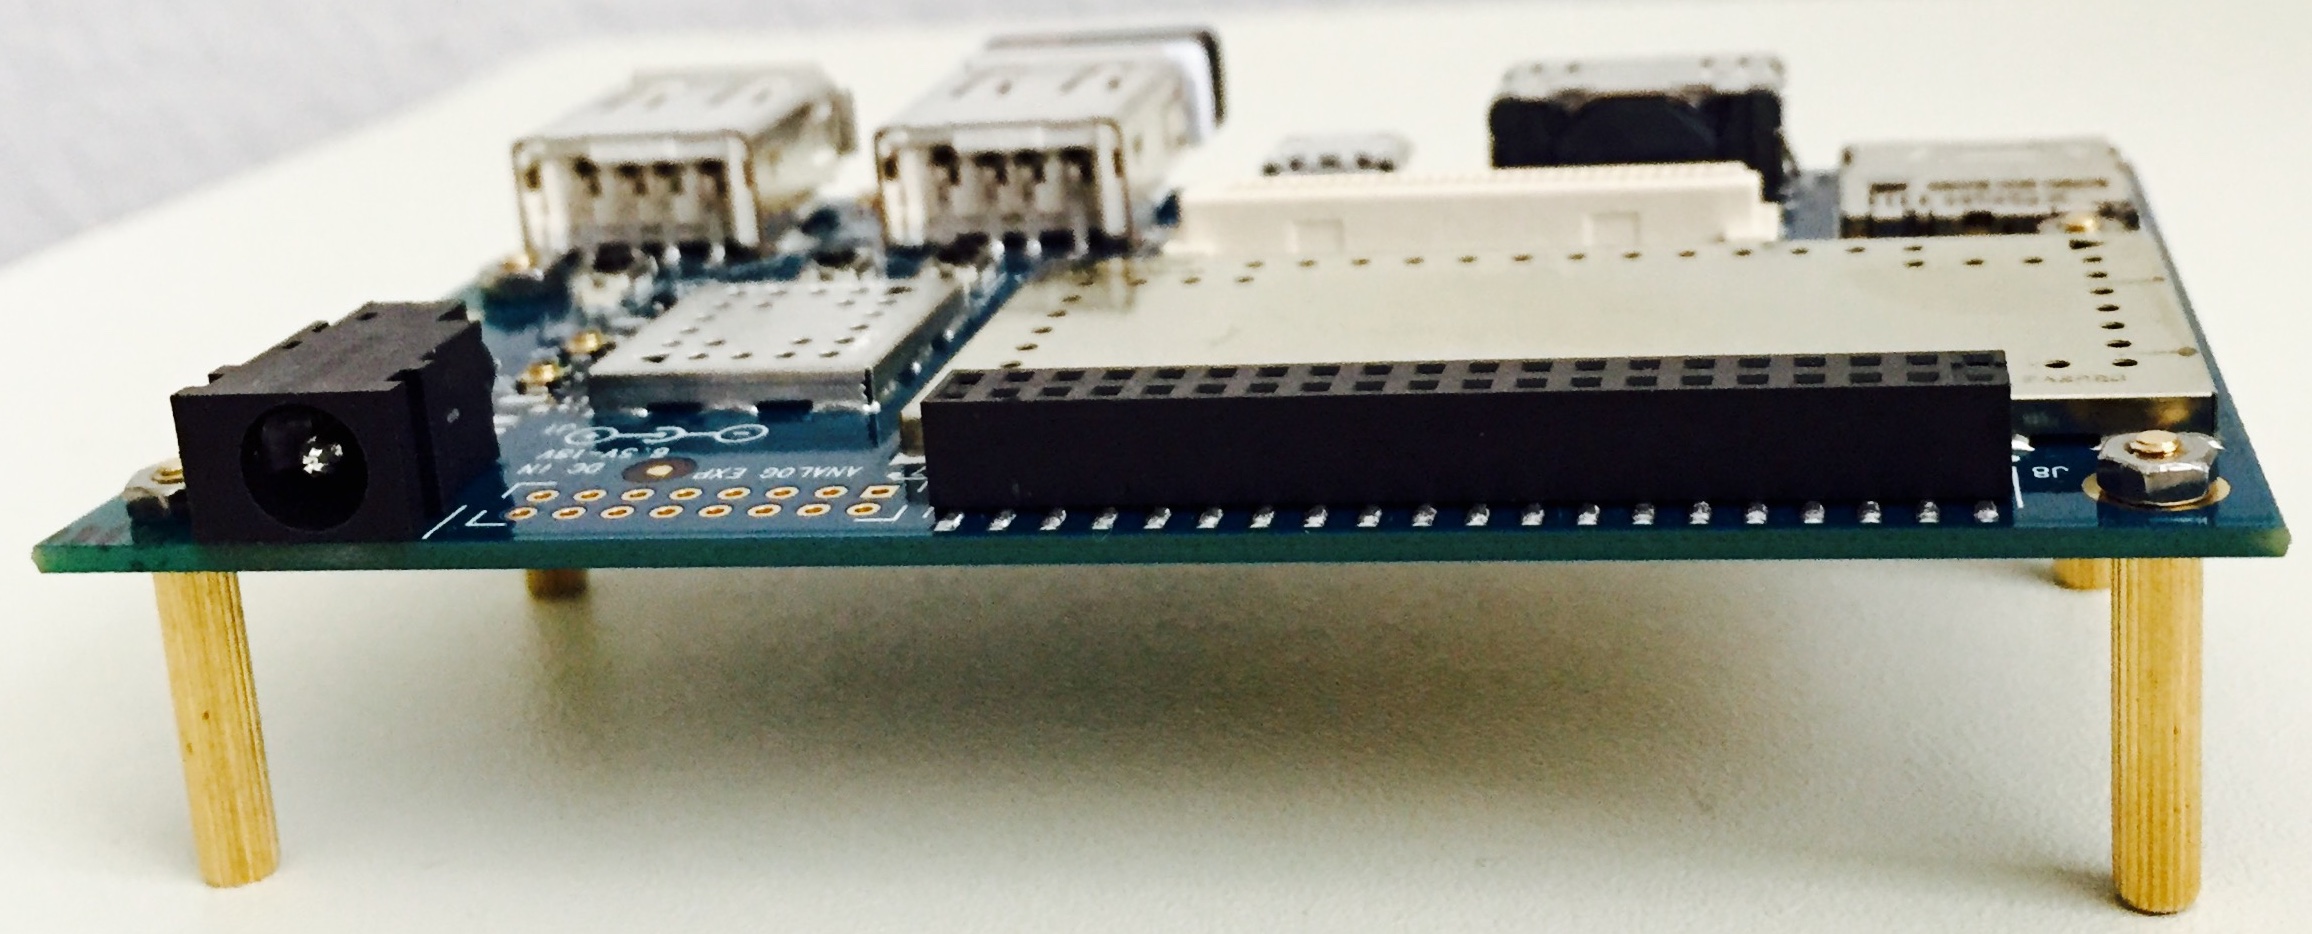
We will use Dragonboard 410c as a development platform for Embedded Linux. Dragonboard 410c from Qualcomm is a powerful piece of hardware based on Quad-core ARM® Cortex® A53 and on board support for Wi-Fi, Bluetooth and GPS. For easy prototyping and development I/O interfaces include UART, SPI, I2S, I2C (2), and GPIO (12). It also supports HDMI interface for display and USB 2.0 for USB devices. For the operating system, it can support Android, Linux, and Windows 10 IoT Core.
It is available for purchase at Arrow for $75 and comes with Android installed.
Setup:
Host machine:
Host Machine: We will use Linux based computer (also called host machine) for our development work. The specs of the host machine do not matter as long as it can run Linux, and has access to network. It is possible to develop on Windows/MAC based computers by using Virtual Machine or by using dual boot. My workstation has Ubuntu 16.04 LTS
IDE: Eclipse CDT on the host machine
Micro USB cable
Micro SD card (minimum of 4GB) and a SD card reader.
HDMI to DVI cable or if monitor supports HDMI then HDMI to HDMI cable.
Access to network
A spare monitor and spare keyboard/mouse – If not available; when connecting to Wi-Fi, borrow from host machine.
Static mat (optional): It is always good to protect the HW from static so a static mat will help
Prepare the Dragon:
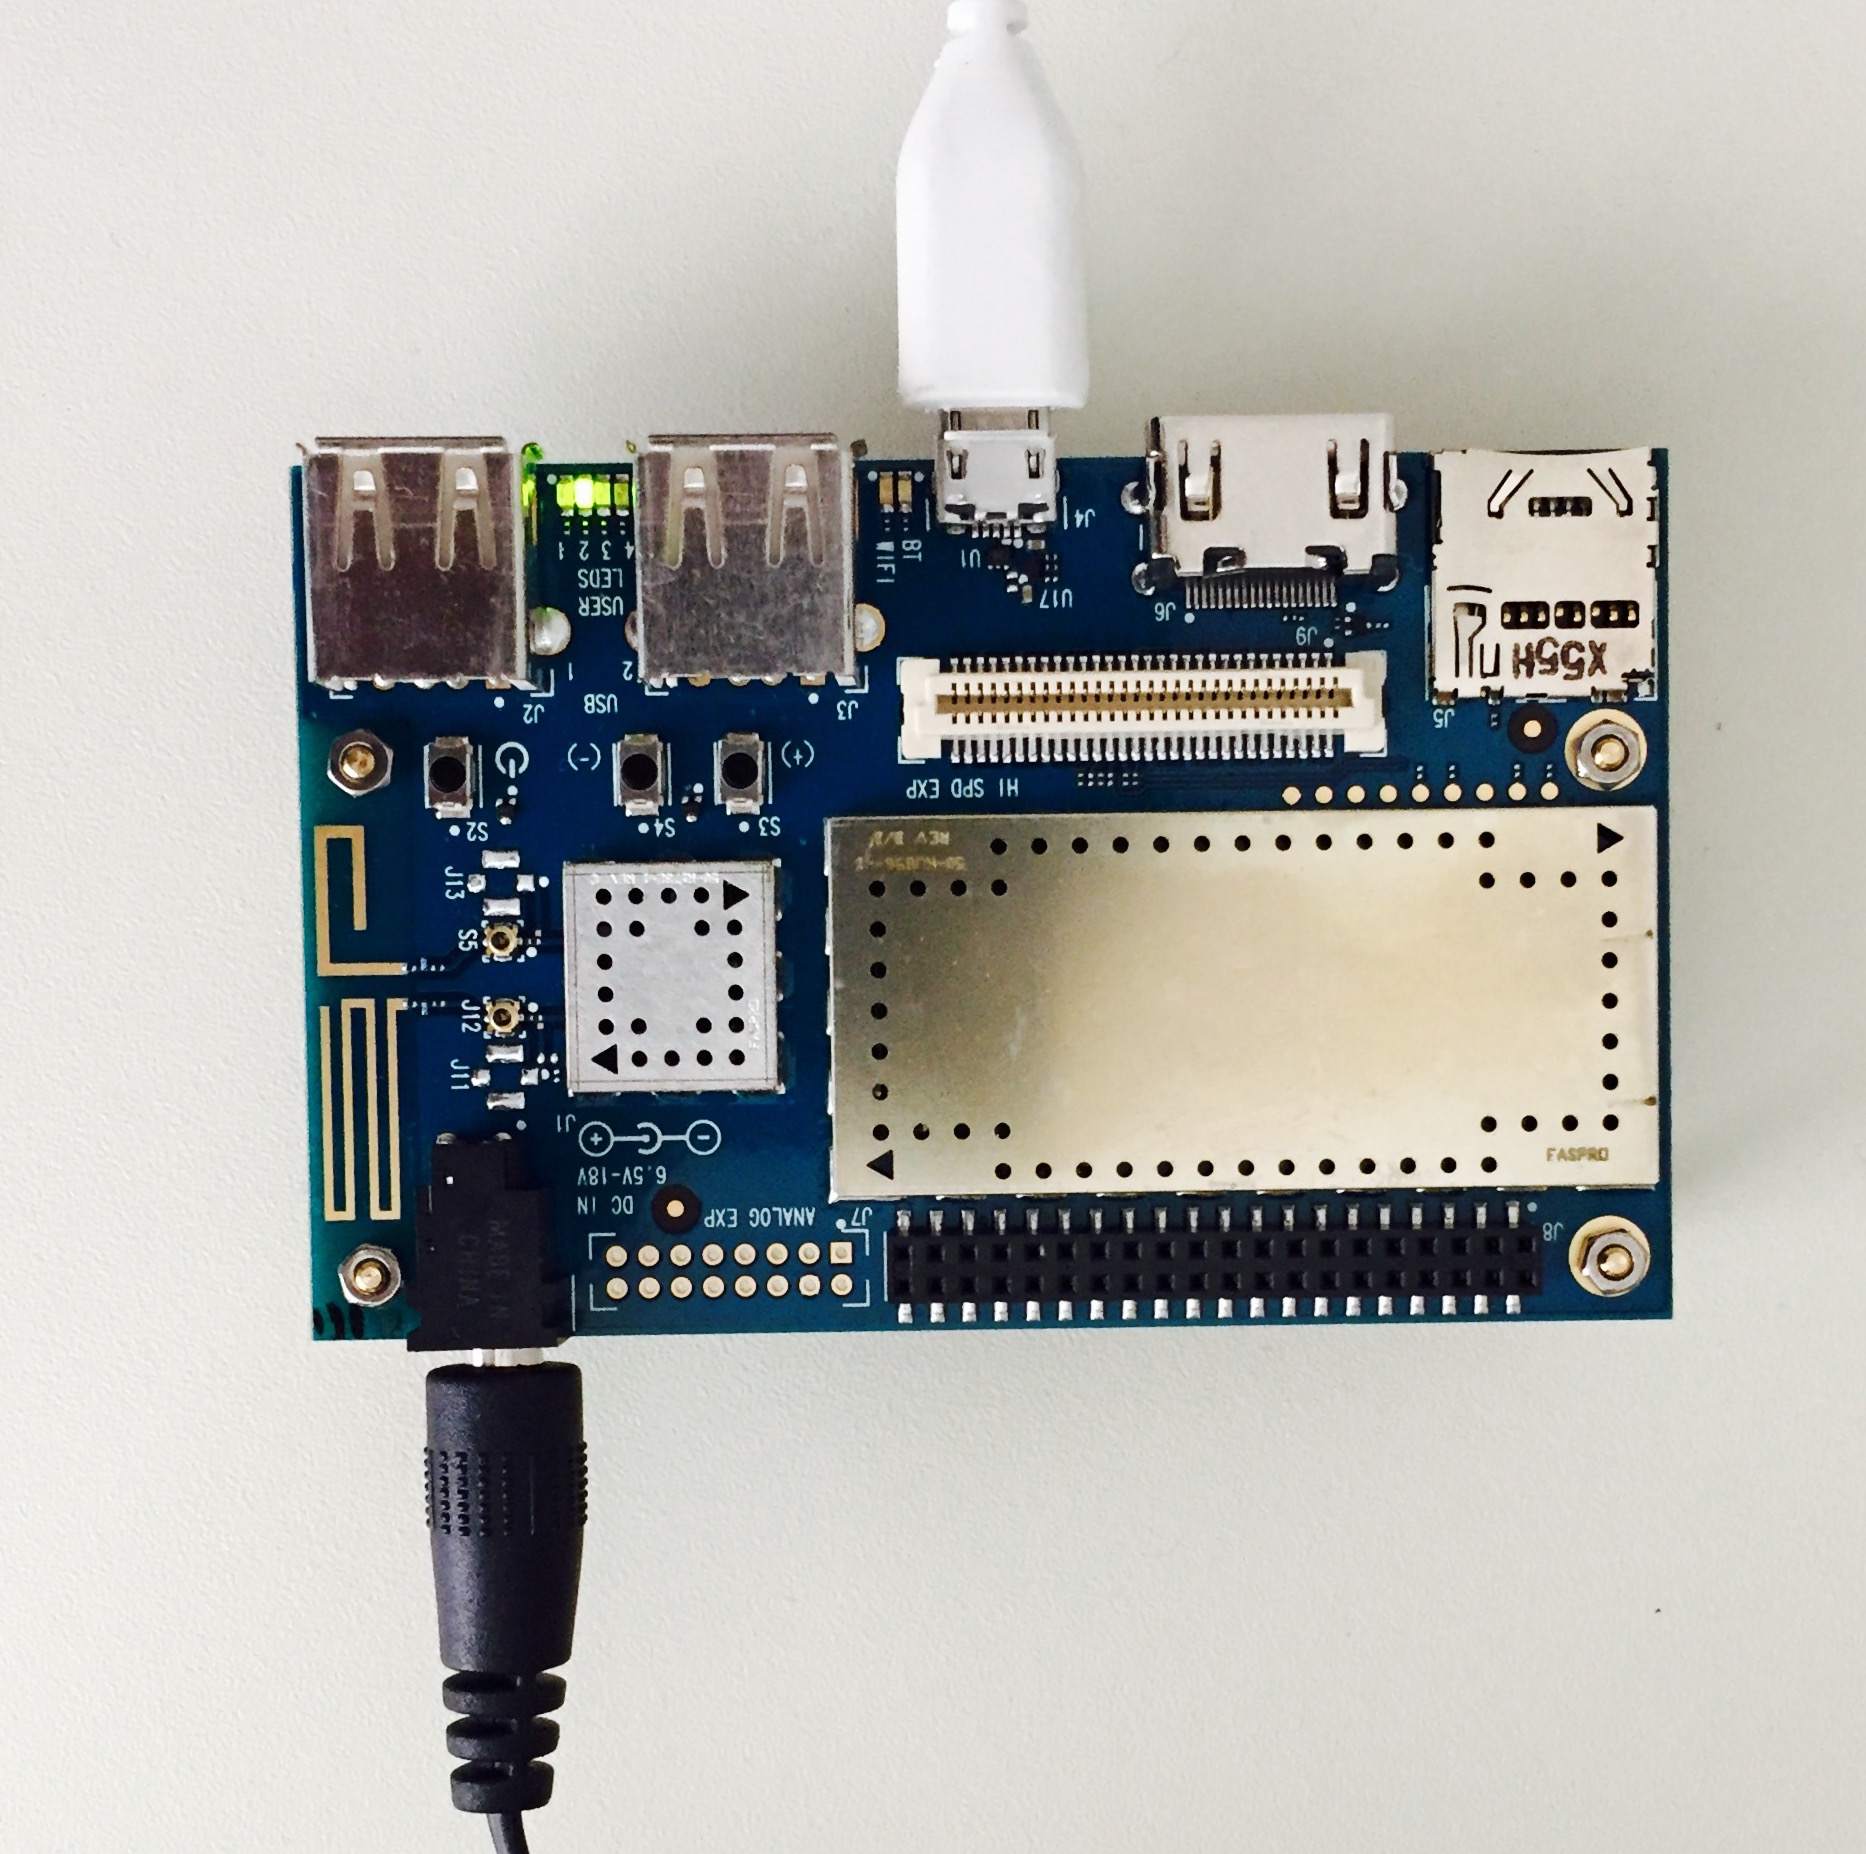
Dragonboard comes with Android installed. For our development, we will install Linux provided by Linaro. Make sure you have su rights on the host machine. Connect the micro USB cable to host machine and the dragonboard.
Power cycle the target and you should boot in Linux. It automatically logins as user: linaro.
Make note of the user and password as they will be used in future.
User: linaro
Password: linaro
Setup Wi-Fi on the dragonboard:
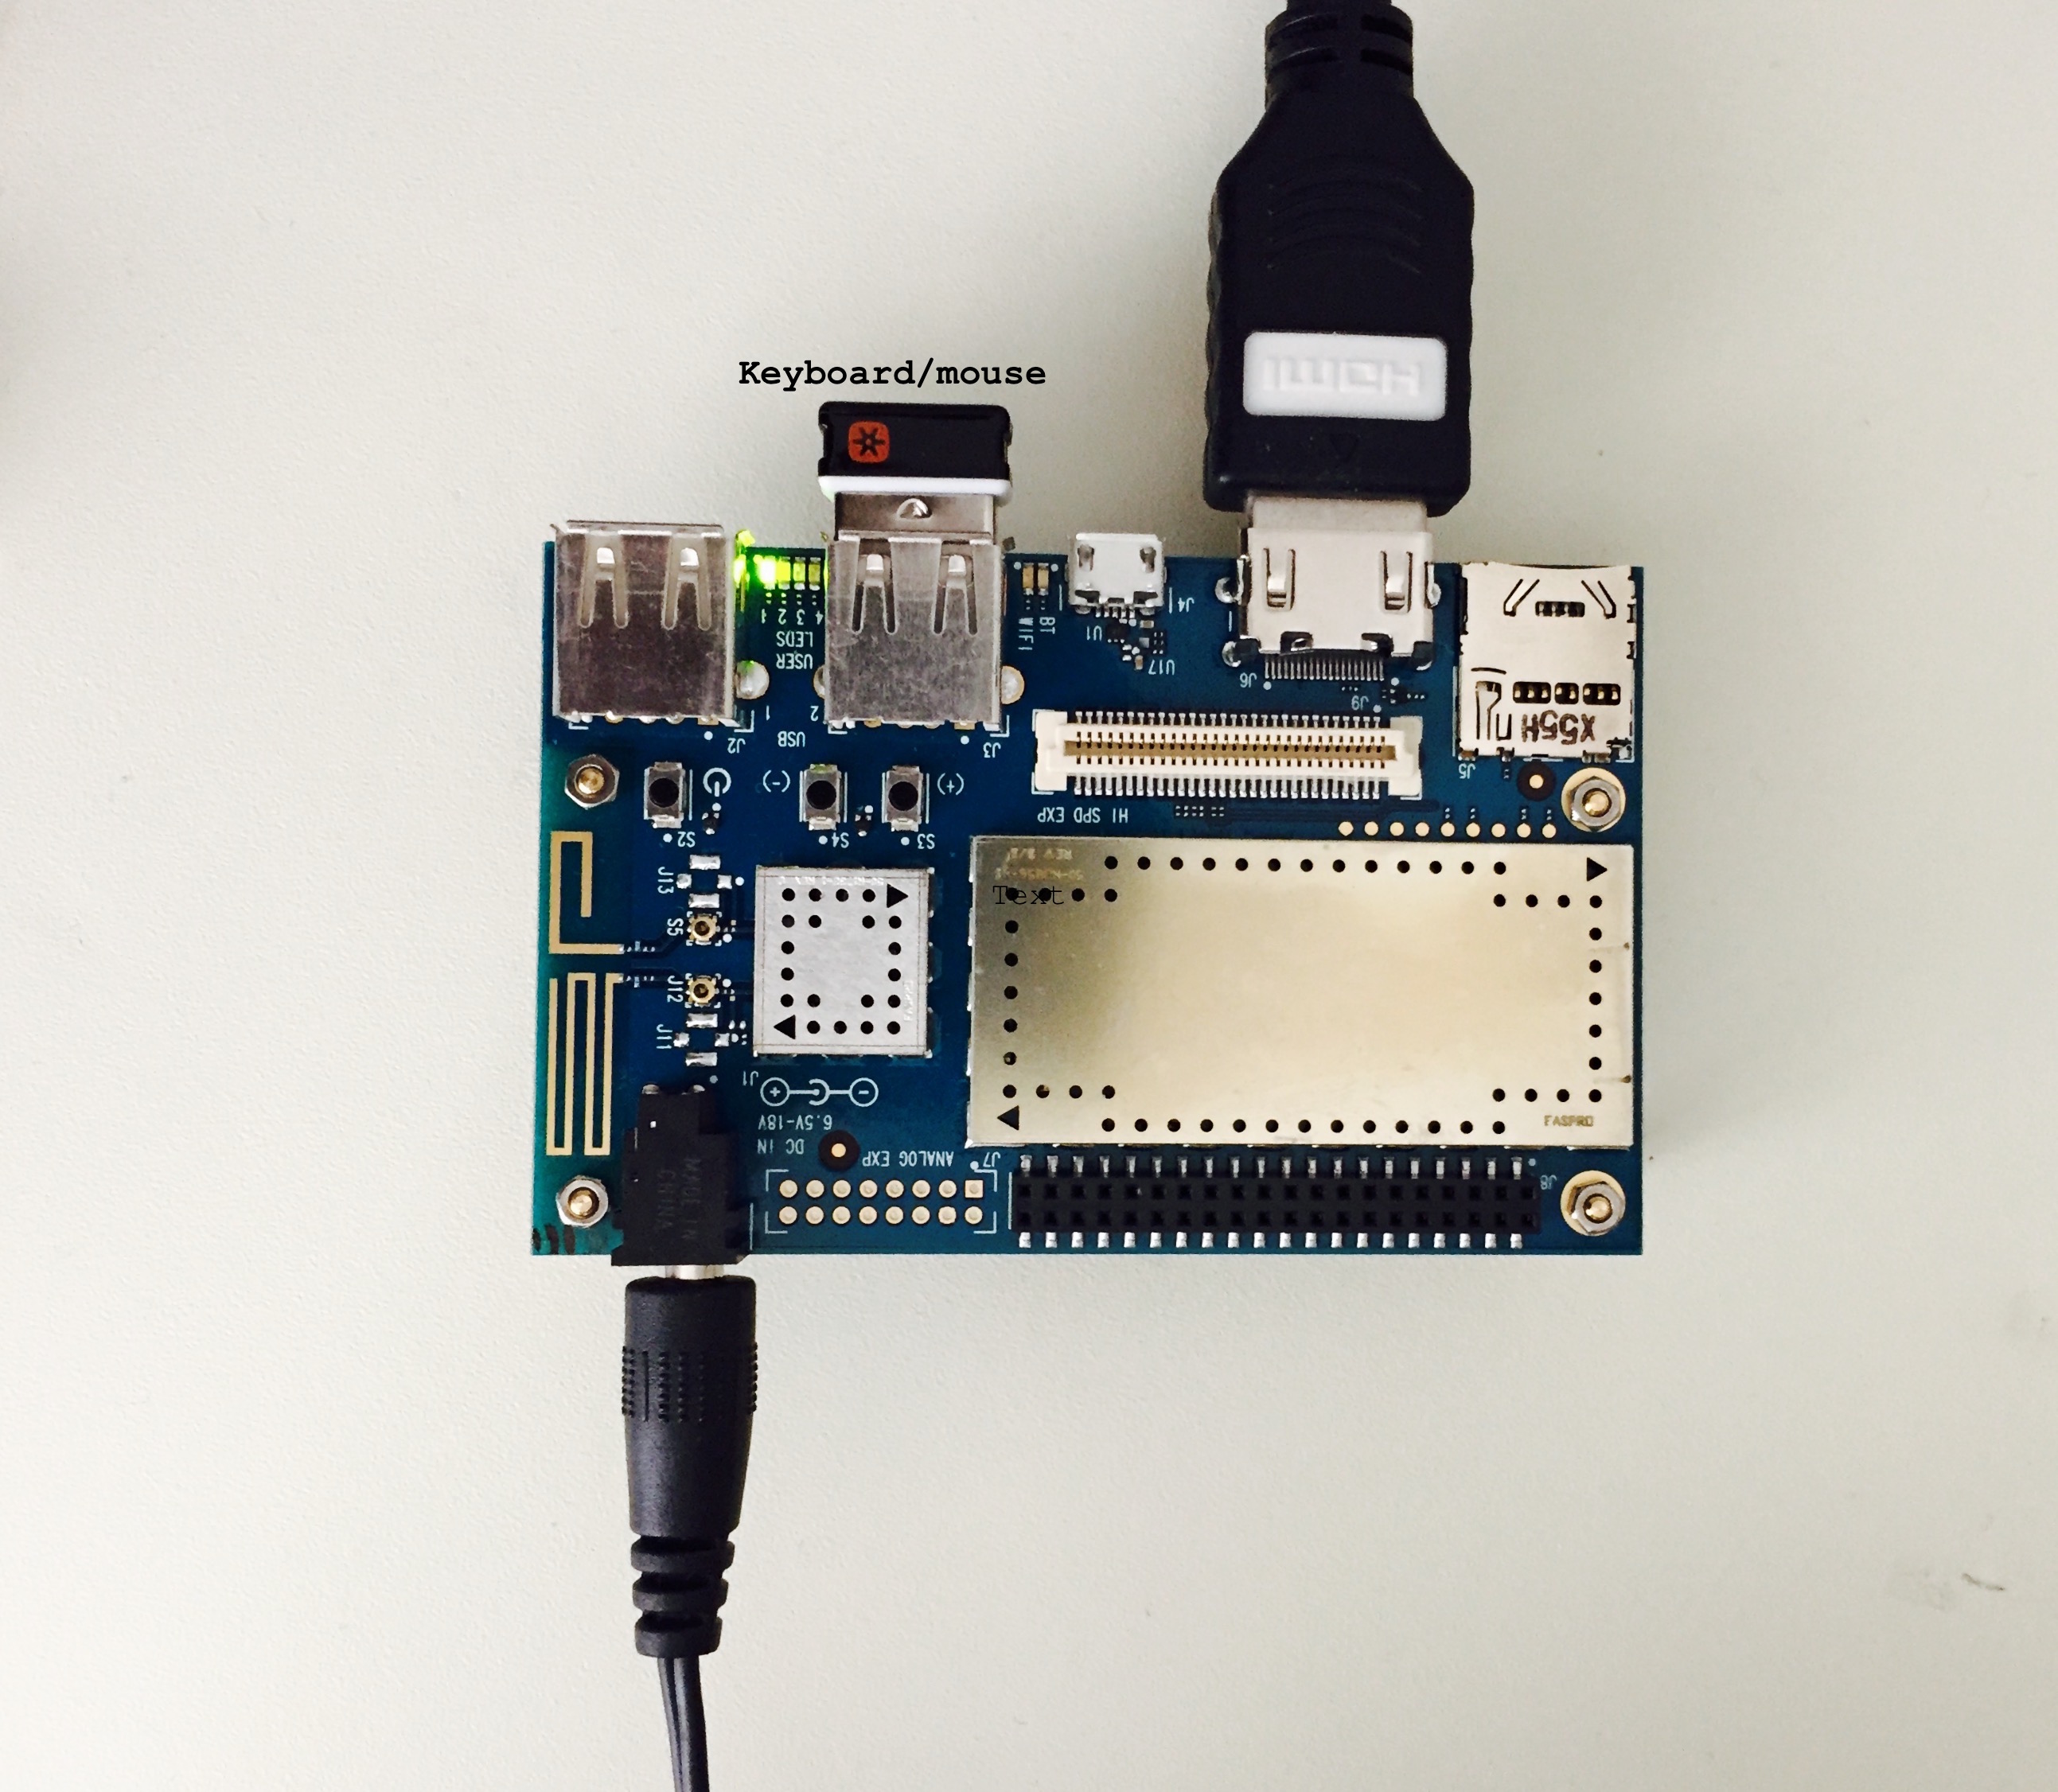
Disconnect the micro USB cable and connect monitor and keyboard/mouse (borrow from host machine if you don’t have spare).
Dragonboard setup for wifi
Go through the GUI and setup Wi-Fi
Ping an external website to make sure Wi-Fi is connected and works as expected.
Ping host machine and make sure it is successful.
(ifconfig does not work on target, so use ip addr to get the ip address of the target)
Ping target from the host machine.
Once you have the IP address of the target, you could SSH and communicate with the target.
ssh linaro@<target IP address>
Connect through SSH and play around with some basic commands. Navigate around your home directory and check the contents.
You can transfer the applications from host machine to target using a flash drive but it is not convenient. And it is not easy to debug the applications on target this way. We want to have a seamless way to share applications between host and target.
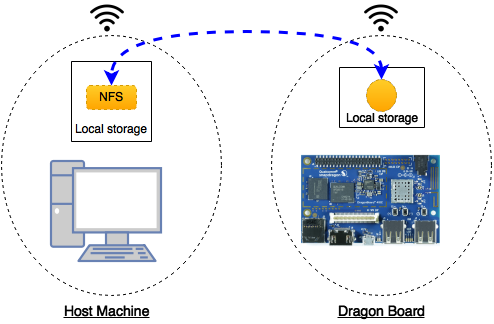
Setup NFS (Network File System):
We will create a space on the host machine and share it. On the target, we will mount this space. This will be a common shared space between host and target. Any files created either from the host or the target in this shared space will be visible to both host and target.
NFS for Dragonboard
Host Machine:
Check for firewall settings – disable if any.
Note down host IP address and mask info (ifconfig should get this info)
Install NFS server application (more info in the link below)
sudo apt-get install nfs-kernel-server
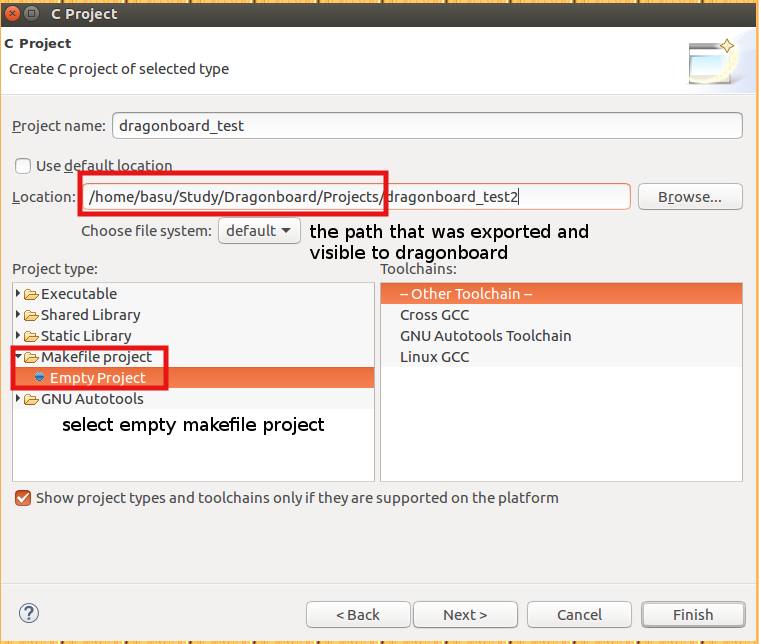
Create a folder that will be shared with the target
For example: /home/<user>/Dragonboard/Projects
Make it read/write/executable:
chmod a+rwx /home/<user>/Dragonboard/Projects
Configure the server (this will make the folder visible to the network)
Edit the exports file in /etc folder (use sudo)
Either vim or gedit should work
Add the following line to the file <path_of_the_folder_created_above> <base_of_network_of_host>/<mask> (rw,sync,no_subtree_check)
If your IP address is 192.168.1.64 then the base is 192.168.1.0
Restart/start the NFS server
Ensure that the folder is indeed exported using
showmount -e
If you see the folder in the export list then your host is setup for NFS.
Target (Dragonboard):
Target needs some work and some new applications to install. All the below installations are to be done on target.
You can use SSH or use a keyboard/mouse with monitor connected to dragonboard. I recommend SSH as you will get used to the command line and this will also ensure that SSH is working reliably.
On my setup, for some reason the busybox did not get copied to /usr/bin. I had to manually copy it from /install from busybox folder (download location)
Once you have the busybox installed, execute the following command to mount the host NFS onto the target (all this is in one line)
busybox mount -o tcp -t nfs -o nolock
         <server_ip_addr_here>:<absolute_path_of_shared_folder_on_server>
         <mount_location_on_target>
For example: busybox mount -o tcp -t nfs -o nolock 192.168.1.64:/home/basu/Dragonboard/Projects /Projects
You can save the command into a script for easy execution
echo <busy_box_command_above> > mount_my_nfs
Make it executable
chmod +x mount_my_nfs
And run when needed
./mount_my_nfs
Instead of executing it every time you reboot the target, you can schedule a cron job. You can install cron on target and add @reboot job for the above script. There are other ways to do the same. Explore them and pick one, it will save you time.
If all goes well, you should have a NFS working between your host and target. Make some changes on your host folder (add a file/folder), it should show up on the target. Similarly, make changes from the target side and the change should reflect on the host location.
Static v/s dynamic IP:
Depending on your router, everytime you boot, you may get the same IP for both host and target. But if your IP happens to change, please consider using static IP for both host and target.
A cross compiler is a compiler capable of creating executable code for a platform other than the one on which the compiler is running. A cross compiler is necessary to compile for multiple platforms from one machine. A platform could be infeasible for a compiler to run on…
So we need to get cross compiler toolchain that generates executables for the dragonboard. Linaro has provided the tool chain for the dragonboard (It is probably possible to use other arm toolchains, but I haven’t looked at them yet).
Download the toolchain from the below location (note: download binaries). If you want to try the latest version, go for it. Should not be an issue.
FYI: I have created a folder for dragonboard in my home directory, where I have all the items related to dragon board (documents, images, etc…). My toolchain is inside this folder <home>/dragonboard/toolchain/<linaro toolchain>
Add the bin path to the system path. Your system path should have this <home>/dragonboard/toolchain/<linaro toolchain>bin
#include <stdio.h>
#include <stdlib.h>

int main(void)
{

	printf("Hello World!, this is Dragonboard.n");
	return 0;
}
Build using Make (Shift + F9).
#  make all - build dragonboard_test
#  make dragonboard_test - build dragonboard_test
#  make clean - clean

CC = aarch64-linux-gnu-gcc

all: dragonboard_test

dragonboard_test: dragonboard_test.c
	${CC} -o $@ $<

clean:
	rm -f *.o
	rm -f dragonboard_test
If all goes well, you should have executable in the project folder.
Execute on target:
You should see the executable on the NFS mounted location on the dragonboard.
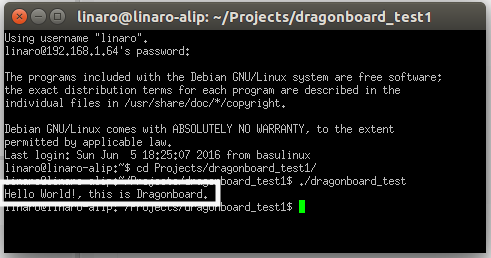
Execute the application.
./dragonboard_test
You should see hello message on the console. See screenshot below (I am using PuTTY for SSH).
Hello World from Dragonboard
Congratulations! On your first program on dragonboard.
Blinking LED:
Just like Hello World program for any C programmer, blinking a LED should be a first program for any embedded engineer. In this chapter, we will blink one of the user LEDs on the dragonboard.
The dragonboard has 4 user defined LEDs. LED1 is used for heartbeat and we will cover it later. For now, we will skip that. We will make use of LED2 in our program.
Method 1: Memory mapping
Note: This is not the recommended way, but this will give an opportunity to look into GPIO registers.
Before we get into the program, lets look at the registers that control the LED. It is connected to APQ GPIO 120.
From DragonBoard_HardwareManual_v5:
The four user LEDs are surface mount Green in 0603 size located next to the two USB type A connector and labeled ‘USER LEDS 4 3 2 1’. The 410c board drives two LEDs from the SoC GPIO, APQ GPIO_21 and APQ GPIO_120. The other two User LEDs are driven by the PMIC via PM GPIO_1 and PM GPIO_2.
From chapter 7 of lm80-p0436-5_e_peripherals_programming_guide:
Each MSM/MDM/APQ chipset has a dedicated number of GPIOs that can be configured for multiple functions. For example, if you check the GPIO mapping for MSM8916 GPIO 0, you will see that the GPIO can be configured as one of the following functions at any time:
Function 0 – GPIO
Function 1 – BLSP1 SPI MOSI
Function 2 – BLSP1 UART TX
Function 3 – BLSP1 User Identity Module (UIM) data
Function 4 – HDMI_RCV_DET
GPIO_CFGn controls the GPIO properties, such as Output Enable, Drive Strength, Pull, and GPIO Function Select.
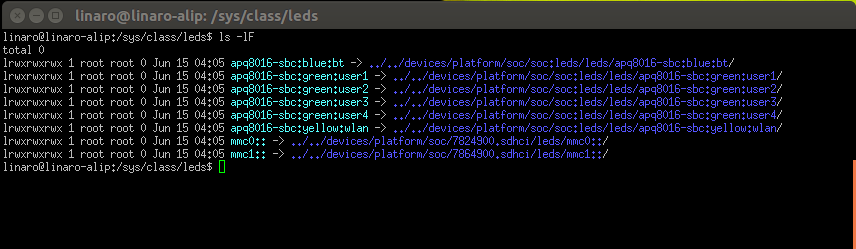
This will list all the LEDs on the dragonboard as shown in the screenshot below
sys files for LEDs
The code again is straight forward:
Open the brightness file
Write “1” to turn LED ON
Write “0” to turn LED OFF
Close the file and exit
Source code:
/*
 * led_sys.c
 *
 *  Created on: Jun 13, 2016
 *      Author: basu
 */


#include <stdio.h>
#include <stdlib.h>
#include <string.h>
#include <errno.h>
#include <signal.h>
#include <fcntl.h>
#include <unistd.h>


#define ERR_FATAL do { fprintf(stderr, "Error: file %s, line %d, error (%d) [%s]n",
		__FILE__, __LINE__, errno, strerror(errno)); exit(1); } while(0)

int abort_program = 0;

/*file system for LED 2*/
#define LED2 "/sys/class/leds/apq8016-sbc:green:user2/brightness"

void stop_program(int sig)
{
	abort_program = 1;
}


int main(int argc, char *argv[])
{
	int fd_led2;
	/*open the file*/

	/*initialize signal to abort the program*/
	signal(SIGINT, stop_program);

	printf("%sn", LED2);

	fd_led2 = open(LED2, O_WRONLY);

	if (fd_led2 < 0)
	{
		ERR_FATAL;
		return 1;
	}

	while (!abort_program)
	{
		write(fd_led2, "1", 2);
		sleep(1);
		write(fd_led2, "0", 2);
		sleep(1);
	}

	/*clean up and exit*/
	write(fd_led2, "0", 2);

	close (fd_led2);
	printf("nProgram exitingn");
	return 0;

}
Debugging using Eclipse:
Debugging is an important step in development. Even though, we can simulate the target HW behavior and exercise most of our code, there are times where debugging with the application running on the target becomes very critical. As a embedded developer, we should execute/debug our program on the HW and make sure it behaves as expected.
Eclipse and gdb make it easier to debug programs on the target.
We will use gdbserver to debug our program on the remote target.
From the man-pages:
gdbserver is a program that allows you to run GDB on a
different machine than the one which is running the program being debugged.
Refer to the link here for more information on gdbserver
Follow the steps below to step through your program. We will use the blinking LED from the previous chapter as an example.
Make sure you can build the program and is visible on the target.
On the target:
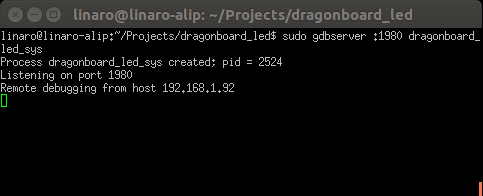
On the target, execute the following
sudo gdbserver :2000 dragonboard_led_sys
gdb server waiting for remote to start debugging
This will start the process and will start listening on port 2000 for the remote debug to begin. This number can be anything > 1023.
On the host machine (inside Eclispe):
We need to configure eclipse to communicate with the target using gdbserver
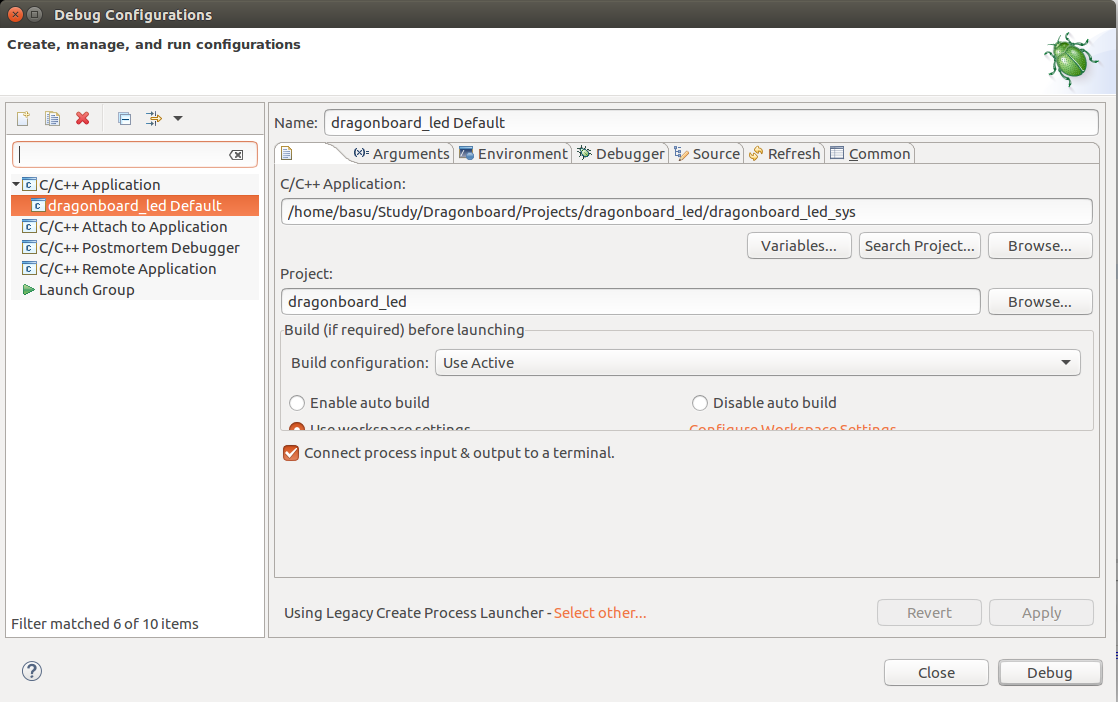
Select the application (shown in the screen shot below):
In the project navigator, right click on the LED project and select Debug As -> Debug Conjurations
On the main tab, Select C/C++ Application and point to the LED program executable (You have to browse to the project and manually select it).
Eclipse debug configuration
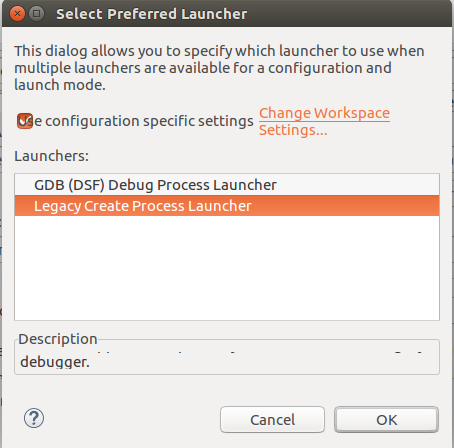
Select the Preferred Launcher (shown in the screen shot below):
Select other for the Using Debug Process Launcher.
On the new pop-up window, select Legacy Create Process Launcher.
Debug preferred launcher
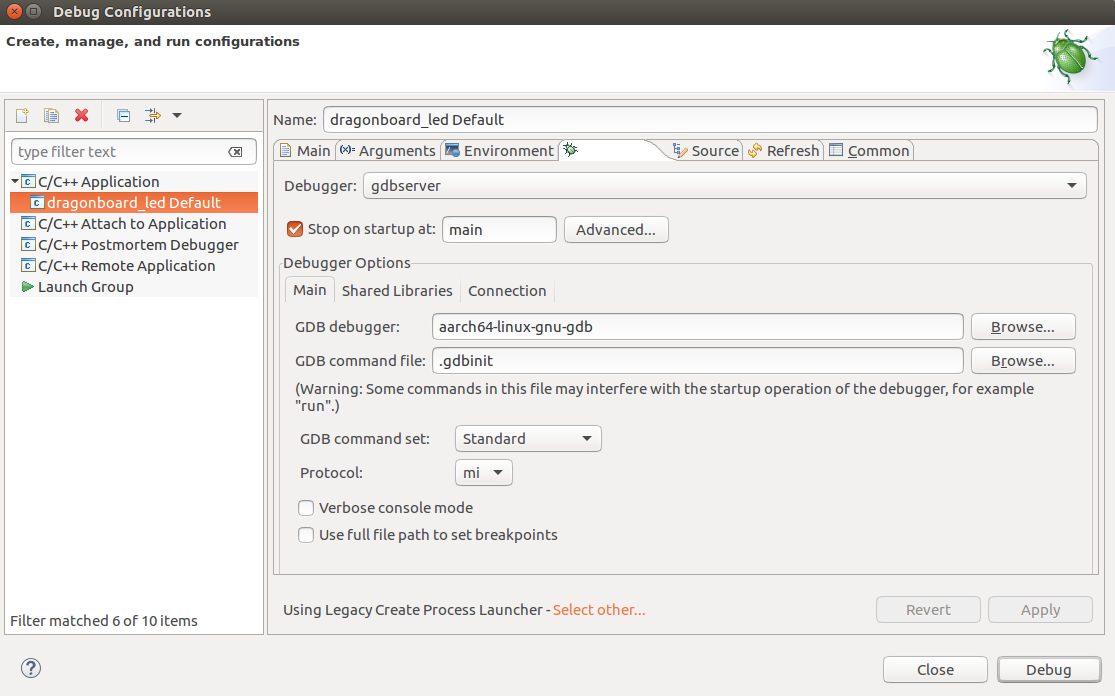
Select the debugger (shown in the screen shot below):
On the debugger tab, select gdbserver for the debugger.
Stop at main on startup.
GDB debugger: aarch-linux-gnu-gdb (this is our dragonboard debugger)
On the connection sub-tab, select TCP for the type of connection
Enter the target IP address (dragonboard IP address)
Enter 2000 for the port number. Or any number you choose while executing on dragonboard.
Debugger settings
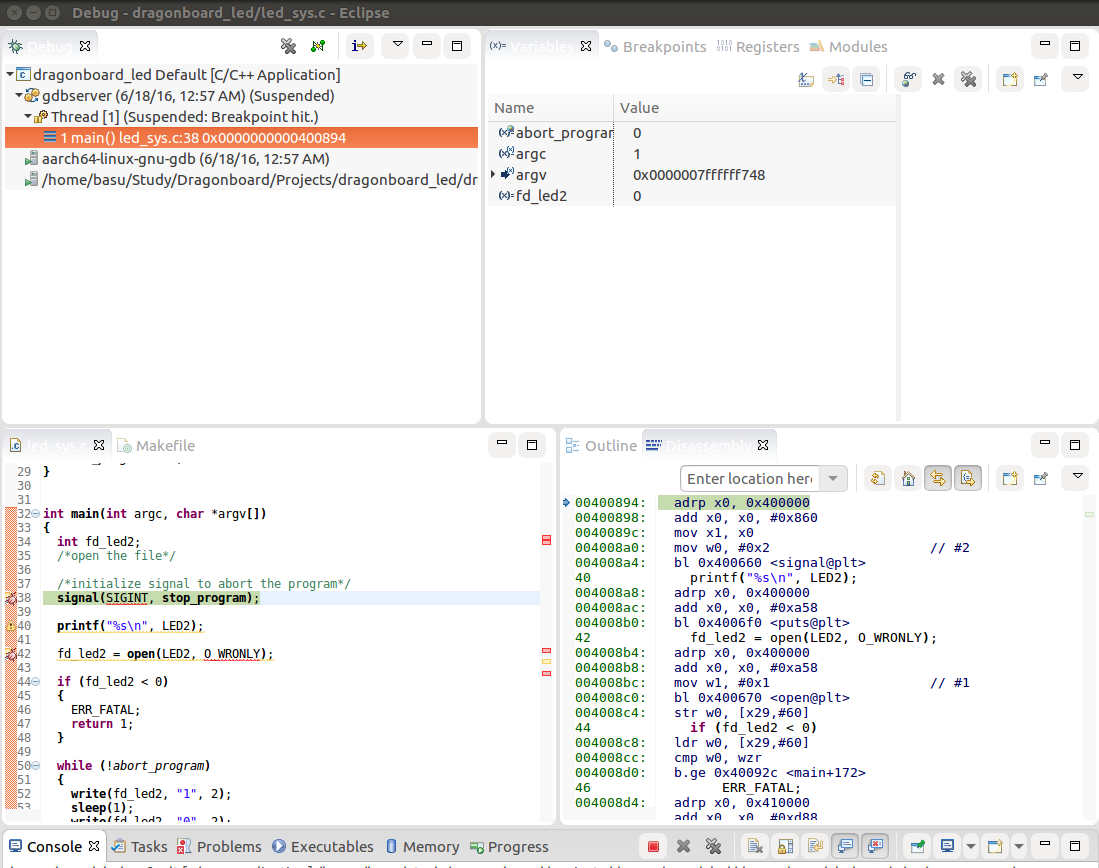
Click Debug.
This should open up a new debug perspective for the application (shown in the screenshot below).
The execution will be stopped at main and waiting for you to continue
Spend sometime on the perspective.
Take a look at variable pane, debug pane, breakpoints, disassembly, etc …
Debu perspective
On the target you should see a remote debugging from host (host IP address) printed. It’s a very small program, so we can just hit F6 and step through.
Remote debugging on target
There you have it, you are remote debugging your program on directly on the target.
Debugging on the target machine is very important and sometimes there are no alternatives but to debug live. Eclipse and gdb make it easier!
If fastboot fails…
Insert the SD card into host machine.
Instead of command line options, use the startup disk creator tool to write rescue image on the SD card.
Disconnect the power from the target.
Insert the rescue SD card into the target.
Set the switches on S6 to 0-1-0-0
Power up the target.
You should detect device in fastboot.
Once images are loaded, remove the SD card and power cycle the target
It is OK to leave the switches in 0-1-0-0 position with no SD card. The switch positions determine the boot order and when SD card is not detected, it will fall back to eMMC.
EMC’s Joshua Bernstein explains why building open source data centers is the key to the modern data center and how the world’s largest organizations are taking advantage of this knowledge.
She is currently a software engineer with the VMKernel team at VMware, and prior to her role there was a Linux kernel developer for the Linux Technology Center at IBM where she focused on energy management.
Flexibility, freedom, innovation and integration is the answer. The question is why should the enterprise build on open source? How can a business survive if it gives away everything? Joshua Bernstein, Vice President of Technology at EMC, makes the case for enterprise open source in his MesosCon North America keynote.
DevOps is key to agility, agility is key to innovation and success, and open source powers DevOps. Bernstein describes the value that this brings to an organization: “We automate everything. We drive out corner cases. We strive for commodity hardware…The biggest thing is that we value this ability to interoperate. This goes along with microservices and the way that we build microservice applications now. We also value tremendously the ability to leverage a collaborative community.”
Flexibility, having the freedom to run the software wherever you want, and ease of integration are major benefits. “If we’re a software developer and we want to deploy it on our laptop for a test/dev environment, we want to put it in our own data centers, we want to run it on Amazon…It allows you to integrate, most importantly, with the rest of the ecosystems you’ve built in the data center.”
Bernstein presents a large number of the benefits of open source for the modern data center in the complete presentation below.
https://www.youtube.com/watch?v=-Xts6Mkujkg
Mesos Large-Scale Solutions
Please enjoy the previous blogs in this series, and watch this spot for more blogs on ingenious and creative ways to hack Mesos for large-scale tasks.
Apache, Apache Mesos, and Mesos are either registered trademarks or trademarks of the Apache Software Foundation (ASF) in the United States and/or other countries. MesosCon is run in partnership with the ASF.
Clement Lefebvre has announced a new release of Linux Mint. The new version, Linux Mint 18, is a long term support release which will receive support through to the year 2021. This release is based on Ubuntu 16.04 and is available in Cinnamon and MATE editions. There are….
Let me give you an idea of how data usage is growing on Comcast’s WiFi network: In 2012, Comcast recorded 1.2 million GB of data traffic. In 2013, it more than doubled to 6.9 million GB of data traffic. It skyrocketed in 2014 when the company recorded 74.8 million GB of data. And in 2015, Comcast recorded 445.8 million GB (or 445.8 PB) of traffic on its Xfinity WiFi network, according toFierceWireless.
To put it in perspective: Comcast’s WiFi data usage grew from modest 1.2 million GB in 2012 to 445.8 million GB in a mere 4 years! And things are going to get even more intense with virtual reality, 4K Xbox and PS4 gaming, YouTube, Netflix, HBO Now, and Hulu all piping their data through network of ISPs like Comcast. Can you imagine how much data Comcast will be dealing with in 2017?
Mark Muehl, SVP Platform Technologies at Comcast
To power these services, Comcast is running a massive infrastructure. Like any other big company, Comcast runs a large data center for application work. At the same time, as a service provider and telecommunications company, they also have a distributed network to deliver lots of different services.
“We’re spending a lot of time and energy figuring out how to make our networks smarter. To extend the capabilities of our network.” Mark Muehl, SVP Platform Technologies at Comcast told me in an interview.
And open source is playing a very big role in Comcast’s empire.
“Today, open source plays an important role throughout that ecosystem and the types of problems that we’re looking at for the foreseeable future, and a lot of them in fact are around the need for us to be more nimble in networking,” said Muehl.
Open Source at Comcast
Comcast is a heavy user of Linux, and it touches everything: from back-end servers to customer facing devices like X1 products. Muehl said. “Comcast, like so many others, is a very Linux-heavy operating system company.”
Comcast’s choice of Linux flavors is interesting. “Generally speaking, we’re more on the open-source side of those Linux distributions than the commercial side of those Linux distributions,” said Muehl. Comcast is using Ubuntu and CentOS.
In addition to Linux, Comcast is a heavy user of OpenStack. They use a KVM hypervisor, and then a lot of data center orchestration is done through OpenStack for the coordination of storage and networking resources with compute and memory resources. Muehl said that Comcast has roughly a petabyte of memory and around a million virtual CPU cores that they are running under the OpenStack umbrella. As an operator, Comcast does a lot of things around operations, and they use Ansible to deploy and manage OpenStack at scale. They also use Cloud Foundry, but according to Muehl that work is in the very early stages at Comcast.
Containers, thanks to Docker, are emerging as the most exciting open source technology. Muehl pointed out that containerization is an up-and-coming area for them.
In Muehl’s own words, “I think it’s fair to say that everything we do in some way touches open source in a pretty significant way.”
Why Open Source?
There are many reasons why giants like Comcast go with open source technologies. Muehl said that there are some defensive reasons, like avoiding vendor lock-in to use open source. But there are actually a lot of positive reasons to choose open source.
If Comcast has a problem to solve, there are three possible approaches: solve it themselves by making an investment in teams and resources; solve it through a commercial vendor that could build a product for them; or work with the open source community.
The last option is where most companies go. As Jim Zemlin, the executive director of The Linux Foundation once told me in an interview, “Organizations have discovered that they want to shed what is essentially commodity R&D and software development that isn’t core to their customers and build all of that software in open source.”
For a company like Comcast, the third option also means lower investment in R&D and much wider support compared to single vendor.
Sometimes Comcast creates a project internally and then open sources that work so that others can contribute to it and use it, said Muehl. He compared open source with biodiversity: the more diverse the technological landscape the healthier it will be. Almost like a biological organism that’s healthier and more resistant to infection.
Be a good citizen
Comcast is not just a consumer of open source; they also contribute heavily to many open source projects. ”To speak generally about open source, OpenStack specifically is one of the larger open source projects that we participate in,” said Muehl.
Comcast has been involved with OpenStack since 2012. “We did a lot of early work around networking because we needed to get IPv6 working. We needed to do some traffic shaping and marking capabilities within the OpenStack infrastructure. All of those have now been upstreamed,” said Muehl.
Stackalytics gives a comprehensive view of the contribution Comcast has made to OpenStack; they have contributed more than 65,000 lines of code — with Neutron being the top project.
In addition to OpenStack, Comcast also participates in many other open source projects such as Apache Traffic Server CDN. Comcast has a GitHub repository where you can see the projects they’ve initiated, but it does not include all of the company’s open source work. Muehl said that OpenStack is a great demonstration of Comcast’s overall philosophy around open source in that it doesn’t want to just take open source software from the community and use it. “We also believe very strongly in giving back to the open source community.”
Do developers really need another collaboration and communications platform, over and above what theyre already using today? In one of the more startling responses you may expect to find from a company in the business of pushing software, Hewlett Packard Enterprise has effectively said, no.
In fact, the service that became the sleeper hit of the last HPE Discover conference in Las Vegas HPEs ChatOps is actually an open-source implementation of the companys existing automation and incident management tools, integrated with Slack, the messaging tool that appears to have finally tipped the balance in the market battle over chat tools in the workplace.
At Discover, a trio of HPE software architects gave The New Stack a demo of ChatOps in action. What we did not see was a centralized platform with a big ChatOps banner and some cartoon icon, giving users yet another stream of real-time comments supplemented with happy faces and fickle fingers. Instead, we saw Slack being leveraged as a common stream of communication between developers in a project; DevOps professionals involved in maintaining software in production; and several lightweight bots performing individual tasks, mostly centered around sending data automatically to and from Slack. Using Slacks existing automation, some of that data was used to trigger automated processes, some of which would be remedial in the case of a real software incident.
Enterprise customers are looking at how they can use their existing assets and HPE products, and be able to leverage this new practice, explained Ke Ke Qi, one of HPEs chief architects in the content management space [pictured above].
Thanks to a news tip we’ve received earlier today, we now know that work on the next major release of the Cinnamon desktop environment has apparently begun, and a lot of improvements are being planned for Cinnamon 3.2 later this year.
Yes, that’s right, Cinnamon 3.2 will be the drop-in replacement for the current stable release of the acclaimed desktop environment, Cinnamon 3.0, which has been officially shipped today, June 30, 2016, to users of the Linux Mint operating system as part of the Linux Mint 18 “Sarah” announcement.
So now that Linux Mint 18 is officially out, it’s time for the developers of the Ubuntu-based distribution to concentrate all of their efforts on the next major release, Linux Mint 18.1. You might want to know that it will ship with Cinnamon 3.2 and MATE 1.16 desktop environments, as well as with numero… (read more)


 Thanks to a news tip we’ve received earlier today, we now know that work on the next major release of the Cinnamon desktop environment has apparently begun, and a lot of improvements are being planned for Cinnamon 3.2 later this year.