
When last we met, in Testing IPv6 Networking in KVM: Part 1, we learned about IPv6 private addressing. Today, we’re going to use KVM to create networks for testing IPv6 to our heart’s content.
Should you desire a refresh in using KVM, see Creating Virtual Machines in KVM: Part 1 and Creating Virtual Machines in KVM: Part 2 – Networking.
Creating Networks in KVM
You need at least two virtual machines in KVM. Of course, you may create as many as you like. My little setup has Fedora, Ubuntu, and openSUSE. To create a new IPv6 network, open Edit > Connection Details > Virtual Networks in the main Virtual Machine Manager window. Click on the button with the green cross on the bottom left to create a new network (Figure 1).
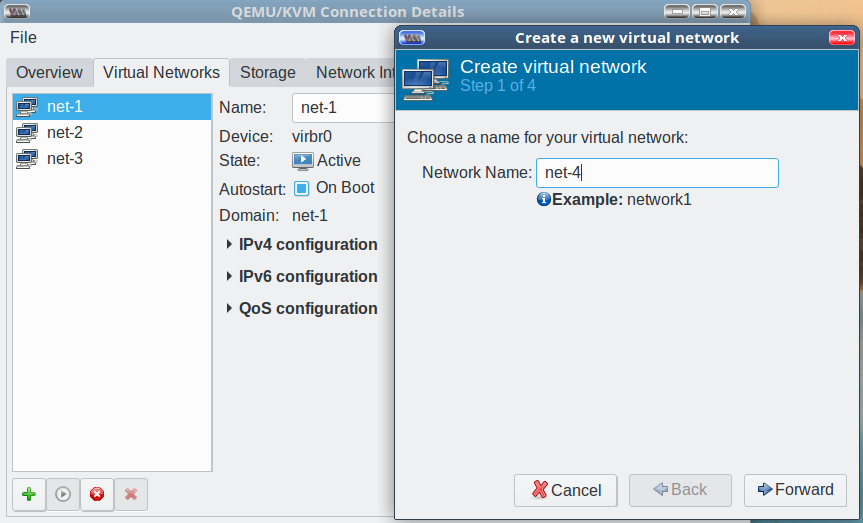
Give your new network a name, then click the Forward button. You may opt to not create an IPv4 network if you wish. When you create a new IPv4 network the Virtual Machine Manager will not let you create a duplicate network, or one with an invalid address. On my host Ubuntu system a valid address is highlighted in green, and an invalid address is highlighted in a tasteful rosy hue. On my openSUSE machine there are no colored highlights. Enable DHCP or not, and create a static route or not, then move on to the next window.
Check “Enable IPv6 network address space definition” and enter your private address range. You may use any IPv6 address class you wish, being careful, of course, to not allow your experiments to leak out of your network. We shall use the nice IPv6 unique local addresses (ULA), and use the online address generator at Simple DNS Plus to create our network address. Copy the “Combined/CID” address into the Network field (Figure 2).
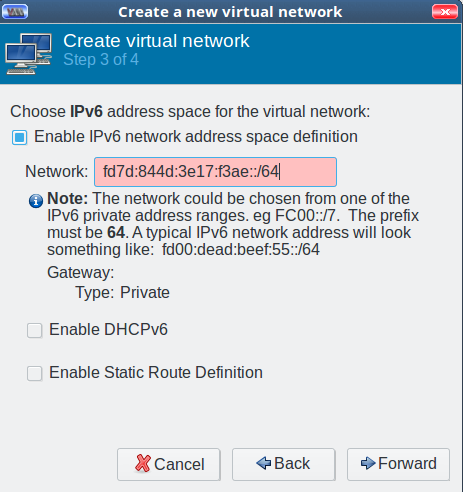
Virtual Machine Manager thinks my address is not valid, as evidenced by the rose highlight. Can it be right? Let us use ipv6calc to check:
$ ipv6calc -qi fd7d:844d:3e17:f3ae::/64
Address type: unicast, unique-local-unicast, iid, iid-local
Registry for address: reserved(RFC4193#3.1)
Address type has SLA: f3ae
Interface identifier: 0000:0000:0000:0000
Interface identifier is probably manual set
ipv6calc thinks it’s fine. Just for fun, change one of the numbers to something invalid, like the letter g, and try it again. (Asking “What if…?” and trial and error is the awesomest way to learn.)
Let us carry on and enable DHCPv6 (Figure 3). You can accept the default values, or set your own.
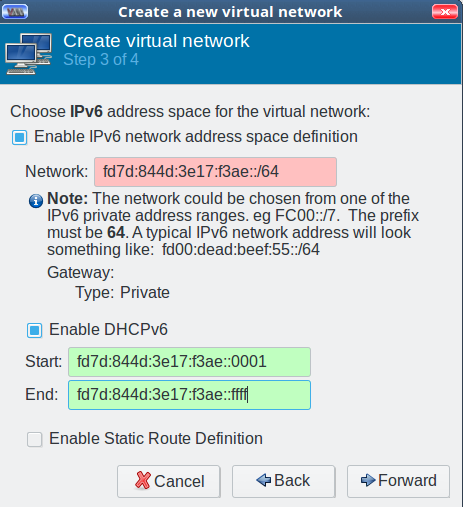
We shall skip creating a default route definition and move on to the next screen, where we shall enable “Isolated Virtual Network” and “Enable IPv6 internal routing/networking”.
VM Network Selection
Now you can configure your virtual machines to use your new network. Open your VMs, and then click the “i” button at the top left to open its “Show virtual hardware details” screen. In the “Add Hardware” column click on the NIC button to open the network selector, and select your nice new IPv6 network. Click Apply, and then reboot. (Or use your favorite method for restarting networking, or renewing your DHCP lease.)
Testing
What does ifconfig tell us?
$ ifconfig
ens3: flags=4163 UP,BROADCAST,RUNNING,MULTICAST  mtu 1500
 inet 192.168.30.207  netmask 255.255.255.0
   broadcast 192.168.30.255
 inet6 fd7d:844d:3e17:f3ae::6314
   prefixlen 128  scopeid 0x0
 inet6 fe80::4821:5ecb:e4b4:d5fc
   prefixlen 64  scopeid 0x20
And there is our nice new ULA, fd7d:844d:3e17:f3ae::6314, and the auto-generated link-local address that is always present. Let’s have some ping fun, pinging another VM on the network:
vm1 ~$ ping6 -c2 fd7d:844d:3e17:f3ae::2c9f
PING fd7d:844d:3e17:f3ae::2c9f(fd7d:844d:3e17:f3ae::2c9f) 56 data bytes
64 bytes from fd7d:844d:3e17:f3ae::2c9f: icmp_seq=1 ttl=64 time=0.635 ms
64 bytes from fd7d:844d:3e17:f3ae::2c9f: icmp_seq=2 ttl=64 time=0.365 ms

vm2 ~$ ping6 -c2 fd7d:844d:3e17:f3ae:a:b:c:6314
PING fd7d:844d:3e17:f3ae:a:b:c:6314(fd7d:844d:3e17:f3ae:a:b:c:6314) 56 data bytes
64 bytes from fd7d:844d:3e17:f3ae:a:b:c:6314: icmp_seq=1 ttl=64 time=0.744 ms
64 bytes from fd7d:844d:3e17:f3ae:a:b:c:6314: icmp_seq=2 ttl=64 time=0.364 ms
When you’re struggling to understand subnetting, this gives you a fast, easy way to try different addresses and see whether they work. You can assign multiple IP addresses to a single interface and then ping them to see what happens. In a ULA, the interface, or host, portion of the IP address is the last four quads, so you can do anything to those and still be in the same subnet, which in this example is f3ae. This example changes only the interface ID on one of my VMs, to show how you really can do whatever you want with those four quads:
vm1 ~$ sudo /sbin/ip -6 addr add fd7d:844d:3e17:f3ae:a:b:c:6314  dev ens3

vm2 ~$ ping6 -c2 fd7d:844d:3e17:f3ae:a:b:c:6314
PING fd7d:844d:3e17:f3ae:a:b:c:6314(fd7d:844d:3e17:f3ae:a:b:c:6314) 56 data bytes
64 bytes from fd7d:844d:3e17:f3ae:a:b:c:6314: icmp_seq=1 ttl=64 time=0.744 ms
64 bytes from fd7d:844d:3e17:f3ae:a:b:c:6314: icmp_seq=2 ttl=64 time=0.364 ms
Now try it with a different subnet, which in this example is f4ae instead of f3ae:
$ ping6 -c2 fd7d:844d:3e17:f4ae:a:b:c:6314
PING fd7d:844d:3e17:f4ae:a:b:c:6314(fd7d:844d:3e17:f4ae:a:b:c:6314) 56 data bytes
From fd7d:844d:3e17:f3ae::1 icmp_seq=1 Destination unreachable: No route
From fd7d:844d:3e17:f3ae::1 icmp_seq=2 Destination unreachable: No route
This is also a great time to practice routing, which we will do in a future installment along with setting up auto-addressing without DHCP.
Learn more about Linux through the free “Introduction to Linux” course from The Linux Foundation and edX.


