Containerization is changing how organizations deploy and use software. You can now deploy almost any software reliably with just the docker run command. And with orchestration platforms like Kubernetes and DC/OS, even production deployments are easy to set up.
You may have already experimented with Docker, and have maybe run a few containers. But one thing you might not have much experience with is understanding how Docker containers behave under different loads.
Because Docker containers, from the outside, can look a lot like black boxes, it’s not obvious to a lot of people how to go about getting runtime metrics and doing analysis.
In this post, we will set up a small CrateDB cluster with Docker and then go through some useful Docker commands that let us take a look at performance.
By Thierry Escande, Senior Software Engineer at Collabora.
Kmemleak (Kernel Memory Leak Detector) allows you to track possible memory leaks inside the Linux kernel. Basically, it tracks dynamically allocated memory blocks in the kernel and reports those without any reference left and that are therefore impossible to free. You can check the kmemleak page for more details.
This post exposes real life use cases that I encountered while working on the NFC Digital Protocol stack.
Enabling kmemleak in the kernel
kmemleak can be enabled in the kernel configuration under Kernel hacking > Memory Debugging.
    [*] Kernel memory leak detector
    (4000) Maximum kmemleak early log entries
    < >   Simple test for the kernel memory leak detector
    [*]   Default kmemleak to off
I used to turn it off by default and enable it on demand by passing kmemleak=on to the kernel command line. If some leaks occur before kmemleak is initialized you may need to increase the “early log entries” value. I used to set it to 4000.
The sysfs interface of kmemleak is a single file located in /sys/kernel/debug/kmemleak. You can control kmemleak with the following operations:
Trigger a memory scan:
$ echo scan > /sys/kernel/debug/kmemleak
Clear the leaks list:
$ echo clean > /sys/kernel/debug/kmemleak
Check the possible memory leaks by reading the control file:
$ cat /sys/kernel/debug/kmemleak
I will not go deep regarding the various NFC technologies and the following examples will be based on NFC-DEP, the protocol used to connect 2 NFC devices and make them communicate through standard POSIX sockets. DEP stands for Data Exchange Protocol.
For the purpose of this post I’m using nfctool, a standalone command line tool used to control and monitor NFC devices. nfctool is part of neard, the Linux NFC daemon.
So let’s start with an easy case.
A simple case: leak in a polling loop
When putting a NFC device in target polling mode, it listens for different modulation modes from a peer device in initiator mode. When I first used kmemleak I was surprised to see possible leaks reported by kmemleak while not even a single byte has been exchanged, simply by turning target poll mode on the nfc0 device.
$ nfctool -d nfc0 -p Target
A few seconds later, after a kmemleak scan using:
$ echo scan > /sys/kernel/debug/kmemleak
The following message appear in the syslog:
[11764.643878] kmemleak: 8 new suspected memory leaks (see /sys/kernel/debug/kmemleak)
The only allocation here is the nfcid2 array, passed to digital_tg_listen() as 4th parameter, a user argument supposed to be returned as a function argument to the callback digital_tg_recv_sensf_req() upon reception of a valid frame from the peer device or if a timeout error occurs (nobody on the other side is talking to us). After a quick check in digital_tg_recv_sensf_req() it appears that the user argument is not used at all and of course not released.
As I said, that one was easy. There was no need for the nfcid2 array to be allocated in the first place so the fix was pretty straightforward.
Now digital_tg_listen_nfcf() looks good:
    int digital_tg_listen_nfcf(struct nfc_digital_dev *ddev, u8 rf_tech)
    {
        int rc;

        rc = digital_tg_config_nfcf(ddev, rf_tech);
        if (rc)
            return rc;

        return digital_tg_listen(ddev, 300, digital_tg_recv_sensf_req, NULL);
    }
The recent Linux Kernel Development Report released by The Linux Foundation, included information about several featured Linux kernel developers. According to the report, roughly 15,600 developers from more than 1,400 companies have contributed to the Linux kernel since 2005, when the adoption of Git made detailed tracking possible. Over the next several weeks, we will be highlighting some specific Linux kernel developers who agreed to answer a few questions about what they do and why they contribute to the kernel.
In this article, we feature Laura Abbott, a Fedora Kernel Engineer at Red Hat.
The incidence of denial-of-service (DoS) attacks has consistently grown over the last few years, “steadily becoming one of the biggest threats to Internet stability and reliability.” Over the last year or so, the emergence of IoT-based botnets — such as Mirai and more recently Reaper, with as yet unknown total capacity — has left security researchers wondering whether a distributed denial-of-service (DDoS) attack could soon take down the entire internet.
The problem is there is no macroscopic view of the DoS ecosphere. Analyses tend to be by individual research teams examining individual botnets or attacks. Now academics from the University of Twente (Netherlands); UC San Diego (USA); and Saarland University (Germany) have addressed this problem “by introducing and applying a new framework to enable a macroscopic characterization of attacks, attack targets, and DDoS Protection Services (DPSs).”
Sad news today for those who have hoped to upgrade their GNU/Linux distributions to Linux kernel 4.14 LTS as Linus Torvalds announced a few moments ago the availability for testing of the eighth and last Release Candidate of the next long-term supported Linux kernel series, supported for the next six years.
The release of RC8 delays the final release of Linux kernel 4.14 LTS with a week. Of course, this also means that the merge window for the Linux 4.15 kernel series will be pushed into Thanksgiving week, which isn’t quite what Linus Torvalds expected as he’ll be on vacation with his family.
OpenStack, the massive open source project that provides large businesses with the software tools to run their data center infrastructure, is now almost eight years old. While it had its ups and downs, hundreds of enterprises now use it to run their private clouds and there are even over two dozen public clouds that use the project’s tools. Users now include the likes of AT&T, Walmart, eBay, China Railway, GE Healthcare, SAP, Tencent and the Insurance Australia Group, to name just a few.
“One of the things that’s been happening is that we’re seven years in and the need for turning every type of infrastructure into programmable infrastructure has been proven out. “It’s no longer a debate,” OpenStack COO Mark Collier told me ahead of the projects semi-annual developer conference this week. OpenStack’s own surveys show that the project’s early adopters, who previously only tested it for their clouds, continue to move their production workflows to the platform, too. “We passed the hype phase,” Collier noted.
YOU’VE PROBABLY NEVER heard of the late Jim Weirich or his software. But you’ve almost certainly used apps built on his work.
Weirich helped create several key tools for Ruby, the popular programming language used to write the code for sites like Hulu, Kickstarter, Twitter, and countless others. His code was open source, meaning that anyone could use it and modify it. “He was a seminal member of the western world’s Ruby community,” says Justin Searls, a Ruby developer and co-founder of the software company Test Double.
When Weirich died in 2014, Searls noticed that no one was maintaining one of Weirich’s software-testing tools. That meant there would be no one to approve changes if other developers submitted bug fixes, security patches, or other improvements. Any tests that relied on the tool would eventually fail, as the code became outdated and incompatible with newer tech.
Selecting technologies means committing to solutions that will support an active, growing business over the long term, so it requires careful consideration and foresight. When an enterprise bets on the wrong horse, the result is often significantly higher development costs and reduced flexibility, both of which can stick around for the long haul.
In the past decade, adoption of open source software at the enterprise level has flourished, as more businesses discover the considerable advantages open source solutions hold over their proprietary counterparts, and as the enterprise mentality around open source continues to shift.
Enterprises looking to make smart use of open source software will find plenty of great reasons to do so. Here are just some of them.
For the longest time, naysayers were fairly intent on shutting down anyone who believed the Linux desktop would eventually make serious headway in the market. Although Linux has yet to breach 5 percent of that market, it continues to claw its way up. And with the help of very modern, highly efficient, user-friendly environments, like PinguyOS, it could make even more headway.
If you’ve never heard of PinguyOS, you’re in for a treat — especially if you’re new to Linux. PinguyOS is a Linux distribution, created by Antoni Norman, that is based on Ubuntu. The intention of PinguyOS is to look good, work well, and — most importantly — be easy to use. For the most part, the developers have succeeded with aplomb. It’s not perfect, but the PinguyOS desktop is certainly one that could make migrating to Linux a fairly easy feat for new users.
In this article, I’ll take a look at what PinguyOS has to offer.
What makes PinguyOS tick?
As I’ve already mentioned, at the heart of PinguyOS is Ubuntu. The current build is a bit behind at Ubuntu 14.04. This means users will not only enjoy some of the best hardware recognition on the Linux market, but the apt package manager is ready to serve. Of course, new users really don’t care about what package manager is employed to install and update applications. What will draw them in is a shiny GUI that makes everything a veritable point-and-click party. That’s where GNOME comes in. I’ve already been on the record saying that GNOME is one of the slickest and most stable desktops on the market. But PinguyOS doesn’t settle for a vanilla take on GNOME. Instead, PinguyOS adds a few extra options to make migration from other desktops a breeze.
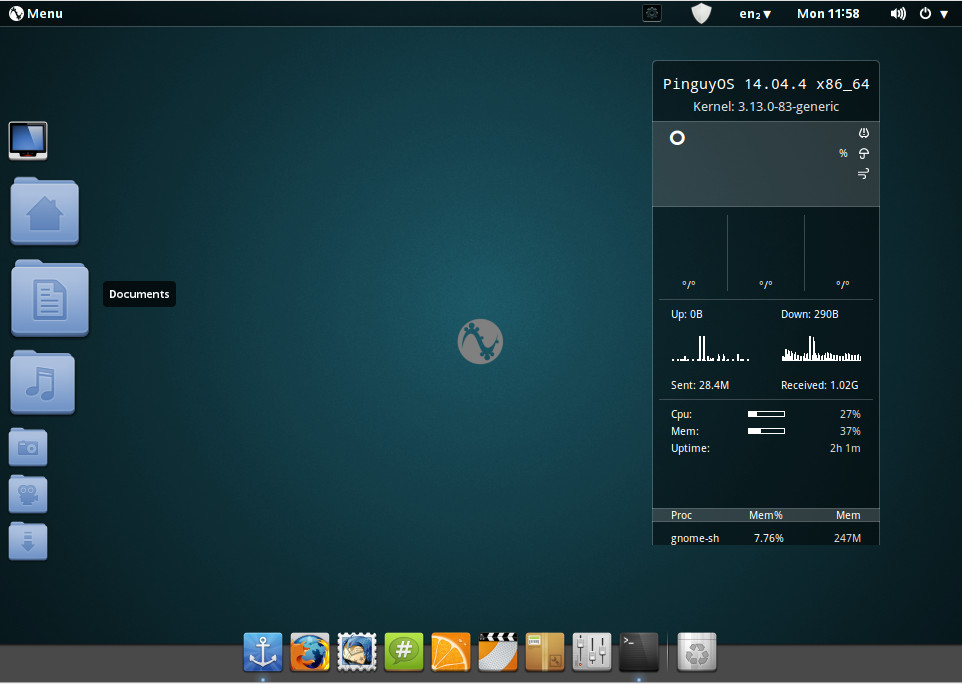
To the standard GNOME desktop, PinguyOS adds a quick launch Docky bar to the bottom of the screen and an autohide Docky Places bar on the left edge of the screen (Figure 1).
Figure 1: The default PinguyOS desktop with the Places Dock in action.
As you can see (on the default desktop), there is one piece that tends to appeal to Linux users. That piece is Conky. I’ve used Conky on a number of desktops, for various purposes. In some instances, it’s actually quite handy. For many a Linux user, it seems a must to have detailed reports on such things as CPU, memory, and network usage; uptime; running processes; and more. Don’t get me wrong, Conky is a great tool. However, for new users, I’d say it’s far less interesting or useful. Thing is, new users won’t even know what that window on the desktop even is. Experienced Linux users will see it, think “That’s Conky,” and know how to easily get rid of it (should they not want it on their desktop) or configure it. New users? Not so much.
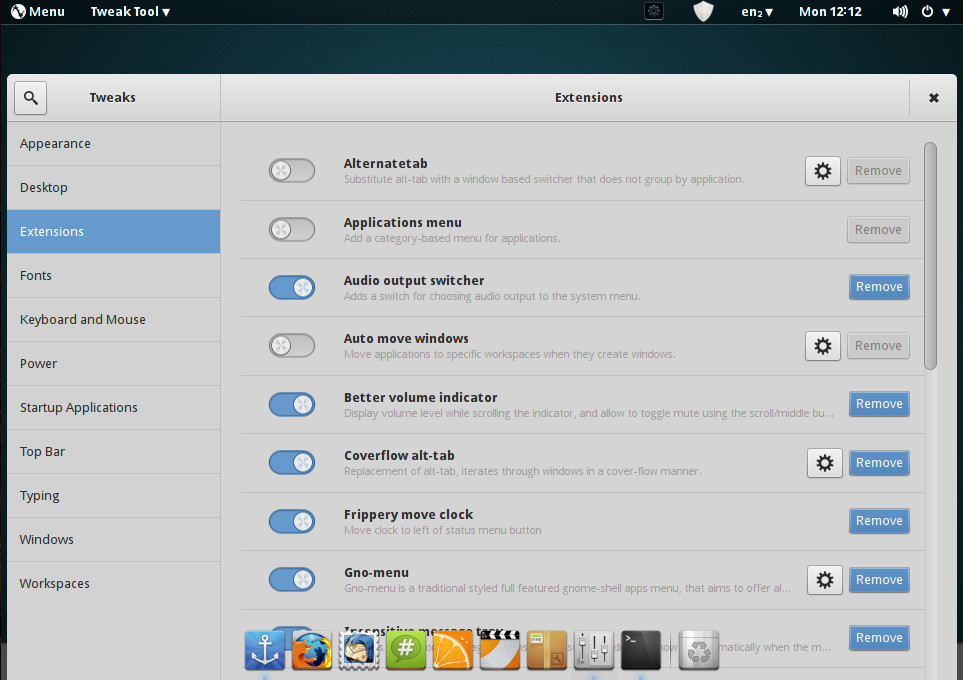
But that is a rather minor issue for a desktop that has so much to offer. Set aside Conky and you’ll see a Linux distribution that tosses just about everything it can at the desktop, in order to create something very useful. The developers have gone out of their way to add the necessary tools to make GNOME a desktop that welcomes just about every type of user. One way the PinguyOS developers have managed this is via GNOME extensions. Open up the Tweaks tool, click on Extensions, and you’ll see a healthy list of additions to GNOME (Figure 2).
Figure 2: The PinguyOS GNOME extension list.
All told, there are 23 extensions added to GNOME — some of which are enabled by default, some of which are not.
Installed applications
Beyond Conky and GNOME extensions, what else can you expect to find installed, by default, on PinguyOS? Click on the Menu in the top left of the desktop, and you’ll see a fairly complete list of applications, such as:
GNOME Do (do things as quickly as possible)
Shutter (capture and share screenshots)
Play On Linux (Install games via Wine)
Steam (manage Steam games)
Pinta (image creation/edit)
Empathy (instant message client)
Firefox (web browser)
Remmina (remote desktop client)
Skype (VOIP client)
TeamViewer 10 (tool for remote support)
Thunderbird (email client)
LibreOffice (full-featured office suite)
wxBanker (finance manager
Plex Home Theatre/Media Manager
Clementine (audio player)
OpenShot (video editor)
VLC (media player)
That’s a healthy list of tools — one that comes with the slightest price. The minimum installation size of PinguyOS is 15.2 GB. That’s nearly four times the size of a minimum Ubuntu installation. However, you do get a considerable amount of software for your trouble — something that will greatly appeal to new users. Instead of having to bother installing a number of software titles (after OS installation), you should have nearly everything you need to get your work done, in a very user-friendly environment. And with GNOME in control of the desktop, you can be certain PinguyOS will enjoy a very stable and slick desktop.
Tiny Faults
If Ihad to find something wrong with PinguyOS, it would be three particular somethings. The first two, I’ve already mentioned — being based on an outdated version of Ubuntu and the addition of Conky by default. The PinguyOS developers should consider working with Ubuntu 16.04 (also an LTS release). Also, Conky should be an optional addition, one that includes a user-friendly setup wizard upon first boot. The third isn’t quite as minor a nit. Instead of including GNOME Software as the default front end for the package manager, PinguyOS opts to include both Synaptic and the now-defunct Ubuntu Software Center. First off, Ubuntu Software Center shouldn’t be included on any distribution these days. The tool is broken, slow, and buggy. But adding Synaptic as a second option (or, rather, a first option — as it is the tool included in the Dock), is a mistake. This is not to say Synaptic isn’t a solid tool; it is. But considering how much better (and, again, user-friendly) GNOME Software is, it would only make sense to include it as the default.
As I said, Synaptic is a good tool, just not one I’d recommend to new users. Since PinguyOS’s focus is simplicity, maybe migrating to GNOME Software would be the right move.
Minor nits, major hits
Set aside the minor nits found in PinguyOS and you’ll see there is quite a lot to love about this distribution. It’s well polished, stable, offers all the software you need to get your work done, and it’s user-friendly. What more can you ask for from a desktop operating system?
Learn more about Linux through the free “Introduction to Linux” course from The Linux Foundation and edX.
The Cloud Foundry Container Runtime is the new name for Kubo, which is Kubernetes running on BOSH. In today’s episode of The New Stack Makers, TNS founder Alex Williams caught up with Cloud Foundry CTO Chip Childers to learn more about Cloud Foundry’s plans for this new runtime, with Childers highlighting how BOSH is serving the needs of today’s developers.
Childers went on to note that the Cloud Foundry Container Runtime and application runtime will sit next to one another, allowing for shared identity between Kuberenetes and Cloud Foundry application runtimes.
“I think that what’s most important right now is thinking about the developers. What is it that the developer in the enterprise needs? …”