The physicist’s third law provides insight into how emerging technologies like containers impact the core network.
Sir Isaac Newton remains our favorite source for axiomatic laws of physics, despite giving us the language of calculus. Particularly relevant for today’s discussion is Newton’s third law as formally stated: “For every action, there is an equal and opposite reaction.”
In the cosmology of the data center, this existentially proves itself in the network whenever there are significant changes in application infrastructure and architectures. As evidence, consider the reaction to first, virtualization, and now, containerization, APIs, and microservice architectures.
If concerns about data breaches have kept your organization from using the public cloud, read about use cases in which these worries should be a thing of the past.
A survey of European IT executives in 2014 revealed that 72% of businesses didn’t trust cloud vendors to obey data protection laws and regulations, and that 53% of respondents said the likelihood of a data breach increases due to the cloud.
In October 2015, Rob Enderle, president and principal analyst of the Enderle Group and previously Senior Research Fellow for Forrester Research and the Giga Information Group, wrote in a CIO.com post, “Simply stated, you can’t trust the employees of cloud service providers. Frankly, I don’t think we can really trust our own employees anymore either, but at least our capability to monitor them is far greater.”
Openness has become the new standard for content and software across a variety of initiatives in higher education. Open source software, open education, open educational resources, open access publishing, open analytics, open data, open science, and open humanities have matured to challenge, even dominate, the global educational landscape.
Those of us working with open projects know how important it is to contribute experiences of best practice, develop common understanding, and share strategic direction, in order to better facilitate communication and synchronization across the emerging open landscape. To that end, the Apereo Foundation—an open source software community of over 100 institutions of higher education—along with the Open Source Initiative and Red Hat organized the first Open Summit.
DARPA’s Cyber Grand Challenge pitted machine against machine in an effort to find the best in autonomous computer security. In the end, Mayhem was the big winner.
After three years of planning and lead-up contests, the finals of the Defense Advanced Research Projects Agency’s Cyber Grand Challenge (CGC) to show the best in autonomous computer security concluded with a win by the Mayhem system from the ForAllSecure team, which won the $2 million grand prize. The Xandra system finished in second place, winning $1 million, while the Mechaphish system placed third, claiming $750,000.
The three systems finished at the top of a field of seven systems that battled for 8 hours in front of an audience at the DefCon security conference here Aug. 4. There was live play-by-play and color commentary of the last hours of the contest from a broadcast booth.
Welcome to small tutorial series of hosting website on Linux machine. This series of articles will teach how to set up a web server on Linux computer and make it available online. The website we’ll host on our personal computer can be accessed from around the globe. In this article(Part 1), we are going to install all the required tools to setup web server. So let’s get started and start our own setup web server.
The Linux distro we’ll be using for this setup is Ubuntu OS. However, this can be implemented in any linux distro. At the end of this tutorial you will be able to host your php and mySQL based website on your own Linux machine. The tutorial is divided into two parts. In first part, we discuss about basic components and their installation part. In next section, we shall write sample php code for basic website and host it under apache2 web server
When you have important sensitive data, then its crucial to have an extra layer of security to your files and directories, specially when you need to transmit the data with others over a network.
That’s the reason, I am looking for a utility to encrypt and decrypt certain files and directories in Linux, luckily I found a solution that tar with OpenSSL can do the trick, yes with the help of these two tools you can easily create and encrypt tar archive file without any hassle.
[[ This is a content summary only. Visit my website for full links, other content, and more! ]]
See how paying attention to your function signature, utilizing language features where possible and using immutable data structures and pure functions can get you pretty far.
The basic unit of programming is the function. You build your program one function (or method) at a time. The smallest thing you can test in a unit test is a function. A function is also the smallest piece of code you can name and hence create a new abstraction. The whole point of a function is to encapsulate some piece of code and make it available to the rest of your program or other programs in a library.
1) British Government Digital Service (GDS) posted a job advertisement looking for a new ‘open source lead’. “How times have changed,” writes Adrian Bridgwater.
The British Digital Service (BDS) seeks an open source lead; a metaphor for the changing times.
2) Vendors are changing their business models to incorporate OSS. Open Source Reshaping Vendor Business Models – Wikibon– Silicon Angle
3) Scott Gilbertson anticipates two great years ahead with Mint 18.x.
In part 1, we learned how to make simple automated unencrypted and encrypted backups. In this article, I will show you how to fine-tune your file selection, and how to backup your encryption keys.
rsync Include and Exclude Files
rsync supports all kinds of complex ways to build lists of files that you want to copy, and lists of files that you want to exclude from copying. man rsync details five ways to select files:
--exclude=PATTERN   exclude files matching PATTERN
--exclude-from=FILE read exclude patterns from FILE
--include=PATTERN   don't exclude files matching PATTERN
--include-from=FILE read include patterns from FILE
--files-from=FILE   read list of source-file names from FILE
Include rules copy everything by default. It seems they should exclude everything by default and copy only the files that you list, but it doesn’t work that way, and you have to use them in combination with exclude rules. Exclude rules exclude nothing by default, but exclude only the files you list. Include rules drive me nuts, so I don’t use them.
The two simplest methods use the –files-from and –exclude-from options. Put your list of files in a text file and then call this file in your backup command. Use the –files-from option when your list of files to copy is smaller than the number of files you don’t want to copy. –files-from does not support pattern matching; it is just a plain list.
Use –exclude-from when your exclude list is shorter than your include list. This supports pattern matching, so you can use regular expressions.
This example include file lists subdirectories and one file from the 1mybooks directory, and the entire blog directory. Filepaths are relative to the root directory, which is ~/Documents/:
This example backup command use the -a (archive) option, which preserves your file metadata, including permissions, file ownerships, and timestamps. -r (recursive) is normally included in the -a option, but the –files-from option does not recurse. -v adds verbosity.
You have to specify the target directory, and trailing slashes have no effect.
–exclude-from supports pattern matching. In this example, logs/2015/* will not copy any subdirectories or files after 2015/. sketchbook/sketch* will not copy any files that start with “sketch”. .* means do not copy dotfiles. games/ and Videos/ are completely excluded:
Now you must mind your trailing slashes, as we learned in part 1. A trailing slash on the source directory copies only the contents, and omitting it copies the directory and contents. It makes no difference on the target directory.
duplicity File Selection
duplicity supports similar file selection conventions to rsync, with includes and excludes and pattern matching. The simplest backup command names a single directory, as we learned in part 1. When you want to backup more than one file or directory, it gets more complicated. No, sorry, you can’t just make a normal plain file list. This example excludes two subdirectories in the ~/foo directory, and by default includes all the others:
Note that duplicity defaults to not allowing multiple different backups to the same backup directory. You can override this with the –allow-source-mismatch option, although I don’t recommend it. It’s cheap and easy to give each backup archive its own directory.
You can put your file list in a file and then call it with the –include-filelist or –exclude-filelist option. This example includes files to backup and excludes all the others in your root backup directory:
duplicity has eleventy-fourteen options. Please study man duplicity to learn about full and incremental backups, pattern matching for uber-nerdy file selection, and the correct syntax for FTP and local backups. Yes, it’s a bit of a rough read, but that is the authoritative source, and believe me it is faster in the long run than wading through web searches.
Backup Keys
The quickest method is to copy your .ssh and .gnupg directories to a safe location. I recommend using an SD card rather than a USB key — because SD cards are more reliable — and locking it somewhere safe. You could also store these on a safe cloud service such as SpiderOak. Then to restore them, you can just copy them back into place. There are several other cool nerdy ways to back up encryption keys, which I’ll discuss in a future article.
Linux offers a world of options. No matter your need, you’ll find a tool for the purpose. This holds true for servers, productivity, games, and everything in between. While you’re working on your desktops or servers, however, there’s one task of singular importance. That task is backups.
You probably already know of rsync and other command-line tools that enable Linux to handle backups in incredibly flexible ways. But, what if you prefer a GUI for such tasks? Where do you turn? The tool I used for years was Lucky Backup. Unfortunately, the development on Lucky Backup has frozen, so it will not be receiving any new features. The developer does still support the tool, but it’s not possible to install his latest release on anything but outdated distributions (such as Ubuntu 14.10). Even though Lucky Backup is still an outstanding backup solution, you’re going to want to find a tool that will continue development. For me, the obvious GUI replacement for Lucky Backup is Déjà Dup.
Déjà Dup offers just about any feature you’d need in a simple backup solution, driven by a GUI front end (for the duplicity command-line tool). It features:
Support for local, remote, or cloud backup location (including services like Amazon S3 and Rackspace Cloud Files)
Built-in encryption and compression support
Incremental backups (so you can restore from any particular point)
Scheduled backups
Integrates into Nautilus and other file managers
I rely on Déjà Dup to run a regularly scheduled backup and it has yet to fail me. Let’s install Déjà Dup, set up a job, run it, and then restore from the backup.
Installation
Déjà Dup can be installed on most Linux distributions. On some variations of Linux, such as Ubuntu, it will come pre-installed. To find out, open up your Dash (or menu) and search for either Backups or Déjà Dup (just type deja in your desktop search, and it should appear). If you do not find it, you can install directly from either your Software Center (search for deja) or you can install from the command line with the following:
Ubuntu: sudo apt-get install deja-dup
Fedora: dnf install deja-dup
openSUSE:zypper install deja-dup
Once installed, you’ll find Déjà Dup in your desktop menu. You’re ready to start backing up.
Usage
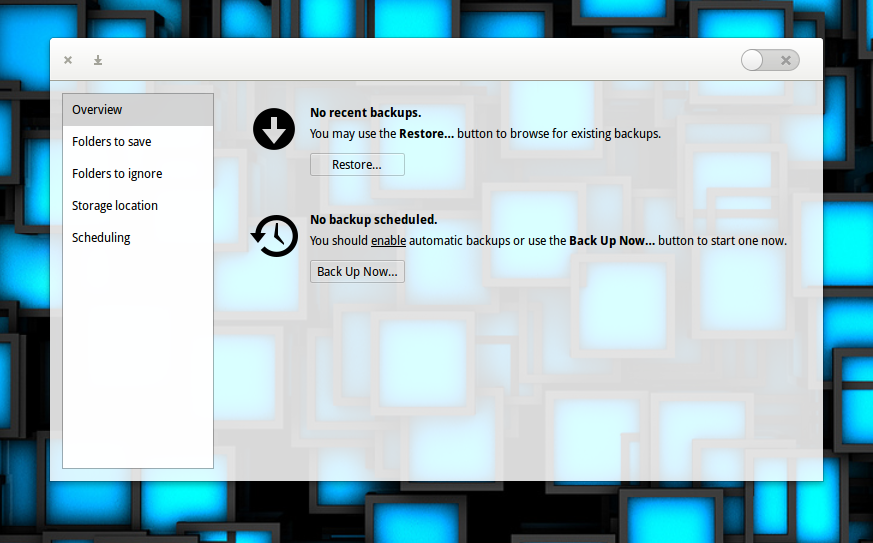
Working with Déjà Dup makes backups incredibly easy. When you first launch the app (I’m running the software on Elementary OS Freya), you’ll see a straightforward window, that clearly indicates Déjà Dup is disabled (Figure 1).
Figure 1: The Déjà Dup main window ready to serve.
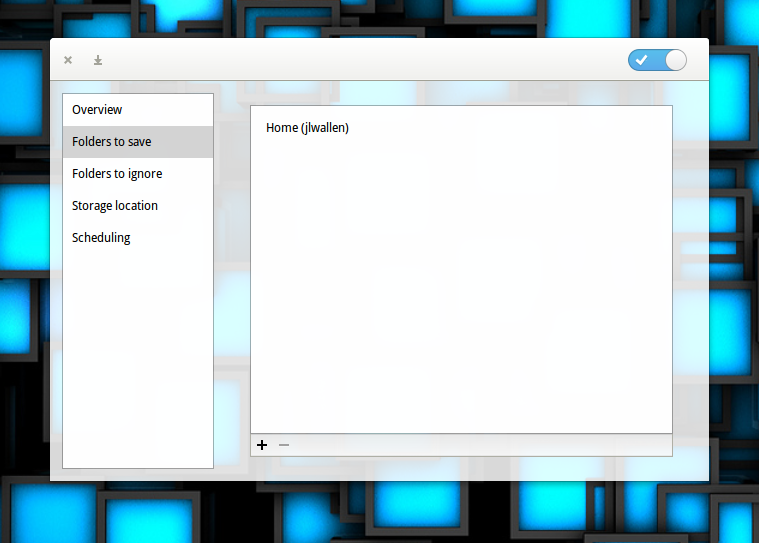
Let’s set up a backup. I’ll be backing up my most important folder (a local Google Drive folder synced using the Insync tool) to an external drive. The first thing to do is enable Déjà Dup by clicking the slider in the upper right corner. Once you’ve done that, click on Folders to save in the left navigation. In the resulting window (Figure 2) click on the + button, navigate to the folder to be backed up, and click Add.
Figure 2: If you don’t need to backup the default (your home directory), select it and click the – button.
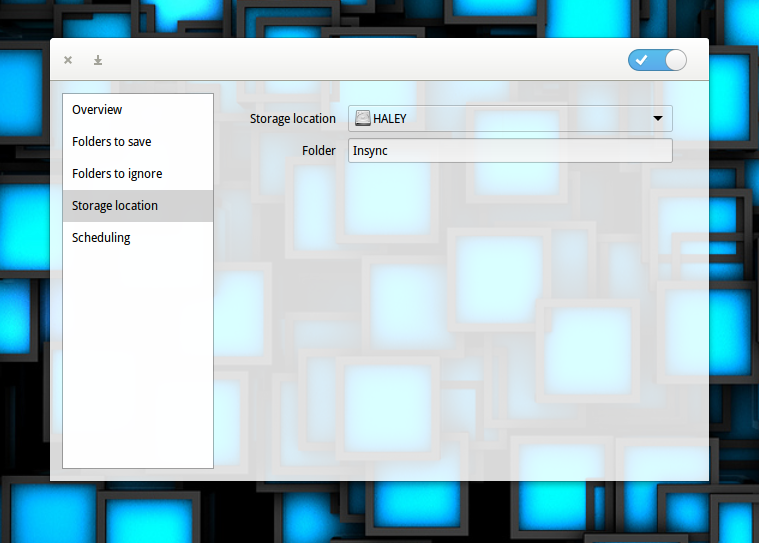
If there are any folders that need to be excluded from your backup, click on Folders to ignore and add them in the same way you added the folder to save. Otherwise, click on Storage location. In the resulting window (Figure 3), select the storage location from the drop-down (in my case a locally attached drive) and then enter the folder the backup is to be saved to.
Figure 3: Selecting your storage location for your backups.
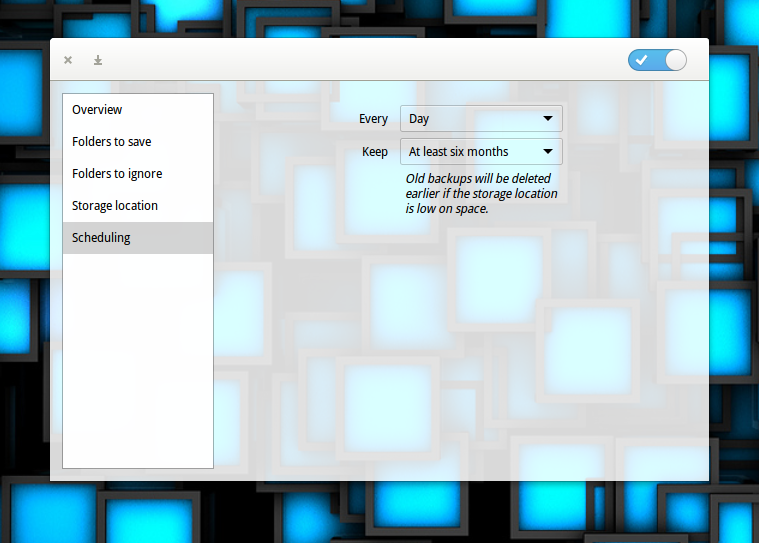
The final step is to click on Scheduling and then, select when you want to run the backups and how long you want to keep a backup (Figure 4).
Figure 4: The scheduling options are a bit limited, but they work well.
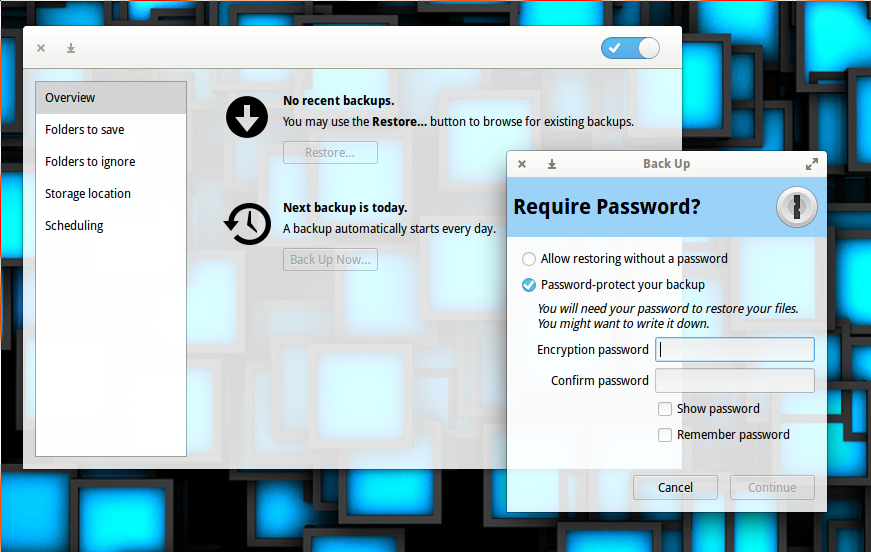
Finally, click back on Overview and you can either run a backup now or wait for the backup to run at its scheduled time. If you click Run Now (from Overview), you will be prompted to either enable or disable encryption for the backup (Figure 5).
Figure 5: Enabling encryption for your backups.
If you opt for encryption, enter your password and then click Continue. If you opt out of encryption, select Allow restoring without a password and then click Continue. The backup will immediately start running. If necessary, you can click Resume later (if the backup is taking too long). An initial backup will take a considerable amount of time (depending, of course, on the amount of data to be backed up). You should start seeing your destination fill up with files. Each of these files is a tar file containing backup information. If you enabled encryption, each file will end with a .gpg extension (otherwise they will end in .difftar).
Restoring a backup
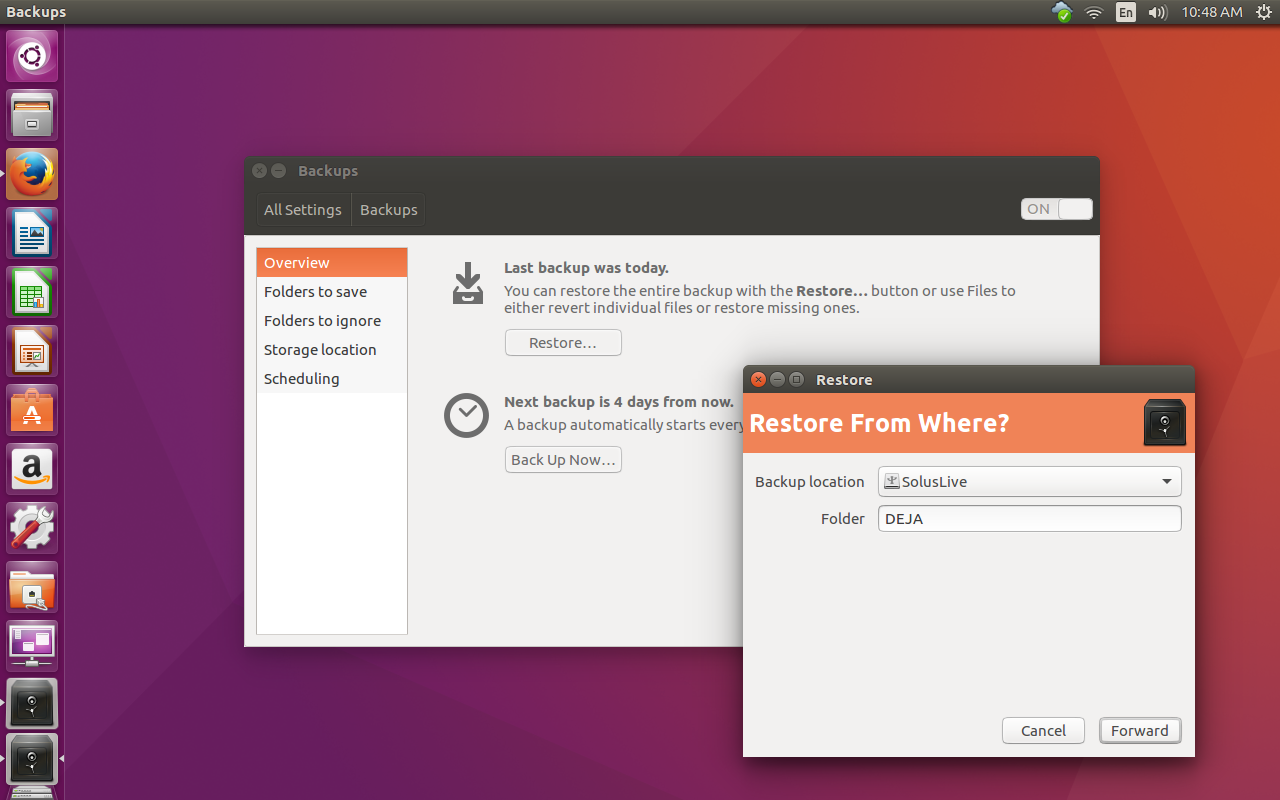
How you restore will depend on which desktop you use. First, we’ll walk through the process of restoring from within the Déjà Dup application (on a Ubuntu 16.04 desktop). This process will work, regardless of what desktop you use.
From the main window, click the Restore button. Next, select the backup location (Figure 6).
Figure 6: Backing up from a USB flash drive on Ubuntu.
Click Forward and then select the restore date. Click Forward again and select where you want to restore the files to (Figure 7).
Figure 7: You can either restore the files to the original locations or a specific folder.
Finally, if you’ve enabled encryption, you’ll be asked to enter your encryption password and the restoration will begin.
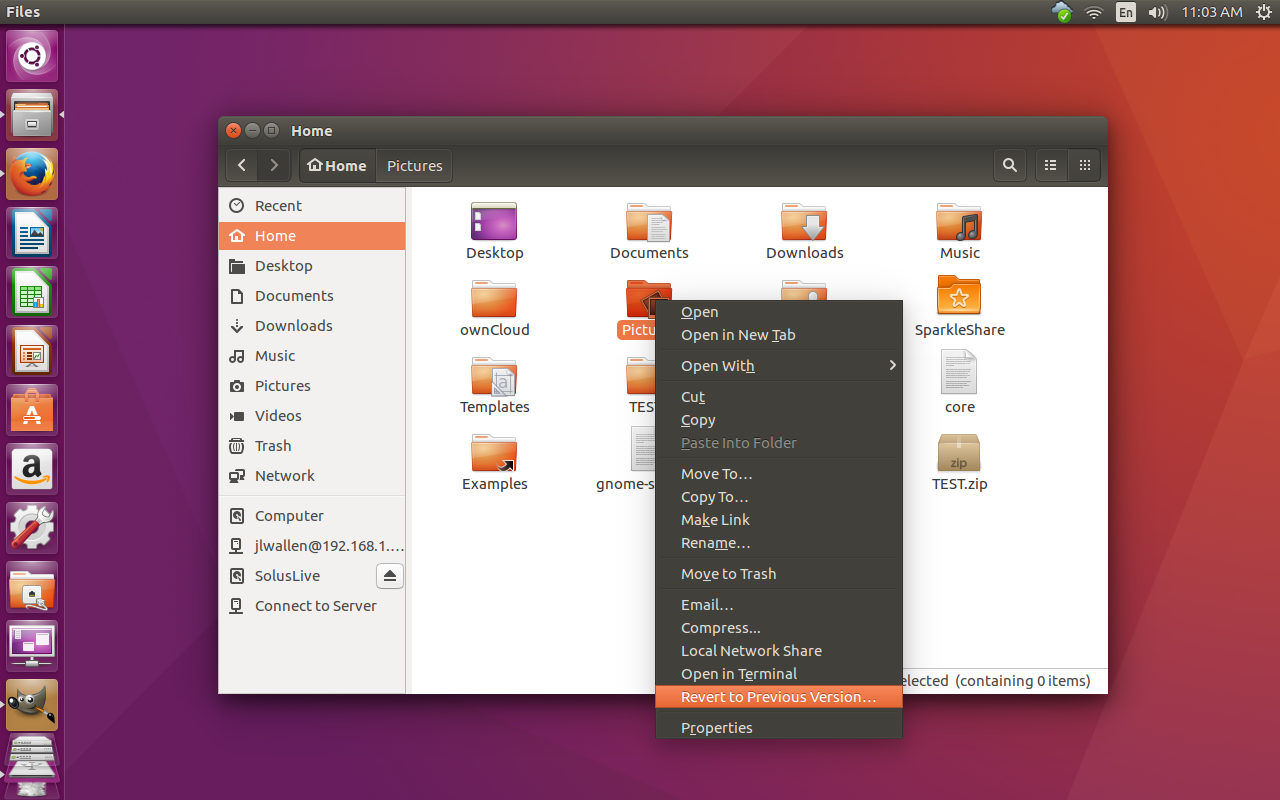
If you’re using Ubuntu (with Unity) or a GNOME-based desktop, you can do the following:
Locate and right-click on the folder to be restored (the folder you backed up with Déjà Dup). When the contextual menu appears (Figure 8), select Revert to Previous Version and the Déjà Dup application will open up to the Restore from where window. You can then continue the process in the fashion as you did above.
Figure 8: Restoring from the context menu of the default Ubuntu file manager.
A Solid and Simple Backup
You will be hard pressed to find an easier, more reliable backup GUI for Linux than Déjà Dup. Although it might not have all the flexibility of some of its command-line counterparts, it is a solution that anyone can depend upon. Install it and schedule a regular backup of your important data…and hope that you never have to use (but rest assured it’s there).