

What has 21 million lines of code, 4000 contributors, and more changes per day than most software projects have in months, or even years? The Linux kernel, of course. In this video, Greg Kroah-Hartman provides an inside view of how the largest, fastest software project of all absorbs so many changes while maintaining a high level of quality and stability.
A Fabulous Machine
Kroah-Hartman presented this talk to Google’s Kubernetes development team. Kubernetes is also undergoing rapid growth, and Kroah-Hartman draws on his extensive experience to provide tips on how to manage such a high-velocity project.
The recently released 4.6 kernel contains more than 21,400,000 million lines of code in more than 53,600 files. Of those 21,400,000 million lines of code, only 1.4 million are needed to run your laptop or PC. Smartphones need more, around 2.5 million. (See the video to learn where the remainder go.) The number of contributors always grows, and currently the project includes more than 4000 contributors and nearly 500 companies.
The rate of change is like a high-speed treadmill that never stops. The 4.6 kernel averaged 11,600 lines added, 5800 removed, and 2000 modified per day. The average number of changes per hour was 8.9, and that’s just the number of changes accepted; the average rate of acceptance is one-third to one-half. Somehow, kernel maintainers managed to review 18 to 27 patches per hour.
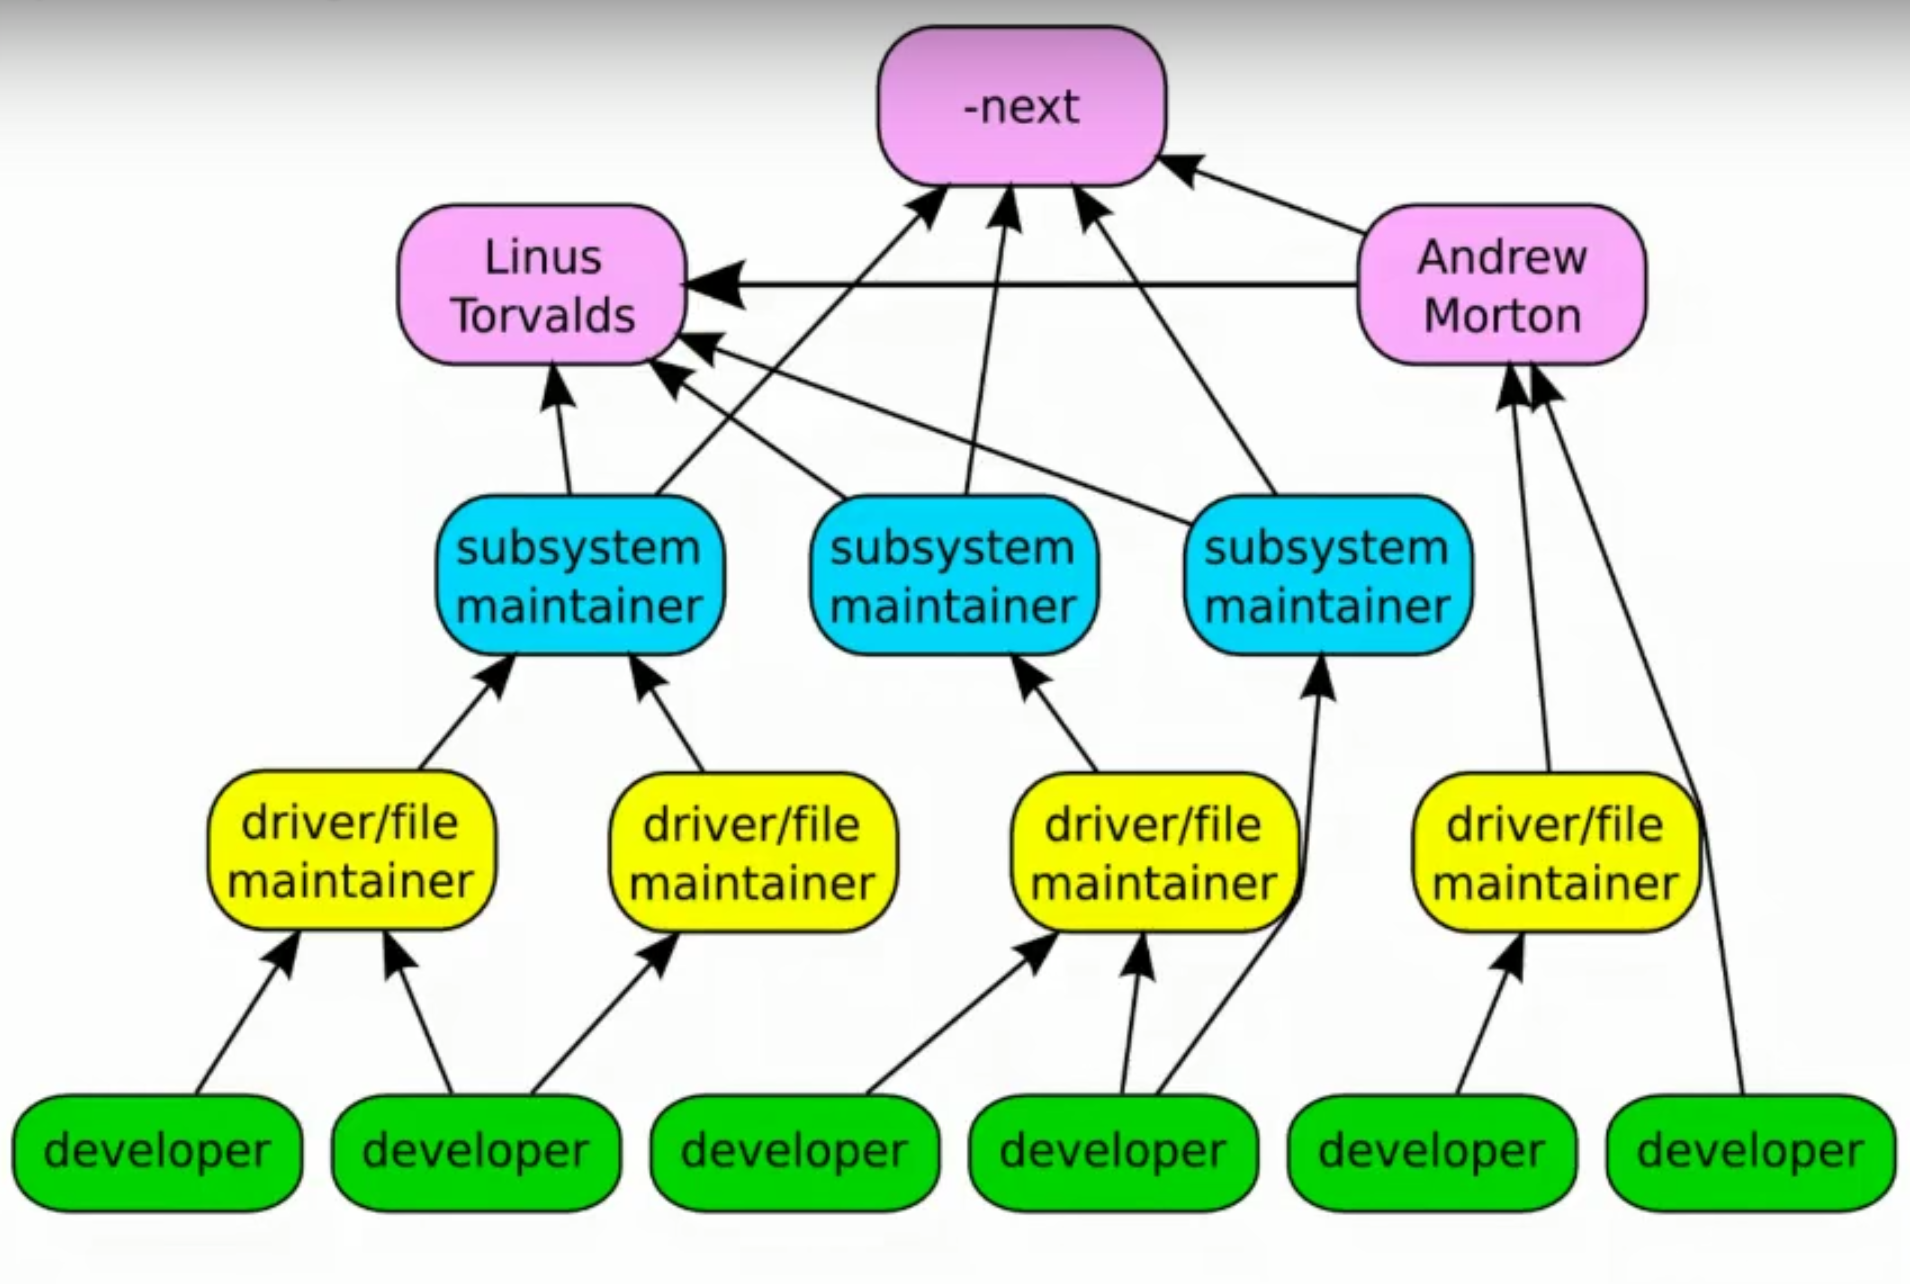
How does the Linux kernel bridge the gap between old and new? With Linus Torvalds’ ironclad rule of “Never break userspace.”
What Does the Linux Kernel Look Like in the Future?
The Linux kernel was born in 1991. (See the famous debate between a young Linus and computer science professor Andrew Tanenbaum, who said that Linus was wrong about everything.) Its rate of adoption and growth is phenomenal, and Linus thinks it can go faster. At a mere 25 years old, it is still a youth. And, so many advances in computer technology are ephemeral. Where are your 5.25″ floppy disks? CRT monitors? DB-25 printer ports? Now Apple is trying to do away with the 3.5mm headphone jack.
With all the buzz around containers and abstracting datacenter resources into clouds, what does the Linux kernel look like in the future? Will the future of tech reinvent everything we use now to run in large-scale distributed environments?
David Aronchick, Kubernetes product manager, says there will be room for the old and new. “I think that distributed computing is a paradigm shift, and folks will be able to focus on applications (not kernels) if it suits them. But not everyone! There will be places for folks up and down the stack. Distributed computing comes when you need more than a single device can provide. It’s highly unlikely the brakes on your car, your radio or your PC will ever need to be part of a distributed cluster.”
So, young Tuxes, if your desire is to become a Linux kernel contributor, there is plenty of opportunity. How do you get started? How do kernel maintainers keep their sanity in such a whirlwind? How do they maintain a high level of quality and rapid development? Kroah-Hartman is an excellent guide for any new contributor.
Watch the complete presentation below to learn how it all works and where to start.
Greg Kroah-Hartman is a Linux Foundation Fellow, and a longtime kernel contributor and maintainer. He maintains the stable kernel branch and several subsystems including USB, the TTY layer, and sysfs, and contributes to the annual Who Writes Linux report. He wrote Linux Device Drivers and Linux Kernel in a Nutshell, is a popular speaker, and founded the Linux Driver Project, which has been very successful in bringing hardware vendors into the Linux fold.


 Canonical is proud to announce today that new Snap desktop launchers are coming soon to an Ubuntu Desktop near you, allowing the integration of desktop applications with Snaps.

