Developers introduce LEDE, a reboot of the OpenWrt community.
“We are building an embedded Linux distribution that makes it easy for developers, system administrators or other Linux enthusiasts to build and customize software for embedded devices, especially wireless routers. The name ‘LEDE’ stands for ‘Linux Embedded Development Environment’.
Members of the project already include a significant share of the most active members of the OpenWrt community. We intend to bring new life to Embedded Linux development by creating a community with a strong focus on transparency, collaboration and decentralisation.”
Docker and other application container technologies are already having a major effect on how enterprises deliver and deploy new applications, according to a new survey from Shippable.
Shippable, the Seattle-based producer of a continuous delivery platform for software developers, recently quizzed 300 coders in the U.S. and found that more than half of them (52 percent) are using Docker or other container technologies to deploy their new applications in production. Fourteen percent are using containers for development and testing purposes.
Nginx (pronounced “engine x”) is a free, open-source, high-performance HTTP server. Nginx is known for its stability, rich feature set, simple configuration, and low resource consumption. This tutorial shows how you can install Nginx on an Ubuntu 16.04 server with PHP 7 support (through PHP-FPM) and MySQL support (LEMP = Linux + nginx (pronounced “engine x”) + MySQL + PHP) .
In this series of four tutorials, Docker Cookbook author Sebastien Goasguen introduces the Docker tools which empower developers to create distributed applications. He introduces Docker Compose, Docker Engine, Docker Machine, and Docker Swarm and demonstrates how to use them to create a multi-container application; how to manage the application; how to start the application on a Docker Swarm cluster and scale it; and finally, how to set up networking for a Swarm to allow containers to communicate with each other across hosts.
Demonstrates a few Docker Compose commands to manage a multi-container application, and introduces Docker Volumes and Docker Networks, which can be specified in the YAML file describing a Compose application.
A cluster of Docker hosts is needed to run a truly distributed application in production. This article looks at setting up networking for a Swarm to allow containers to communicate with each other across hosts.
In previous articles, I have showed how to find things in Git and how to fix mistakes in Git. Here, I’ll be looking at why and how to rebase in Git.
What Is Rebasing?
Rebasing is when you take a set of patches from one Git branch and apply them to another branch. As with so many Git operations, whether or not to use rebasing is more a question of policy than technical correctness, because you can achieve the same results with merging. We’ll do a bit of comparing and contrasting of merging vs. rebasing and then look at a couple of rebasing scenarios, one of which is rather unusual.
Rebase vs. Merge
Merging is always the safest option, because it preserves all history. Rebasing rewrites history, which can do real damage to a project by making it impossible to go back in time to see what happened. It can disrupt the work of contributors using the old history, and it may invalidate any previous testing. Introducing new bugs via rebasing is unlikely to win friends.
You can’t go wrong with merging. The disadvantage, however, is being drowned in clutter and not being able to easily find what you want, because merging preserves everything. However, this could be strong motivation to get really good with advanced usage of git log commands.
The (greatly simplified) policy for the Linux kernel is: Rebase only private history to make nice clean pull requests, and never rebase work pushed by anyone else. Rebasing private history is good. Rebasing public history is bad.
Two Rebase Scenarios
The projects I am involved in that use Git are fairly simple. Most work starts in working branches created from master, and occasionally other stable branches if the changes are specific to those versions. There are two scenarios where I rebase rather than merge.
The first scenario is a bit unusual, because it happens only with production trees that use Git submodules. When the submodules are updated, they mess up existing pull requests (Figure 1).
Figure 1: GitHub gives me sad news.
One way to fix this is to click the Update Branch button on GitHub. If you’re not using GitHub, or want to test your changes locally first, follow these steps.
This breaks the policy of “Rebasing public history is bad,” because it’s rewriting history after I have pushed changes upstream. However, it’s the project’s policy, so I use it.
Making Things Tidy
I like to use an interactive rebase to clean up my work before opening a pull request, so that I have a simplified commit history instead of a giant mucky mess all full of reverts, commits to fix previous commits, and extra commits because I kept forgetting things. This is a more routine use of rebasing.
To start, update your production branch, then change to your working branch and launch an interactive rebase against the production branch.
pick 7758944 example json configpick 2584c53 sample htaccesspick f89c54f add readmepick 51d9f5a describe bridged networkingpick 1e1088c remove readme# Rebase 46f1974..1e1088c onto 46f1974 (5 command(s))## Commands:# p, pick = use commit# r, reword = use commit, but edit the commit message# e, edit = use commit, but stop for amending# s, squash = use commit, but meld into previous commit# f, fixup = like "squash", but discard this commit's log message# x, exec = run command (the rest of the line) using shell
Now you can edit your commits. In the above example, I can safely delete f89c54f add readme and 1e1088c remove readme. There is no value in leaving them in there.
Another option is to squash the commits you want to keep into a more compact form. As you can see in your editor, s melds the commits together while retaining the commit messages, andfmelds and then discards the commit message.
I usually don’t squash commits, but when it’s a bunch of small changes, I’ll use s to squash and retain the commit messages. Commits are listed in order from oldest to newest and are processed in order. After deleting the two readme commits, my squash example looks like this:
If there are any error messages, you can rungit status to see what the problem is. Most likely it’s a merge conflict, so you can resolve the conflict, add the file (git add [filename]) after fixing the conflicts, and then finish with git rebase –continue.
In the previous article, I showed how to do the initial build of our Mantis robot, featuring a RoboClaw motor controller board and a Raspberry Pi. Here, I’ll move on to attaching motors, connecting the RoboClaw to your Pi through a USB port, and supplying the RoboClaw with its own power source.
The RoboClaw Controller
The Roboclaw series of motor controller starts with a model that can control two motors at up to 7 amps each and ranges up to controlling two motors at 160 amps each with many models in between. I’ll be using the 45-amp model, which is available in two versions: one with pin heads for rotary encoders and the other with screw terminals for those connections.
Attaching Motors
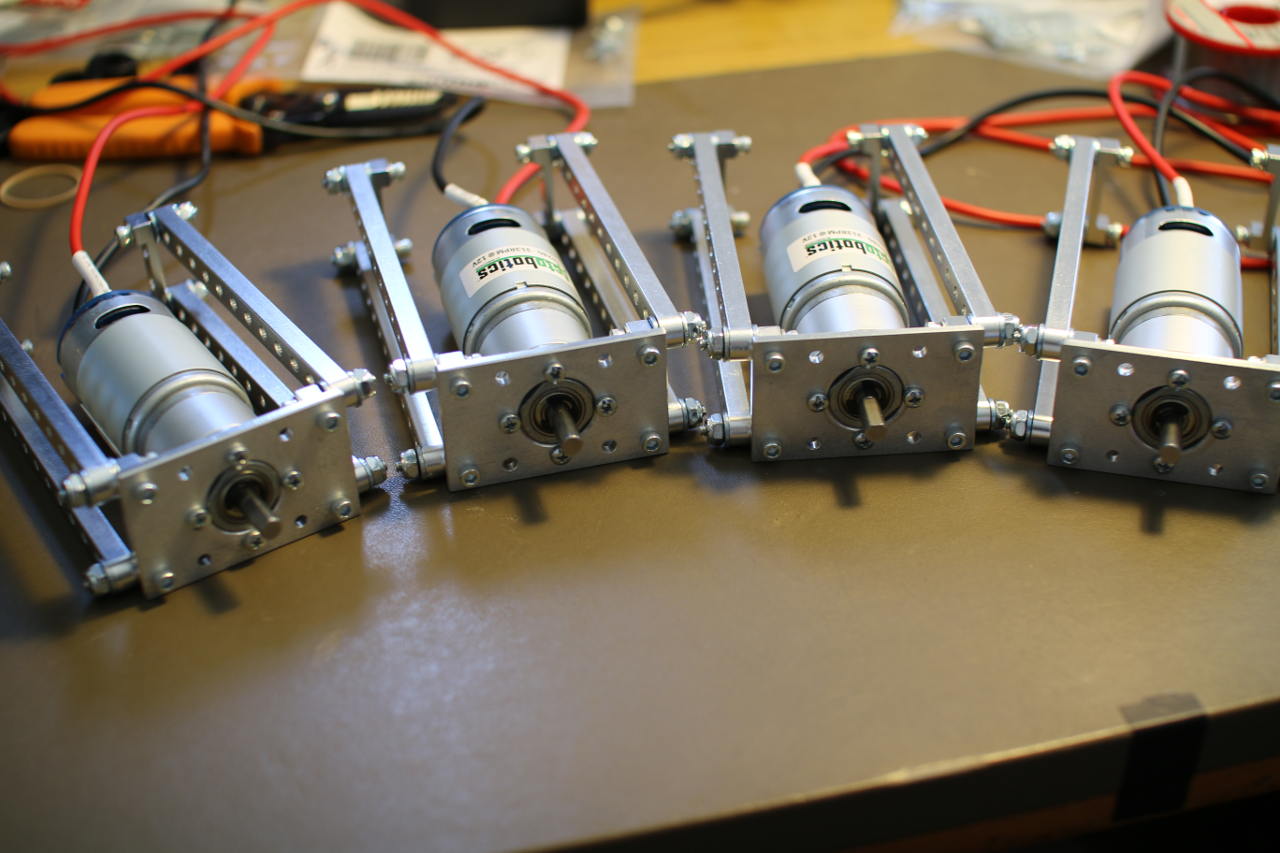
You might be wondering how the motors on the Mantis will be driven using a motor controller that has two outputs. All of the motors on the left side of the Mantis use one motor output and all of the motors on the right side use the other output. To turn left, all the motors on the left side will be set to turn at the same slower rate than all the motors on the right side of the Mantis. Because each of the x motors on one side of the Mantis is connected to the same motor controller output in parallel, in a worst case if all the motors on the left side stall, they will each draw 20 amps, and the potential draw from the motor controller is 20xamps. For the four-wheel Mantis, I used the 45-amp RoboClaw controller so the controller was happy to serve up enough power to run all the motors in a stalled state.
In the course of this build, I clarified some things with ON Motion Control (ionmc) who make the RoboClaw board. According to ionmc, each Roboclaw will handle over-current cases automatically. The maximum current that can be supplied is limited by the temperature of the RoboClaw board. “For example under 85 C the 2x45amp and 2x30amp [RoboClaw] can output up to 60 amps (the amount will vary on a linear slope from 25 V to 85C. Once 85C is reached the current limit is at the rated current(eg 45a or 30a per channel). Once temperature goes over 85 C there is an over temperature current limit which will reduce the maximum current down to 0 amps when it reaches 100 C,” ionmc said.
Never leave an electric motor in a stalled state. It will generate a lot of heat and likely damage the motor. With the Mantis, one of the motors could stall for a bit as the tire it is driving encounters an obstacle on the ground. That’s ok, as long as the Mantis gets over that obstacle; then the motor will revert to drawing significantly less current and not become damaged. Looking at the above quote, the 30 amp RoboClaw controller might be able to drive a six-wheel Mantis — even though the three wheels on a single output might draw 60 amps if they all stall. As long as the RoboClaw doesn’t heat up to 100C, it should still provide power. If a stall is prolonged, then the RoboClaw might just heat up to 100C and stop supplying power to the motors automatically.
Figure 1: Mounted motors.
Because the RoboClaw has one output for each motor channel it can control, I used a 60-amp terminal block to connect the motors in parallel (Figure 1). Once the motors are connected to a terminal block, two wires per channel can be run up through the Actobotics channel to the screw terminals on the RoboClaw controller. This let me mount the terminal block itself inside the channel to leave the robot with a neat and tidy appearance.
Other Connections to the RoboClaw
A USB port on the RoboClaw allows easy connection to the Raspberry Pi, but the USB port on the RoboClaw cannot power the RoboClaw. So, you will have to supply the RoboClaw with its own power source to talk to it over USB. There are two ways to do this: either having an explicit logic power supply on the “LB IN” pins or by installing the jumper on the LB-MB (logic battery from main battery) jumper header. My RoboClaw came with the jumper on the LB-MB header already.
The RoboClaw has many input modes that let you tell the RoboClaw what to do using wireless receivers, serial commands over TTL serial, or the USB port on the RoboClaw. The default mode of the RoboClaw is 7, which allows you to control it over USB. Mode 7, is packet serial control at address 0x80.
You must make sure the connect any battery to the RoboClaw with the correct orientation. Reversing the ground and power leads will result in hardware damage or worse. Connecting a 9V battery over the battery input terminals and connecting the microUSB to the Raspberry Pi resulted in the following when looking at the output of dmesg.
root@pi:~# dmesg | tail...[ 3585.758555] cdc_acm 1-1.4:1.0: ttyACM0: USB ACM device[ 3585.760209] usbcore: registered new interface driver cdc_acm[ 3585.760229] cdc_acm: USB Abstract Control Model driver for USB modems and ISDN adaptersroot@pi:~# ls -l /dev/*ACM*crw-rw---T 1 root dialout 166, 0 Dec 22 07:16 /dev/ttyACM0root@pi:~# lsusb -v > /tmp/lsusb.txtroot@pi:~# emacs /tmp/lsusb.txt... idVendor 0x03eb Atmel Corp. idProduct 0x2404 bcdDevice 1.00 iManufacturer 1 iProduct 2 USB Roboclaw 2x45A
This output tells you that the RoboClaw should be at /dev/ttyACM0. Instead of using that magic value, it can be convenient to have udev create a link for you to the correct device file.
The below 99-roboclaw.rules file will have a /dev/roboclaw device created whenever you connect the RoboClaw to a USB port on the Raspberry Pi. A huge advantage here is that, if you connect something else to a USB port that creates a /dev/ttyACM device, you don’t have to wonder if the RoboClaw is now at /dev/ttyACM0 or /dev/ttyACM1; it should still be available at /dev/roboclaw.
root@pi:~# cat /etc/udev/rules.d/99-roboclaw.rulesACTION=="add", ATTRS{idProduct}=="2404", ATTRS{idVendor}=="03eb", SYMLINK+="roboclaw"root@pi:~# l /dev/roboclaw lrwxrwxrwx 1 root root 15 Dec 22 07:24 /dev/roboclaw -> bus/usb/001/005
Talking to the RoboClaw from the Raspberry Pi
To ensure that the connection to the RoboClaw is working, as good test is to ask the RoboClaw what version board it is and what firmware it is running. The command number 21 does this. Because you can have multiple RoboClaw controllers on a single bus, each command starts with the address of the RoboClaw you are wanting to talk to. The default RoboClaw address is 0x80 — which is what I’m using in the example. The RoboClaw address is mainly useful if you want to have multiple RoboClaw controllers connected to the same TTL serial interface. If you are connecting to the RoboClaw over USB, then each RoboClaw can have the default address of 0x80, because each will have a different serial device on the Linux machine.
Boost is a common collection of libraries used in C++ programming. It includes support for many things, such as intrusive reference counting, collections, graph library, parser generator, and more. The following C++ source code uses boost and boost::asio to talk to the RoboClaw over the USB cable and get the version from the RoboClaw. The boost::asio lets you talk to networks and low-level I/O, which is used below to perform serial communication over the USB port.
#include <boost/asio.hpp>#include <boost/asio/serial_port.hpp> #include <boost/bind.hpp>#include <boost/integer.hpp>using namespace boost;using namespace boost::asio;#include <string>#include <iostream>using namespace std;int main( int argc, char** argv ){ std::string serialDev = "/dev/roboclaw"; const uint8_t roboclawAddress = 0x80; if( argc > 1 ) { serialDev = argv[1]; } cerr << "serialDevice:" << serialDev << endl; boost::asio::io_service io; boost::asio::serial_port serial( io, serialDev ); // issue the "Read Firmware Version" command 21 // to the RoboClaw at 0x80 uint8_t commands[] = { roboclawAddress, 21 }; write( serial, boost::asio::buffer(commands, 2)); // give the RoboClaw heaps of time to reply. sleep(1); // read the result string ver = ""; char c = 0; bool reading = true; while( reading ) { asio::read(serial,asio::buffer(&c,1)); switch(c) { case '�': // also read the crc asio::read(serial,asio::buffer(&c,1)); asio::read(serial,asio::buffer(&c,1)); reading = false; break; default: ver+=c; } } cout << "version: " << ver << endl; return 0;}
The getversion command should give you something like the following result.
pi@pi ~/src/roboclaw $ ./getversion serialDevice:/dev/roboclawversion: USB Roboclaw 2x45a v4.1.13
Next Time
In the rest of this series, I’ll extend the communication with the RoboClaw motor controller, leading to a program to control the robot with the keyboard. I will then move on to using a PS3 joystick to control the robot over Bluetooth. This should give you are powerful robot base that can happily adventure outdoors.
This is a great base platform with which to start playing with perception and semi-autonomous robot control. Delving deeper, you might like to add some feedback mechanism to the wheels of your Mantis so that you know how far you have traveled. You might also like to run a robotics platform such as ROS on top of an Ubuntu Linux installation on your Mantis.
The Linux Foundation has released the first round of CII Best Practices badges as part of a program designed to improve the quality and security of open-source software.
Announced on Tuesday, the non-profit said the Core Infrastructure Initiative (CII), a project which brings tech firms, developers and stakeholders together to create best practice specifications and improve the security of critical open-source projects, has now entered a new stage with the issue of CII badges to a select number of open-source software.
The early badge owners include Curl, GitLab, the Linux kernel, OpenBlox, OpenSSL, Node.js and Zephyr.
Docker SDN (Software Defined Network) already exists for quite some time. What is new, starting from the release 1.11, is the addition of DNS round-robin load balancing. That is both a reason for celebration and an opportunity to explore Docker networking and DNS. We’ll explore internal and external networking, see how DNS fits into the picture, discuss use cases that might be a good fit, and finish with pros and cons.
Let’s start from the beginning. Since I don’t know whether you’re a Mac, Windows, or Linux user, we’ll create a few VMs running Ubuntu and use them to simulate a Docker Swarm cluster.
For Solomon Hykes, founder and CEO of Docker, IT plumbing functions best if it is worked on by the entire community of its users, with developers modifying it however they wish and submitting the results back to the repository.
In this episode of The New Stack Makers podcast, The New Stack founder Alex Williams spoke with Hykes to hear his thoughts on cluster management when working at scale, orchestration, and how Docker is helping improve the open source community.
Hykes explains that there are a variety of projects currently ongoing which aim to make programming more accessible while Docker is hoping to make the tools used to create new things accessible as well. “To program, you need tools. If these tools are not designed to be accessible and useful to programmers of all levels of expertise and specialization, then as an industry we failed,” Hykes said.
Letting go of infrastructure is hard, but once you do – or perhaps more precisely, once you can – picking it back up again is a whole lot harder.
This is perhaps going to be the long-term lesson that cloud computing teaches the information technology industry as it moves back in time to data processing, as it used to be called, and back towards a rental model that got IBM sued by the US government in the nascent days of computing and compelled changes in Big Blue’s behavior that made it possible for others to create and sell systems against what was, technically speaking, a regulated monopoly….
This is an industry at a peculiar point in its history, one where the market is growing at over 50 percent during the fourth quarter, with over $8.2 billion in revenues according to statistics from Synergy Research Group and still growing at over 50 percent.