Autodesk is undergoing a company-wide shift to open source and inner source. And that’s on top of the culture change that both development methods require.
Inner source means applying open source development practices and methodologies to internal projects, even if the projects are proprietary. And the culture change required to be successful can be a hard shift from a traditional corporate hierarchy to an open approach. Even though they’re connected, all three changes are distinct heavy lifts.
They began by hiring Guy Martin as Director of Open Source Strategy in the Engineering Practice at Autodesk, which was designed to transform engineering across the company. Naturally, open source would play a huge role in that effort, including spurring the use of inner source. But neither would flourish if the company culture didn’t change. And so the job title swiftly evolved to Director of Open @ADSK at the company.
The fiftieth TOP500 list of the fastest supercomputers in the world has China overtaking the US in the total number of ranked systems by a margin of 202 to 143. It is the largest number of supercomputers China has ever claimed on the TOP500 ranking, with the US presence shrinking to its lowest level since the list’s inception 25 years ago.
Just six months ago, the US led with 169 systems, with China coming in at 160. Despite the reversal of fortunes, the 144 systems claimed by the US gives them a solid second place finish, with Japan in third place with 35, followed by Germany with 20, France with 18, and the UK with 15.
In native cloud environments, classic monitoring tools reach their limits when monitoring transient objects such as containers. Prometheus closes this gap, which Kubernetes complements, thanks to its conceptual similarity, simple structure, and far-reaching automation.
Kubernetes [1] makes it much easier for admins to distribute container-based infrastructures. In principle, you no longer have to worry about where applications run or if sufficient resources are available. However, if you want to ensure the best performance, you usually cannot avoid monitoring the applications, the containers in which they run, and Kubernetes itself.
You can read how Prometheus works in a previous ADMIN article [2]; here, I shed light on the collaboration between Prometheus and Kubernetes. Because of its service discovery, Prometheus independently retrieves information about the container platform, the current container, services, and applications via the Kubernetes API. You do not have to change the configuration of Prometheus when pods launch or die or when new nodes appear in the cluster: Prometheus detects all of this.
Concurrently, we are gearing up for the next phase in ensuring broad adoption of common container image format and runtime specs as we prepare to launch an OCI certification/conformance program. This program will allow folks to be confident that their OCI solutions meet a high set of criteria that deliver interoperable solutions. We’ll be presenting a session on Container Runtime & Image Format Standards: What it Means to be ‘OCI-certified during CloudNatvieCon + KubeCon in Austin, Texas on Wednesday, December 6 at 11:10 am. If you’ll be on site, please stop by our booth and check the schedule for additional OCI-related sessions
This week in Linux and open source news, The Linux Foundation’s Open Source Guides surface useful strategic knowledge via TODO Group, Hyperleder’s new free course more relevant than ever, and more!
1) More Open Source Guides have been released by The Linux Foundation & TODO Group. Read them to glean free tips on building an open source program.
3) In a podcast from The New Stack, Cloud Foundry’s Executive Director Abby Kearns shares how the platform is evolving to benefit organizations working outside Silicon Valley.
Linux is a remarkably flexible operating system. One of the easiest means of understanding that is when you see that, given a task, there are always multiple paths to success. This is perfectly illustrated when you find the need to display a remote desktop on a local machine. You could go with RDP, VNC, SSH, or even a third-party option. Generally speaking, your desktop will determine the route you take, but some options are far easier than others. Once you understand how streamlined modern desktops have made this task, your remote administration of Linux desktops and servers (with GUIs) becomes much simplified.
As I mentioned, how you do this will depend upon your distribution. In this article, I’ll cover how this can be done between Ubuntu Desktop 18.04 and Fedora 26 and Fedora 26 to Kubuntu. The big issue you will come across is that some desktops simply don’t work well with this technology. For example, as it stands, Wayland has yet to find its way to supporting VNC. The same thing holds true with the Elementary OS desktop. So I’ll demonstrate connecting to Fedora 26 from Ubuntu 18.04 and then from Fedora 26 to Kubuntu 17.10. I’ll be using the tools remmina, krfb, and the GNOME built-in tools.
From Ubuntu to Fedora
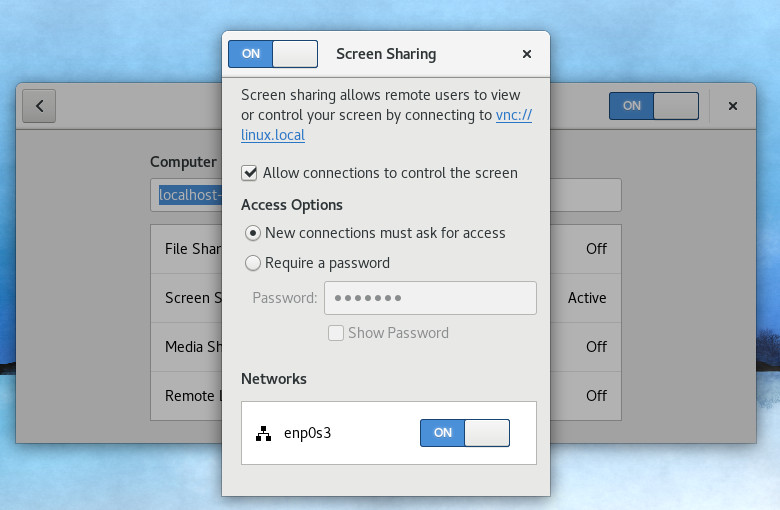
With the latest release of Fedora 26, using the default GNOME desktop, setting up a remote connection is fairly straightforward (because everything is installed by default). The first thing you must do is enable sharing. If you open up the GNOME Dash and typesharing, you’ll see the Sharing option appear, which allows you to open the tool. When the window opens, click the ON/OFF slider to the ON position and then click Screen Sharing. In the resulting window (Figure 1), click the checkbox for Allow connections to control the screen.
Figure 1: Enable Sharing in Fedora 26.
You can also enable the access options for New connections must ask for access and requiring a password. I highly recommend, at a bare minimum, that you enable the option for New connections must ask for access. That way, when someone attempts to gain access to your remote desktop, the connection will not be made until it is approved. Once these options have been taken care of, you can close out that window.
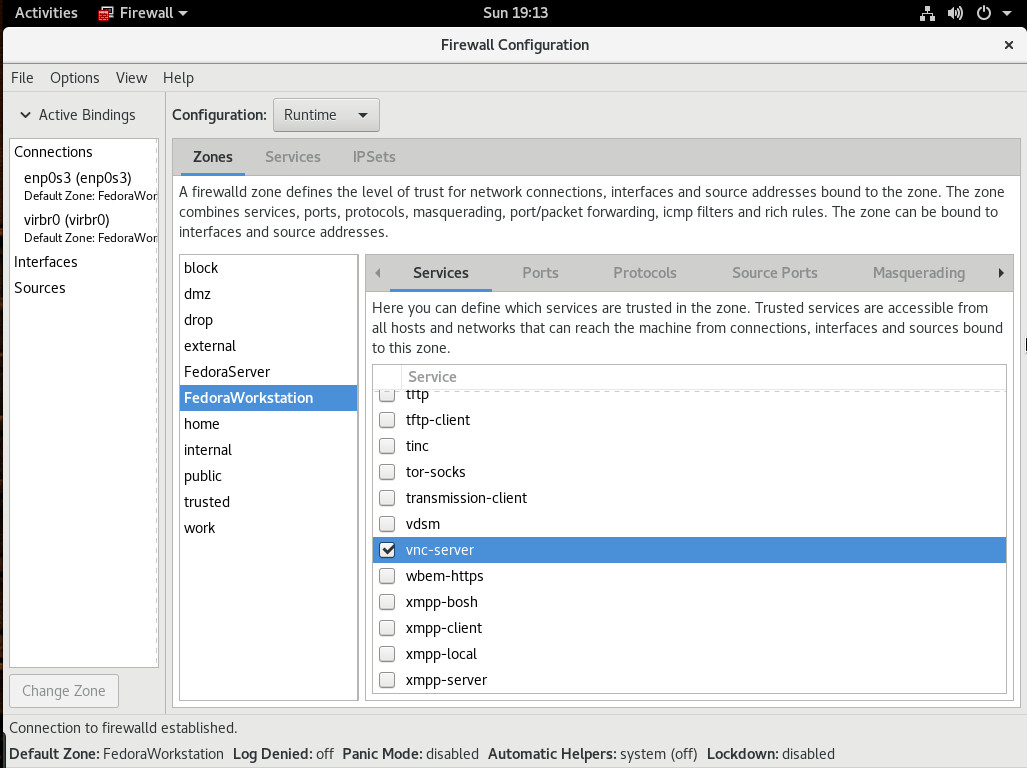
Out of the box, Fedora must have the necessary port opened in the firewall, so this remote connection can work. Go back to the GNOME Dash and type firewall. When the firewall icon appears, click on it, and enter your admin password. In the resulting window, click on Services and scroll down until you see vnc-server (Figure 2).
Figure 2: Enabling the necessary VNC ports through the firewall.
Click to enable vnc-server and then, when prompted, type your admin password. Access to the VNC port is now enabled.
Head over to the Ubuntu machine. We need to install the remmina application (which is one of the better remote client applications). Because the version in the standard repository contains a few bugs, we’ll install the most recent version with the following steps:
Add the necessary repository with the command sudo apt-add-repository ppa:remmina-ppa-team/remmina-next
Update the apt sources with the command sudo apt update
Install the software with the command sudo apt-get install remmina remmina-plugin-rdp remmina-plugin-gnome libfreerdp-plugins-standard
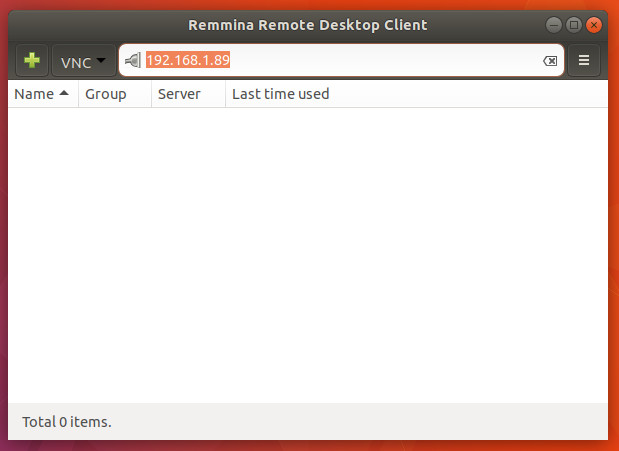
From the desktop menu, type remmina and open the newly installed software. In the address window (Figure 3), select VNC from the drop-down, enter the IP address of the Fedora machine, and hit Enter on the keyboard.
Figure 3: The remmina main window.
Once you hit Enter on the keyboard, the Fedora desktop notification will pop up. Hover over that notification and click Accept (Figure 4). The connection will be made and whoever is on the Ubuntu machine can control your Fedora desktop.
Figure 4: Accepting a request to share out the desktop on Fedora 26.
From Fedora to Kubuntu
Now we’re going to connect from Fedora to Kubuntu. Because we’re going to use the same client (remmina), we need to install it on Fedora. To do this, open up a terminal window and issue the command sudo dnf install remmina.
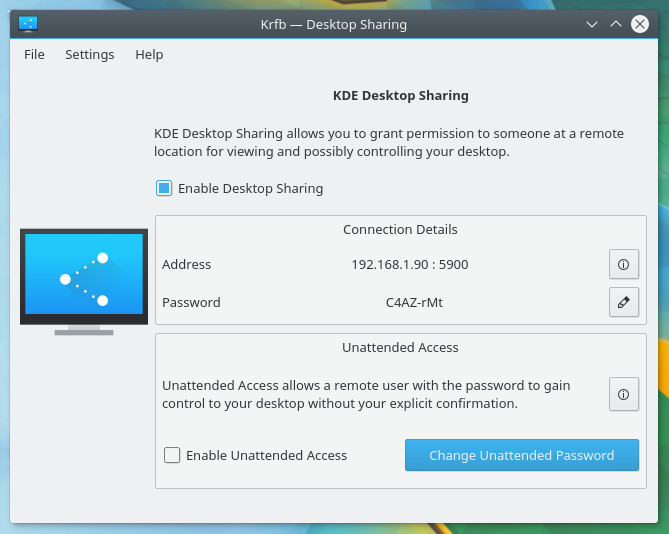
With that installed, we now have to add the necessary piece of software on the Kubuntu desktop. The application in question is krfb and can be installed with the command sudo apt install krfb. Once that is installed, you can open the KDE menu and type krfb. Click on the resulting entry and then, in the new window, click the checkbox associated with Enable Desktop Sharing (Figure 5).
Figure 5: Enabling desktop sharing on Kubuntu, via krfb.
The krfb tool also gives you the necessary IP address as well as the password to use in order to gain access from the client. If you don’t like the given password, it can be changed by clicking the associated edit button.
At this point, your KDE desktop is ready to share. Head over to Fedora, open the GNOME Dash, type remmina and click the icon to open the software. Select VNC from the drop-down, type the IP address of the Kubuntu machine, and hit enter. You will be prompted for the krfb password. Type that and click OK. Back on the Kubuntu desktop, you’ll be asked to accept the connection. Once accepted, the Kubuntu desktop will appear on the Fedora. You’re ready to work.
Simple remote desktop connection
And that’s all there is to it. Yes, there are plenty of other ways to enable these types of connections (and some desktops don’t make the process nearly as easy). Fortunately, modern desktop distributions do include everything necessary to make remote connections incredibly simple. If your particular desktop of choice doesn’t include the tools to make this easy, you’re looking at installing one of the many VNC servers available for Linux (such as vino, TigerVNC, or tightvnc). Going the standard VNC server route might not be as user-friendly as the methods I’ve explained here, but, once set up, it is equally reliable.
Learn more about Linux through the free “Introduction to Linux” course from The Linux Foundation and edX.
A container runtime is software that executes containers and manages container images on a node. Today, the most widely known container runtime is Docker, but there are other container runtimes in the ecosystem, such as rkt, containerd, and lxd. Docker is by far the most common container runtime used in production Kubernetes environments, but Docker’s smaller offspring, containerd, may prove to be a better option. This post describes using containerd with Kubernetes.
Kubernetes 1.5 introduced an internal plugin API named Container Runtime Interface (CRI) to provide easy access to different container runtimes. CRI enables Kubernetes to use a variety of container runtimes without the need to recompile. In theory, Kubernetes could use any container runtime that implements CRI to manage pods, containers and container images.
The following is reformatted from a presentation I gave at LinkedIn last year. The presentation attempted to explain functional programming without using concepts like “monads” or “immutability” or “side effects”. Instead it focuses on how thinking about composition can make you a better programmer, regardless of what language you use.
40years ago, on October 17th, 1977, the Turing Award was presented to John Backus for his contribution to the design of high-level programming systems, most notably the Fortran programming language. All Turing Award winners are given the opportunity to present a lecture on a topic of their choice during the year in which they receive the award. As the creator of the Fortran programming language, one may have expected Backus to lecture on the benefits of Fortran and future developments in the language. Instead, he gave a lecture entitled Can programming be liberated from the Von Neumann style? in which he criticized some of the mainstream languages of the day, including Fortran, for their shortcomings. He also proposed an alternative: a functional style of programming.
This is the second in a series of articles on systems administrator fundamentals. These days, DevOps has made even the job title “systems administrator” seem a bit archaic, much like the “systems analyst” title it replaced. These DevOps positions are rather different from sysadmin jobs in the past. They have a much larger emphasis on software development far beyond basic shell scripting, and as a result, they often are filled by people with software development backgrounds without much prior sysadmin experience. In the past, a sysadmin would enter the role at a junior level and be mentored by a senior sysadmin on the team, but in many cases currently, companies go quite a while with cloud outsourcing before their first DevOps hire. As a result, the DevOps engineer might be thrust into the role at a junior level with no mentor around apart from search engines and Stack Overflow posts.
In this series, I’m going to expound on some of the lessons I’ve learned through the years that might be obvious to longtime sysadmins but may be news to someone just coming into this position.
Improved local storage is at the heart of the new release of Prometheus 2.0, according to Fabian Reinartz, a CoreOS software engineer and a core developer of the Prometheus monitoring system.
With distributed system coordination software such as Kubernetes and Mesos, monitored environments have become increasingly more dynamic, Reinartz pointed out in a blog post. The motioning software needed its own dedicated storage to ensure responsiveness in these dynamic environments.
Though Prometheus 1.6 introduced auto-tuning capabilities, the team has been working on a more performant time-series database. “It’s just way more reliable and faster. Ideally, you don’t want to have to reconfigure all the time, so Prometheus just responds to change in demands, so there are way fewer knobs to turn for the people running it,” Reinartz said in an interview.