Teams working in agile test each new function during the release cycle, maybe do some light poking the day before shipping, and then give the thumbs up. Alternately, they just do nothing and software still ships. There is a better way to approach this problem; develop a regression testing strategy.
Why You Should Develop a Regression Testing Strategy
Every new software change introduces the potential for new problems. A user might get a new web page and submit a date format the programmer wasn’t expecting. In return, that user gets an error on the page explaining things they might not understand or even care about, data loss, and browser crashes. These risks are easy to imagine and are where feature testing during a sprint shines. A tester can perform these scenarios, discover the problems, and report them. Programmers can come back over the code to fix the problems, and then build automated checks that run with the build so the team finds out fast when they emerge again.
When you are a Linux power user, it is always mandatory to master using the command-line, since using commands to control the system offers a system user more power and control over the Linux…
[[ This is a content summary only. Visit my website for full links, other content, and more! ]]
Read the full article: http://www.tecmint.com/best-linux-terminal-console-games/
The time is ripe for new ways to distribute and deploy desktop applications: between snappy, Flatpak, AppImage and others there are quite a few projects in this area.
Sandboxing
Most of these projects involve some notion of sandboxing: isolating the application from the rest of the system.
Snappy does this by setting environment variables like XDG_DATA_DIRS, PATH, etc, to tell apps where to find their ‘stuff’ and using app-armor to not let them access things they shouldn’t.
Flatpak takes a somewhat different approach: it uses bind mounts and namespaces to construct a separate view of the world for the app in which it can only see what it is supposed to access.
Tor is a software that enables you to hide your identity on the internet. It is an open network that helps defend against traffic analysis and grants you a high level of privacy.
Tor protects you by bouncing your communications around a distributed network of relays (known as onion routing) run by volunteers all around the world: it prevents somebody watching your Internet connection from learning what sites you visit, and it prevents the sites you visit from learning your physical location.
What is Onion Routing?
In onion routing, the data to be sent is encapsulated in layers of encryption, just like the layers of an onion. The resulting encrypted data is then transmitted through a series of network nodes called onion routers, each of which “peels” away (or decrypts) a single layer of the encryption, uncovering the data’s next destination. Upon decrypting the final layer, the data arrives at its destination. The sender remains anonymous because each intermediary knows only the location of the immediately preceding and following nodes.
How to Install Tor on Ubuntu
Follow these steps to install Tor on Ubuntu:
1. Adding Source Entries
First find out which version of Ubuntu you are using. Then choose that version from the following list and add the following lines to the file /etc/apt/sources.list using the editor you use or simply by using the cat command.
$ sudo cat >> /etc/apt/sources.list
If you are using Ubuntu 14.xx
deb http://deb.torproject.org/torproject.org trusty main
deb-src http://deb.torproject.org/torproject.org trusty main
If you are using Ubuntu 15.xx
deb http://deb.torproject.org/torproject.org wily main
deb-src http://deb.torproject.org/torproject.org wily main
If you are using Ubuntu 16.xx
deb http://deb.torproject.org/torproject.org xenial main
deb-src http://deb.torproject.org/torproject.org xenial main
$ sudo apt-get update
$ sudo apt-get install tor deb.torproject.org-keyring
Using Tor
1. Configuring Tor
Tor puts the torrc file in /usr/local/etc/tor/torrc if you compiled tor from source, and /etc/tor/torrc or/etc/torrc if you installed a pre-built package.
Tor comes with a control port, which can be used to control it. It is highly recommended that in order to control Tor using the control port, you set up an authentication method to prevent anyone else from accessing it. The recommended way is to use a password. If you choose to use a password for authentication first run this command to get a hashed password to use in the config file in the next step:
$ tor --hash-password "passwordhere"
16:AC5FB526B90B4ED06027C6C4343EF87075B63B9A25822EE198622EE4D6
Open the torrc file (if you followed the above installation steps, then your torrc file path should be /etc/tor/torrc) and uncomment these lines:
ControlPort
CookieAuthentication OR HashedControlPassword (if you choose to uncomment HashedControlPassword, copy the hashed password you got in the previous step and paste it next to HashedControlPassword in the torrc file)
These lines are shown below:
# This provides a port for our script to talk with. If you set this then be
# sure to also set either CookieAuthentication *or* HashedControlPassword!
#
# You could also use ControlSocket instead of ControlPort, which provides a
# file based socket. You don't need to have authentication if you use
# ControlSocket. For this example however we'll use a port.

ControlPort 9051 # <--- uncomment this ControlPort line

# Setting this will make Tor write an authentication cookie. Anything with
# permission to read this file can connect to Tor. If you're going to run
# your script with the same user or permission group as Tor then this is the
# easiest method of authentication to use.

CookieAuthentication 1 #either uncomment this or below HashedControlPassword line

# Alternatively we can authenticate with a password. To set a password first
# get its hash...
#
# % tor --hash-password "my_password"
# 16:E600ADC1B52C80BB6022A0E999A7734571A451EB6AE50FED489B72E3DF
#
# ... and use that for the HashedControlPassword in your torrc.

HashedControlPassword 16:E600ADC1B52C80BB6022A0E999A7734571A451EB6AE50FED489B72E3DF #if you choose to uncomment this line, paste your hashed password here
Cookie authentication simply means that your credential is the content of a file in Tor’s DataDirectory.
In order for the changes to take effect, you must restart Tor using this command:
$ sudo /etc/init.d/tor restart
2. How to authenticate with Tor Control Port
If you want to authenticate with Tor to communicate with the Tor control port (e.g. to start a new session), you can do this: (if you chose cookie authentication method, you can use AUTHENTICATE without any password)
By default, Tor listens for SOCKS connections on port 9050. To use this SOCKS proxy, you can point your application directly to it (“localhost” port “9050”). For applications that do not have this feature, you can use torsocks.
3. How to install torsocks
To install torsocks you can either directly run this command:
$ sudo apt-get install torsocks
ALTERNATIVELY, To install it directly from source (this gets you the latest version and recent patches):
$ git clone https://git.torproject.org/torsocks.git
$ cd torsocks
$ ./autogen.sh
$ ./configure
$ make
$ sudo make install
Now let’s use torsocks! First, get your public ip address.
$ curl 'https://api.ipify.org'
75.119.16.140
So, it says 75.119.16.140 is my public ip, now use torsocks before the curl command:
As you can see, we now have a different ip address that was used to browse on the internet.
4. Signalling Tor Control to create a new circuit (or path)
You can tell Tor control to initiate a new Tor circuit. An important thing to note here is that a new circuit does not necessarily mean a new IP address. To do this, we use a command already introduced above:
$ telnet localhost 9051
Trying 127.0.0.1...
Connected to localhost.
Escape character is '^]'.
AUTHENTICATE "my_password"
250 OK
SIGNAL NEWNYM
250 OK
QUIT
250 closing connection
Connection closed by foreign host.
5. Use a Python Controller Library for Tor
Stem is an officially supported Python controller library for Tor. You can find all about how to install Stem and a few good tutorials to start with from the official website of Tor.
File comparison compares the contents of computer files, finding their common contents and their differences. The result of the comparison is often known as a diff.
diff is also the name of a famous console based file comparison utility that outputs the differences between two files. The diff utility was developed in the early 1970s on the Unix operating system. Typically, diff is used to show the changes between two versions of the same file. Modern implementations also support binary files.
When you setup proftpd on your Linux server, you may sometimes run into permission errors. By default, the home directory of the logged in user to FTP is that which is created when you make the user (using adduser or so). However, if you change the directory for this user, you’ll often find that you won’t be able to write files to that folder. So here are some tips on debugging this process:
1) Check the folder ownership. In order to write files to a folder, you need to belong to the folder’s usergroup or owner. You can check the folder’s usergroup by:
ls -o
This will list the group and file owner. To change the group to one that your FTP user belongs to use:
chgrp <folder> <groupname>
To change the owner use:
chown <file> <user>
<hr>
2) Check the permissions of the folder. Use ls -o to check the read/write permissions of the folder. We want the group users to be able to read/write/execute on the folder, so you want to chmod to something like 775. You can do this using the chmod command:
chmod 775 <file/folder>
<h4>
3) Also check your proftpd config that make’s sure the directory is chrooted (Configure proftpd on Debian). There are a number of directives you can use to setup the folder permissions, such as creating <directory /> blocks. This guide was particularly useful to me: http://www.proftpd.org/docs/howto/Directory.html
You probably have a folder full of documents that say things like importantpresentation.final.odp, importantpresentation.real.final.odp, and importantpresentation.final.changesfromjen.odp. The dates the files were created might help you figure out which one is the latest version, but it can get confusing very easily. Version control solves that problem by tracking document versions for you.
Version control is a process that lets you keep track of changes to electronic items. It’s used by coders who might make a change that breaks things. Version controls allows them to go back to the last working version. But it’s also a useful workflow for collaborating on documents.
In this tutorial, you’re going to learn how to use version control to collaborate on a document. We’re going to use a program called Git to track our files and a site called GitLab to host them. Git is the perfect tool to end the book on because it’s a command line tool that you can use with graphical tools, like text editors. The command line aspect is what makes this attractive to Linux users and it’s one of the reasons I covered it in my book, Learn Linux in a Month of Lunches.
A quick note: One confusing thing about Git is that it’s got two components:
Git, the software, which you use from the command line of your computer
Git Repositories, which are web-based and hold the content being tracked.
So while every person using the Git software is using the same program, the repositories where the content is synced and tracked can vary. If you stop for a minute to think about this, this set-up makes sense. You have Git, a program on your local machine, tracking files. But you need someplace that collaborators can see and access the files, which is where the web-based repository comes in. The most popular repository is probably GitHub, which holds the code from lots of different projects and has become a sort of living resume for people who program. But there are other repositories with which Git can be used.
For the purposes of this tutorial, we’re going to create a private repository in GitLab.
Once you have confirmed your email address, you’ll be able to login
Click the New Project button.
Make the project path end in linuxlunches and keep the visibility level private so that no one can see your repository without your permission
Click Create project
You now have a repository!
Connecting to your repository with Git
The first thing you need to do is install the Git package on your computer. The package is, conveniently enough, called git.
Creating Your Git Identity
Once that’s installed, you need to tell Git who you are. You’ll do that with two commands. The first one will set-up your email and the second will set-up your name. This will let your collaborators know who’s doing what in the repository.
Once you’ve done that, create a folder called repo in your Documents directory and navigate into it via the command line. This folder is where we’ll add the repository we just created in GitLab. To get the address for your repository, go into GitLab and click the Project link. You should see an SSH link for your repository that begins *git@gitlab.com: *. Copy the link.
Cloning a Repository
Now that we have the address for our repository, we can tell Git to clone it, or copy it into that repo directory on our local computer.
The command to copy the repository is git clone and the full git@gitlab.com link you just copied.
While you were cloning the repository, you probably saw a message that it’s empty. That’s fine. Let’s add a file now. Go into the linuxlunches directory within the repo folder. Create a file called firstfile.txt. To upload it to your repository
git add firstfile.txt Git is now tracking this file.
To prepare the file for upload, use git commit -m “My first file” The file is ready to be uploaded to the repository.
To finish the job, use the command git push origin master This will push the committed file, or files, to the repository.
Go into your GitLab repository via the web interface and click on Files. You’ll see your empty file in the repository. You just uploaded your first file via Git!
This tutorial shows how to use eCryptfs to encrypt a directory on Ubuntu 16.04. eCryptfs is a POSIX-compliant enterprise-class stacked cryptographic filesystem for Linux. You can use it to encrypt partitions and also directories that don’t use a partition of their own, no matter the underlying filesystem, partition type, etc.
Read the complete article: https://www.howtoforge.com/tutorial/how-to-encrypt-directories-with-ecryptfs-on-ubuntu-16-04/
This week in Linux and open source news, Nike releases its open source software on GitHub, Kubernetes’ growth continues as a new version is released, and more! Stay in-the-know with our weekly digest.
1) Nike publishes three open source projects on GitHub and open-sourced the code that powers its own site.
One of the greatest aspects of Linux is its flexibility—it can be whatever you need it to be. It can be a massive server for big data, a desktop for rendering video or editing audio. A graphic designer’s studio. An every-day, get things done machine.
Or something in between.
For every job, you’ll find a distribution. For every need, you’ll find a tool. For every piece of hardware, you’ll find a version of Linux ready to make it work for you. Whether you’re working working with big iron or a low-end, aging desktop or laptop…there’s a Linux for the job.
At the same time, Linux can be a bit challenging to new users. Yes, most modern distributions and desktops have come a very long way to making the Linux ecosystem much, much easier than it once was. But some new users need a bit more help than others. And some, lesser-powered hardware could use that same helping hand.
That’s where the likes of Linux Lite shines to a brilliant perfection. Linux Lite falls into that ubiquitous category of Linux distributions perfectly suited for low-end hardware. However, this particular take on the lightweight operating system achieves something few in this category can manage.
It delivers all the tools you need to get the job done, all the while making Linux a no-brainer for any level of user.
Linux Lite isn’t a stripped-down version of our favorite open source operating system. You won’t open up the main menu to see software that barely gets the job done. There’s no Abiword, Gedit, or Gnumeric in place of LibreOffice. You won’t find Midori standing in for Firefox. Linux Lite has everything you need…and more. In fact, this take on the “lightweight Linux distribution” is so not lightweight, it might well leave you wondering why the term “lite” even applies. The only conclusion that I can draw with the name is that the lite actually applies to Linux and not to the size of the distribution’s footprint.
In other words, this is Linux that doesn’t actually feel like Linux. Anyone could login to this distribution and be instantly at home. It’s that easy to use.
Lite is still lite
At the heart of every lightweight distribution is the desktop and most all of them use Xfce. Linux Lite is no exception, and it uses that desktop to perfection. With the Linux Lite desktop, users will find all the things they have become accustomed to. There are no tricks, no unique takes on the desktop metaphor. Linux Lite is simplicity designed around the fundamental idea of familiarity….all the while, retaining a speed that other “full-blown” desktops have trouble matching.
To test the limits of Linux Lite, I installed the OS on my oldest laptop—one that comes to a crawl with the likes of Ubuntu, GNOME, and Fedora. I wanted to see how standard tools would fare on a platform laying claim to the “lite” title.
By all accounts (in terms of technology), this machine is a dinosaur (a Sony VAIO, purchased sometime around 2009) and should have been retired long ago. However, it has made for an interesting compare and contrast for how Linux distributions fare with low-powered hardware. And Linux Lite certainly gave this poor machine a new lease on life.
The minimum requirements of Linux Lite are:
700MHz processor
512mb RAM
VGA screen capable of 1024×768 resolution
DVD drive or USB port for the ISO image
The suggested requirements of Linux Lite are:
1.5GHz processor+
1024mb ram+
VGA, DVI or HDMI screen capable of 1366×768 resolution+
DVD drive or USB port for the ISO image
Making Linux easy for new users
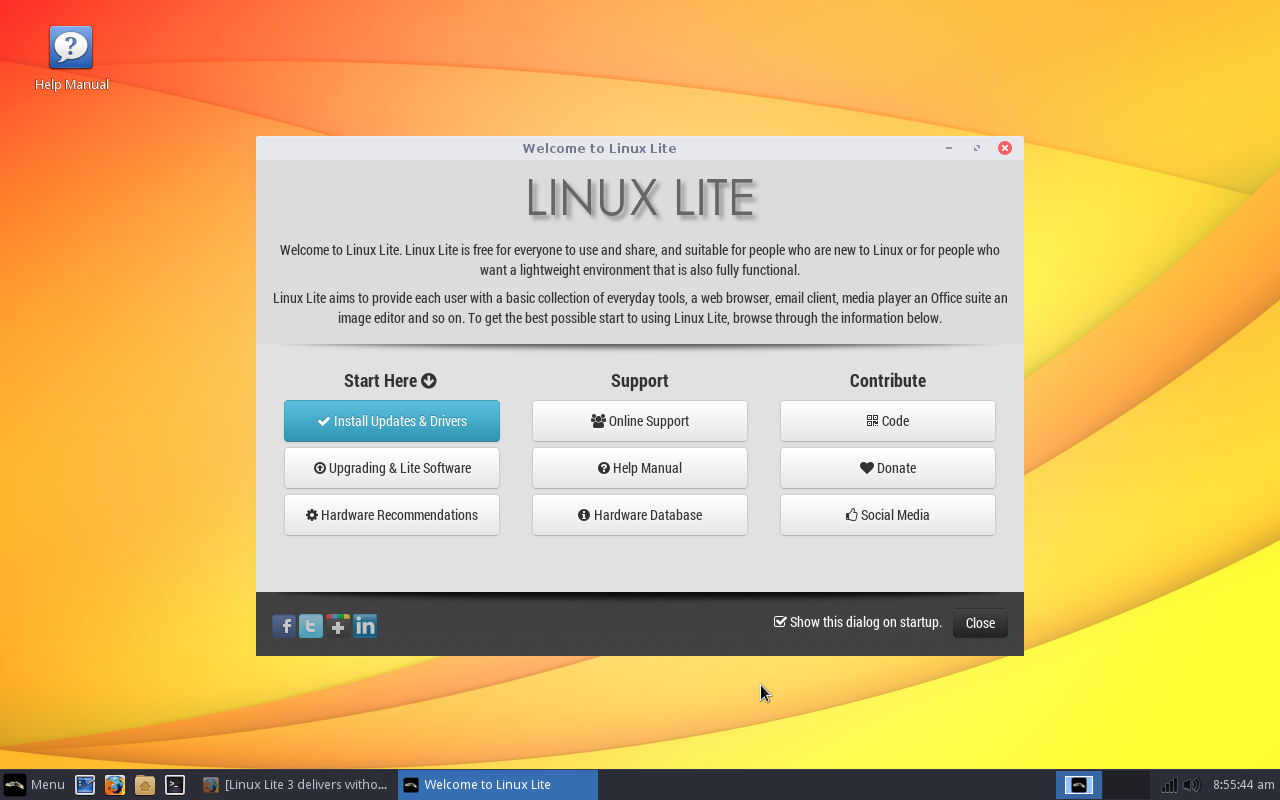
When you log into Linux Lite, you’ll be greeted by something every Linux distribution should include—a welcome screen. This welcome screen (Figure 1) offers to walk the new user through the process of getting up to speed on the platform.
Figure 1: The Linux Lite Welcome window will be a welcome sight for new users.
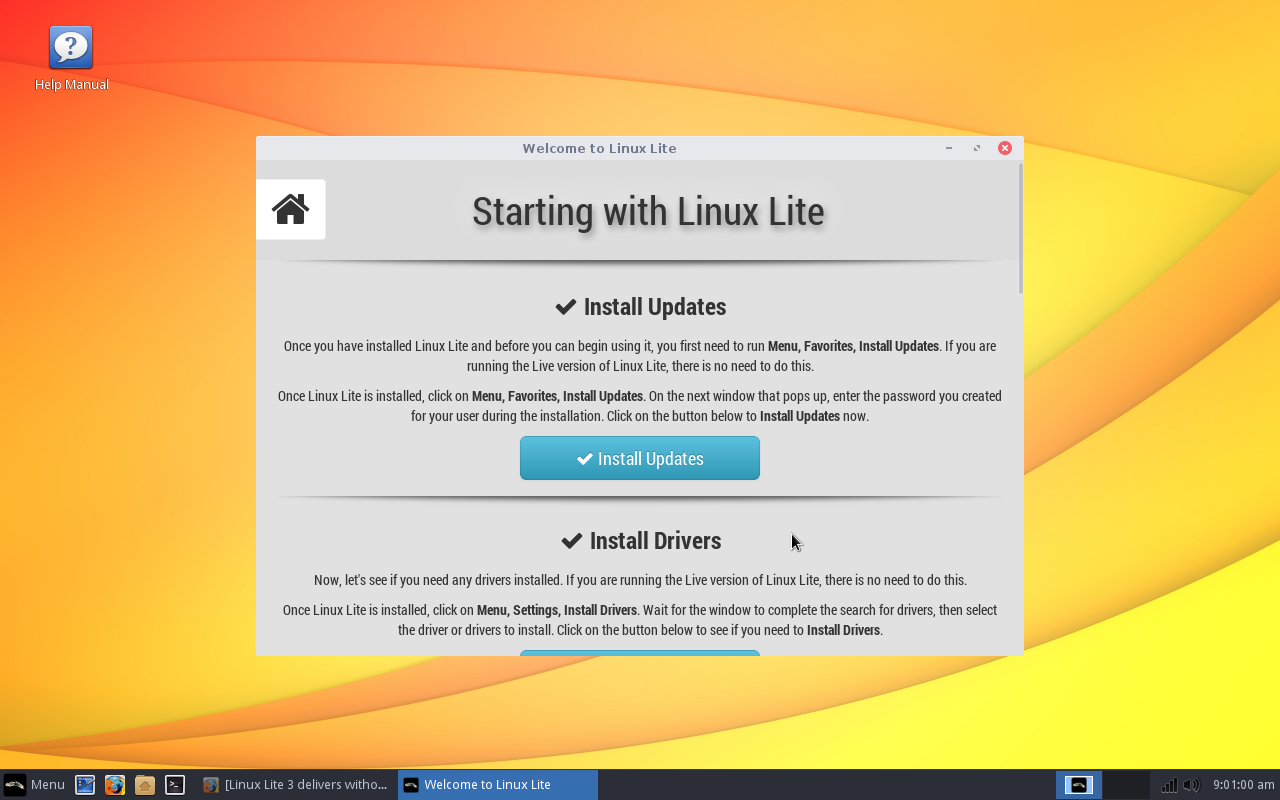
The first thing the Welcome window instructs you to do is click on the Install Updates and Drivers button. Do that and you’ll find yourself in a new window labeled Starting With Linux Lite (Figure 2).
Figure 2: Getting started with Linux has never been so easy.
Click on the Install Updates button, enter your user password, and then click Yes when prompted. All updates will be downloaded. Once the updates have been downloaded, click the Update button and the process will begin. If the kernel happens to be included in the update, you will be prompted to reboot the machine; otherwise, you’re good to go. Simple.
Once the updates are complete, you can proceed with checking for and installing (if applicable) any necessary proprietary drivers. Should the tool find any proprietary drivers, it is up to you if you apply them. Since my VAIO test machine makes use of Intel graphics, there were no proprietary drivers to install. Should you be using hardware with an Nvidia GPU (or a wireless chipset that might require a third-party driver), a proprietary driver will most likely be available.
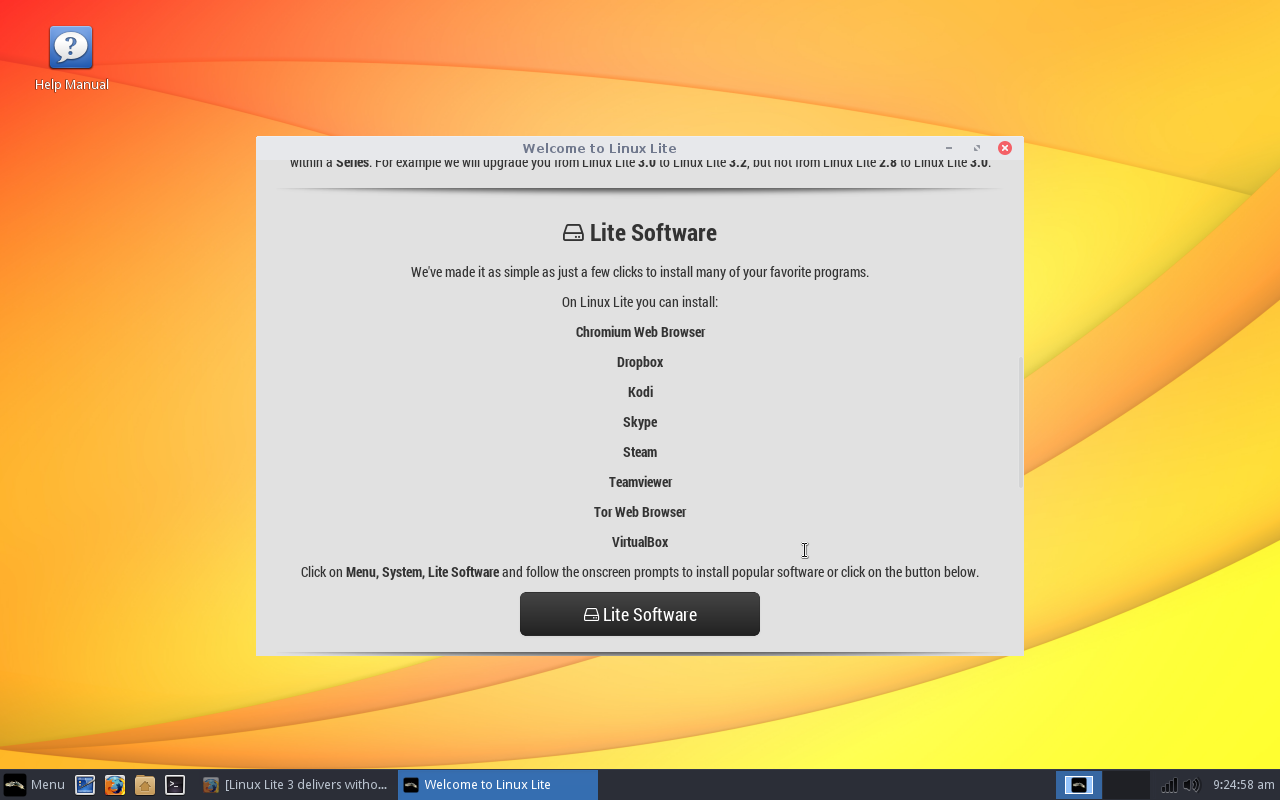
Beyond the proprietary drivers, the Welcome window offers one last bit of useful help. Click on the Lite Software button (Figure 3) and you will be greeted with a simple window asking you if you want to Install Software, Remove Software, or Exit.
Figure 3: Linux newbies won’t have any trouble installing software on Linux Lite.
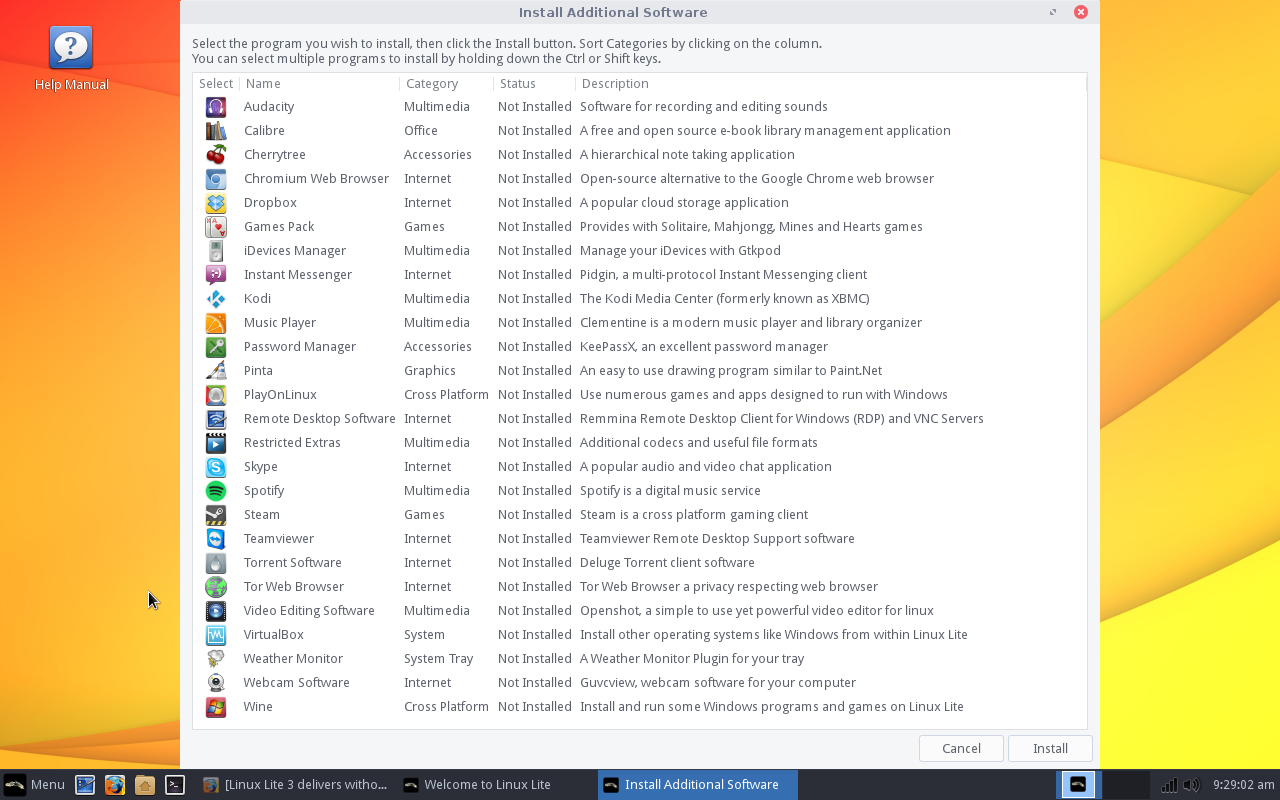
When prompted, select Install Software, and then click OK. What happens next might surprise long-time Linux users. A window will appear (Figure 4) with a basic list of available titles. Click on a title and then click Install. That’s it.
Figure 4: Incredibly easy software installation with Linux Lite.
There may not be many bells and whistles for the Linux Lite software installation tool, but it makes installing key software (such as Audacity, Skype, Clementine, Spotify, Wine, Steam, etc.) something that won’t put off any level of user. To me, that is the heart and soul of Linux Lite—and why I believe the lite applies more to the Linux than to the footprint of the distribution.
Last but not least
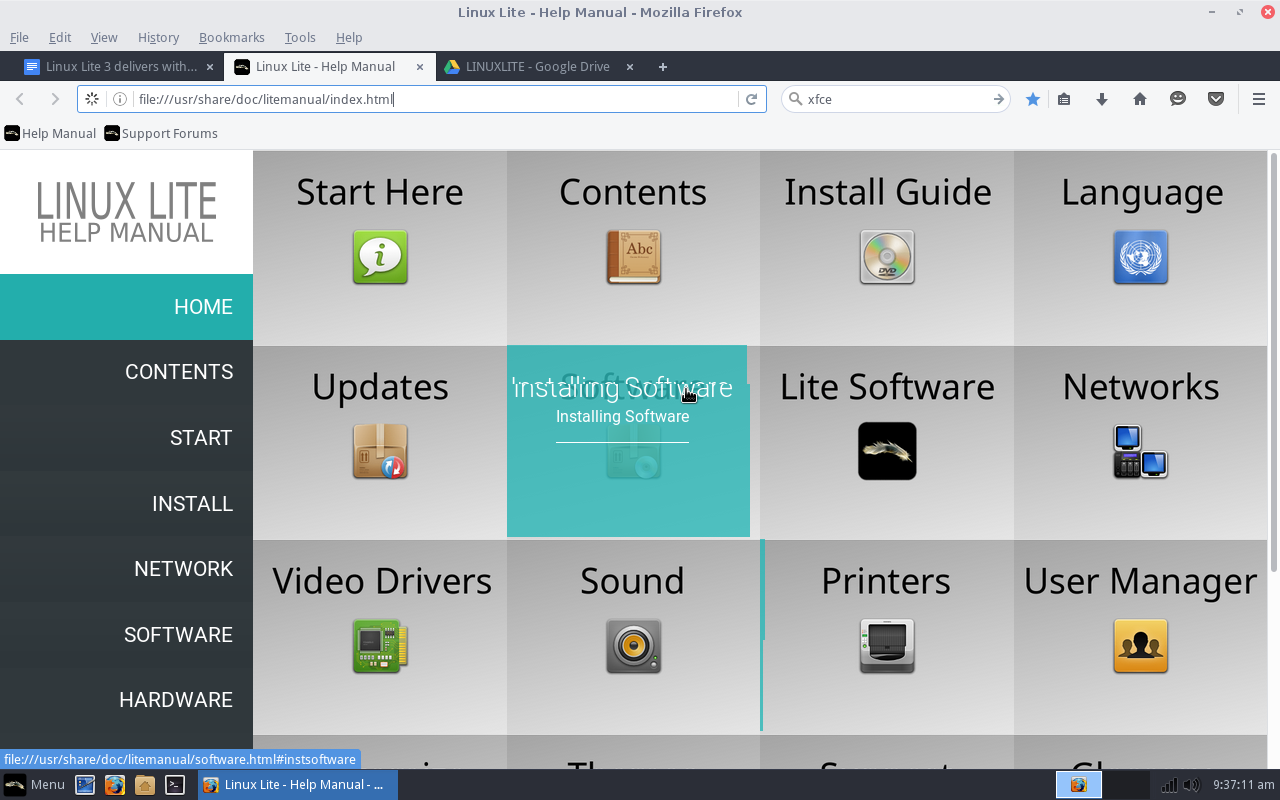
As if Linux Lite couldn’t make it any easier for the new user, they include a single icon on the desktop labeled Help Manual. Click on that and a local web page will open (Figure 5). This page includes help sections for every aspect of using Linux Lite.
Figure 5: The Linux Lite Help Manual.
Any user, new to Linux Lite, could comb through the Help Manual and learn everything they need to get up to speed on the platform (although most users won’t need it—thanks to Linux Lite’s ease of use). The developers of Linux Lite deserve a massive round of applause for taking the time to put this together.
The bottom line
It’s simple. Linux Lite is, hands down, not only one of the best “lightweight” Linux distributions I’ve ever used, but probably one of the single best distributions geared toward new users. I cannot imagine a user—even one who has never experienced a platform other than Windows—finding Linux Lite even remotely challenging to use.
In the end, if you’re looking for a distribution that will breathe new life into old hardware, and make using Linux as easy as any other operating system on the planet, look no further than Linux Lite.