
Horde is a groupware suite that offers email, calendar, task, contact management and more things. It also offers SyncML and ActiveSync to synchronize with your cell phones or other software. This Howto assumes that you followed the ISPConfig 3 installation for Debian Jessie (Apache2, Bind, Dovecot) and all the packages there.
Docker 1.11.2 Linux Container Engine Improves CentOS and Ubuntu 16.04 Support
 The Docker developers have announced the availability of Docker 1.11.2, the second maintenance update for the Docker 1.11 stable series of rhe widely used Linux container engine.
Docker 1.11.2 has been in development for the past one and a half months, during which it received a single Release Candidate (RC) build that included the same changes available now in the final build.
Among these, we can mention improved networking support by patching an issue that made the “docker inspect”, “docker ps”, and “docker port” commands to report the wrong port, as well as fixing a stale endpoint problem for overlay networks, which occurred due to clumsy reboots.
CentOS and Ubuntu 16.04 LTS support has been improved
Moreover, it looks like Docker 1.11.2 attempts to fix the support for running 32-bit binaries under the Ubuntu 16.04 LTS (Xenial Xerus) operating system, and improves devicemapper support for CentOS Linux series of distributions by patching a “han… (read more)
New Chips Give Linux a Hand in Wearables

Aside from the Tizen-based Samsung Gear S2, and a dozen or so Android-based Android Wear watches, Linux has been something of a no-show in the smartwatch market. Most lower-end watches skip the overhead of Linux in favor of simpler RTOS-based devices running on MCUs.
Yet Linux got a boost into wearables this week when Qualcomm, whose Snapdragon chips fuel most Android Wear watches, announced a Snapdragon Wear 1100 system-on-chip for lower-end smartwatches and wearables. The 28nm-fabricated SoC is built around a single Cortex-A7 core that can be clocked to 1.2GHz.
The Wear 1100 can also support RTOS implementations, but it’s designed primarily for Linux. The main draw here appears to be Linux’s support for more advanced connected apps that can orchestrate a variety of sensors and radios.
Another Linux-based platform supporting wearables was announced this week by Marvell. Part of Marvell’s IoT Application Processor (IAP) family, the IAP220 SoC has dual Cortex-A7 cores, as well as a Cortex M4F microcontroller.
The device, which supports Android and Brillo in addition to Linux, has a more general IoT focus, supporting home and industrial automation and smart appliances in addition to wearables. Still, it offers an additional choice for developers who want to look beyond Android and the Apple Watch in designing next generation smart watches and bracelets.
Snapdragon Wear 1100
The Snapdragon Wear 1100 targets “the fast growing targeted-purpose wearables segments such as connected kid and elderly watches, fitness trackers, smart headsets, and wearable accessories,” says Qualcomm. The platform complements a more advanced, quad-core Cortex-A7 Snapdragon Wear 2100 SoC announced in February that targets the next-generation of Android Wear watches.
The Snapdragon Wear 1100 SoC measures 79 x 79mm and has a 256KB L2 cache. It lacks a GPU with 3D acceleration such as the Wear 2100’s Adreno 304, but offers a fixed function 2D graphics processor. The Wear 100 includes many of the features of the 2100, including optional WiFi and Bluetooth 4.1 LE support. It even supports a more advanced 802.11ac radio compared to the 2100.
Standard features shared with the Wear 2100 include a Qualcomm iZat location chip with support for GPS, GLONASS, Galileo, and Beidou standards. The iZat chip also offers “multi-GNSS, cell-ID positioning, and ability to support applications that utilize geo-fencing for safety monitoring,” says Qualcomm.
The Wear 1100 also provides 4G LTE and 3G global band support, although it’s only CAT 1 LTE instead of CAT 4. This would limit you to 10Mbps downlink and 5Mbps uplink speeds instead of 150Mbps and 50Mbps on the higher-end Connected version of the Wear 2100. The platform supports cellular voice, as well as data.
The Wear 1100 is further equipped with power management features and support for DDR2 RAM instead of DDR3 on the Wear 2100. Security features include hardware cryptography, a hardware random number generator, and TrustZone technology. There was no mention of Wear 2100 features like NFC, Fluence audio, a DSP sensor hub chip, or support for eMMC 4.5 and USB.

Interestingly, the Android- and Wear 2100-based collaborations were also mostly aimed at kids and the elderly, including a Borqs-built kids watch from Lima, Peru based Anda Technologies aimed at the Latin American market. inWatch is also planning several China-destined kids watches built on the Wear 2100, and Infomark is prepping on a Joon2 kids watch based on chip.
If smartwatches for adults are still far from a must-have item in the consumer market, the kids and elderly market seems like even more of a longshot. Presumably, the devices are aimed primarily at parents who want to track their kids — or their own elderly parents — and figure a watch has a better chance staying with their owners than a phone.
The kids focus may also be a way of avoiding market leader Apple, which is still working on an updated Apple Watch due later this year rather than taking on the low-end wearables market. Still, even the Apple Watch is not exactly flying off the shelves. There’s plenty of room for other successes here — or potentially a collective failure. Yet, with new chips from Qualcomm, and others, such as Marvell’s IAP220, not to mention the numerous vendors involved, there’s a better chance of finding the perfect mix of features.
This Week in Linux News: OpenSwitch Now a Linux Foundation Project, Linus Torvalds to Speak at LinuxCon Japan, & More

New open source networking project, OpenSwitch, is now a Linux Foundation Collaborative Project.
HPE’s OpenSwitch Project Gets Linux Foundation Backing– SiliconANGLE
Linus Torvalds will speak at LinuxCon Japan this July.
ContainerCon and LinuxCon Japan 2016 Events to Take Place July 13-15 in Tokyo– Softpedia
Dr. Angel Diaz of IBM explains why organizations like The Linux Foundation & The OpenStack Foundation can be looked to as examples for cloud development.
How To Attract Top Cloud Dev Talent– InformationWeek
Feral Interactive comfirms BAFTA award-winning episodic game will be released on Mac, then Linux soon.
Feral Interactive Confirms Life Is Strange is Coming to Mac, Linux– HardcoreGamer
CoreOS releases a prototype of Torus, an open source distributed storage system for providing storage to container clusters.
How to Enable PGP Encryption in Evolution

Whether you’re using the Evolution groupware client for work or personal email, you very well might need to add a layer of security to your communications. You might be transmitting company secrets or sensitive personal data—either way, having that extra insurance that your missive will arrive without having been read by prying eyes will go a long way toward bringing you peace of mind.
But, how do you achieve this? If you happen to use Evolution for email, you probably already have everything you need to make this happen. With just a tiny bit of work, you’ll have PGP and Evolution keeping that data secure. Let’s dive into the process of setting this up and using it. I’ll be demonstrating on Ubuntu GNOME 16.04, with the latest version of PGP and Evolution available to the platform.
Your PGP Key
As I said, Ubuntu GNOME 16.04 has everything you need, out of the box, to work with encryption in Evolution. The one thing you have to do is create a PGP key. You might already have one (in which case, you would only need export the key into Evolution—more on that in a bit).
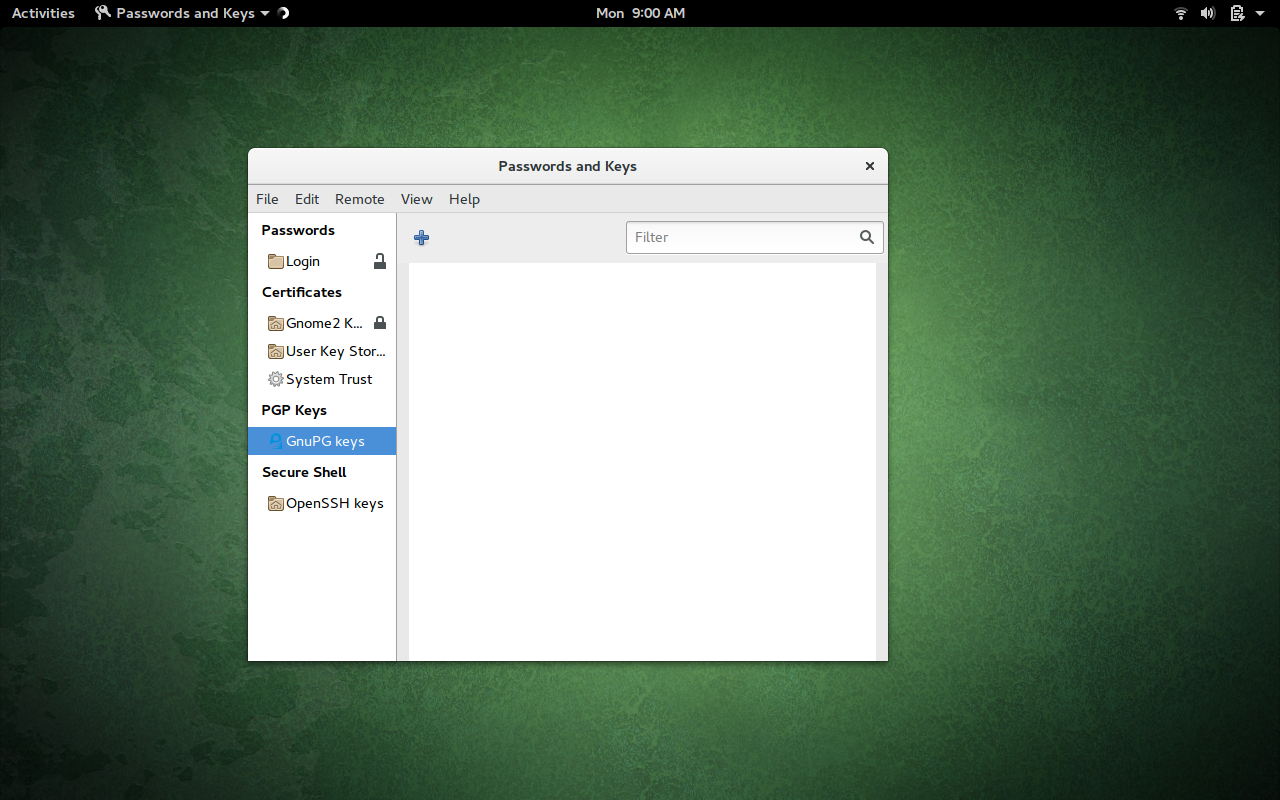
I will first walk you through the process of generating a key by using the built-in Seahorse GUI tool. If you open the GNOME Dash, and type seahorse, you should see Passwords and Keys. Click on that to open the app.
Once the app is open, click on GnuPG Keys (in the left navigation—Figure 1).
Click on the + button, select PGP Key from the list, and click Continue. You will then be asked for your full name and an email address. You can expand the Advanced Key Options, in order to configure the expiration date, comment, key strength, and encryption type (Figure 2).

Click the Create button, enter/verify a password for the key, and click OK. The key will begin to generate. One caveat to using Seahorse is that it gives you absolutely no indication the key is being generated. So, at this point, what you need to do is work. Type, open apps, move windows around. This is necessary to aid GPG in generating the random data necessary to create the key.
After the key generates, go back to the main window and select the key you just created. Right-click the new key and select properties. In the new window, select Names and Signatures. Click the Sign button and then, when prompted (Figure 3), select Casually, and then click Sign.
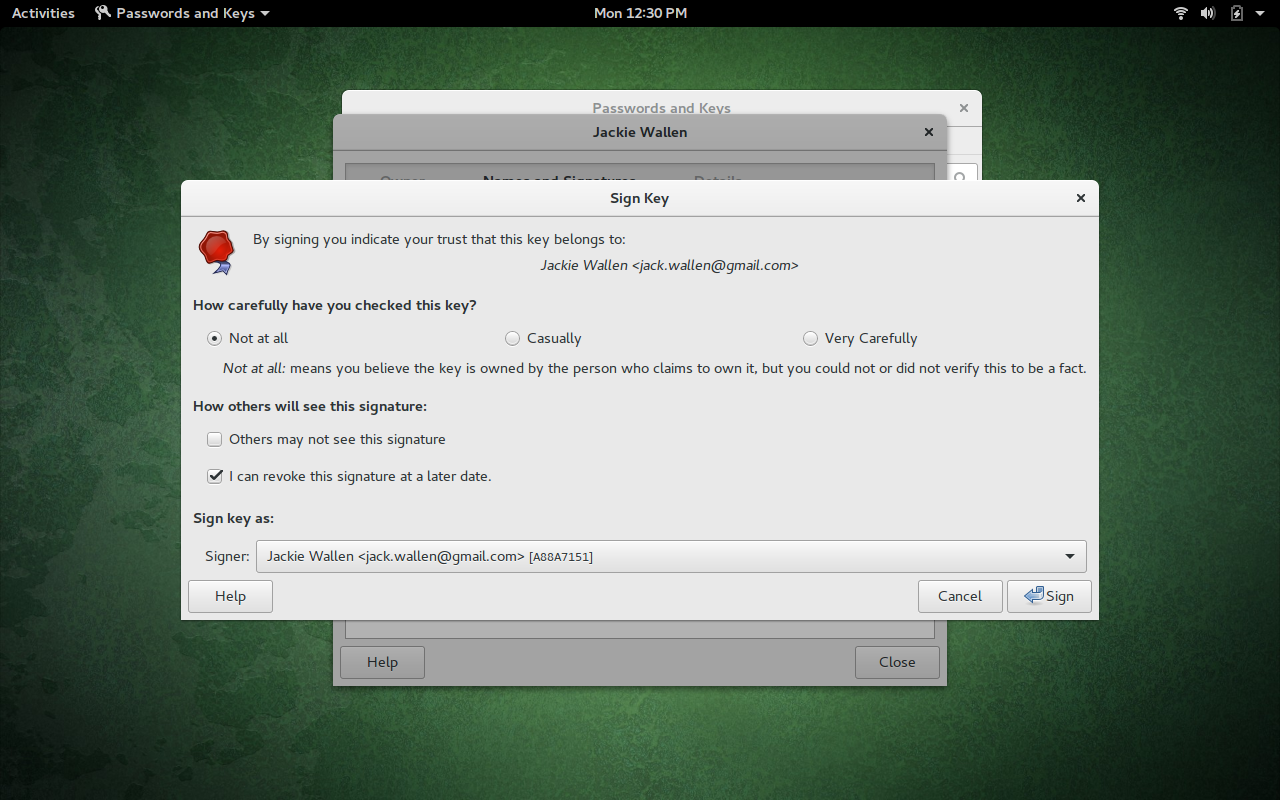
Once the key is signed, it is now ready to be used, for encryption, in Evolution.
Command-Line Keys
If you find that Seahorse doesn’t suit your needs, you can always create your GPG key through the command line. This is also quite simple. Let me walk you through the steps:
-
Open up a terminal window
-
Issue the command gpg2 –full-gen-key
-
Answer the presented questions (in most cases, the defaults will work fine)
-
Enter a passphrase for the GPG key
At this point, you will have to (as you did when using Seahorse) work on your desktop, so GPG can generate the random data it needs to create the key. What I have found works best is to open up LibreOffice (or any application that allows you to type) and start typing. Also move the mouse around, open up an app or two, and work.
Once the key is generated, you will see it automatically appear in Seahorse. You can then use the GUI app to sign the key (it’s the easiest method to ensure the key is usable with Evolution).
Importing Keys
If you already have a key for signing, you can import it into Seahorse by clicking File > Import. Navigate to where you’ve saved the key, select it, and then click Open. The key should then import and be immediately available to use. You will then have to sign the key (as instructed earlier) for it to work in Evolution.
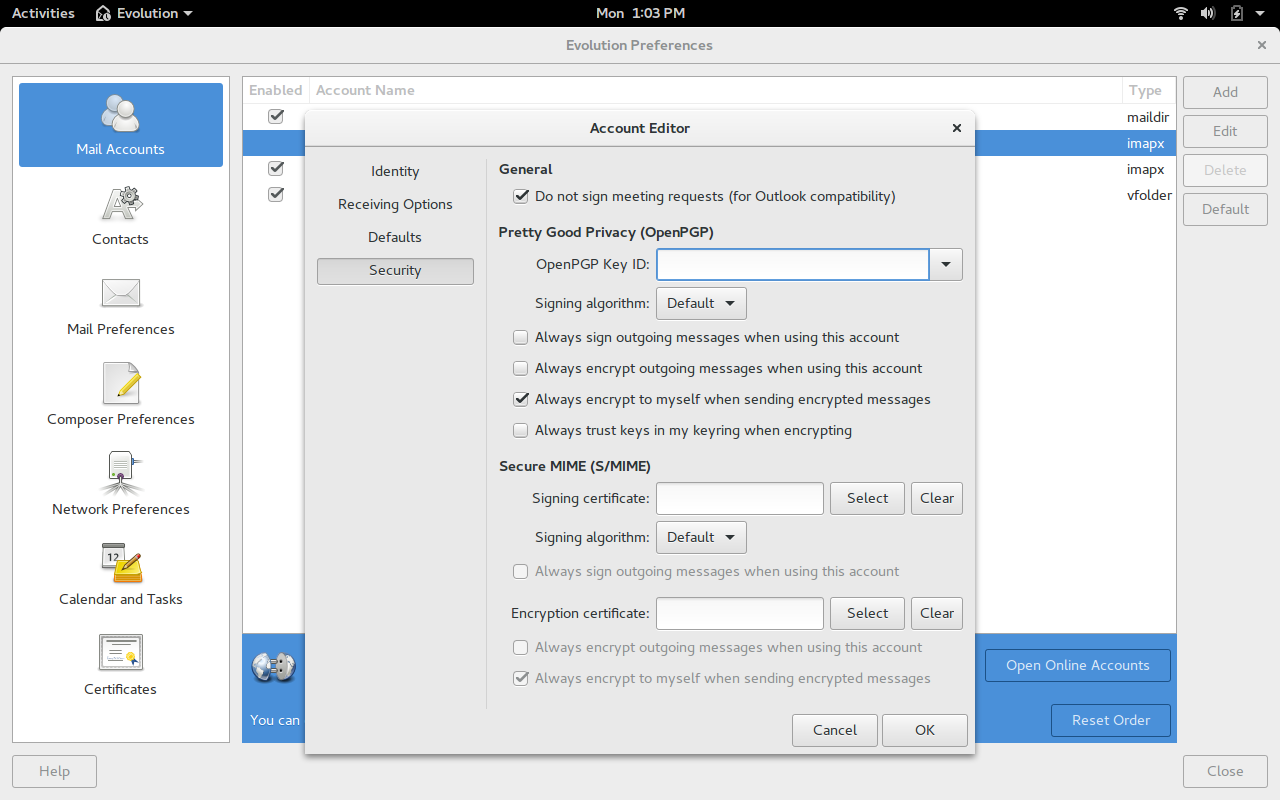
Enabling your Key in Evolution
Now you’re ready to use the key in Evolution. To do this, follow these steps:
-
Open Evolution
-
Click Edit > Preferences
-
In Mail Accounts, select the account to be used
-
Click Edit
-
Click Security
-
In the OpenPGP Key ID field, enter the email address associated with the key you created (Figure 4) or click the drop-down and select the correct key
-
Click OK
That will associate the newly created key with your email address.
Encrypting Email
By default, outgoing email will not be encrypted. To encrypt your email, do the following:
-
Open Evolution
-
Create a new email
-
Click Options > PGP Encrypt
-
You can optionally click Options > PGP Sign (which will help the receiver know the key used can be trusted)
-
Send the email
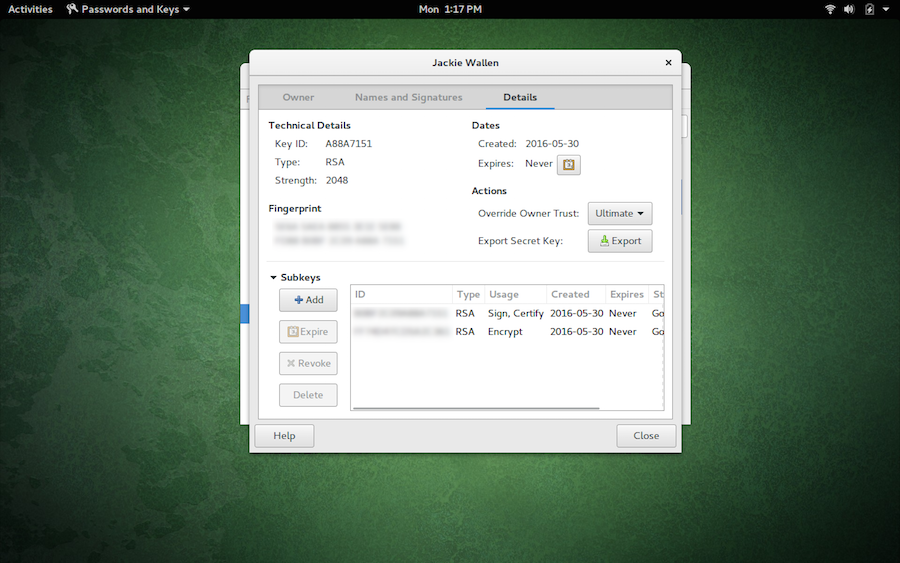
Your encrypted email will then arrive in the sender’s inbox. Of course, in order for them to decrypt the email, they will have to have your key. To export your key, we’ll turn back to Seahorse. Here are the steps:
-
Open Seahorse
-
Right-click on the key to use and select properties
-
Select the Details tab
-
Click the Export button (Figure 5)
-
Give the key a name and click Export
-
When prompted, enter the passphrase associated with the key
Keep It Secure
If you’re using Evolution, you owe it to yourself (and those you communicate with) to make use of encryption and all its options. Yes, it does add a layer of complexity with your email, but the peace of mind you gain is worth every extra click.
Destress Your Mail Server with Postfix Troubleshooting Tips: Part 2

As I discussed in the previous article, it’s clearly important to know when your trusty mail transfer agent (MTA) is struggling to perform its duties. In this article, I’ll take a closer look at some warning signs and consider potential ways to mitigate issues when you spot that your server is stressed.
When there’s no stress causing your mail server to creak at the seams, a standard response time is, for all intents and purposes, immediate. It’s a very snappy retort with generally no latency visible to the human eye. If there are unwieldy, sizeable attachments, you may see a slight performance hit because network IO and disk IO obviously need to stretch their legs, limber up, and get involved.
Warning Signs
For Postfix, the point of no return is when the number of SMTP clients exceeds the number of SMTP server processes. There’s a whole host of reasons why a higher volume of usual of legitimate emails may arrive within a short period of time. For example, a mail server that has been unavailable for some time (due to maintenance, network outages, DNS problems, or other issues) might suddenly become available again and empty its previously undelivered queue. Or, of course, it could be due to an attack of varying flavors, and the deluge of email may not be legitimate or welcome at all.
On a basic level, you can probably spot a busy Postfix machine relatively easily. You can fire up a Telnet session to your mail server (running the command telnet <mail.chrisbinnie.tld> 25) and look for a slow initial response. This is where the following line is presented, replacing “mail.chrisbinnie.tld” with your MTA’s name obviously, acting as the opening gambit of the transaction:
220 mail.chrisbinnie.tld ESMTP Postfix
As I’ve said, these delays might be because of DNS issues somewhere in the transaction chain and can obviously exist even when the server is running without excessive load, so don’t immediately jump to conclusions.
Let’s consider another error. It’s possible that your logs contain multiple “lost connection after CONNECT” errors. Here a mail client is connecting but not completing the transaction and, frankly, just irritating your poor, old mail server. Note, from a security perspective, that it’s possible to attempt to tie your server in knots with many of these connections each second; you can generate this error by running a port scan, for example. The clever Postfix (as of version 2.3) adds a helpful reminder to your logs to help you figure out if you’re suffering from process depletion as follows:
warning: service "smtp" (25) has reached its process limit "30":
  new clients may experience noticeable delays
In reality, all sorts of reasons could cause this issue, from saturated bandwidth, incorrect MTU, slow DNS lookups, reverse/forward DNS lookup mismatches, to misconfigurations at the other end of the connection.
There are a few things to bear in mind, however. These errors could potentially be a symptom of Postfix tripping over itself with any rules that process inbound emails before they hit its queue. If you’re stumped about what the root cause of such problems might be, then look for errors and typos in your config (or switch off pre-processing to see if it fixes it). In most cases, legitimate clients aren’t likely to generate these errors, so something else is to blame.
Hopefully, this highly logical, supplementary comment, which is apparently from the writer of Postfix, Wietse Venema, will help if you get stuck thanks to the appearance of such an issue:
“The client disconnected before Postfix could ask the KERNEL for the client IP address. Either your server is too slow or the client is too impatient.“
There’s additional wisdom regarding that comment online.
One final thing to assert is that, if your server’s capacity issues are only temporary, then clearly there’s much less chance of emails actually being lost. Retries should mean that deliveries will be successful when the condition subsides.
Destressing Yourself
From Postfix version 2.5 on, a clever addition was added to assist with automatically mitigating stressful operating conditions. Postfix calls it “stress-adaptive behavior” and, sadly, the solution only applies to your MTA and not real life, which would be welcome for many sysadmins I’m sure.
According to the docs, if your Postfix server encounters an “all server ports are busy” error, then, as well as logging a warning, your trusty MTA will also actually restart itself (and without interrupting existing network sessions). When Postfix comes fully back up, the eagle-eyed among you will notice it has added this option to its command-line options: -o stress=yes. It would look something like this if you ran the ps -ef command:
1010 ?? S 11:11.11 smtpd -n smtp -t inet -u -c -o stress=yes
Should this cause consternation, note that apparently the “yes” is usually missing, but “-o stress=” is present, and this option only applies to public-facing services and not local ones.
This super-clever option means that several additional options kick in. I was genuinely intrigued when I discovered that Postfix had this undeniably sophisticated capability. Let’s look at the options it controls in more detail.
The first change it makes is that the “smtpd_timeout” option is altered when Postfix feels stressed out. Normally, it would default to 300 seconds, but under heavy load this will drop to just 10 seconds. This will not meet RFC rules so it should only be used temporarily. Even lowering this to 5 seconds means that most clients will still manage to deliver email successfully, and those that are too slow will retry. So, in theory, if this is used briefly, then no valuable email will be lost.
Next, we get seriously medieval with a command that we’ve already looked at, namely “smtpd_hard_error_limit”. The usual default value of 20 drops to just one. Very sensibly, Postfix is far less sympathetic to mail client problems when it’s busy, as you can see.
Our battle-hardened MTA also massively reduces the value for “smtpd_junk_command_limit” all the way down to one instead of the default 100. Essentially, this should penalize any client that tries to keep connections open. It stops them from continually bombarding your server with HELO, EHLO, NOOP, RSET, VRFY, or ETRN commands.
The last three adjustments only apply to Postfix versions 2.6 and up — by all accounts. In this case, Postfix alters the way that it handles the “smtpd_timeout” and “smtpd_starttls_timeout” options. Rather than focusing on a time limit for reads or writes, what now becomes important is the time taken, for both sending and receiving a complete email transaction (this involves an SMTP command line, an SMTP response line, and SMTP message content line or a TLS protocol message).
The second countermeasure, from version 2.6 on — used as a stress relief mechanism — comes in the form of “smtpd_timeout” now also applying to TLS handshakes, too. Here we drop to the floor and offer 10 push-ups instead of 300. Clearly, any transaction involving encryption encourages greater server load, and again there should be retries so that no email is lost.
The third option enforces a strict option whereby Postfix won’t wait for six seconds for an address verification probe. An explanation of how it works from the unerring docs: “Address verification is a feature that allows the Postfix SMTP server to block a sender (MAIL FROM) or recipient (RCPT TO) address until the address has been verified to be deliverable.” Again, the functionality is very clever; (much) more information is available online.
The long and short of using this setting under heavy load is that if the result is not already in the address verification cache, it will reply immediately with “unverified_recipient_tempfail_action” or “unverified_sender_tempfail_action”. If this option is a used as a temporary countermeasure, email should arrive after retries kick in. I would encourage a quick read of the information cited above for more detail.
Permanence
What about if you encounter ongoing load issues, and you can’t bump up your server specification or bandwidth? Let’s consider a few options to assist in making useful changes permanent.
Think back to the “all server processes busy” error again for a moment. To mitigate the effects of that particular issue, we need to increase the number of SMTP processes. I’m sure that you won’t be surprised to read that Postfix prefers, by default, not to aim for world domination and utilize every possible last modicum of system resource. Instead, it prefers to take a considerate approach. Let’s look at hogging more of your server’s overall resources in order to meet the demands of more simultaneous client connections.
We’ll avoid tinkering with the “master.cf” file and ignore the optional way to achieving this outcome via that route (it’s considerably easier to break Postfix). Instead, we’ll edit or add the “default_process_limit” option in “main.cf” adding a higher value as we do so. Remember to execute a reload following this change:
# postfix reload
The docs warn that you need Postfix version 2.4 or higher to configure more than 1,000 processes (and an operating system that supports BSD kqueue(2), Linux epoll(4), or Solaris “/dev/poll”) and that adding more processes soaks up more of your precious RAM, so tread carefully.
You can apparently reduce the RAM hit by opting for “cdb” lookup tables instead of other alternatives, such as Berkeley DB’s hash table format. One quick caveat: In case you’re using a relatively old version, the “SMTPD_POLICY_README” might contain misleading information relating to fixed daemon processes, so even if you can’t install the latest version, view its README file.
If you’re in an unhappy job and want to spend less time with clients who pester you, then you can of course limit your server’s attention span instead of bumping up your RAM usage.
A popular addition to “greylisting” (an invaluable anti-spam measure) is to use Realtime Black Lists (RBLs), also called Realtime Blackhole Lists, which need to perform a remote, third-party lookup before an incoming email is deemed acceptable.
It’s common to add several RBLs to your configuration, but over time some of these blacklists are closed down or no longer useful due to obsolete or dated information. Additionally, it’s possible that you are duplicating your RBLs lookups because a provider, such as the excellent SpamHaus, offers several blacklists in a combined format. The Postfix docs recommend disabling both obsolete RBL and duplicated RBLs in order to remove their lookup times and therefore the time you spend on each transaction.
An (incomplete) example of how efficient Postfix is with RBL follows. Here, we are actually only querying the same RBL once with one lookup despite the repetition (added to your “main.cf” file again):
smtpd_client_restrictions =
       permit_mynetworks
       reject_rbl_client zen.spamhaus.org=127.0.0.10
       reject_rbl_client zen.spamhaus.org=127.0.0.11
       reject_rbl_client zen.spamhaus.org

Additionally, if you add rules for checking email headers to a greater degree
than is usual, then it’s more efficient to combine them as opposed to have them
spread out in your config file as individual rules. The docs suggest this
approach in the “/etc/postfix/header_checks” file:
if /^Subject:/
  /^Subject: virus found in mail from you/ reject
  /^Subject: ..other../ reject

endif
As you can see, more than one rule is held within one “if” statement to expedite its processing time.
Innately Suspicious
When your MTA is stressed out, you might adopt a much stricter stance so that any machine connecting to you — which appears even a little bit suspicious — is presented with a cold shoulder.
We can use the SMTP 521 error code, which returns a response saying that a certain domain name does not accept email as per RFC 1846. This applies to newer versions of Postfix (2.6 onwards) and other codes are used in earlier versions. The sophisticated Postfix dutifully rejects the email and then stubbornly disconnects. This is Postfix acting as intransigent as it gets; there’s no patience and the connection is dropped even without receiving a remote QUIT command.
Testing
Previously, I mentioned that it is very easy to give Postfix build headaches if you break the “master.cf” file. We need to carefully edit that file for these next two tweaks.
You can force Postfix into, what I refer to as, overload-mode (where it deploys its countermeasures to combat stress) by diligently adding a line to the “master.cf” file. Introducing “-o stress=yes” as an option will enable that mode as shown in Listing 1:
# ==========================================================================
# service type  private unpriv  chroot  wakeup  maxproc command + args
#               (yes)   (yes)   (yes)   (never) (100)
# ==========================================================================
smtp      inet  n       -       n       -       -       smtpd
     -o stress=yes
     -o . . .
Listing 1: Enabling countermeasures manually, which usually Postfix will do automagically under heavy load.
After making the changes in Listing 1, remember to run this command:
# postfix reload
Conversely, if you would prefer to never allow automatic stress-adaptive behavior, then you simply alter “master.cf” as seen in Listing 2.
# =============================================================
# service type  private unpriv  chroot  wakeup  maxproc command
# =============================================================
#
 submission inet n       -       n       -       -       smtpd
        -o stress=
        -o . . .
Listing 2: Never permit Postfix’s anti-stress mode to automatically kick in.
Essentially, we’re adding the option but leaving it empty. Again, remember to run a config reload after deploying the changes seen in Listing 2.
Flesh Eating
Sadly, botnets continue to remain popular, and spambots also continue to relentlessly hammer poor, unsuspecting mail servers. As they search for the latest place to deposit their unwelcome payloads, clearly it’s important that MTAs evolve to keep up. As of Postfix 2.8, the Postscreen tool was introduced to help mitigate spambots. It cleverly achieves its welcome effects by handling several SMTP connections within just one system process apparently.
The efficacious Postscreen also keeps track of connections by using its own whitelist for clients that have been proven valid previously by passing a series of connection-related checks. It then remembers IP addresses within its whitelist and, if it deems one such machine is friend and not foe, then it will push through the email delivery onto an SMTP process. This cache of friendly IP addresses cuts down on how much effort Postfix applies to each valid email, thereby reducing load and delivery times. If you would like to read more about this clever addition to Postfix, please refer to the manual.
EOF
Tempting as it is to continue exploring the many other options that Postfix includes, unfortunately, there are simply too many to cover. What with talking about debugging, automatic stress-adaptive functionality, and briefly touching upon Postscreen, we haven’t really done justice to the powerhouse that is Postfix. The quality of the features included with Postfix, its reliability, and the sheer volume of choices available in how you deploy the superior MTA make this subject one for continued study.
The next time you encounter a config mistake, an unwelcome zombie attack, or simply need to check how your mail queue is performing, then, with the information I’ve provided here, I hope you’ll be armed with the information required to make headway.
Chris Binnie is a Technical Consultant with 20 years of Linux experience and a writer for Linux Magazine and Admin Magazine. His new book Linux Server Security: Hack and Defend teaches you how to launch sophisticated attacks, make your servers invisible and crack complex passwords.