
Home Blog Page 658

Software Defined Networking Fundamentals Part 2: Switches and Network Architecture

Explore Software Defined Networking Fundamentals today by downloading the free sample. Download Now

Join us in this three-part weekly blog series to get a sneak peek at The Linux Foundation’s Software Defined Networking Fundamentals (LFS265) self-paced, online course. 

In part one, we introduced the historical background that led to the current virtualization innovation wave.  We then introduced the concept of data planes, control planes and management planes and highlighted the role of each.  In part two we will learn how traditional data switches are architected and how these planes are implemented.  You will learn a fundamental aspect of SDN, namely the separation of the data plane and the control plane.

Traditional Switches

The core of a traditional network switch is based on custom silicon, either an ASIC, FPGA or NPU.  Even though FPGAs and NPU’s can be modified in the field, they are still limited in functionality and relatively expensive. These hardware devices can forward packets based on Layer 2 and Layer 3 input at the requisite “wire speed.”   The trade off worth noting is performance over flexibility.   The control plane handles the routing functions and calculates the packet forwarding rules.  

The figure below illustrates a traditional non-SDN switch, with the following components:

• The transceivers (TRX), which are the ports transmitting or receiving communications on the medium (copper, optical, radio frequency, etc.).

• An Application Specific Integrated Circuit (ASIC) is used to handle the incoming and outgoing data packets. An ASIC is a specialized purpose built silicon device that executes just a limited set of tasks, and, in this particular instance, do it very fast (up to 40Gbit/sec per port).

• The Layer 2 and Layer 3 tables are the central building blocks the ASIC acts on.

To fulfill the demands of virtualized servers, Virtual Local Area Networks (VLANs) or Virtual Routing Functions (VRFs), new features have been added for better isolation of the hosts or virtualized machines: Access Control, Quality of Service (QoS), port groups, etc. Most of these features must be configured manually and in different ways for various vendors.
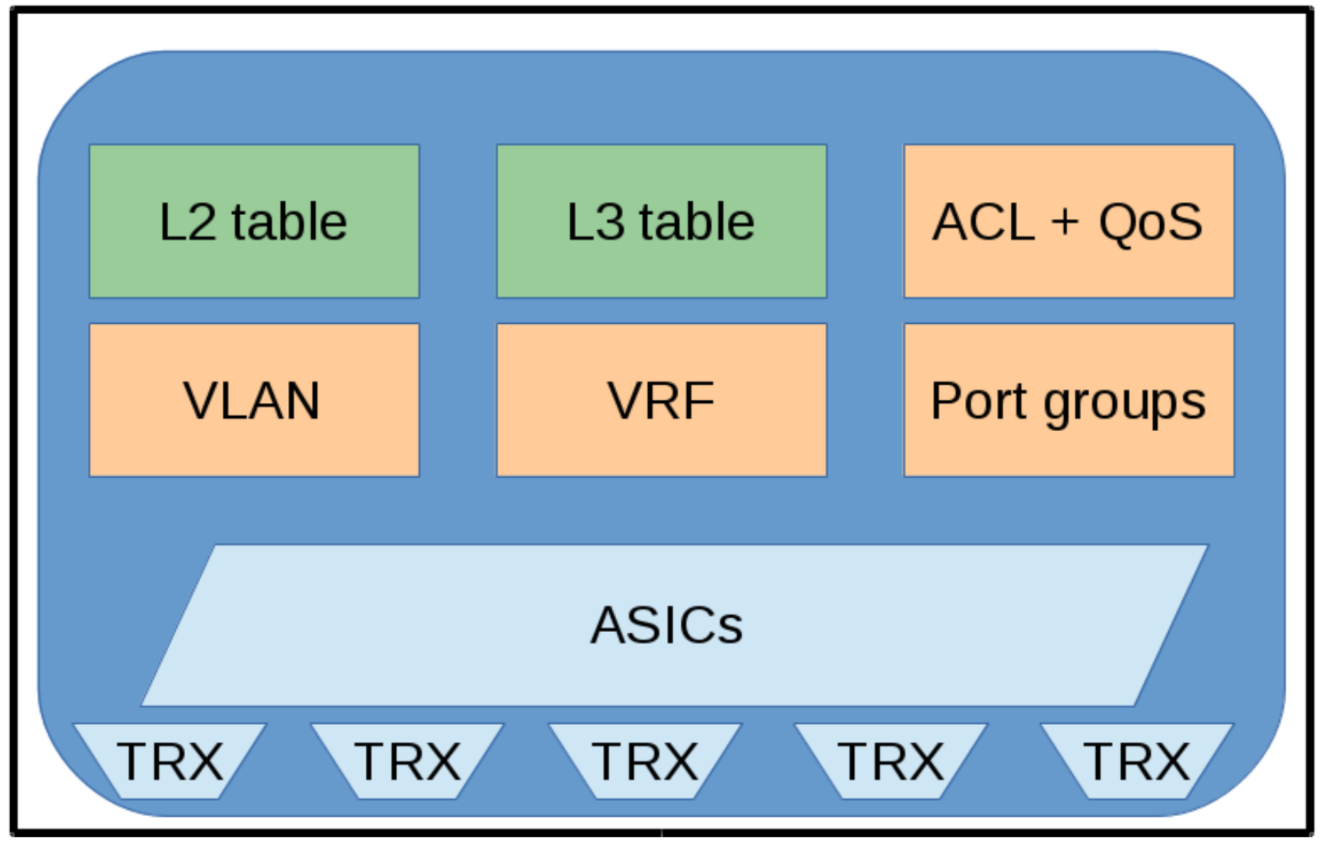
Figure 1: A traditional non-SDN switch.

Traditional Switches and the Three Planes

The next figure illustrates what a switch looks like when combining the components of a non-SDN switch with the data, control, and management planes:

• The transceivers (TRX) and the ASIC form the data plane.

• A general purpose CPU hosts both the control and management planes.

• The control plane handles the routing functions and is also responsible for calculating the forwarding rules.

• The management plane is used to set up and change the network switch configuration.
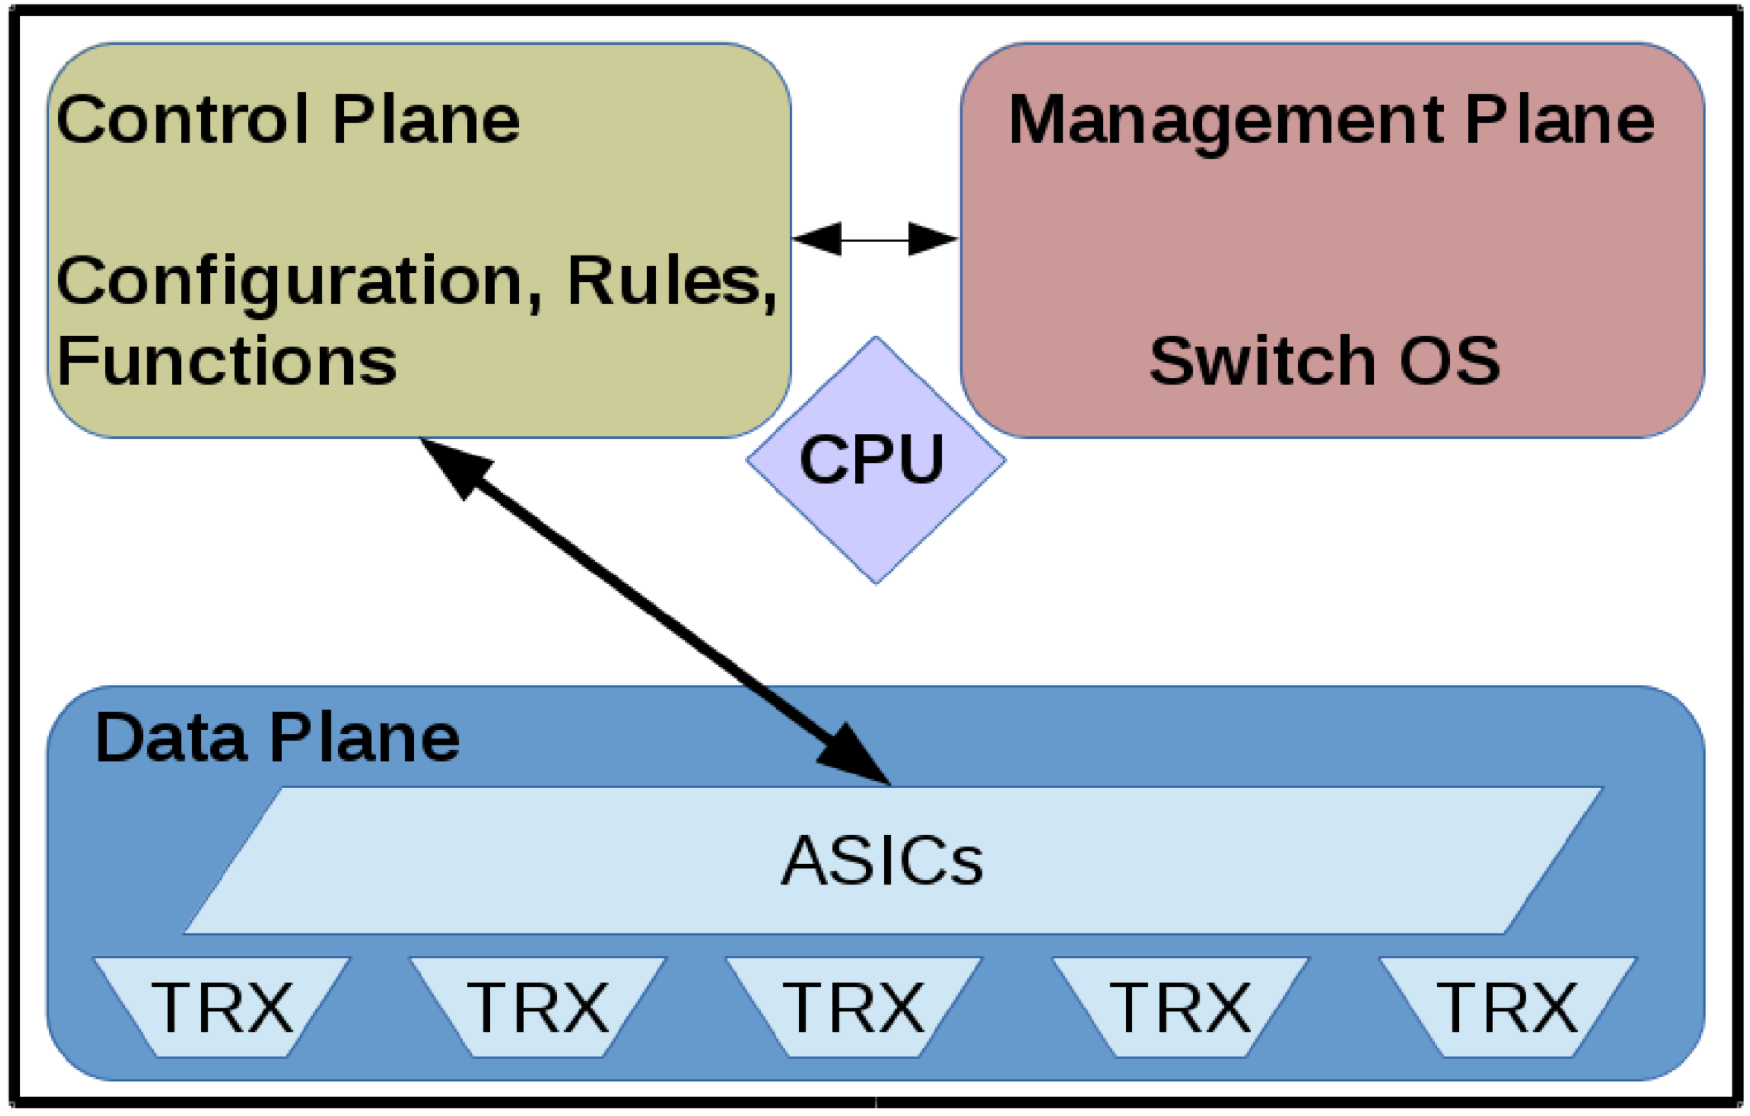
Figure 2: Data, Control, and Management Planes in a Switch.

New Packet Arriving at a Switch

When a packet enters a switch the data plane looks for a forwarding rule based on information in the packet header.   If there’s a match the packet is sent on its way.  If there isn’t a match, the packet is sent to the control plane where routing (Layer 3) processing occurs and the packet is sent back to the data plane for forwarding to the appropriate output port. The control plane then adds the new forwarding rule to the Layer 2 forwarding table so subsequent similar packets are no longer exceptions and are forwarded at wire speed.

Here’s what happens when a new packet arrives:

1. A new packet arrives on the receiving port and is stored in a buffer.

2. If there is no rule matching this packet in the data plane, the control plane must decide what to do.

3. The control plane receives the packet from the data plane and executes the routing functions.

4. Then, the control plane stores the calculated action (e.g. output port) into the forwarding tables. Forwarding tables are stored in content-addressable memory, for fast and effective lookup and matching.

5. At this point, the data plane can apply the rules stored in the TCAM (Ternary Content- Addressable Memory).

6. The data plane forwards the packet to the output port.

7. The output port then transmits the packet over the medium.

The request to the control plane takes time, because the action needs to be calculated and because the CPU of the control plane runs at a lower speed.
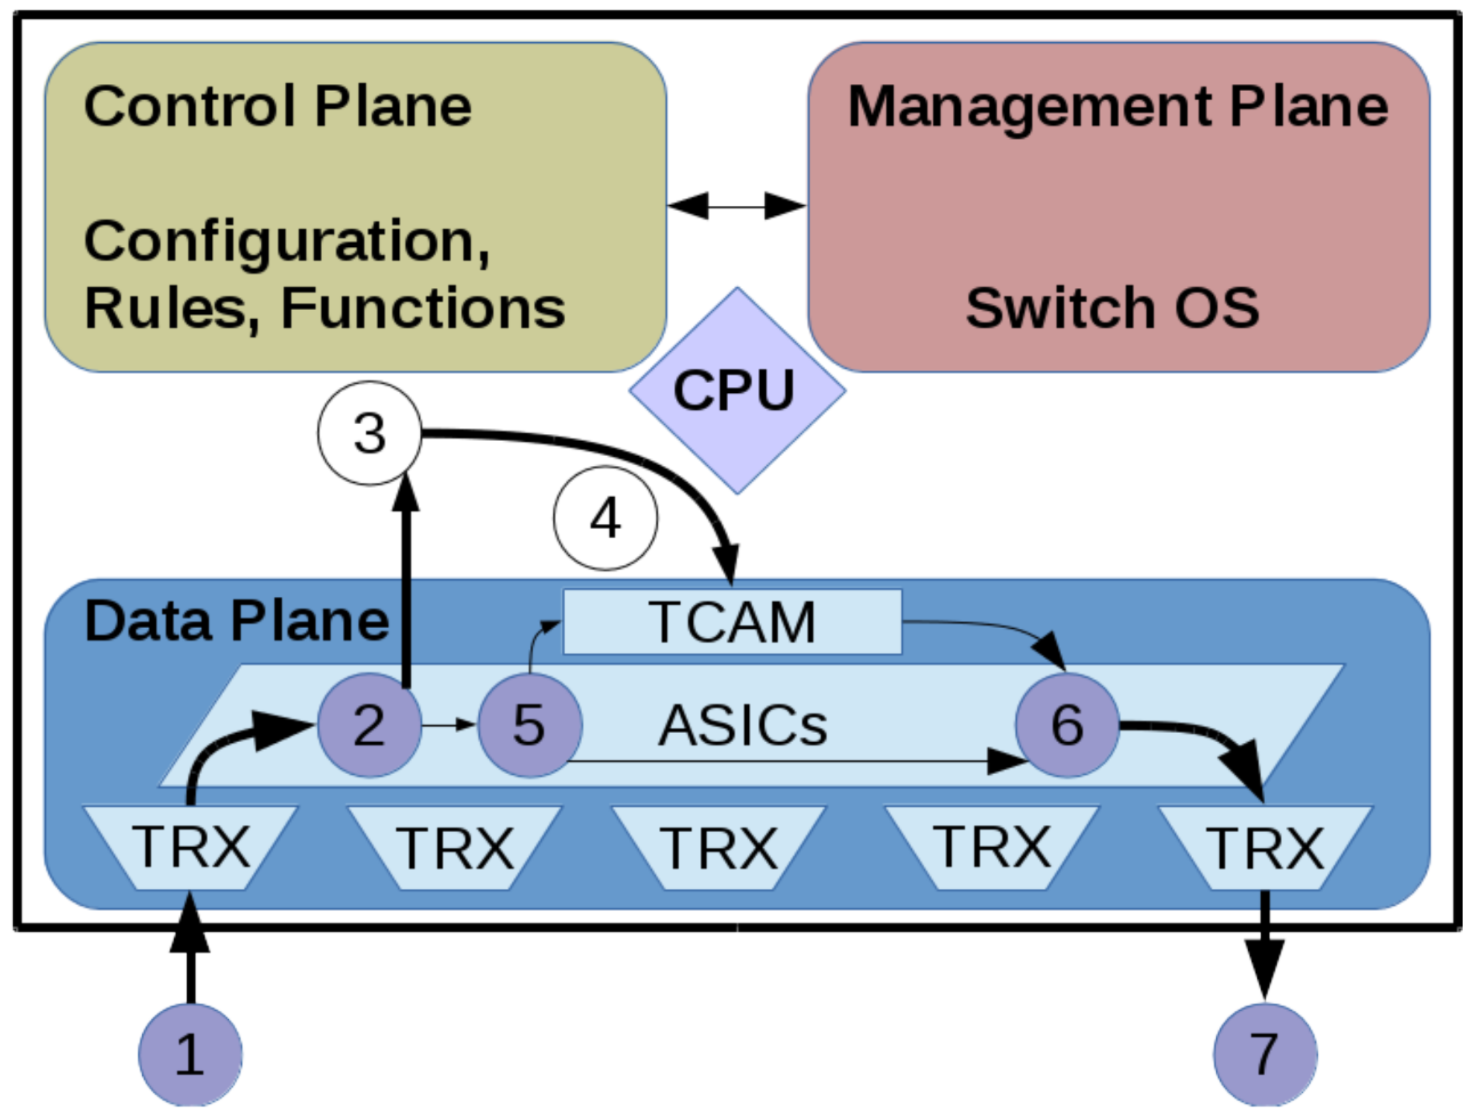
Figure 3: New Network Packet Arriving at Switch.

Subsequent Packet Arriving at a Switch

The next packet arriving with the same source and destination will be forwarded based on the existing rules, as long as they are valid and not expired:

1. The packet arrives.

2. It is matched with the rules stored in the TCAM.

3. The packet is then forwarded to the output port.

4. The output port transmits the packet over the medium.
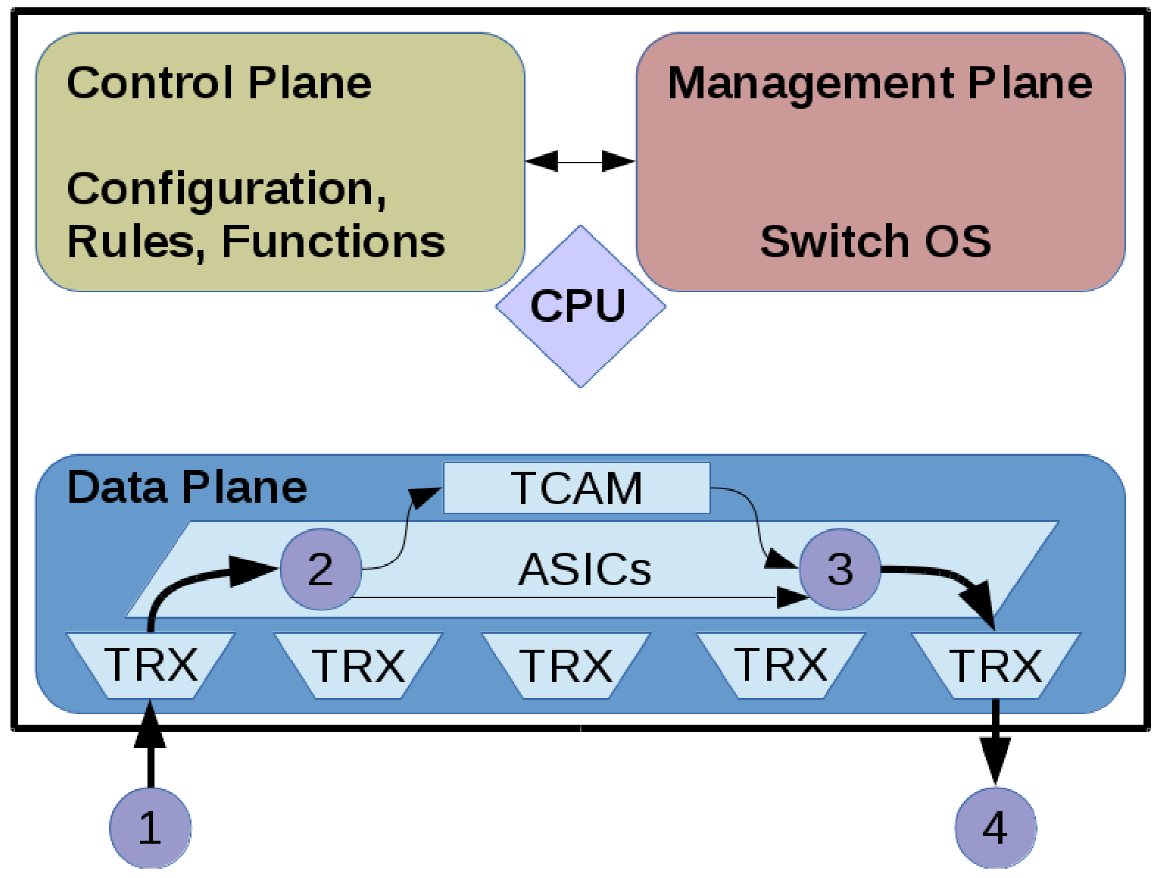
Figure 4: Network Packet with Known Forwarding Rule.

In this article, we reviewed the architecture and operations of a traditional data switch.  We showed how the three planes are implemented and how they interact.  A fundamental trade-off illustrated is performance over flexibility. This trade off and subsequent limitations lead to the advent of SDN.  In part three, we will discuss the implementation and operation of a software defined switch and we’ll introduce the concept of the SDN Controller.  Lastly, RFC 7426 will be introduced highlighting the various abstraction layers  created to simplify complex data networks.

The “Software Defined Networking Fundamentals” training course from The Linux Foundation is designed to provide system and network administrators and engineers with the skills necessary to maintain an SDN deployment in a virtual networking environment. Download the sample chapter today!

OwnTracks Part 2: Using Your Location Data

The OwnTracks system allows you to track the location of Android or IOS phones, and it places a huge focus on data ownership. You get to decide where your location data is sent and what is done with it. In the previous article of the series, we looked at how to install OwnTracks on a phone and set up a personal MQTT server that collects the location data. This time around, we’ll take a look at some of the clients that can be used with the collected location data.

We have already seen a very basic client for our OwnTracks location information by using mosquitto_sub to test that location data is getting through. We will now look at how to set a nice icon for users in the OwnTracks app, take a look at firewall rules to allow MQTT traffic to pass, and then look at the OwnTracks recorder client.

Setting an icon

One of the simplest OwnTracks clients lets you set an icon for each user on your server. Below I am using the image2card.sh script to publish a little headshot for my OwnTracks icon. Just as in the first article, I need to specify the user to publish as, the password, and the certificate of the local CA that I used to set up my mosquitto MQTT server. Notice that my phone is publishing messages on owntracks/ben/g5, and I set the JSON-encoded icon by sending a retained message to owntracks/ben/g5/info. The image I want to use is called ben-headshot.jpg, and I’ll describe the user just as “Ben”.


$ git clone https://github.com/owntracks/recorder.git
$ ln -s recorder/contrib/faces/image2card.sh .

$ ./image2card.sh  ben-headshot.jpg "Ben"  >| card.json
$ mosquitto_pub -t owntracks/ben/g5/info -f card.json -r -u USERNAME  -P PASSWORD -p 8883  --cafile /etc/mosquitto/conf.d/ca.crt

If you don’t know the exact topic that OwnTracks is using to publish your data, use the below mosquitto subscribe command to print each MQTT message that goes through your server. Grab your phone and tap the little upward-pointing arrow (upload) in the OwnTracks app to generate a new MQTT message and see it arrive on the console:


$ mosquitto_sub -v -t '#' -u USERNAME  -P PASSWORD -p 8883  --cafile /etc/mosquitto/conf.d/ca.crt

Firewall rules

If you are running a local MQTT server, then you will want to allow Internet traffic to connect to it using TLS, the default port is 8883. Then OwnTracks can connect over TLS to your server and send the location data. So nobody on the Internet gets to snoop on your location data between OwnTracks and your MQTT server.

If the MQTT server is not on your Internet gateway machine, then you will want to do some Destination Network Address Translation (DNAT) on the gateway machine to allow the MQTT server to be reachable from the Internet. The OwnTracks app will be configured to talk to port 8883 on your public IP address and using DNAT the traffic will be forwarded to the MQTT server on your local network. For example, in the following example, the connection is forwarded from the gateway to the MQTT server machine.

 +---------+         +-------------+        +--------------+
 | Phone   |  <----> | gateway     | <----> | MQTT server  |
 | 1.2.3.4 |         | 2.3.4.5     |        |              |
 |         |         | 192.168.1.2 |        | 192.168.1.30 |
 +---------+         +-------------+        +--------------+  

To allow OwnTracks to connect from the Internet you might use something like the following — assuming that eth0 is the network interface that connects to the Internet.


iptables -t nat -A PREROUTING  -p tcp --dport 8883 -i eth0  -j DNAT --to-destination 192.168.1.30
iptables -I FORWARD -p tcp -i eth0 --dport 8883 -m state --state NEW,ESTABLISHED,RELATED -j ACCEPT
iptables -I FORWARD -p tcp -i eth0 --sport 8883 -m state --state     ESTABLISHED,RELATED -j ACCEPT

This raises a sticky case when your phone gets back home and connects to WiFi. This is a major problem because you really want your smart house to know when you are home.

When your phone connects to your house WiFi, it will get an IP address on the local network of the house. When OwnTracks tries to connect to the MQTT sevrer on your public IP address 2.3.4.5 it might be able to send a packet to that address and have the packet forwarded to your MQTT server. The reply packet is unlikely to get back however.

The reply will have issues because the MQTT server will see that the packet came from an address on the local network and will try to reply directly to the phone. Unfortunately, the phone is expecting the reply to come from 2.3.4.5 and not 192.168.1.30 so will drop the packet.

The iptables commands below aim to solve the case when the phone is connected at home. They perform the same destination network address translation to divert the packet to the MQTT server. The second command performs a source address translation so that the MQTT server will think that the packet came from your Internet gateway machine rather than directly from the phone. This way, the MQTT server will send the reply to the gateway which will then undo the address translation and send the reply back to the phone. The phone then thinks it is sending data to to 2.3.4.5 and getting a reply from 2.3.4.5 and is happy.


iptables -t nat -A PREROUTING  -p tcp --dport 8883 -d 2.3.4.5 -i eth1 -j DNAT --to-destination 192.168.1.30
iptables -t nat -A POSTROUTING -p tcp --dport 8883 -d 192.168.1.30 -s 192.168.1.0/24  -j SNAT --to 192.168.1.2

iptables -I FORWARD -p tcp -i eth1 --dport 8883 -m state --state NEW,ESTABLISHED,RELATED -j ACCEPT
iptables -I FORWARD -p tcp -i eth1 --sport 8883 -m state --state NEW,ESTABLISHED,RELATED -j ACCEPT

You should make sure you are comfortable with what these iptables commands are doing and that they do not allow more traffic to pass than you are comfortable with. DNAT is a fairly common setup that can be found in many articles, doing both SNAT and DNAT as in the above is harder to find examples of.

Recording the data

The OwnTracks Recorder is a client that can record your location history and present a web interface as shown in Figure 1.

Figure 1: OwnTracks Recorder.

There are three ways to get OwnTracks Recorder installed, using the packages provided, using the docker image, or compiling from source. There are package repositories for Debian, CentOS, and Raspbian. If Docker is your thing, then the setup is described  here. I’ll install by compiling from source to keep installation as widely applicable as possible.

I am installing from source using Debian 8.1 on an Orange Pi. Some instructions list the kernel headers as being required, but I found that they were not needed to compile. Instead of running ./configure, you simply copy the config.mk.in and make adjustments as desired. I left the default options in place to help keep installation simple. After that, the standard make and install completes the installation.


# apt-get install build-essential  libcurl4-openssl-dev libmosquitto-dev liblua5.2-dev libsodium-dev libconfig-dev
$ mkdir ~/src
$ cd ~/src
$ git clone https://github.com/owntracks/recorder.git
$ cd ./recorder
$ cp -av config.mk.in config.mk
$ make
$ sudo make install

Configuration is done by editing a file in /etc as shown below. I made the connection to the local MQTT server over TLS so had to specify the path to the certificate file for the MQTT server used in the first article. Again, starting out with the –debug option is useful to make sure recorder program can connect to the MQTT server properly and will receive data as it comes through. Once you are connected, tap the little upward pointing arrow (upload) in the OwnTracks app on your phone to generate a new MQTT message and see it arrive on the console you are running recorder on.


# edit /etc/default/ot-recorder

OTR_PASS="FIXME-THIS-IS-NOT-THE-PASSWORD"
OTR_HOST="localhost"
OTR_PORT=8883
OTR_USER="ben"
OTR_CAFILE="/etc/mosquitto/conf.d/ca.crt"

# ot-recorder --debug  'owntracks/#'
...
+++++ [owntracks/ben/g5 (plen=111, r=0) [{"_type":"location","tid":"g5","lat":0.1234,"lon":5.6789,"batt":77}]]
- 02:36:23 owntracks/ben/g5               tid=g5 loc=0.1234,5.6789 [MOON] 15 Dark Side, The Moon 

Notice in the above that a reverse lookup has been performed on the longitude and latitude sent by OwnTracks on the phone. I’ve modified the reported data to show a street number on the moon, but you should see something much closer to the location of your phone printed there.

Although it is nice to be able to see the data from the phone on the console, ot-recorder also presents a web interface, which by default is at http://127.0.0.1:8083/. The web interface has three main sections: a map, a table of locations, and a history or locations.

The map shows a Google map with place markers for the current location of all the people who are sending messages to the MQTT server. Each place marker has a click bubble with the address, time, and longitude and latitude reported. The table of locations lets you see the all the people, their location as an address, what time the location was reported, and other data (Figure 2). You can also sort the data by each column. The table of locations is shown below with just me.

Figure 2: Recorder locations.

If you have been running ot-recorder to collect data over a period of time, the main table allows you to bring up a map for each user to see on a map what places they have been in the last 12 hours, week, or longer.

Wrap Up

Although there are many documents talking about destination network address translation, you really want to do two translations if your phone is going to connect on the Internet and the local network without requiring any configuration changes.

OwnTracks can integrate location data into both openHAB and Home Assistant. I hope to show this in a later article that first covers setting up one of these home IoT solutions.

Learn more about embedded Linux with the Embedded Linux Development course from The Linux Foundation.

How to Build a Minecraft Server with Raspberry Pi 3

The beauty of the Raspberry Pi 3 is that you can tinker and do fun stuff to your heart’s content. This tiny $35 computer lets you do anything.

The Pi I have runs Raspbian for other uses. I keep several micro SD cards, each with different applications and swap them to get more out of the same Pi.

In this tutorial, you’ll learn how to set up a Minecraft machine on the Pi 3 from scratch. Minecraft is a fun game that lets you build whole worlds however you want, by yourself or with friends. Having your own Minecraft server gives you full control over the game.

I set up a Minecraft server because we don’t watch TV, but we have one TV in the kids’ area, and I have hooked a Pi to it so my son can play Minecraft.

In the next two tutorials, you’ll learn how to transform your Pi 3 into your own custom Netflix/Pandora-like streaming service with Plex Media Server and then how to use the Pi as a Plex media player to stream content directly to your HDMI-enabled TV.

What you need:

  1. Raspberry Pi 3

  2. HDMI enabled monitor

  3. Keyboard+mouse

  4. HDMI cable

  5. Power adapter for Pi

  6. Micro SD card (I am using 32GB capacity)

  7. Ethernet or Wireless connectivity

We are using the NOOBS distribution installer, just to make things easier for new users. Download NOOBS from the official site and extract the content. Next, plug in the micro SD card and format it as FAT32. Then copy all the extracted files to the root of the SD card. Note: Don’t copy the entire folder, copy the content of the folder.

Plug the card into the Raspberry Pi , connect the monitor via HDMI, connect the mouse/keyboard and plug in the power supply. If everything goes well, you will see the NOOBS window, where you can choose the OS that you want to install; I recommend Raspbian. Once installed, it will reboot and you are logged into your brand new Raspbian OS running on Raspberry Pi 3. Now connect the network (I recommend ethernet to get faster download speed) and update the system:

sudo apt-get update

sudo apt-get dist-upgrade

If you want you can also change the user password. The default username is pi and the password is raspberry. Change the password by typing the command, and then the new password at the prompt:

passwd pi 

Now install these packages for OpenGL Driver for improved graphics:


sudo apt-get -y install xcompmgr libgl1-mesa-dri && sudo apt-get -y install libalut0 libalut-dev && sudo apt-get -y install mesa-utils

Now it’s time to enable OpenGL drivers:

sudo raspi-config

Here you will see the option to expand the file system and change the password. We don’t need either of those because NOOBS automatically expands the file system and we have already changed the password. Skip everything and go to the advanced option.

J9bx8lw14xnFvhNZFWQb1jao8my0Fnp2QRD6hOdM

Scroll down to find AB GL Driver, hit enter and then select yes to enable. (note: the mouse won’t work, so use the arrow keys).

K3OtOgE86mrl4oOjBRDNLzP1chIdBUSWIL4shOaT

Reboot the system. Once rebooted, check if OpenGL is enabled, run ‘glxgears’ in the terminal and you should see gears turning.

Install Minecraft packages

First, we need to create directories for Minecraft:

mkdir -p ~/Minecraft/Natives

Change directory to Minecraft:

cd ~/Minecraft/

Now log into your Minecraft account and download the Minecraft.jar file for Linux to the Minecraft directory that we created. Install the launcher and log into your account:

java -jar Minecraft.jar

Click on the edit profile option and select version 1.8.9 from the list, save the profiles. If you get any error (there is a possibility of an error related to ‘execstack’), please close Minecraft and run these commands to patch some files:

cd ~/Minecraft/Natives

wget https://www.dropbox.com/s/4oxcvz3ky7a3x6f/liblwjgl.so

wget https://www.dropbox.com/s/m0r8e01jg2og36z/libopenal.so

Then update the libraries:

cd /home/pi/.minecraft/libraries/org/lwjgl/lwjgl/lwjgl/2.9.4-nightly-20150209

rm lwjgl-2.9.4-nightly-20150209.jar

wget https://www.dropbox.com/s/mj15sz3bub4dmr6/lwjgl-2.9.4-nightly-20150209.jar

Change directory to Minecraft folder:

cd ~/Minecraft/

And download the ‘run’ script:

wget https://www.dropbox.com/s/jkhr58apwa7pt1w/run.sh

Make it executable:

sudo chmod +x run.sh

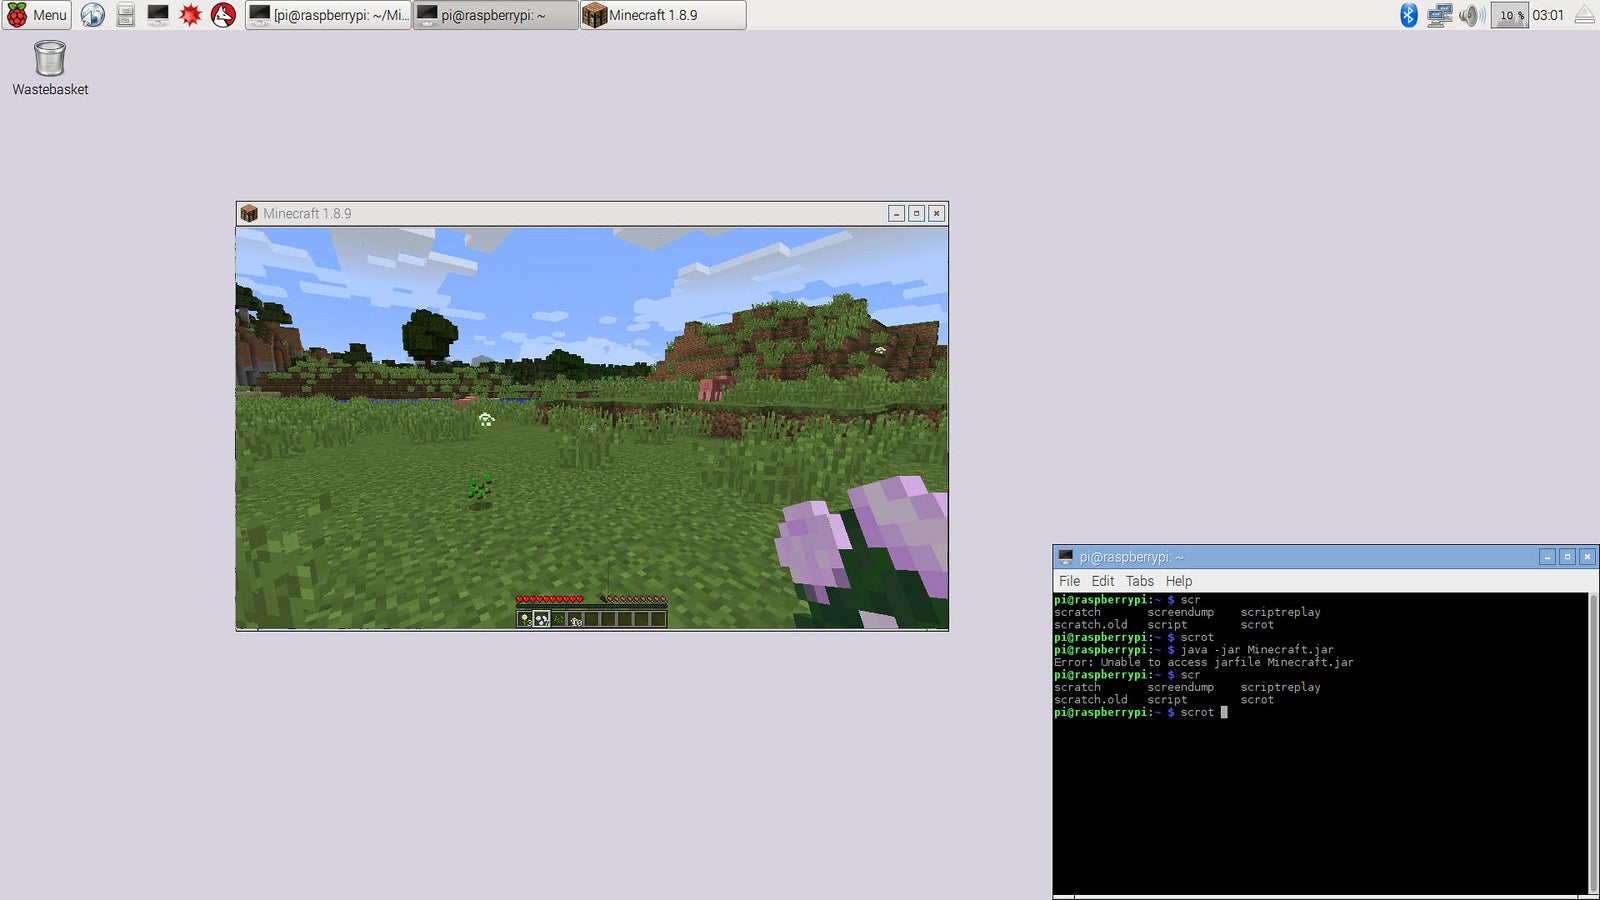
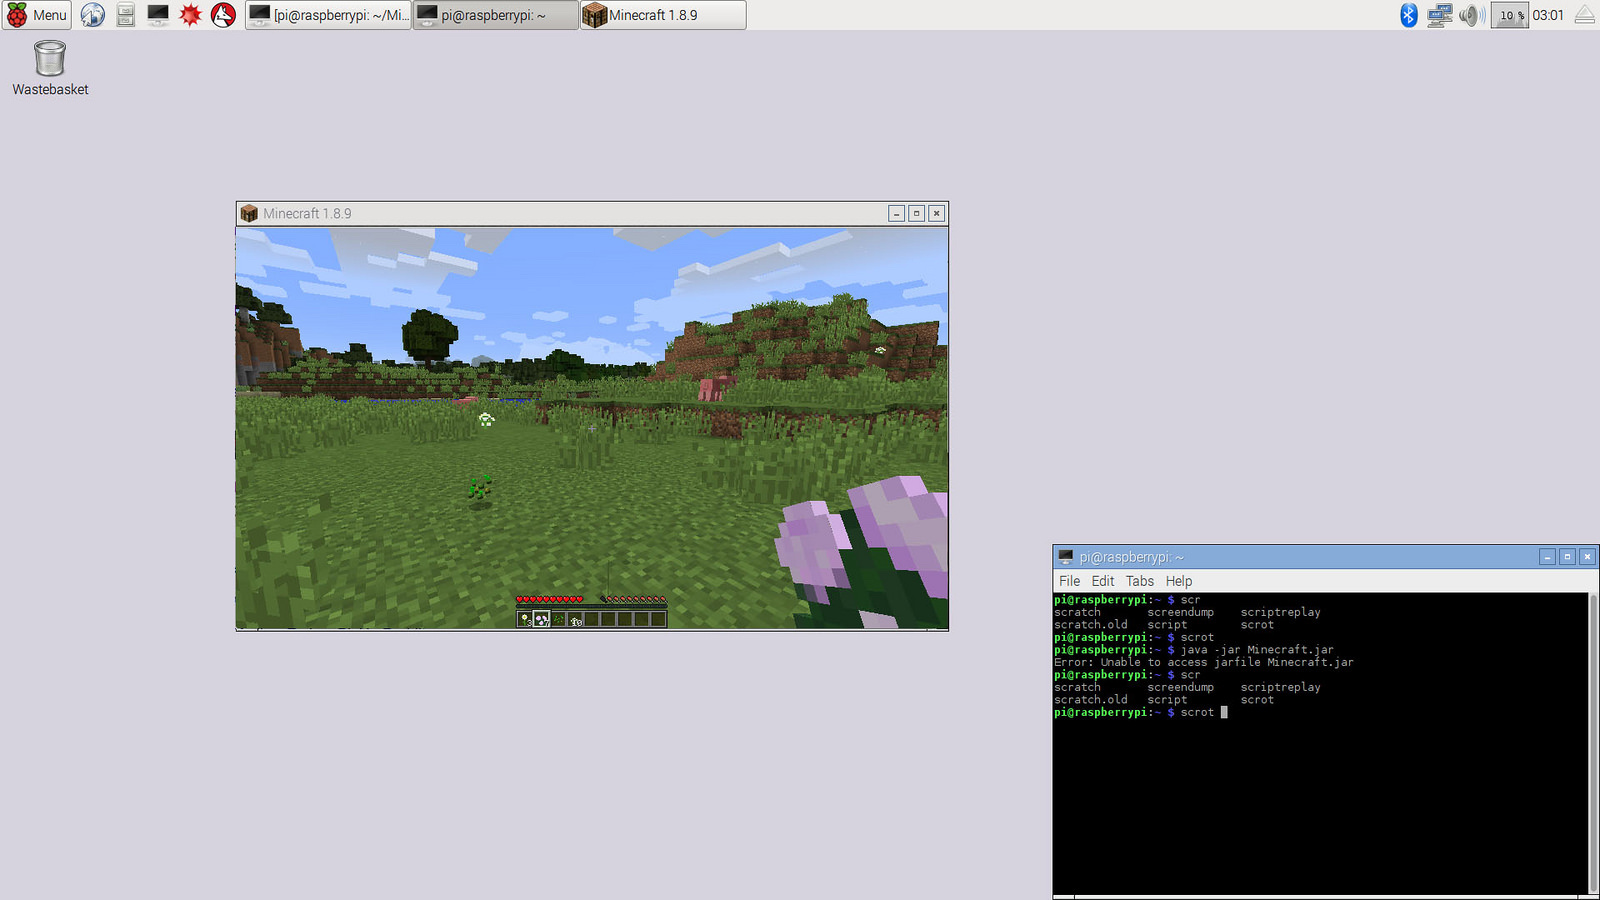
Now either browse to this script from the file manager and open it by clicking on it, or run it from the terminal, and you will have Minecraft running on your machine (image below)

cd ~/Minecraft/

./run.sh

That’s it! Once it’s installed, you can start playing Minecraft on your your system. Build new worlds, invite your friends to play on your server, and keep tinkering with your new Pi 3.

For 5 more fun projects for the Raspberry Pi 3, including a holiday light display and Minecraft Server, download the free E-book today!

Read the next articles in the series:

Build Your Own Netflix and Pandora With Raspberry Pi 3

Turn Raspberry Pi 3 Into a Powerful Media Player With RasPlex

Fedora 25 Officially Released as the First Major OS to Offer Wayland by Default

Today, November 22, 2016, Fedora Project officially announced the release of the Fedora 25 Linux-based operating system, which is a major milestone featuring the latest GNU/Linux technologies and Open Source software.

Six months in development and delayed twice, Fedora 25 Linux is now available for download in its production-ready state, and it appears to be the first ever release of the distribution to ship with the next-generation Wayland display server by default, but only for the Workstation edition, which is built around the GNOME 3.22 desktop environment.

“Wayland now replaces the old X11 display server by default. Its goal is to provide a smoother, richer experience when navigating Fedora Workstation,” said Paul W. Frields, ex-Fedora Project Leader. “You can still choose the old X11 server if required. …

Read more at Softpedia

5 Ways to Hone your Production Incident Postmortems

I’ve messed up many times, as has everyone else on my team. There have been outages, oversaturated content, and frustrated users. We’ve put out a lot of fires. And we’ve done a lot of postmortems afterward.

“What’s a postmortem?”

I’m delighted you asked! Postmortems, also referred to less deathly as “root cause analysis,” are a way of retrospecting on a particular incident or failure. They help to better understand what went wrong and – crucially – how it can be avoided in the future. We’ve found that a few guidelines are necessary for getting maximum value from postmortems:

  • Postmortems are blameless. Nobody is singled out for fault….

Read more at Shutterstock Tech

25 Years of Linux in 5 Minutes

Jeremy Garcia of LinuxQuestions.org and Bad Voltage (a podcast) delivers 25 years of Linux in five minutes: starting with Linux’s first steps as “just a hobby” for creator Linus Torvalds, to its staggering popularity today with 135,000 developers from more than 1,300 companies and 22 million lines of code .

It’s a lot to cover.

Read more at OpenSource.com

Testing LXD, Canonical’s Container Hypervisor for Linux

Canonical is betting that LXD, which it calls the “pure-container hypervisor,” can beat VMware, KVM and other traditional hypervisors. To see for myself, I recently gave it a whirl. Here’s what I found.

By “pure-container hypervisor,” Canonical means it is a hypervisor that works by creating containers running on top of the host system, just like Docker. There is no hardware emulation evolved. Because LXD containers have much less overhead than traditional virtual machines, they theoretically can support many more guest operating systems than traditional hypervisors, while also delivering better performance.

Read more at Container Journal

OPNFV Demonstrates How to Cut the Cord from Proprietary Hardware Designs

There are few things more frustrating than a dropped call. At the keynote during OpenStack Barcelona 2016 conference, the folks behind the Open Platform for Network Functions Virtualization Project (OPNFV) demonstrated, in a most dramatic fashion, the resilience of Network Functions Virtualization (NFV) technology, and how it could minimize such call drops.

During the keynote, technical engineer Ildiko Vancsa made a cell phone call to OPNFV Director Heather Kirksey, using a set of 5G equipment on stage, running OPNFV (An open source implementation of NFV) on top of OpenStack. The call remained intact even though OpenStack Chief Operating Officer Mark Collier, also on-stage, started randomly cutting cables to the 5G gear, “Chaos Monkey” style.

Read more at The New Stack

Radio Free Linux

Do a web search for “Linux radio station”, and the pickings are slim indeed, with most sites promoting instead ham radio software or streaming audio players, and a handful devoted to setting up a streaming web radio station—including one such optimistic article in Linux Journal some 15 years ago (see “Running a Net Radio Station with Open-Source Software”, January 2001).

Unfortunately, much of this documented interest took place a decade or more in the past via domains like opensourceradio.com that are no longer with us. A few projects persevere, but a good number of postings are similarly dated. The fact is, there are more Linux-based ways to stream and listen to radio stations than there actually are the means to broadcast and control them.

Read more at Linux Journal

Trends in the Open Source Cloud: A Shift to Microservices and the Public Cloud

Cloud computing is the cornerstone of the digital economy. Companies across industries now use the cloud — private, public or somewhere in between — to deliver their products and services.

A recent survey of industry analysis and research that we conducted for our 2016 Guide to the Open Cloud report produced overwhelming evidence of this.

Forty-one percent of all enterprise workloads are currently running in some type of public or private cloud, according to 451 Research. That number is expected to rise to 60 percent by mid-2018. And Rightscale reports that some 95 percent of companies are at least experimenting in the cloud. Enterprises are continuing to shift workloads to the cloud as their expertise and experience with the technology increases.

As we mentioned last week, companies in diverse industries — from banking and finance to automotive and healthcare — are facing the reality that they’re now in the technology business. In this new reality, cloud strategies can make or break an organization’s market success. And successful cloud strategies are built on Linux and open source software.

But what does that cloud strategy look like today and what will it look like in the future?

Short Term: Hybrid Cloud Architectures

While deployment and management remain a challenge, microservices architecture is now becoming mainstream. In a recent Nginx survey of 1,800 IT professionals, 44 percent said they’re using microservices in development or in production. Adoption was highest among small and medium-sized businesses. Not coincidentally, the use of public cloud is also predominant among SMBs, which are more nimble and faster to respond to market changes than large enterprises with legacy applications and significant on-premise infrastructure investments.   

Many reports tout hybrid cloud as a fast-growing segment of the cloud. Demand is growing at a compound rate of 27 percent, “far outstripping growth of the overall IT market,” according to researcher MarketsandMarkets. And IDC predicts that more than 80 percent of enterprise IT organizations will commit to hybrid cloud architectures by 2017.

However, hybrid cloud growth is happening predominantly among large enterprises with legacy applications and the budget and staffing to build private clouds. They turn to cloud for storage and scale-out capabilities, but keep most critical workloads on premise.  

In the mid-market, hybrid cloud adoption stands at less than 10 percent, according to 451 Research. Hybrid cloud is, then, a good transition point for legacy workloads and experimenting with cloud implementation. But it suffers from several challenges with more advanced cloud implementations, including management complexity and cost.

“Most organizations are already using a combination of cloud services from different cloud providers. While public cloud usage will continue to increase, the use of private cloud and hosted private cloud services is also expected to increase at least through 2017. The increased use of multiple public cloud providers, plus growth in various types of private cloud services, will create a multi-cloud environment in most enterprises and a need to coordinate cloud usage using hybrid scenarios.

“Although hybrid cloud scenarios will dominate, there are many challenges that inhibit working hybrid cloud implementations. Organizations that are not planning to use hybrid cloud indicated a number of concerns, including: integration challenges, application incompatibilities, a lack of management tools, a lack of common APIs and a lack of vendor support,” according to Gartner’s 2016 Public Cloud Services worldwide forecast.

Long term: Microservices on the Public Cloud

Over the long term, workloads are shifting away from hybrid cloud to a public cloud market dominated by providers like AWS, Azure, and Google Compute. “The share of enterprise workloads moved to the public cloud is expected to triple over the next five years,” from 16 percent to 41.3 percent of workloads runnin g in the public cloud, according to a recent JP Morgan survey of enterprise CIOs. Among this group, 13 percent said they view AWS as “intrinsic to future growth.”

By the end of 2016 the public cloud services market will reach $208.6 billion in revenue, growing by 172 percent from $178 billion in 2015, according to Gartner. Cloud application services (software-as-a-service or SaaS) is one of the largest segments of that and is expected to grow by 21.7 percent in 2016 to reach $38.9 billion while Infrastructure-as-a-Service (IaaS) is projected to see the most growth at 42.8 percent in 2016.

The public cloud itself is largely built on open source software. Offerings including Amazon EC2, Google Compute Engine and OpenStack are all built on open source technologies. They provide APIs that are well documented. They also provide a framework that is consistent enough to allow users to duplicate their infrastructure from one cloud to another without a significant amount of customization.

This allows for application portability, or the ability to move from one system to another without significant effort. The less complex the application the more likely that it can remain portable across cloud providers. And so the development practice that seems to be most suited for this is to abstract things into their simplest parts — a microservices architecture.

A whole new class of open source cloud computing projects has now begun to leverage the elasticity of the public cloud and enable applications designed and built to run on it. Organizations should become familiar with these open source projects, with which IT managers and practitioners can build, manage, and monitor their current and future mission-critical cloud resources.

Learn more about trends in open source cloud computing and see a list of the top open source cloud computing projects. Download The Linux Foundation’s Guide to the Open Cloud report today!

Read the other articles in the series:

4 Notable Trends in Open Source Cloud Computing

3 Emerging Cloud Technologies You Should Know

Why the Open Source Cloud Is Important